|
13618| 3
|
[教程] 解决树莓派驱动OLED(非SSD1306)花屏问题 |
|
个人站原文:http://www.haoqiabin.cn/2017/08/06/raspberry-oled/ 树莓派驱动非SSD1306芯片的OLED  最近在学习树莓派,驱动OLED屏时出现了一个问题,就是花屏,折腾了两天后发现原来这个OLED的驱动芯片不是SSD1306而是SH1106,所以用Adafruit_Python_SSD1306这个库是花屏的,OLED的驱动芯片有好几种,但是有的库只支持SSD1306芯片,所以当你的OLED屏出现花屏时就应该是芯片和库没对应上,购买OLED屏时最好购买i2c的SSD1306芯片的,库多且接线比较简单 Python有两个可以用的OLED库:
Adafruit_Python_SSD1306库与Luma.oled库的安装说明(看不懂英文没关系,看下面我会说)
本文的Luma.oled库参考了I2C接口的OLED在树莓派3上的应用,但这是旧版本的,新版本库不是这样安装,请看下文 i2c接线 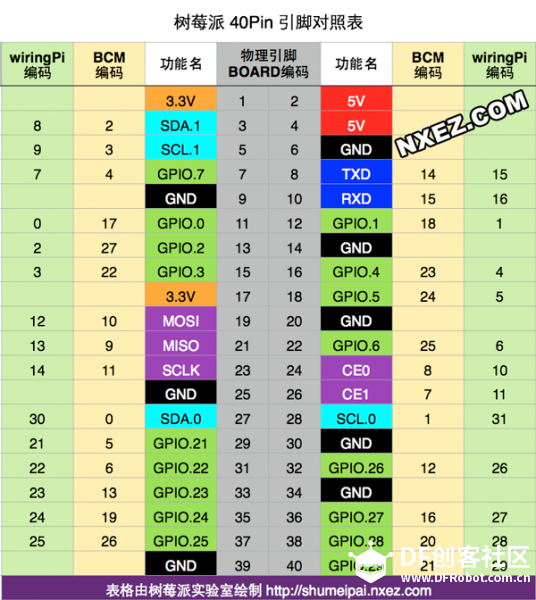
接好线后就是像一个L型的  开启i2c功能 [mw_shl_code=shell,true]sudo apt-get install -y python-smbussudo apt-get install -y i2c-tools sudo raspi-config[/mw_shl_code] 打开树莓派配置选择5 Interfacing Options 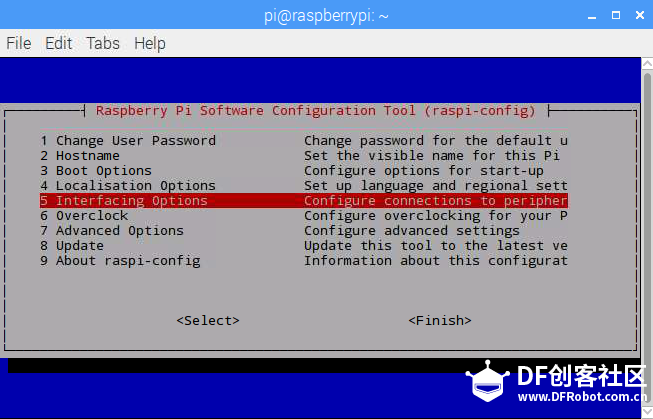 选择P5 I2C回车激活I2C 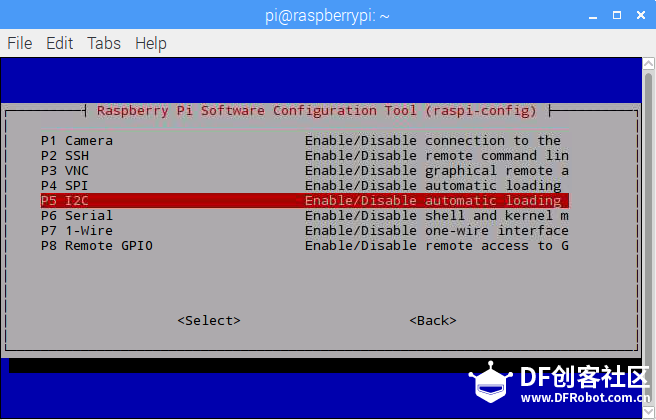 按回车启动就得了 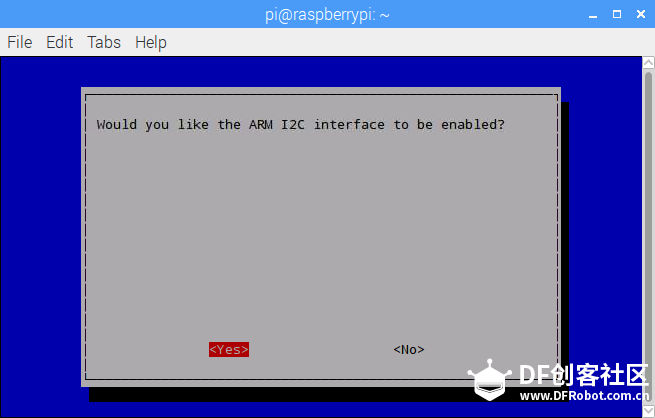 查看i2c地址[mw_shl_code=shell,true]sudo i2cdetect -y 1[/mw_shl_code]  - 安装Adafruit_Python_SSD1306库 终端输入下面命令[mw_shl_code=shell,true]sudo apt-get update sudo apt-get install build-essential python-dev python-pip sudo pip install RPi.GPIO sudo apt-get install python-imaging python-smbus sudo apt-get install git git clone https://github.com/adafruit/Adafruit_Python_SSD1306.git cd Adafruit_Python_SSD1306 sudo python setup.py install[/mw_shl_code] 安装好Adafruit_Python_SSD1306库后,cd examples进入例程目录,ls查看文件,以shapes.py例程说明 [mw_shl_code=python,true]import time import Adafruit_GPIO.SPI as SPI import Adafruit_SSD1306 import Image import ImageDraw import ImageFont # Raspberry Pi pin configuration: RST = 24 # Note the following are only used with SPI: DC = 23 SPI_PORT = 0 SPI_DEVICE = 0 # Beaglebone Black pin configuration: # RST = 'P9_12' # Note the following are only used with SPI: # DC = 'P9_15' # SPI_PORT = 1 # SPI_DEVICE = 0 # 128x32 display with hardware I2C: disp = Adafruit_SSD1306.SSD1306_128_32(rst=RST) # 128x64 display with hardware I2C: # disp = Adafruit_SSD1306.SSD1306_128_64(rst=RST) # Alternatively you can specify an explicit I2C bus number, for example # with the 128x32 display you would use: # disp = Adafruit_SSD1306.SSD1306_128_32(rst=RST, i2c_bus=2) # 128x32 display with hardware SPI: # disp = Adafruit_SSD1306.SSD1306_128_32(rst=RST, dc=DC, spi=SPI.SpiDev(SPI_PORT, SPI_DEVICE, max_speed_hz=8000000)) # 128x64 display with hardware SPI: # disp = Adafruit_SSD1306.SSD1306_128_64(rst=RST, dc=DC, spi=SPI.SpiDev(SPI_PORT, SPI_DEVICE, max_speed_hz=8000000)) # Alternatively you can specify a software SPI implementation by providing # digital GPIO pin numbers for all the required display pins. For example # on a Raspberry Pi with the 128x32 display you might use: # disp = Adafruit_SSD1306.SSD1306_128_32(rst=RST, dc=DC, sclk=18, din=25, cs=22) # Initialize library. disp.begin() # Clear display. disp.clear() disp.display() # Create blank image for drawing. # Make sure to create image with mode '1' for 1-bit color. width = disp.width height = disp.height image = Image.new('1', (width, height)) # Get drawing object to draw on image. draw = ImageDraw.Draw(image) # Draw a black filled box to clear the image. draw.rectangle((0,0,width,height), outline=0, fill=0) # Draw some shapes. # First define some constants to allow easy resizing of shapes. padding = 2 shape_width = 20 top = padding bottom = height-padding # Move left to right keeping track of the current x position for drawing shapes. x = padding # Draw an ellipse. draw.ellipse((x, top , x+shape_width, bottom), outline=255, fill=0) x += shape_width+padding # Draw a rectangle. draw.rectangle((x, top, x+shape_width, bottom), outline=255, fill=0) x += shape_width+padding # Draw a triangle. draw.polygon([(x, bottom), (x+shape_width/2, top), (x+shape_width, bottom)], outline=255, fill=0) x += shape_width+padding # Draw an X. draw.line((x, bottom, x+shape_width, top), fill=255) draw.line((x, top, x+shape_width, bottom), fill=255) x += shape_width+padding # Load default font. font = ImageFont.load_default() # Alternatively load a TTF font. # Some other nice fonts to try: http://www.dafont.com/bitmap.php #font = ImageFont.truetype('Minecraftia.ttf', 8) # Write two lines of text. draw.text((x, top), 'Hello', font=font, fill=255) draw.text((x, top+20), 'World!', font=font, fill=255) # Display image. disp.image(image) disp.display()[/mw_shl_code] 按照你的oled屏修改代码,程序默认是12832的,你的oled屏是这个就不用改直接运行就OK 如果是12864的I2C就像下面那样修改,把12832加#注释,12864#注释去掉保存 [mw_shl_code=python,true]# 128x32 display with hardware I2C: #disp = Adafruit_SSD1306.SSD1306_128_32(rst=RST) # 128x64 display with hardware I2C: disp = Adafruit_SSD1306.SSD1306_128_64(rst=RST)[/mw_shl_code] 终端输入sudo python shapes.py或用Python打开文件运行就能看到OLED屏有显示了 - 安装Luma.oled库 终端输入下面命令[mw_shl_code=python,true]sudo apt-get install python-dev python-pip libfreetype6-dev libjpeg-dev sudo -H pip install --upgrade pip sudo apt-get purge python-pip sudo -H pip install --upgrade luma.oled[/mw_shl_code] 注:如果你需要安装Python3的Luma.oled库的则按下面对应的Python3版本修改上面的命令进行安装 pip ⇒ pip3 python ⇒ python3 python-dev ⇒ python3-dev python-pip ⇒ python3-pip 如果安装Luma.oled库时出现红字错误,请继续执行命令重试,那是因为网络问题下载一个叫Pillow的库不成功 安装好Luma.oled库后新建文件命名为oled.py,复制粘贴下面代码。参考这里使用说明 [mw_shl_code=python,true]from luma.core.interface.serial import i2c, spi from luma.core.render import canvas from luma.oled.device import ssd1306, ssd1325, ssd1331, sh1106 # rev.1 users set port=0 # substitute spi(device=0, port=0) below if using that interface serial = i2c(port=1, address=0x3C) # substitute ssd1331(...) or sh1106(...) below if using that device device = sh1106(serial)#这里改ssd1306, ssd1325, ssd1331, sh1106 with canvas(device) as draw: draw.rectangle(device.bounding_box, outline="white", fill="black") draw.text((30, 40), "Hello World", fill="white")[/mw_shl_code] 如果你的oled驱动芯片是其它型号找到device = sh1106(serial),把sh1106改成库支持的其它型号 树莓派上用Python2打开oled.py运行就能看到下图的Hello World  能驱动成功后我们去下载Luma.oled的examples代码 然后是examples里面的例子怎么用呢?如果是非ssd1306芯片直接运行还是花屏的,因为那个examples的代码需要修改 下面以pi_logo.py为例参考上面那个Hello World的例子修改成自己OLED芯片型号的(文件放在在examples内) [mw_shl_code=python,true]#!/usr/bin/env python # -*- coding: utf-8 -*- # Copyright (c) 2014-17 Richard Hull and contributors # See LICENSE.rst for details. # PYTHON_ARGCOMPLETE_OK """ Display the Raspberry Pi logo (loads image as .png). """ import os.path from PIL import Image from luma.core.interface.serial import i2c, spi from luma.oled.device import ssd1306, ssd1325, ssd1331, sh1106 def main(): img_path = os.path.abspath(os.path.join(os.path.dirname(__file__), 'images', 'pi_logo.png')) logo = Image.open(img_path).convert("RGBA") fff = Image.new(logo.mode, logo.size, (255,) * 4) background = Image.new("RGBA", device.size, "white") posn = ((device.width - logo.width) // 2, 0) while True: for angle in range(0, 360, 2): rot = logo.rotate(angle, resample=Image.BILINEAR) img = Image.composite(rot, fff, rot) background.paste(img, posn) device.display(background.convert(device.mode)) if __name__ == "__main__": try: serial = i2c(port=1, address=0x3C) device = sh1106(serial) main() except KeyboardInterrupt: pass[/mw_shl_code] Python运行上面的程序oled屏会出现一个能旋转的树莓派LOGO  如果想了解更多欢迎访问我的个人站:www.haoqiabin.cn |


© 2013-2024 Comsenz Inc. Powered by Discuz! X3.4 Licensed

 置顶卡
置顶卡 变色卡
变色卡 千斤顶
千斤顶
 活跃会员
活跃会员
 编辑选择奖
编辑选择奖
 ARD DAY


