|
2570| 1
|
手势识别带触摸传感器试用2:触摸功能 |
|
手势识别带触摸传感器试用1:手势识别功能 手势识别带触摸传感器试用2:触摸功能 视频: 器材: 虚谷号教育版 虚谷号扩展板(购买链接:https://www.dfrobot.com.cn/goods-1953.html) 手势带触摸传感器(购买链接:https://www.dfrobot.com.cn/goods-1994.html) 实现弹奏简单的曲子《我是一个粉刷匠》,曲子的简谱显示在OLED屏上,当触摸到不同的端口会发出不同的单调,同时虚谷号扩展板上的RGB灯也会亮不同的颜色。 其实这个项目可变形的地方很多的,而且也可以把作品进行美化,做成一个非常炫酷的钢琴。不过本人手实在笨,时间也有限,就把相关部分做出来。各位脑洞比我大,手比我巧,肯定能做的比我好的多。 这是一个综合展示的项目,对每个要求各个突破:
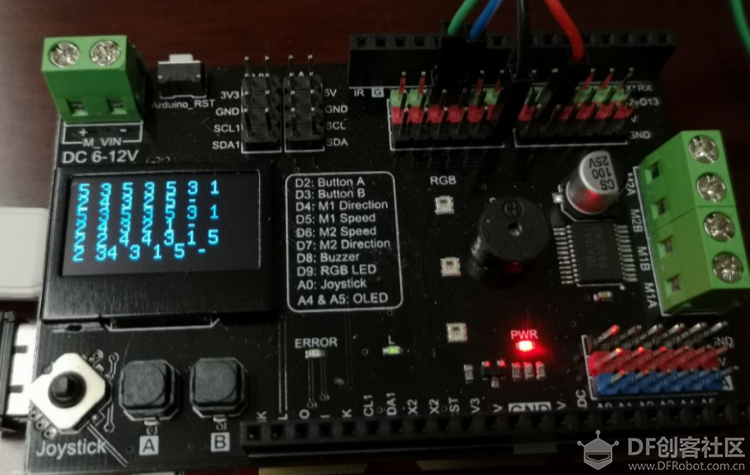 使用u8g库,代码如下: [mw_shl_code=cpp,true]#include "U8glib.h" U8GLIB_SSD1306_128X64 u8g(U8G_I2C_OPT_NONE|U8G_I2C_OPT_DEV_0); // I2C / TWI void draw(void) { // graphic commands to redraw the complete screen should be placed here u8g.setFont(u8g_font_unifont); //u8g.setFont(u8g_font_osb21); u8g.drawStr( 0, 10, "5 3 5 3 5 3 1"); u8g.drawStr( 0, 20, "2 4 3 2 5 - "); u8g.drawStr( 0, 30, "5 3 5 3 5 3 1"); u8g.drawStr( 0, 40, "2 4 3 2 1 - "); u8g.drawStr( 0, 50, "2 2 4 4 3 1 5"); u8g.drawStr( 0, 60, "2 34 3 1 5 -"); } void setup(void) { } void loop(void) { // picture loop u8g.firstPage(); do { draw(); } while( u8g.nextPage() ); // rebuild the picture after some delay delay(50); }[/mw_shl_code] 2. 当触摸不同的端口时,灯呈现不同的颜色  代码如下: [mw_shl_code=cpp,true]#include <Adafruit_NeoPixel.h> #include "DFRobot_Gesture_Touch.h" #ifdef __AVR__ #include <avr/power.h> #include "SoftwareSerial.h" SoftwareSerial mySerial(10, 11); // example for uno, use software serial #elif defined ESP_PLATFORM #include "HardwareSerial.h" HardwareSerial mySerial(1); #endif #define PIN 9 DFRobot_Gesture_Touch DFGT(&mySerial); // init sensor object, request write and read function Adafruit_NeoPixel strip = Adafruit_NeoPixel(3, PIN, NEO_GRB + NEO_KHZ800); void setup() { // This is for Trinket 5V 16MHz, you can remove these three lines if you are not using a Trinket #if defined (__AVR_ATtiny85__) if (F_CPU == 16000000) clock_prescale_set(clock_div_1); #endif // End of trinket special code strip.begin(); strip.setBrightness(50); strip.show(); // Initialize all pixels to 'off' Serial.begin(115200); mySerial.begin(9600); delay(500); while(mySerial.available()) // flush serial buffer mySerial.read(); Serial.println("gesture&touch sensor test"); // set auto sleep time out, in sleep mode, something approach will weak it up } void loop() { int8_t rslt = DFGT.getAnEvent(); // get an event that data saved in serial buffer if(rslt != DF_ERR) { // DFGT.setSleep(DFGT_SLEEP_DISABLE); // disable auto sleep switch(rslt) { case DFGT_EVT_TOUCH1: { Serial.println("get event touch1"); colorWipe(strip.Color(127, 0, 0), 50); // Red } break; case DFGT_EVT_TOUCH2: { Serial.println("get event touch2"); colorWipe(strip.Color(0, 127, 0), 50); // Green } break; case DFGT_EVT_TOUCH3: { Serial.println("get event touch3"); colorWipe(strip.Color(0, 0, 127), 50); // Blue } break; case DFGT_EVT_TOUCH4: { Serial.println("get event touch4"); colorWipe(strip.Color(127, 127, 0), 50); // yellow } break; case DFGT_EVT_TOUCH5: { Serial.println("get event touch5"); colorWipe(strip.Color(127, 0, 127), 50); // cyan } break; } } // Some example procedures showing how to display to the pixels: colorWipe(strip.Color(0, 0, 0, 0), 50); // black } // Fill the dots one after the other with a color void colorWipe(uint32_t c, uint8_t wait) { for(uint16_t i=0; i<strip.numPixels(); i++) { strip.setPixelColor(i, c); strip.show(); delay(wait); } }[/mw_shl_code] 3. 当触摸不同的端口时,蜂鸣器发出声音 代码如下: [mw_shl_code=cpp,true] case DFGT_EVT_TOUCH1: { Serial.println("get event touch1"); tone(tonepin,C_1); //发出do delay(400); //发音时间,可自调 noTone(tonepin); //停止发声[/mw_shl_code] 4. 集成 五个触摸键分别对应音符的do、re、me、fa、so,弹奏《我是一个粉刷匠》,OLED屏幕显示简谱,触摸某个按键时发出相应的音符,同时RGB灯珠发出不同的颜色。 完整代码如下: [mw_shl_code=cpp,true] #include <Adafruit_NeoPixel.h> #include "DFRobot_Gesture_Touch.h" #include "U8glib.h" // 定义音符,本例只用到1~5个音符 #define C_0 -1 #define C_1 262 #define C_2 294 #define C_3 330 #define C_4 350 #define C_5 393 #define C_6 441 #define C_7 495 int tonepin=8;//虚谷号扩展版蜂鸣器8号输出口 //定义OLED显示屏 U8GLIB_SSD1306_128X64 u8g(U8G_I2C_OPT_NONE|U8G_I2C_OPT_DEV_0); // I2C / TWI #ifdef __AVR__ #include <avr/power.h> #include "SoftwareSerial.h" SoftwareSerial mySerial(10, 11); // example for uno, use software serial #elif defined ESP_PLATFORM #include "HardwareSerial.h" HardwareSerial mySerial(1); #endif #define PIN 9 //定义RGB灯引脚 DFRobot_Gesture_Touch DFGT(&mySerial); // init sensor object, request write and read function Adafruit_NeoPixel strip = Adafruit_NeoPixel(3, PIN, NEO_GRB + NEO_KHZ800); //在OLED上显示《我是一个粉刷匠》的简谱 void draw(void) { // graphic commands to redraw the complete screen should be placed here u8g.setFont(u8g_font_unifont); //u8g.setFont(u8g_font_osb21); u8g.drawStr( 0, 10, "5 3 5 3 5 3 1"); u8g.drawStr( 0, 20, "2 4 3 2 5 - "); u8g.drawStr( 0, 30, "5 3 5 3 5 3 1"); u8g.drawStr( 0, 40, "2 4 3 2 1 - "); u8g.drawStr( 0, 50, "2 2 4 4 3 1 5"); u8g.drawStr( 0, 60, "2 34 3 1 5 -"); } void setup() { // 定义蜂鸣器引脚: pinMode(tonepin,OUTPUT); // This is for Trinket 5V 16MHz, you can remove these three lines if you are not using a Trinket #if defined (__AVR_ATtiny85__) if (F_CPU == 16000000) clock_prescale_set(clock_div_1); #endif // End of trinket special code strip.begin(); strip.setBrightness(50); strip.show(); // Initialize all pixels to 'off' Serial.begin(115200); mySerial.begin(9600); delay(500); while(mySerial.available()) // flush serial buffer mySerial.read(); Serial.println("gesture&touch sensor test"); // set auto sleep time out, in sleep mode, something approach will weak it up } void loop() { u8g.firstPage(); do { draw(); int8_t rslt = DFGT.getAnEvent(); // get an event that data saved in serial buffer if(rslt != DF_ERR) { // DFGT.setSleep(DFGT_SLEEP_DISABLE); // disable auto sleep switch(rslt) { case DFGT_EVT_TOUCH1: { Serial.println("get event touch1"); colorWipe(strip.Color(127, 0, 0), 50); // Red tone(tonepin,C_1); //发出do delay(400); //发音时间,可自调 noTone(tonepin); //停止发声 } break; case DFGT_EVT_TOUCH2: { Serial.println("get event touch2"); colorWipe(strip.Color(0, 127, 0), 50); // Green tone(tonepin,C_2); //发出re delay(400); //发音时间,可自调 noTone(tonepin); //停止发声 } break; case DFGT_EVT_TOUCH3: { Serial.println("get event touch3"); colorWipe(strip.Color(0, 0, 127), 50); // Blue tone(tonepin,C_3); //发出me delay(400); //发音时间,可自调 noTone(tonepin); //停止发声 } break; case DFGT_EVT_TOUCH4: { Serial.println("get event touch4"); colorWipe(strip.Color(127, 127, 0), 50); // yellow tone(tonepin,C_4); //发出fa delay(400); //发音时间,可自调 noTone(tonepin); //停止发声 } break; case DFGT_EVT_TOUCH5: { Serial.println("get event touch5"); colorWipe(strip.Color(127, 0, 127), 50); // cyan tone(tonepin,C_5); //发出so delay(400); //发音时间,可自调 noTone(tonepin); //停止发声 } break; } } // Some example procedures showing how to display to the pixels: colorWipe(strip.Color(0, 0, 0, 0), 50); // black } while( u8g.nextPage() ); // rebuild the picture after some delay delay(50); } // Fill the dots one after the other with a color void colorWipe(uint32_t c, uint8_t wait) { for(uint16_t i=0; i<strip.numPixels(); i++) { strip.setPixelColor(i, c); strip.show(); delay(wait); } }[/mw_shl_code] 试用体会:传感器非常小巧,带5个触摸端口,很适合做一些可穿戴应用。虽然手势识别精度还不理想,不过后期准备以此为点让学生做一个针对性的研究:如何使用可以最大限度提高识别准确性。 建议: 如果能有Python的库就更好了,可以结合虚谷号搭载摄像头做更多好玩的应用。 关于虚谷号: 在参与虚谷号体验计划时因为不了解型号,选择了“创客版”,在进行测试体验时感觉性能还是弱了一点。后来入手了一块教育版,明显性能好了不少。虽然从参数上来说并没有很大提高,但是用户体验性却有了很大的改进,等待时间不会那么难以接受,也不会动不动就崩。打开多任务很迅速,运行速度也很不错。建议大家如果条件许可还是用教育版的来玩。 |


© 2013-2024 Comsenz Inc. Powered by Discuz! X3.4 Licensed

 置顶卡
置顶卡 变色卡
变色卡 千斤顶
千斤顶
 版主限定
版主限定
 创作达人
创作达人
 编辑选择奖
编辑选择奖
 ARD DAY
 编辑选择奖
编辑选择奖
 编辑选择奖
编辑选择奖
 编辑选择奖
编辑选择奖


