iooops 发表于 2016-3-31 23:50:37

【音乐项目】触摸竖琴

本帖最后由 iooops 于 2016-4-1 00:09 编辑

这个项目的诞生来源其实是这样的:
近半年以来楼主从各方面接触了一下makeymakey,然后发现makeymakey好则好矣,就是还是要依赖电脑(操作系统),不能以特别独立的方式给人玩耍。
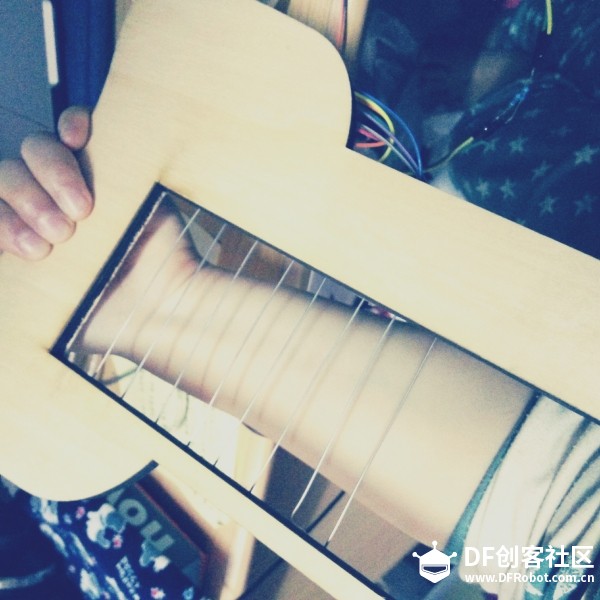
然后楼主恰巧在蘑菇云激光切割的余料里发现了一块好用的板子,正好又在附近的五金店买到了细钢丝,就心想做个触摸竖琴好了~~ 又想起半年前乐乐曾经给过我一段仅用导线实现触摸传感器的代码,于是这个小制作项目就这么速度地开展下来了~~~


【材料清单】
Arduino开发板
细钢丝 X 10
DFPlayer Mini 播放器模块 X 1
SD卡
小喇叭 X 1
导线若干

【制作过程】

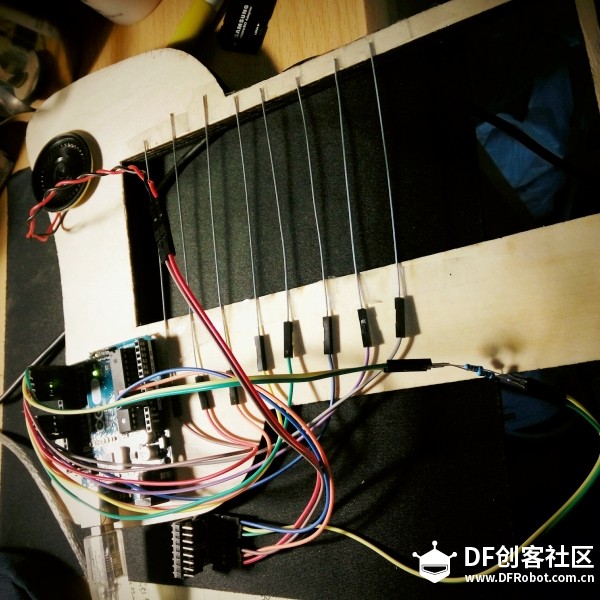
1. 把钢丝剪到合适的尺寸,然后分别黏上去。
2. 把钢丝连上导线。
3. 把导线连上Arduino。
4. 做测试。代码如下:
int ledPin = 13;
int capval;
void setup()
{
pinMode(ledPin, OUTPUT);
Serial.begin(9600);
Serial.println("Touch senser");
}

void loop ()
{
digitalWrite(ledPin,LOW);
capval = readCapacitivePin(6);    //各个引脚都尝试一下
Serial.println(capval, DEC);
if (capval > 2) {
// turn LED on:
digitalWrite(ledPin, HIGH);          // 如果该引脚有反应的话,Arduino上的13号灯会亮
delay(10);
}
}

uint8_t readCapacitivePin(int pinToMeasure) {
// Variables used to translate from Arduino to AVR pin naming
volatile uint8_t* port;
volatile uint8_t* ddr;
volatile uint8_t* pin;
// Here we translate the input pin number from
// Arduino pin number to the AVR PORT, PIN, DDR,
// and which bit of those registers we care about.
byte bitmask;
port = portOutputRegister(digitalPinToPort(pinToMeasure));
ddr = portModeRegister(digitalPinToPort(pinToMeasure));
bitmask = digitalPinToBitMask(pinToMeasure);
pin = portInputRegister(digitalPinToPort(pinToMeasure));
// Discharge the pin first by setting it low and output
*port &= ~(bitmask);
*ddr |= bitmask;
delay(1);
// Make the pin an input with the internal pull-up on
*ddr &= ~(bitmask);
*port |= bitmask;

// Now see how long the pin to get pulled up. This manual unrolling of the loop
// decreases the number of hardware cycles between each read of the pin,
// thus increasing sensitivity.
uint8_t cycles = 17;
if (*pin & bitmask) { cycles = 0;}
else if (*pin & bitmask) { cycles = 1;}
else if (*pin & bitmask) { cycles = 2;}
else if (*pin & bitmask) { cycles = 3;}
else if (*pin & bitmask) { cycles = 4;}
else if (*pin & bitmask) { cycles = 5;}
else if (*pin & bitmask) { cycles = 6;}
else if (*pin & bitmask) { cycles = 7;}
else if (*pin & bitmask) { cycles = 8;}
else if (*pin & bitmask) { cycles = 9;}
else if (*pin & bitmask) { cycles = 10;}
else if (*pin & bitmask) { cycles = 11;}
else if (*pin & bitmask) { cycles = 12;}
else if (*pin & bitmask) { cycles = 13;}
else if (*pin & bitmask) { cycles = 14;}
else if (*pin & bitmask) { cycles = 15;}
else if (*pin & bitmask) { cycles = 16;}

// Discharge the pin again by setting it low and output
// It's important to leave the pins low if you want to
// be able to touch more than 1 sensor at a time - if
// the sensor is left pulled high, when you touch
// two sensors, your body will transfer the charge between
// sensors.
*port &= ~(bitmask);
*ddr |= bitmask;

return cycles;
}
   楼主测试下来发现,2、3、4、5、8、9、10、11是能用的。
5. 接DF mini player模块和小喇叭,如下所示
https://wiki.dfrobot.com.cn/images/8/82/PlayerMini_CN.png
6. 把准备好的音乐放入SD卡,注意格式,楼主发现用wav文件好像还不行,得用MP3。
问 :SD卡中的文件和文件夹名字有什么格式要求吗?

    答:函数mp3_play (1); 播放文件的格式为"0001***.mp3(或支持其他格式)". 您可能需要注意这些:

(1). 该音频文件的名称应该命名一个四位数字开始,如:

    0001.mp3
    0002Chasing The Sun.mp3
    0003.mp3
    0004Try.mp3
    0010FourFiveSeconds.mp3
https://wiki.dfrobot.com.cn/images/thumb/9/96/MP3-1.png/450px-MP3-1.png

(2).该音频文件应该放在“MP3”'它坐落在TF卡的根目录'文件夹;
https://wiki.dfrobot.com.cn/images/thumb/c/cd/MP3-2.png/450px-MP3-2.png
7. 安装Arduino的DFPlayer_Mini MP3库
(上述两个步骤详细内容查阅DFPlayer Mini WIKI - - 这链接死活传不上来啊你们看着办吧直接在产品资料库里面搜就行)
8. 在Arduino文件中把每根钢丝触摸开关对应到不同的MP3文件。

#include <SoftwareSerial.h>
#include <DFPlayer_Mini_Mp3.h>

int ledPin = 13;
int capval;

void setup() {
Serial.begin(9600);
mp3_set_serial (Serial);//set Serial for DFPlayer-mini mp3 module
delay(1);//wait 1ms for mp3 module to set volume
mp3_set_volume (30);

pinMode(ledPin, OUTPUT);
mp3_play (1);
}

void loop () {
digitalWrite(ledPin,LOW);
capval = readCapacitivePin(2);
capval = readCapacitivePin(3);
capval = readCapacitivePin(4);
capval = readCapacitivePin(5);
capval = readCapacitivePin(8);
capval = readCapacitivePin(9);
capval = readCapacitivePin(10);
capval = readCapacitivePin(11);
Serial.println(capval, DEC);
if (capval > 2) {
    mp3_play (2);
    delay(100);
}
if (capval > 2) {
    mp3_play (3);
    delay(100);
}
if (capval > 2) {
    mp3_play (4);
    delay(100);
}
if (capval > 2) {
    mp3_play (5);
    delay(100);
}
if (capval > 2) {
    mp3_play (6);
    delay(100);
}
if (capval > 2) {
    mp3_play (7);
    delay(100);
}
if (capval > 2) {
    mp3_play (8);
    delay(100);
}
if (capval > 2) {
    mp3_play (1);
    delay(1000);
}
}

uint8_t readCapacitivePin(int pinToMeasure) {
// Variables used to translate from Arduino to AVR pin naming
volatile uint8_t* port;
volatile uint8_t* ddr;
volatile uint8_t* pin;
// Here we translate the input pin number from
// Arduino pin number to the AVR PORT, PIN, DDR,
// and which bit of those registers we care about.
byte bitmask;
port = portOutputRegister(digitalPinToPort(pinToMeasure));
ddr = portModeRegister(digitalPinToPort(pinToMeasure));
bitmask = digitalPinToBitMask(pinToMeasure);
pin = portInputRegister(digitalPinToPort(pinToMeasure));
// Discharge the pin first by setting it low and output
*port &= ~(bitmask);
*ddr |= bitmask;
delay(1);
// Make the pin an input with the internal pull-up on
*ddr &= ~(bitmask);
*port |= bitmask;

// Now see how long the pin to get pulled up. This manual unrolling of the loop
// decreases the number of hardware cycles between each read of the pin,
// thus increasing sensitivity.
uint8_t cycles = 17;
if (*pin & bitmask) { cycles = 0;}
else if (*pin & bitmask) { cycles = 1;}
else if (*pin & bitmask) { cycles = 2;}
else if (*pin & bitmask) { cycles = 3;}
else if (*pin & bitmask) { cycles = 4;}
else if (*pin & bitmask) { cycles = 5;}
else if (*pin & bitmask) { cycles = 6;}
else if (*pin & bitmask) { cycles = 7;}
else if (*pin & bitmask) { cycles = 8;}
else if (*pin & bitmask) { cycles = 9;}
else if (*pin & bitmask) { cycles = 10;}
else if (*pin & bitmask) { cycles = 11;}
else if (*pin & bitmask) { cycles = 12;}
else if (*pin & bitmask) { cycles = 13;}
else if (*pin & bitmask) { cycles = 14;}
else if (*pin & bitmask) { cycles = 15;}
else if (*pin & bitmask) { cycles = 16;}

// Discharge the pin again by setting it low and output
// It's important to leave the pins low if you want to
// be able to touch more than 1 sensor at a time - i
// the sensor is left pulled high, when you touch
// two sensors, your body will transfer the charge between
// sensors.
*port &= ~(bitmask);
*ddr |= bitmask;

return cycles;
}

OK!大功告成!!


http://player.youku.com/player.php/sid/XMTUxODk3NjExMg==/v.swf


其实它最后应该是这样玩的(哎呀手不够拍了 - - ):


【制作心得】
楼主表示应该去买个好点的功放和喇叭 - - 这夜晚打更的喇叭效果实在是有点呵呵……


参考:
用arduino直接检测电容值:http://www.geek-workshop.com/thread-3335-1-1.html
DFPlayer Mini WIKI

hnyzcj 发表于 2016-4-1 08:58:34

哈哈,不错不错

大连林海 发表于 2016-4-1 09:57:01

有时间做一个

iooops 发表于 2016-4-1 10:42:25

hnyzcj 发表于 2016-4-1 08:58
哈哈,不错不错

{:5_153:}

dsweiliang 发表于 2016-4-1 17:51:12

弦改造成激光的就更炫酷了

iooops 发表于 2016-4-1 21:33:28

dsweiliang 发表于 2016-4-1 17:51
弦改造成激光的就更炫酷了

激光的 - - 怎么改

dsweiliang 发表于 2016-4-2 08:36:54

iooops 发表于 2016-4-1 21:33
激光的 - - 怎么改

把钢丝触摸开关改成光电开关

iooops 发表于 2016-4-2 13:30:25

dsweiliang 发表于 2016-4-2 08:36
把钢丝触摸开关改成光电开关

给个淘宝链接 - - {:5_153:}

hnyzcj 发表于 2016-4-9 10:34:51

我想到当年的六指情魔

tzlzy 发表于 2016-4-10 15:44:37

一统江湖~~

iooops 发表于 2016-4-10 21:56:53

tzlzy 发表于 2016-4-10 15:44
一统江湖~~

你让我想到了统一方便面 - -

zhengx84 发表于 2016-6-12 16:09:37

大神啊

iooops 发表于 2016-6-20 14:29:44

zhengx84 发表于 2016-6-12 16:09
大神啊

小白啊

我爱宋富珍 发表于 2017-5-16 03:48:53

dsweiliang 发表于 2016-4-1 17:51
弦改造成激光的就更炫酷了

请问代码怎么改还有怎么连线

lisper 发表于 2017-5-17 17:36:07

厉害啊!

我爱宋富珍 发表于 2017-6-14 14:38:45

楼主为什么我只检测到一个口可以用,请问这是为什么?

iooops 发表于 2017-6-26 03:10:01

我爱宋富珍 发表于 2017-6-14 14:38
楼主为什么我只检测到一个口可以用,请问这是为什么?

= = 你用的是细钢丝吗
可以看一下Arduino的数值

我爱宋富珍 发表于 2017-6-28 10:40:55

iooops 发表于 2017-6-26 03:10
= = 你用的是细钢丝吗
可以看一下Arduino的数值

对啊我拆了一把伞,但是灯就亮了一下
页: [1]
查看完整版本: 【音乐项目】触摸竖琴