|
6772| 2
|
基于Edison的智能家居温室系统设计 |

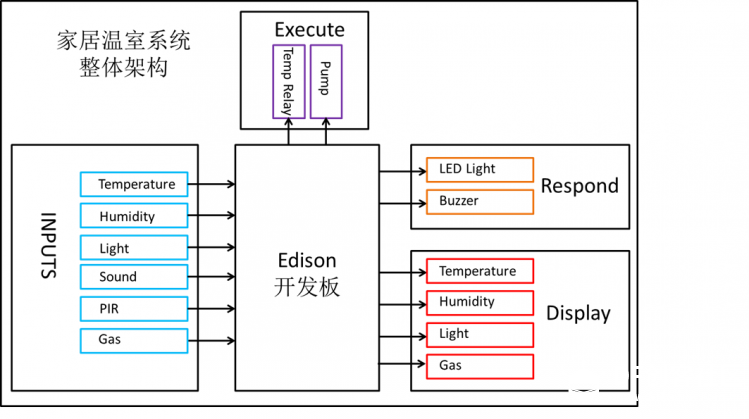
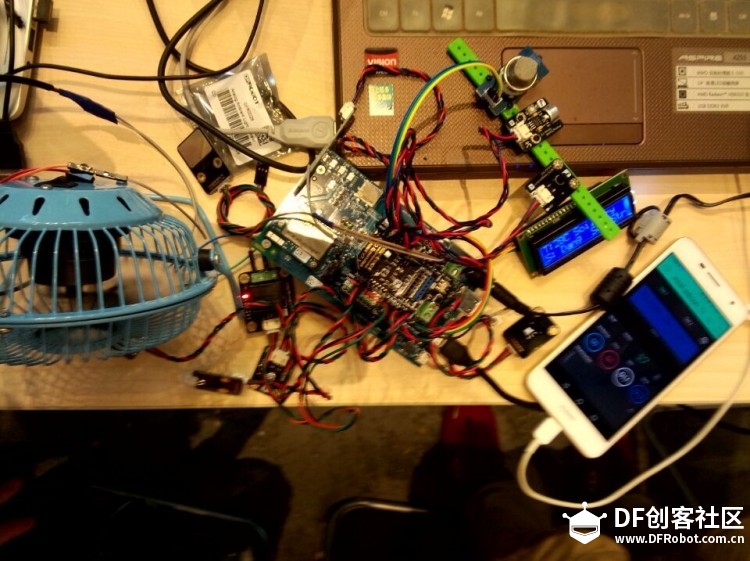
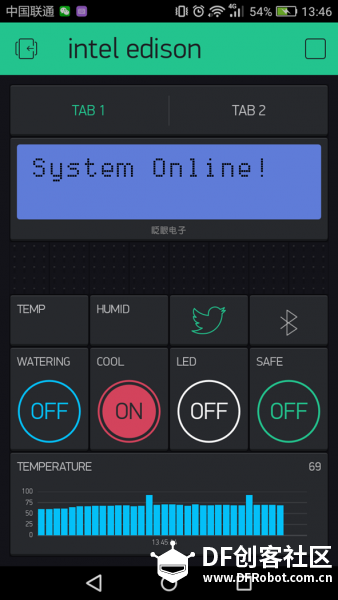
在城市生活中,小型的温室系统越来越流行,它给予城市生活的人群一个在家就能亲近大自然的机会和动手操作的乐趣。而将家居生活和温室结合起来的家居温室系统则能更好地满足人们对于美好生活的追求。我们采用Intel Edison 开发板套件和传感器套件实现一个智能家居温室系统,对特定环境的温度、土壤湿度、光照强度和室内空气质量进行采集并上传至云端。在此基础上根据采集的湿度数据利用water pump对土壤湿度进行调整。另外利用PIR sensor对进入这一系统的红外源进行检测并报警。整个家居温室系统的整体框架如下图1: 首先通过Edison和相应的传感器采集家居温室系统的各种数据,然后对得到的数据进行处理并作出相应的响应,还可以将采集到的数据上传至云端服务器进行后续的分析。这里使用的Blynk的服务器,它的好处与edison兼容,同时可以很方便的使用控制edison的外设。电路的硬件连接如下图2所示:  连接上手机Blynk后的信息采集如下图3所示:  可以看到通过Blynk手机可以很方便的显示采集到的温度信息,同时也可以使用Blynk提供的开关按钮控制edison连接的外部设备,例如控制图中连接的小风扇。当然这里使用的云端服务是Blynk的云端服务器,我们也可以使用其他云端或者自己开发的Web云端。这里主要是对基于Arduino平台的edison开发板的学习使用以及与Blynk云端的控制连接,希望和大家一起学习进步。下面是整个系统用到的代码。 #define BLYNK_PRINT Serial #include <BlynkSimpleIntelEdisonWiFi.h> #include <SPI.h> #include <WiFi.h> #include <Wire.h> #include <LiquidCrystal_I2C.h> #include <PubSubClient.h> char auth[] = "d607e5e2377245f9bd02e46bfab03190"; //char ssid[] = "I-CUBE"; // your network SSID (name) //char pass[] = "spspvc111"; // your network password (use for WPA, or use as key for WEP) char ssid[] = "Inno space-office"; // your network SSID (name) char pass[] = "inn0space"; // your network password (use for WPA, or use as key for WEP) int lightPin=A0; //设置光强传感器引脚-A int TemperaturePin=A1; //设置温度传感器引脚-A int HumidityPin=A2; //设置湿度传感器引脚-A int SoundPin=A3; //设置声音传感器引脚-A int GasPin = A5; //设置气体传感器引脚-A int LedPin = 11; //设置LED 灯控制引脚-D int MotionPin=12; //设置运动传感器引脚-D int BuzzerPin=9; //设置蜂鸣传感器引脚-D int touchPin = 2; int relayPin = 7; int lightValue; //用于存储光线强度的模拟量 int temperatureValue; //用于存储温度的模拟量 int temperature; int humidityValue; //由于存储湿度的模拟量 int humidity; int SoundValue; //用于存储声音模拟量 int GasValue; //用于存储声音模拟量 int MotionValue; //用于存储运动数字量 int BuzzerValue; //用于存储蜂鸣器数字量 int relayState = HIGH; int touchState; int lastTouchState = LOW; long lastDebounceTime = 0; long debounceDelay = 50; int status = WL_IDLE_STATUS; WidgetLCD App_lcd(V3); LiquidCrystal_I2C lcd(0x20,16,2); // set the LCD address to 0x20 for a 16 chars and 2 line display WiFiClient wifiClient; // Initialize the Wifi client library unsigned long lastConnectionTime = 0; // last time you connected to the server, in milliseconds const unsigned long postingInterval = 1000; // delay between updates, in milliseconds void callback(char* topic, byte* payload, unsigned int length) { // handle message arrived } void setup() { //Initialize serial and wait for port to open: Serial.begin(9600); pinMode(MotionPin,INPUT); pinMode(BuzzerPin,OUTPUT); pinMode(LedPin,OUTPUT); digitalWrite(LedPin, LOW); //pinMode(touchPin, INPUT); pinMode(touchPin, OUTPUT); pinMode(relayPin, OUTPUT); digitalWrite(relayPin, relayState); BlynkInit(); LcdInit(); WifyInit(); lcd.setCursor(0, 0); //光标移到第一行,第一个字符 lcd.print(" "); //clear the first line } void loop() { static unsigned long readSensorTimer=0; relay(); if(millis()-readSensorTimer>300) { readSensorTimer=millis(); temperatureValue=analogRead(TemperaturePin); //读取温度的模拟量 temperature=(500 * temperatureValue) /1024; //通过模拟量计算出实际温度 humidityValue=analogRead(HumidityPin); //读取湿度的模拟量 humidity=(100 * humidityValue) /1000; //通过模拟量计算出实际湿度 lightValue=analogRead(lightPin); //读取光照强度的模拟量 SoundValue=analogRead(SoundPin); // GasValue=analogRead(GasPin); //读取气体浓度的模拟量 MotionValue = digitalRead(MotionPin); LcdDisplay(); //判断声音信号,当检测到声音信号后打开LED灯 if (SoundValue > 10) { digitalWrite(LedPin, HIGH); //delay(10000); }else{ digitalWrite(LedPin, LOW); } //判断运动信号,当检测到运动信号放到,蜂鸣器报警 if (MotionValue == HIGH) { digitalWrite(BuzzerPin, HIGH); //digitalWrite(LedPin, HIGH); }else{ digitalWrite(BuzzerPin, LOW); //digitalWrite(LedPin, LOW); } Blynk.run(); } } void relay(){ // put your main code here, to run repeatedly: int reading = digitalRead(touchPin); if (reading != touchState) { touchState = reading; if (touchState == HIGH) { relayState = !relayState; //delay(10000); } } digitalWrite(relayPin, relayState); lastTouchState = reading; } void LcdInit(){ lcd.init(); // initialize the lcd lcd.backlight(); lcd.setCursor(0, 0); //光标移到第一行,第一个字符 lcd.print("Wifi Connecting."); App_lcd.clear(); App_lcd.print(0, 0, "System Online!"); } void LcdDisplay(){ //LCD显示当前温度 Serial.println("display temp: "); lcd.setCursor(0, 0); //光标移到第一行,第一个字符 lcd.print("T:"); lcd.print(temperature); lcd.print("C"); lcd.print(" "); //LCD现实当前湿度 Serial.println("display Humid: "); lcd.setCursor(6, 0); //光标移动到第一行,第七个字符 if (humidityValue<300) { lcd.print("Soil:Dry "); } else if (humidityValue>=300 && humidityValue<700){ lcd.print("Soil:Humid"); } else{ lcd.print("Soil:Water"); } //LCD现实当前光照强度 Serial.println("display light: "); lcd.setCursor(8, 1); //光标移动到第一行,第七个字符 if (lightValue>300) { lcd.print("Sun:Stro"); } else if (lightValue>=100 && lightValue<300){ lcd.print("Sun:Warm"); } else{ lcd.print("Sun:Weak"); } //LCD现实当前气体浓度 Serial.println("display Gas: "); lcd.setCursor(0, 1); //光标移动到第一行,第七个字符 if (MotionValue == HIGH) { lcd.print("M:Dang"); } else{ lcd.print("M:Safe"); } // //LCD现实当前气体浓度 // Serial.println("display Gas: "); // lcd.setCursor(8, 1); //光标移动到第一行,第七个字符 // if (GasValue<50) { // lcd.print("Gas: Good"); // } // else if (GasValue>=50 && GasValue<70){ // lcd.print("Gas: well"); // } // else{ // lcd.print("Gas: poor"); // } } void BlynkInit(){ Blynk.begin(auth, ssid, pass); while (Blynk.connect() == false) { // Wait until connected,等待连接成功 } } void WifyInit(){ // check for the presence of the shield: if (WiFi.status() == WL_NO_SHIELD) { Serial.println("WiFi shield not present"); // don't continue: while(true); } String fv = WiFi.firmwareVersion(); if( fv != "1.1.0" ) Serial.println("Please upgrade the firmware"); // attempt to connect to Wifi network: while ( status != WL_CONNECTED) { Serial.print("Attempting to connect to SSID: "); Serial.println(ssid); // Connect to WPA/WPA2 network. Change this line if using open or WEP network: status = WiFi.begin(ssid, pass); // wait 10 seconds for connection: delay(5000); } // you're connected now, so print out the status: printWifiStatus(); } void printWifiStatus() { // print the SSID of the network you're attached to: Serial.print("SSID: "); Serial.println(WiFi.SSID()); // print your WiFi shield's IP address: IPAddress ip = WiFi.localIP(); Serial.print("IP Address: "); Serial.println(ip); // print the received signal strength: long rssi = WiFi.RSSI(); Serial.print("signal strength (RSSI):"); Serial.print(rssi); Serial.println(" dBm"); } 最后谢谢DFrobot的这个平台,我们在这里第一次接触Edison和Arduino,学习也收获了很多,也希望更多的人能够关注,谢谢大家,:) 。 第3组,自由地带队, |
 沪公网安备31011502402448
© 2013-2026 Comsenz Inc. Powered by Discuz! X3.4 Licensed