|
11723| 10
|
和弦吉他的设计与制作 |

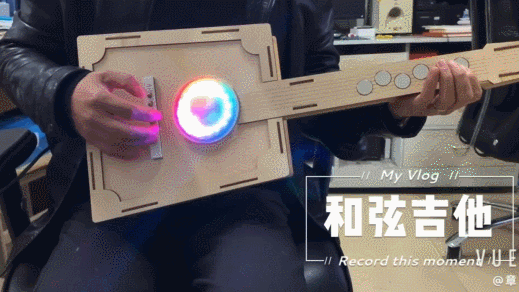 【视频演示】 由于CocoTouch编程板它内置MIDI控制器,集成了120多种乐器,加上编好程序后可以脱离电脑运行,直接插上音箱就行了,所以非常适合制作乐器。在上两期中分别介绍了炫彩电子钢琴和架子鼓的设计与制作,这一次我们再来设计制作一把和弦吉他。 【工作原理】 这个吉他的工作原理:吉他琴颈上的6个强磁通过导线与控制板上的0—5号触点相连,琴码上的6个铜盖型螺母通过导线与控制板上的6—11号触点相连,再通过编写相应的程序,就能实现了把琴颈上的 6 个强磁触控点变成了 6 个和弦按钮,琴码上的 6 个铜盖型螺母触控点变成了吉他的6 根琴弦,这样弹奏者在弹奏时只要按住其中一个和弦按钮,然后拨动琴弦,便可发出对应的和弦声音了,而且在弹奏的过程中音孔位置还会亮起非常炫酷的灯光效果,如果不弹奏灯就会熄灭。当然我们还可以通过修改程序来实现不同6个和弦的分布,也可以分解和弦等。 我们把相对应的程序编写好上传到控制板后,这时只要用冲电宝等给控制板供电,再把音箱直接插在侧面板的耳机连接线音频输出口上,弹奏吉他时,音箱就会发出相对应的音了。 【硬件清单】 CocoTouch 可编程控制板 WS2812 RGB LED灯环 接线端子 耳机延长线 铜螺丝、螺帽、铜盖型螺母及垫片 圆形稀土钕铁硼强磁 连接导线 铆钉 激光切割件【制作过程】 1、结构图设计并切割 我们先利用软件在电脑中设计出吉他的结构件,材料用椴木板和白色的亚克力板,并用激光切割机进行切割。图纸上黑色的线表示要切透,红色的表示不切透只划线,蓝色框内的材料是白色的亚克力板。 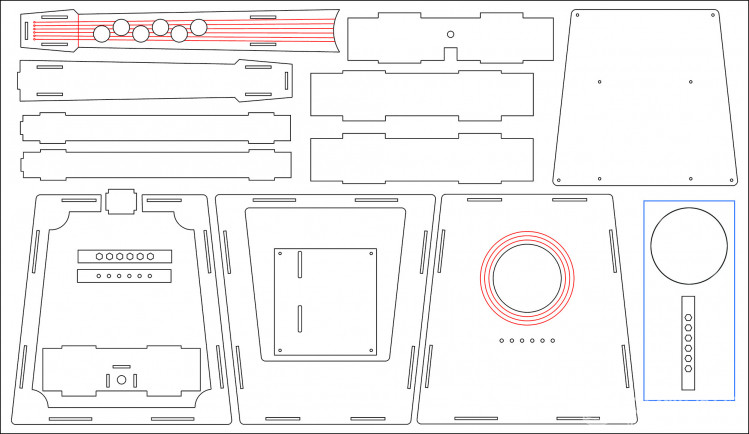 2、琴颈面板的制作 我们把6个10MM的圆形稀土钕铁硼强磁安装在琴颈面板的六个孔上,然后把剥了线的6根导线的一端用铜箔胶带贴在圆形强磁,这样能保证良好的导电性,最后再用热熔胶进行固定。这里的六个圆形强磁通过导线与主控板对应的接口相连接,再通过程序的编写从而实现按不同的圆形强磁可以弹出不同的和弦音的效果,也就是由这6个触控点来完成 6 个和弦按钮的功能。 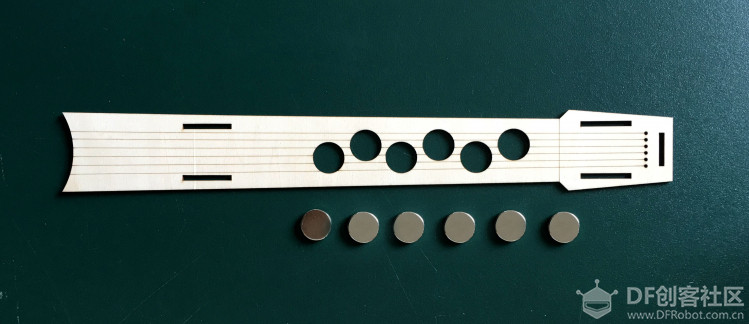 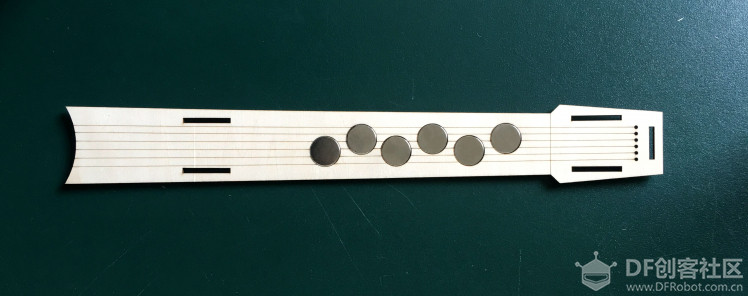  3、琴码的制作 把相对应的椴木条和亚克力条用502胶水粘在一起,再把6个铜盖型螺母固定在相应的6个孔内。这个结构的功能并不是作为琴码使用,它的实际功能相当于琴弦,等下我们再把这6个铜盖型螺母通过铜螺丝、铜垫片和导线,使之与主控板相对应的接口相连,再通过编写程序从而实现触碰不同的铜盖型螺母就相当于拨动不同的琴弦的效果。 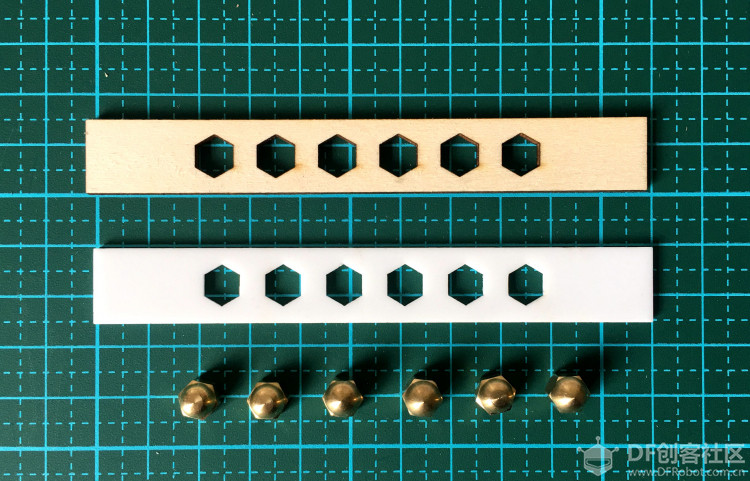 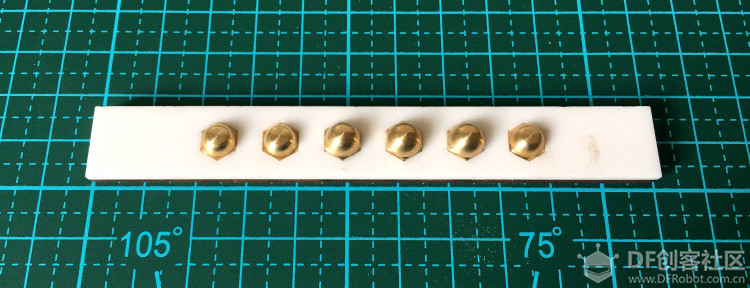 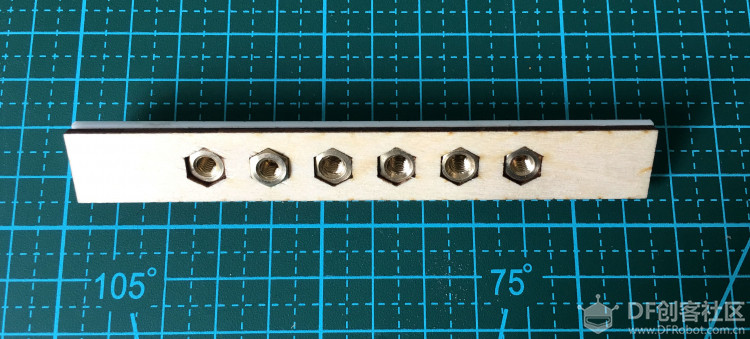 4、把琴码固定在吉他的面板上,并在音孔上贴上圆形的亚克力板。 我们利用铜螺丝、铜垫片把琴码固定在吉他面板上,在固定时把导线也连接上,这里用铜螺丝、铜垫片主要也是为了实现良好的导电性。接着把圆形的亚克力板用热熔胶固定在吉他面板的音孔上,这里用亚克力板的目的一是美化作用,二是柔化下面灯环发出的光线。 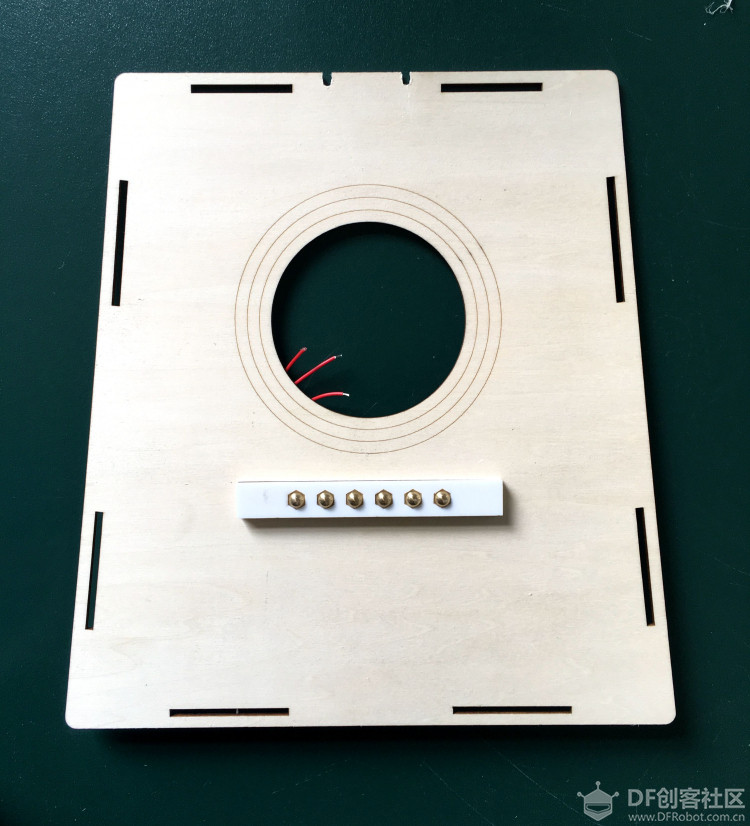 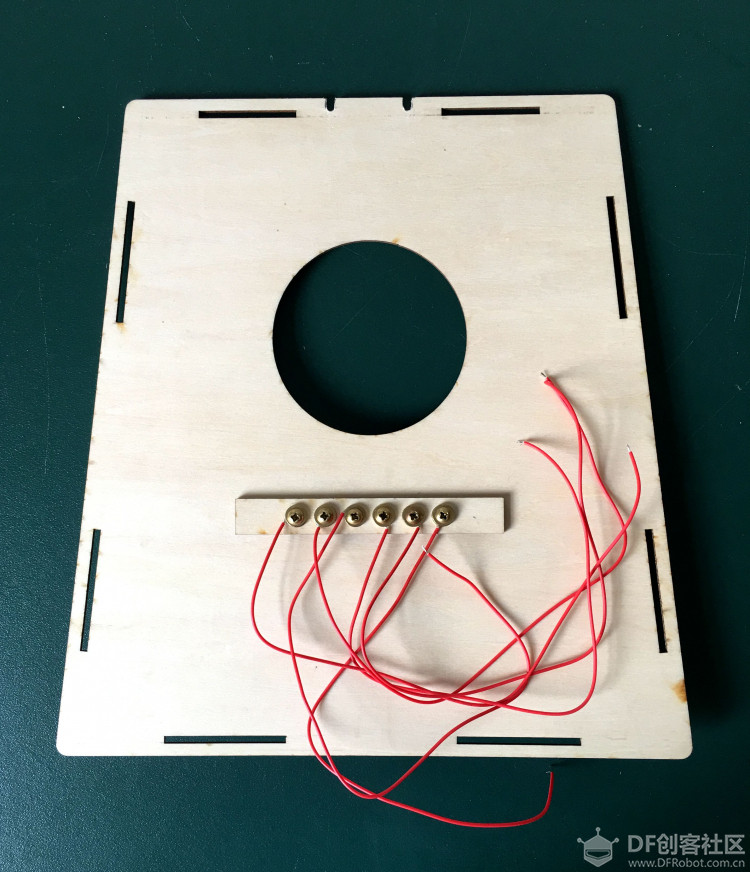 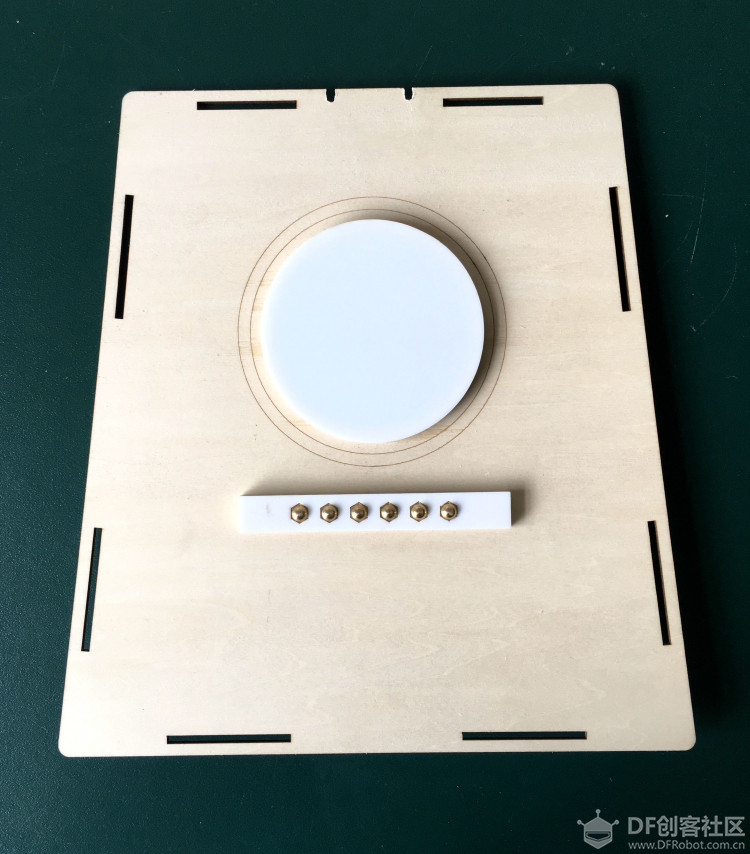 5、组装吉他。 如下图所示,我们把吉它的外框架子组装好并用热熔胶固定,接着把耳机延长线也安装在相对应的侧面板上,并用热熔胶进行固定,最后再把面板安装上。 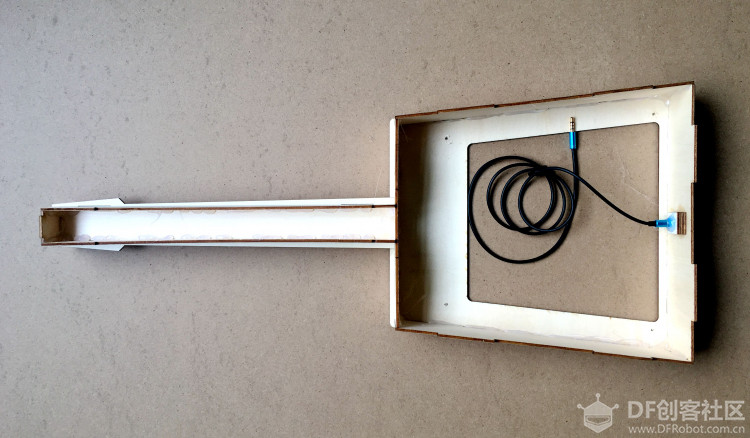 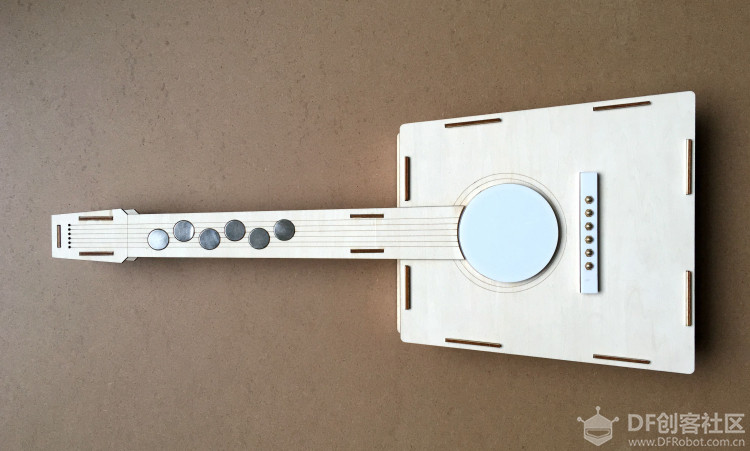 6、安装灯环。 先把3根导线焊接在灯环上,红色导线焊接在灯环的VCC上,黑色导线焊接在GND上,黄色导线焊接在DI上,接着把灯环用热熔胶固定在木板上,再把它们固定在面板的背面音孔处,固定时注意要使灯环处在音孔的中间,这样效果比较好。 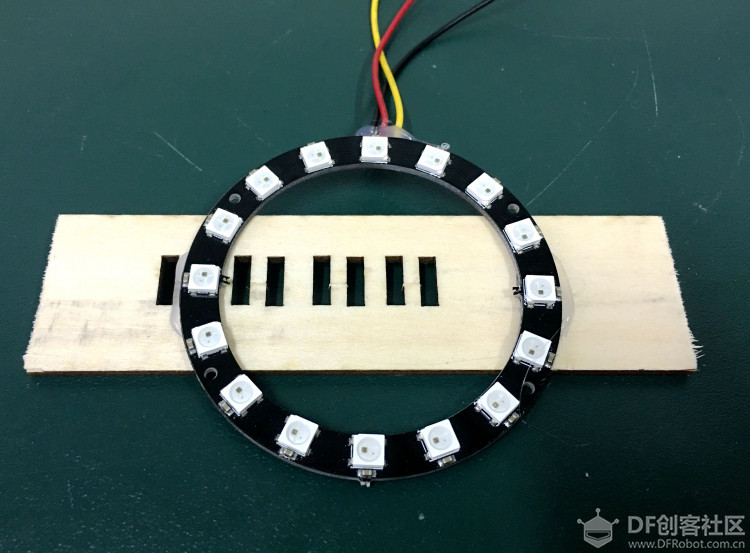 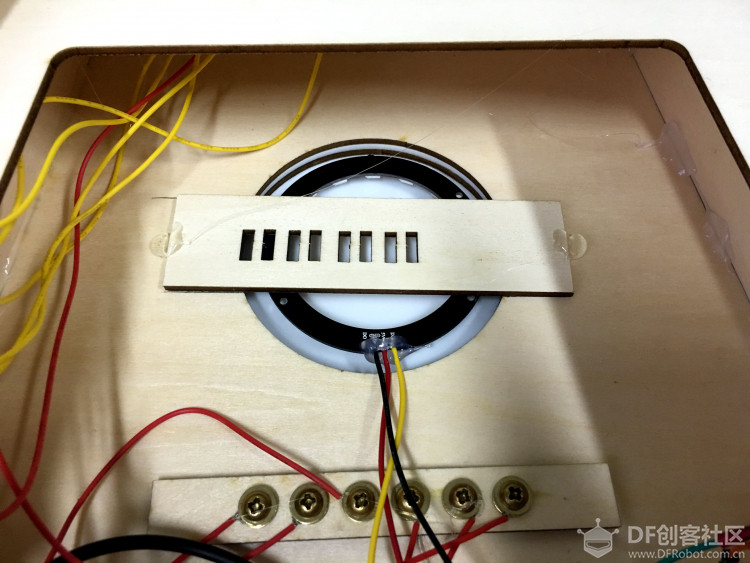 7、安装CocoTouch可编程控制板。 我们先把12根导线的一头用铜的螺丝、螺母和垫片固定在CocoTouch 可编程控制板的0—11的触控孔上,这里用铜的螺丝、螺母和垫片也是为了实现良好的导电性,接着再把控制板固定在底板上,再在底板的一侧安装上接线端子,方便导线的连接。 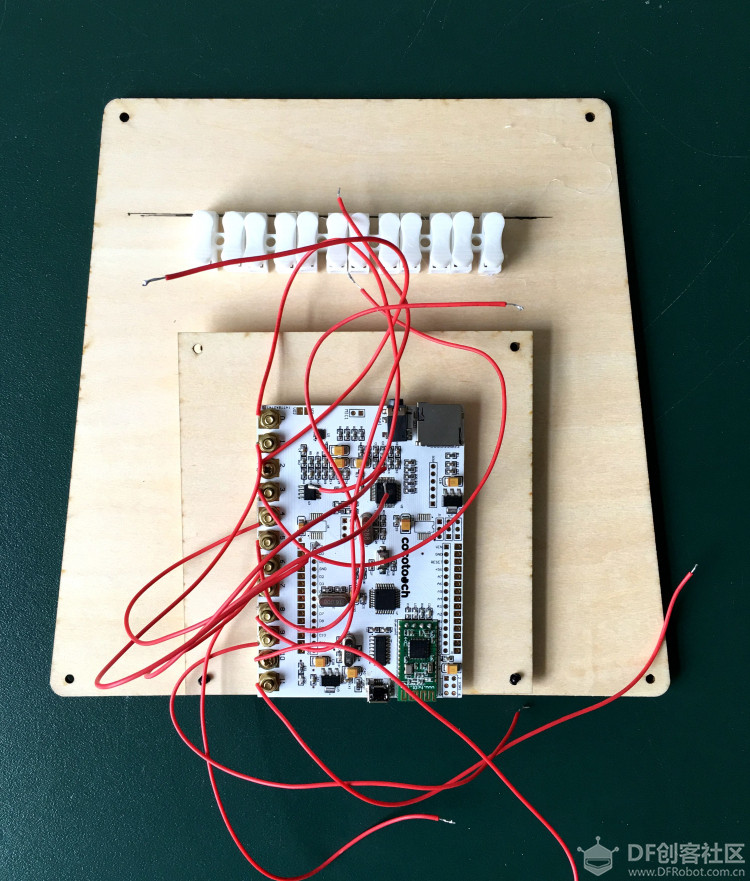 8、线路连接。 把琴颈面板上与6个强磁连接的线通过接线端子与CocoTouch 可编程控制板上的0—5的触控点引出的导线依次相连,而琴码上引出的6根导线也通过接线端子与控制板上的6—11的触控点引出的导线依次相连,再把灯带的VCC、GND接线插在主控板上的VCC、GND针脚上,把灯带上的控制信号输入端也就是DI这根线插在主控板的D2针脚上(这里主控板事先这几个针脚并没有焊上,所以我们事先要先焊上这几根针脚),最后把耳机连接线一头插在控制板的音频输出口上。 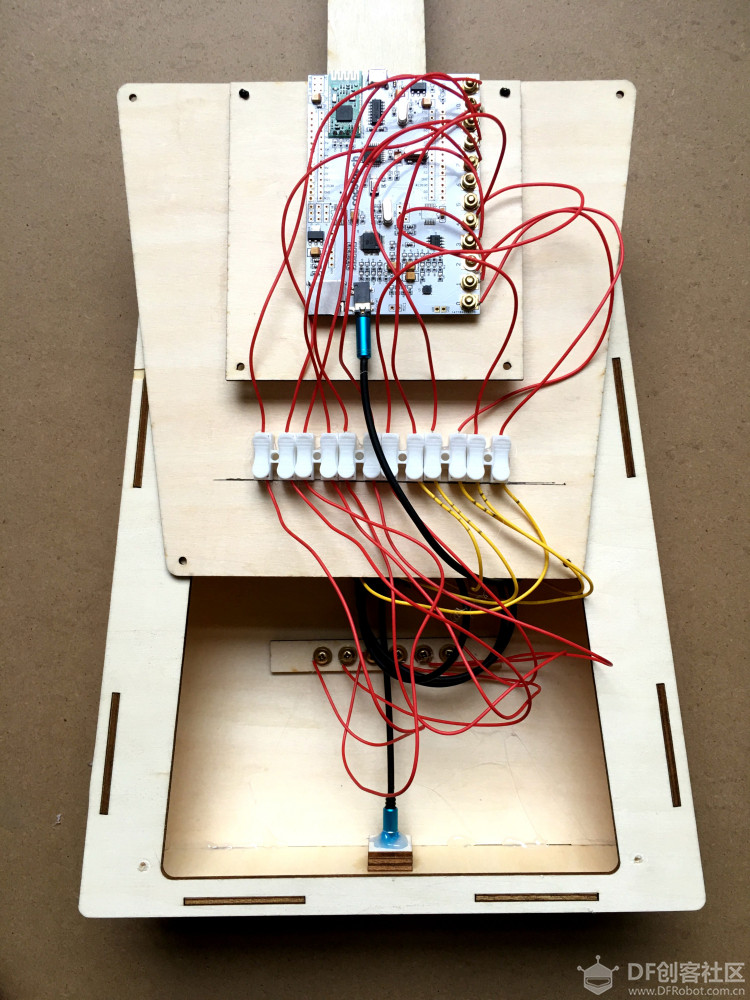 9、安装上底板及面板装饰条。 最后我们把底板和面板装饰条安装上,这里的底板与吉他架子利用铆钉进行固定,方面以后的检修,这样一把吉他就组装完成了。 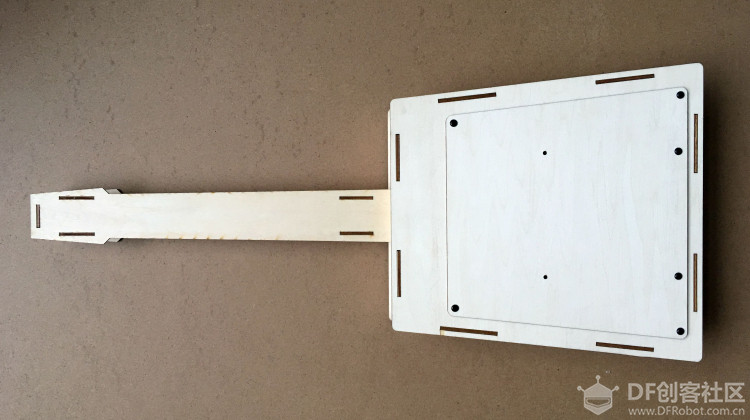 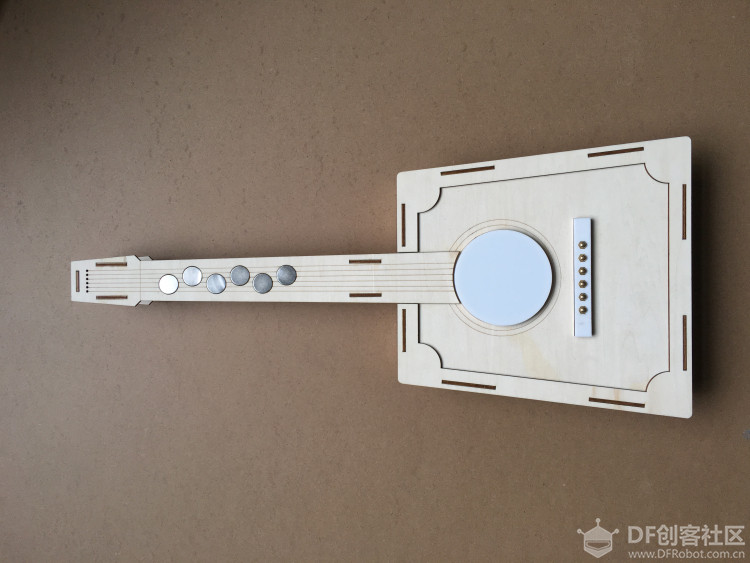 【程序编写】 程序是利用Arduino IDE编写的,详细程序如下: [mw_shl_code=applescript,true]#include "cocotouch.h" #include <Adafruit_NeoPixel.h> #define PIN 2 //The signal pin connected with Arduino #define LED_COUNT 16 // the amount of the leds of your strip char itemIndex; uint8_t idx; uint8_t midiNotes[6]; uint8_t states[6]; CocoTouch touch; Adafruit_NeoPixel leds = Adafruit_NeoPixel(LED_COUNT, PIN, NEO_GRB + NEO_KHZ800); void setup() { if (!touch.begin()) { while(1){;} } touch.setMIDIProgram(26, 1); leds.begin(); // Call this to start up the LED strip. clearLEDs(); // This function, defined below, turns all LEDs off... leds.show(); // ...but the LEDs don't actually update until you call this. } void loop() { for (idx = 6; idx <= 11; idx++) { itemIndex = idx - 6; if (states[itemIndex] == 0 && touch.getTouched(idx) == 1) { touch.playMIDINote(midiNotes[itemIndex], 100, 1); states[itemIndex] = 1; } else if (states[itemIndex] == 1 && touch.getTouched(idx) < 1) { states[itemIndex] = 0; } } if (touch.getTouched(0) == 1) { midiNotes[0] = 43; midiNotes[1] = 48; midiNotes[2] = 52; midiNotes[3] = 55; midiNotes[4] = 60; midiNotes[5] = 64; for (int i=0; i<LED_COUNT; i++) { rainbow(i); delay(10); // Delay between rainbow slides } } else if (touch.getTouched(1) == 1) { midiNotes[0] = 45; midiNotes[1] = 50; midiNotes[2] = 54; midiNotes[3] = 57; midiNotes[4] = 62; midiNotes[5] = 66; for (int i=0; i<LED_COUNT; i++) { rainbow(i); delay(10); // Delay between rainbow slides } } else if (touch.getTouched(2) == 1) { midiNotes[0] = 43; midiNotes[1] = 47; midiNotes[2] = 52; midiNotes[3] = 55; midiNotes[4] = 59; midiNotes[5] = 64; for (int i=0; i<LED_COUNT; i++) { rainbow(i); delay(10); // Delay between rainbow slides } } else if (touch.getTouched(3) == 1) { midiNotes[0] = 45; midiNotes[1] = 48; midiNotes[2] = 53; midiNotes[3] = 57; midiNotes[4] = 60; midiNotes[5] = 65; for (int i=0; i<LED_COUNT; i++) { rainbow(i); delay(10); // Delay between rainbow slides } } else if (touch.getTouched(4) == 1) { midiNotes[0] = 47; midiNotes[1] = 50; midiNotes[2] = 55; midiNotes[3] = 59; midiNotes[4] = 62; midiNotes[5] = 67; for (int i=0; i<LED_COUNT; i++) { rainbow(i); delay(10); // Delay between rainbow slides } } else if (touch.getTouched(5) == 1) { midiNotes[0] = 45; midiNotes[1] = 48; midiNotes[2] = 52; midiNotes[3] = 57; midiNotes[4] = 60; midiNotes[5] = 64; for (int i=0; i<LED_COUNT; i++) { rainbow(i); delay(10); // Delay between rainbow slides } } else { leds.begin(); // Call this to start up the LED strip. clearLEDs(); // This function, defined below, turns all LEDs off... leds.show(); // ...but the LEDs don't actually update until you call this. } } void clearLEDs() { for (int i=0; i<LED_COUNT; i++) { leds.setPixelColor(i, 0); } } // Prints a rainbow on the ENTIRE LED strip. // The rainbow begins at a specified position. // ROY G BIV! void rainbow(byte startPosition) { // Need to scale our rainbow. We want a variety of colors, even if there // are just 10 or so pixels. int rainbowScale = 192 / LED_COUNT; // Next we setup each pixel with the right color for (int i=0; i<LED_COUNT; i++) { // There are 192 total colors we can get out of the rainbowOrder function. // It'll return a color between red->orange->green->...->violet for 0-191. leds.setPixelColor(i, rainbowOrder((rainbowScale * (i + startPosition)) % 192)); } // Finally, actually turn the LEDs on: leds.show(); } // Input a value 0 to 191 to get a color value. // The colors are a transition red->yellow->green->aqua->blue->fuchsia->red... // Adapted from Wheel function in the Adafruit_NeoPixel library example sketch uint32_t rainbowOrder(byte position) { // 6 total zones of color change: if (position < 31) // Red -> Yellow (Red = FF, blue = 0, green goes 00-FF) { return leds.Color(0xFF, position * 8, 0); } else if (position < 63) // Yellow -> Green (Green = FF, blue = 0, red goes FF->00) { position -= 31; return leds.Color(0xFF - position * 8, 0xFF, 0); } else if (position < 95) // Green->Aqua (Green = FF, red = 0, blue goes 00->FF) { position -= 63; return leds.Color(0, 0xFF, position * 8); } else if (position < 127) // Aqua->Blue (Blue = FF, red = 0, green goes FF->00) { position -= 95; return leds.Color(0, 0xFF - position * 8, 0xFF); } else if (position < 159) // Blue->Fuchsia (Blue = FF, green = 0, red goes 00->FF) { position -= 127; return leds.Color(position * 8, 0, 0xFF); } else //160 <position< 191 Fuchsia->Red (Red = FF, green = 0, blue goes FF->00) { position -= 159; return leds.Color(0xFF, 0x00, 0xFF - position * 8); } }[/mw_shl_code] 作者其它帖子 ◆ 乐高积木遇见麦克纳姆轮——动手搭建一辆麦克纳姆轮小车 https://mc.dfrobot.com.cn/thread-296783-1-1.html ◆ 小尚,别跟丢了!——自动跟随的麦克纳姆轮小车 https://mc.dfrobot.com.cn/thread-296803-1-1.html ◆ 来吧!一起动手制作一台架子鼓 https://mc.dfrobot.com.cn/thread-289948-1-1.html ◆ 炫彩电子钢琴的设计与制作 https://mc.dfrobot.com.cn/thread-280116-1-1.html ◆ [micro:bit×OBLOQ物联网挑战赛第三轮] 坐姿矫正仪 https://mc.dfrobot.com.cn/thread-269139-1-1.html ◆ 【挑战2】基于物联网的智能闸道、人数统计与安全预警系统 https://mc.dfrobot.com.cn/thread-268643-1-1.html ◆ 物联网比赛第一关:远程监测温度和亮度 https://mc.dfrobot.com.cn/thread-268162-1-1.html ◆ 来来来,让我们一起来打地鼠! https://mc.dfrobot.com.cn/thread-268413-1-1.html |


 沪公网安备31011502402448
© 2013-2026 Comsenz Inc. Powered by Discuz! X3.4 Licensed

 置顶卡
置顶卡 变色卡
变色卡 千斤顶
千斤顶
 宣传大使
宣传大使
 牛X认证
牛X认证
 创作达人
创作达人
 蘑菇老人
蘑菇老人
 荣誉教师
荣誉教师
 编辑选择奖
编辑选择奖


