Latest Linux Distributions on LattePanda and Kernel Customization
前言 Preface
原创文章,转载引用请务必注明链接,水平有限,如有疏漏,欢迎指正。从此以后,尽量使用双语,英语水平有限,贻笑大方,万事开头难。
有时候买到心仪的东西,特别盼着早点到货,然后隔一会就去打开手机客户端刷新一下查看快递信息,时间久了浪费生命,所以想着用电脑帮我查,有变动告诉我。
[TOC]
软硬件环境:
LattePanda、Python3.8、Arduino 18.12、Lubuntu 20.04。
本项目将分为三个部分:
- Latest Linux Distributions on LattePanda and Kernel Customization | 为LattePanda安装Ubuntu 20.04并重新编译优化内核
- Core Code to Track the Packages | 包裹监视追踪项目的核心代码
- Additional Features like Tracking People with Wifi Using Kismet | 额外功能例如识别人在旁边时的智能化动作
本项目预计实现以下功能Features:
- 网页前端添加待监视信息
- 查询的所有快递历史记录
- 自定义查询频率
- 快递信息变动时微信通知
- 人在家中时额外LED、Speaker、Dashboard等提醒
本项目后期准备添加以下功能TODO:
-
使用微信等添加待监视快递信息,或者小程序
-
添加中文语音播报
-
整合进Home Assisant Dashboard
最后可以了解到的知识包括:
- Install and setup latest Ubuntu for LattePanda | 在LattePanda上安装配置最新版Ubuntu
- Interaction between MPU and MCU on LattePanda with Firmata protocol | LattePanda上Linux和Arduino使用Firmata协议进行交互
- Python GUI Programming with remi | Python图形化编程(使用remi)
- Usage of TinyDB——a lightweight database 破折号还是逗号?| 介绍轻量级数据库TinyDB的使用
- Wechat notification via ServerChan | 使用Server酱实现微信通知功能
- Tracking people with wifi using kismet | 使用Kismet识别人是否在旁边
- Using Kismet REST-like API | 使用Kismet的API
- Text To Speech with Python | 语音合成播报
- Home Assistant | HA的一些整合与应用
本文为第一部分。看到社区的活动,觉得很有趣,加上有个Intel 和 DFRobot合办的活动,需要Intel CPU,我的是AMD CPU,也没有神经开发棒,然后拿出LattePanda(以下称胖哒) 作为可行性验证。基板准备用LattePanda v1,系统准备转成Linux,方便开发。安装Linux的过程中发现一些问题,本文分享相关经验。另外LattePanda Alpha / Delta 相关架构类似,一些内容也有参考价值。
1. 准备
为什么要使用Linux | Why do we prefer to use Linux
Linux可定制化更高,用来开发更熟悉。
选择Ubuntu还是Mint | Ubuntu or Mint: which one to choose?
Mint 最新版基于Ubuntu 18.04,pass。但不喜欢Ubuntu的Unity桌面,加上LattePanda性能捉襟见肘,所以我们选择使用比较轻量级的LXQt桌面(之前是LXDE,使用Qt重写)的Lubuntu,基于openbox,能看到遗留。感兴趣的也可以看看来自TW的LXQt开发者洪任諭醫師的一些介绍:一、二。
1.1 现状
通过网上冲浪可知,目前关于在LattePanda上运行Linux有以下信息:
Caution:
以上三个都有一个共同的特点:OUTDATED。我们需要更好的软硬件兼容性以及主流的Linux版本和内核支持。当然,从以上还是能获得一些有价值的信息,也就是我们需要解决的问题。
1.2 面临的问题
- rtl8723bs wifi & bluetooth driver
- HDMI audio output issue
- Goodix touch panel dirver
- PWM? 这个我暂时不知道啥问题
1.3 探索
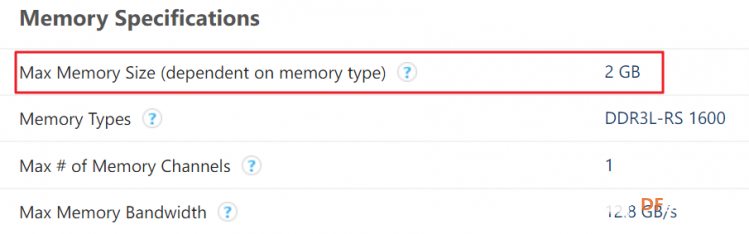
为啥LattePanda有上述问题要解决呢,主要和胖哒采用的Intel Atom x5 z8350 CPU有关,其规格如下:
Intel Atom x5 z8350, (Code Name: Cherry Tail, Original Target: Lightweight tablets / High-end Smartphones. Microarchitectures: Airmont——the 14 nm die shrink of Silvermont, more info, Via), remember that there is no avx instruction set supported, therefore, recompile is need to run newer version of Tensorflow.
原来z8350设计用于Windows平板以及手机,并没有考虑Linux兼容性,所以有很多问题,特别是驱动上,总结起来有以下:
- 无线和蓝牙功能:使用RTL8723BS模块,SDIO接口,2.4GHz 802.11bgn,bt4.0,RealTek官网仅提供了Windows驱动
- 触摸屏:使用Goodix gt911 方案
甚至默认最大仅支持2GB内存,不过国内魔改支持4GB,但是据说内存带宽也减半。
在Linux Kernel 4.12之前,需要手动安装RTL8723BS模块的驱动,但是Since Linux 4.12, rtl8723bs has been merged,这就很像早几年在树莓派上使用小米随身wifi(mt7601u芯片),最初需要自己编译安装驱动,后来也合并到内核里开箱即用了,可以看到mop的内核还是4.11。
Caution:
采用z8350的设备有很多,比如Lenovo Miix 310 和Chuwi Hi10 Pro,其中联想的miix310属于笔记本,更接近胖哒的使用情景。
参考链接:
1.4 发现
字里行间我们发现两个东西:Ian Morrison's isorespin.sh 和kernel_gcc_patch。
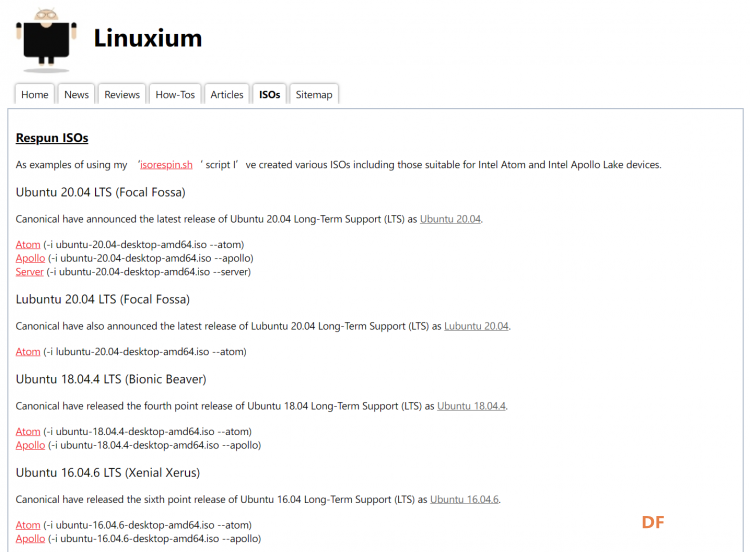
1.4.1 isorespin.sh
项目主页和工具介绍。
简而言之,就是使用Intel Bay Trail 和 Cherry Trail处理器的设备安装Linux会遇到一些兼容性问题,特别是HDMI输出、系统假死以及无线驱动,Linux 4.11 解决了HDMI音频输出和系统假死的问题,4.12解决了无线驱动的问题。而Ian Morrison(Linuxium)则更进一步,开发了isorespin.sh这个工具,可以制作适合上述CPU的带有Linux Mainline内核的新版Ubuntu ISO安装镜像。另外Ian也是 cnx-software网站的作者之一。——Via
我们使用该脚本来定制化Linux系统,而且作者有做好的最新系统镜像可供下载。目前支持自定义64bit Ubuntu、Ubuntu Flavoured、LinuxMint等等。
该脚本针对Intel Atom处理器做了如下改进:
- Add a GRUB 32-bit bootloader to allow ISOs to boot on the many Intel Atom devices limited by their BIOS.
- Add functionality to boot ISOs on any Intel Apollo device regardless of the BIOS settings.
- Upgrade the kernel to the latest mainline version or to a specific version to benefit from recent patch functionality e.g. for audio and wifi/bluetooth or to use a rolling (HWE) kernel.
- Add (or remove) repositories, software packages, scripts and files to allow the installation of firmware and favourite programs.
- Preseed or perform set-up commands and scripts and also change system defaults and kernel boot parameters.
- Add persistence so that the ISO can retain data, installed software packages and settings across reboots.
- Create a server ISO that works on both 32-bit and 64-bit bootloaders found on various low cost Intel Atom mini PCs or one that works on the more recent Apollo and Gemini Lake mini PCs..
--atom include the flags, packages, scripts and commands that I recommend when respinning an ISO for a device with an Intel Atom (Bay Trail or Cherry Trail) processor and mirrors the manual invocations of '-l rtl8723bX_4.12.0_amd64.deb -f linuxium-install-UCM-files.sh -f wrapper-linuxium-install-UCM-files.sh -f linuxium-install-broadcom-drivers.sh -f wrapper-linuxium-install-broadcom-drivers.sh -c wrapper-linuxium-install-UCM-files.sh -c wrapper-linuxium-install-broadcom-drivers.sh'.
关于HWE内核可以参考《为 Ubuntu LTS 安装 HWE 以获取更新的内核与图形支持》。
遇着宝了,似乎我们的问题都可以一揽子解决,是否真的可以高枕无忧呢?这里下载Lunbutu 20.04 LTS Atom。
1.4.2 kernel_gcc_patch
项目主页 | Kernel patch enables gcc optimizations for additional CPUs.
由于Atom x5-8350和Celeron N4100相对性能比较低,操作系统默认会使用generic内核,着眼于兼容性普适性,就是安装好之后大多数的硬件都可以运行起来。所以我们可以针对性地重新编译内核,以期获得更高的性能。另外本项目也支持Celeron N4100 (Intel Goldmont Plus family of low-power Atom processors——Gemini Lake)。

注意这里是我理解错了,generic是实时性方面的东西,具体见参考链接所述
2. 整活
2.1 Install Lubuntu Customized for Cherry Trail CPU
制作安装U盘
- 我用
balenaEtcher将作者ISO安装镜像烧录到U盘上,插上制作好的U盘(不支持从mSD卡启动),开机按ESC或者Del进入到bios,更改boot设置即可,忘记看是不是 默认U盘启动顺序最高了,大家可以试试。
- 可以从清华镜像站下载原版镜像以供定制。
硬盘分区
- esp分区 | 必须要有,100MB就行,flag: boot
- root分区,xfs文件系统,反正ext4不是emmc的最优解,后续还要改改默认调度模式
- swap,根据内存大小,2-4G选择1:1即可。我这里4G。
插电!启动!
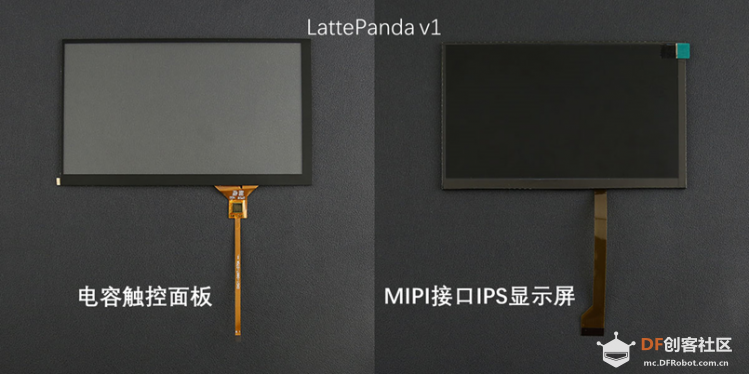
我是插HDMI连接显示器,不是用的MIPI接口的显示屏(以下称IGD, 内置图形显示),然后显示器上只有壁纸没有图标和任务栏,原来主输出跑到没连接的IGD上了。这整的真的是。。。盲开终端,然后输入sudo poweroff先关上机,然后插上显示屏和触控面板,发现触控面板没反应。
 #### 2.2 Post-Installation Setup
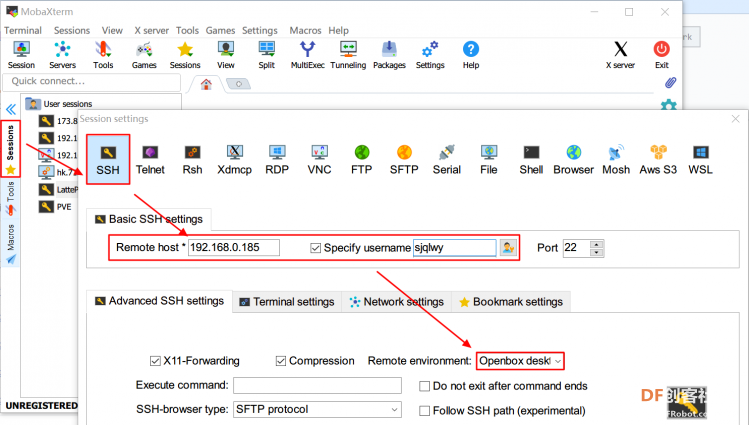
好的,目前需要测试上面提到的问题以及解决HDMI输出和触控面板的问题。先插上专用IPS屏,设置HDMI为主输出,然后安装OpenSSH,我们通过MobaXterm连接到LP,具体可以参考我的文章《忘掉VNC/RDP,拿起手中的MobaXterm轻松上手远程桌面》。
安装必要的软件:
sudo apt install openssh-server tmux
2.2.1 测试无线、蓝牙、音频输出功能
我们下载的是作者为atom处理器制作的镜像,根据isorespin.sh使用介绍:
--atom include the flags, packages, scripts and commands that I recommend when respinning an ISO for a device with an Intel Atom (Bay Trail or Cherry Trail) processor and mirrors the manual invocations of '-l rtl8723bX_4.12.0_amd64.deb -f linuxium-install-UCM-files.sh -f wrapper-linuxium-install-UCM-files.sh -f linuxium-install-broadcom-drivers.sh -f wrapper-linuxium-install-broadcom-drivers.sh -c wrapper-linuxium-install-UCM-files.sh -c wrapper-linuxium-install-broadcom-drivers.sh'.
也就是安装了rtl8723bs的无线蓝牙固件,注意有些是系统带驱动driver但是不带正确的固件firmware,也不能正确使用。增加了音频输出的UCM文件。
我们来测试一下:
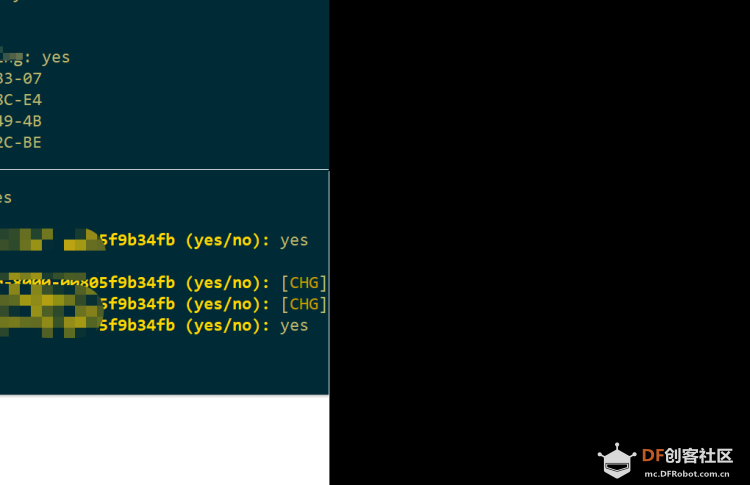
蓝牙部分使用bluetoothctl,参考https://wiki.archlinux.org/index.php/Bluetooth#Console,成功连上了我的手机
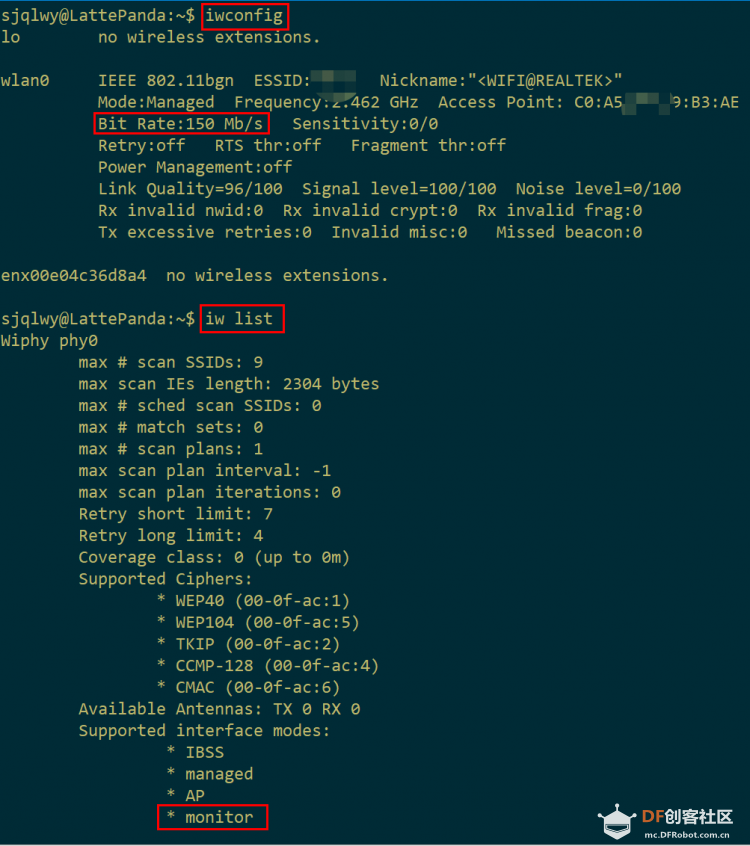
无线部分可以用iwconfig、iw list等命令,可以看到该无线网卡支持``monitor模式,为我们下面使用kismet进行无线嗅探提供了硬件基础,关于无线网卡的介绍可以参考我的文章:UP Board USB无线网卡选购指南。
连接无线网络 CLI
了解一番发现使用的是networkmanager,图形化很好弄,CLI的话就是nmcli:
$ nmcli device status
DEVICE           TYPE      STATE         CONNECTION
wlx001f1fa92b87  wifi      connected     nww
wlan0            wifi      disconnected  --
$ nmcli device wifi list ifname wlan0
$ sudo nmcli device wifi connect nww password PASSWORD ifname wlan0
以上命令即可,注意改成你的无线网络名称SSID和密码。具体可以参考nm操作指南。
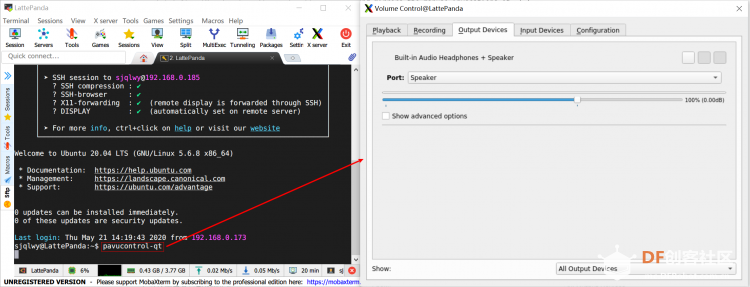
声音输出的话,LXQt桌面自带的任务栏右下角调节widget支持不好,使用的是pavucontrol进行控制,图形菜单栏里也有,实测HDMI音频输出和3.5mm都正常。
其他相关命令:
dmesg | grep XXX
lsmod | grep XXX
lshw
lsusb
lspci
2.2.2 默认输出设置为HDMI
这个很头疼,我是先用专用屏上去连无线网安装ssh server后从SSH里面暂时用。虽然进入桌面后手动更改主/副输出后,可以正常使用,但是重启还是一个样,所以干脆关闭IGD输出。
查看How to Disable Internal Display from BIOS?,官方说的BIOS->"Chipset"->"North Bridge"->"IGD - LCD Control"->"Force Lid Status"->"Off"没用,最后参考k3dAR的回帖解决: add kernel parameter: video=DSI-1:d
怎么做到的呢?查看archwiki的Kernel parameters页面:
sudo nano /etc/default/grub
# 在GRUB_CMDLINE_LINUX_DEFAULT这行处”前添加video=DSI-1:d
# 例如GRUB_CMDLINE_LINUX_DEFAULT="quiet splash resume=UUID=cb38daad-4618-4b36-98de-1915abb168cf video=DSI-1:d"
# 重新生成grub.cfg文件
sudo grub-mkconfig -o /boot/grub/grub.cfg
# TODO:使用sed进行更改
重启生效,想要启用IGD,步骤同上,删除添加的那句话。如果我们想要生成默认关闭IGD的镜像,参考isorespin.sh的介绍,添加grub内容,生成iso镜像参数为isorespin.sh -i xxx.iso --atom -g "video=DSI-1:d"
2.2.3 解决触控面板驱动问题
安装之后主要功能正常,但是触摸屏不行,以为是我没插好,试了好几次都一样,使用xinput list命令没看到,使用dmesg | grep Goodix可以看到识别了一个设备,但是没有正确驱动;进系统使用lsmod goodix也有加载,怀疑是驱动不正确问题。
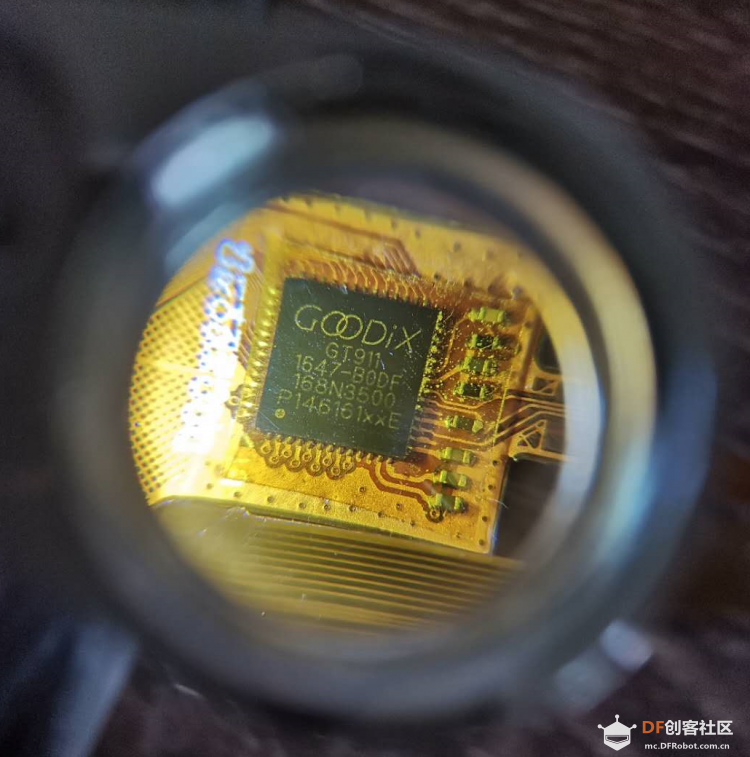 可以看到触控面板主控芯片为
Goodix GT911
dmesg | grep goodix # 能识别到设备,但是有报错
lsmod # 我不记得输出什么样的,大家可以自己瞅瞅
xinput list # 识别不到Goodix Capacitive TouchScreen
参考以下内容,可以发现Goodix驱动确实存在问题。而且在Linux内核里能看到GT911相关内容,很困惑。
放狗一搜,找到了这个:Goodix Touchscreen Linux Driver,实测可用。
# 编译驱动
git clone https://gitlab.com/AdyaAdya/goodix-touchscreen-linux-driver
cd goodix-touchscreen-linux-driver
make
# 测试驱动(删除原驱动并加载刚编译的驱动),我这里成功
sudo su
rmmod goodix
insmod goodix.ko
# 安装驱动
xz goodix.ko
mv goodix.ko.xz /lib/modules/$(uname -r)/kernel/drivers/input/touchscreen/goodix.ko.xz
重启之后可用。
完整的debug命令:
  $ dmesg | grep -i goodix
  $ cat /proc/bus/input/devices | grep -B 1 -A 8 -i goodix
  # libinput list-devices | grep -A 17 -i goodix
  # libinput debug-events
  $ xinput list
前文说过针对Atom X5 z8350重新编译内核,可以些许提高性能,现在就来实际操作一番。
sjqlwy@LattePanda:~$ uname -a
Linux LattePanda 5.6.8 #1 SMP Sat May 2 23:36:54 CST 2020 x86_64 x86_64 x86_64 GNU/Linux
sjqlwy@LattePanda:~$ cat /proc/version
Linux version 5.6.8 (sjqlwy@LattePanda) (gcc version 9.3.0 (Ubuntu 9.3.0-10ubuntu2)) #1 SMP Sat May 2 23:36:54 CST 2020

这是我在LattePanda上为它自己编译的内核,不带genetic字样。编译花了一个多小时?建议在其他性能更强的电脑上进行编译。
2.3.1 下载源码并打上补丁
打开Linux Kernel网站可以看到最新的Stable版是5.6.x,下载下来备用。建议阅读Linux内核版本介绍与查询。Ubuntu自带的内核讲究一个通用性,所以我们使用patch来针对z8350重新编译内核,以期获得更好的性能。好在已经有人做了,并且进行了日常维护,移步:kernel_gcc_patch。
| CPU Family |
GCC Optimization |
| Intel Silvermont family of low-power Atom processors |
-march=silvermont |
| Intel Goldmont family of low-power Atom processors (Apollo Lake and Denverton) |
-march=goldmont |
| Intel Goldmont Plus family of low-power Atom processors (Gemini Lake) |
-march=goldmont-plus |
教程使用silvermont,怎么没看到我们需要的Cherry Trail ,这些代码都是啥意思?查找Intel Atom的相关Wiki,了解到如下内容。
- Cherry Trail、Apollo Lake、Gemini Lake等是Code Name开发代号
- Silvermont、Goldmont、Airmont等是CPU微架构
- 微架构下又有子集,例如Airmont是Silvermont的子集,Goldmont Plus是的子集
- Goldmont Plus——Gemini Lake——Celeron N4100(Mobile processors)
- Airmont——Cherry Trail ——Atom X5 z8350(consumer SoCs aimed at tablets)
- Airmont is the 14 nm die shrink of Silvermont(22 nm)
2.3.2 编译内核
-
这里我们下载enable_additional_cpu_optimizations_for_gcc_v9.1+_kernel_v5.5+.patch(5.6)放到Linux源码所在文件夹里。
-
This patch works with gcc versions 9.1+ and with kernel version 5.5+ and should
NOT be applied when compiling on older versions of gcc due to key name changes
of the march flags introduced with the version 4.9 release of gcc
-
如果使用Ubuntu 20.04则编译环境gcc版本、kernel版本都满足,否则需要进行设置
-
patch -p1 < PATCH_NAME.patch 会报错
sudo apt-get install gcc make libncurses5-dev libssl-dev bison flex libelf-dev
patch -Np1 -i /path/to/patch
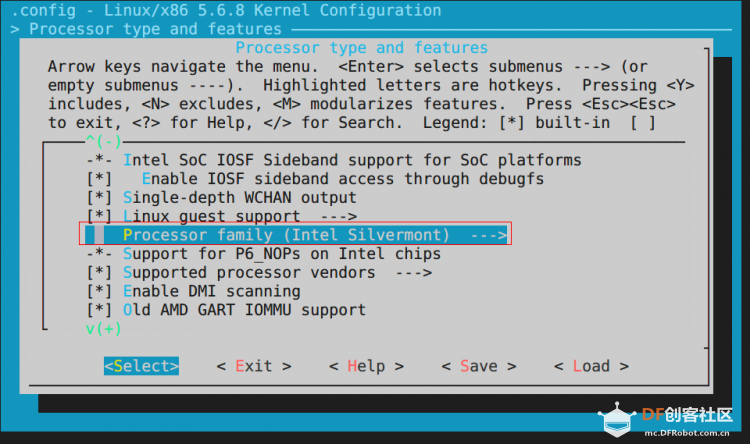
make menuconfig
此时在 "Processor type and features -> Processor family"中可以选择 "Intel Silvermont family of low-power Atom processors (Silvermont)"了。
make -j4 bindeb-pkg # 编译内核,根据机器性能大约需要20m-2h不等
sudo dpkg -i linux*.deb # 安装编译好的内核,会自动设置grub
重启即可看到已经启用了新的内核。
参考:
2.3.3 番外1 升级gcc
上面讲到使用该补丁需要gcc 9.1以上,但是我在我的其他机器上(Ubuntu 18.04 LTS)可以看到默认安装的是gcc 7.5,这将导致安装失败。
ubuntu@VM-126-41-ubuntu:~$ gcc --version
gcc (Ubuntu 7.5.0-3ubuntu1~18.04) 7.5.0
尝试过ubuntu-make,backports源等方法后,参考如何在 Ubuntu 18.04 LTS 系统中安装多版本 GCC 编译器的PPA源方法,完美。
你正在运行 Debian稳定版 因为你更偏好选择 Debian 稳定版分支。它运行得很好,但是只有一个问题:与其他发行版相比,它的软件有一点过时了。这便是 backports 出现的原因。
root@build-server:~# gcc --version
gcc (Ubuntu 9.3.0-11ubuntu0~18.04.1) 9.3.0
# Ubuntu 20.04 不存在该问题
sjqlwy@LattePanda:~$ gcc --version
gcc (Ubuntu 9.3.0-10ubuntu2) 9.3.0
2.3.4 番外2 阻止apt更改内核
我们运行apt upgrade时会提醒你安装generic内核,我们使用apt-mark命令来阻止这一行为。
apt list --installed
dpkg-query -l # 输出更清晰
apt-mark hold <pkg> # 将<pkg>改为apt upgrade里提示的所有内核相关的包
apt-mark unhold <pkg>
apt-mark showhold
参考:
2.3.5 docker 支持
参考DIY NAS Project (2) Docker and ownCloud以及上文Miix 310的设置来配置内核编译参数
2.3.6 TODO
3. 总结
最终我们比较完美地在LattePanda上安装了Lunbutu 20.04,解决了BT/Wifi/Audio Output/Touch Panel以及IGD的问题,并使用优化内核提高了LP的性能,后续有时间的话可以自己定制适合LP的ISO镜像,包括:
- 默认关闭内置输出,采用HDMI输出信号
- 优化过的内核,支持Docker,更好的性能
- 预装触摸屏驱动
- 更改io调度和添加更多文件系统支持
- 预装SSH Server
4、Reference | 参考

 萌萌哒新人
萌萌哒新人
 活跃会员
活跃会员
 宣传大使
宣传大使
 版主限定
版主限定
 牛X认证
牛X认证
 老版主限定
老版主限定
 创作达人
创作达人
 小蘑菇
小蘑菇
 编辑选择奖
编辑选择奖
 ARD DAY
 编辑选择奖
编辑选择奖
 摸鱼团员
摸鱼团员
 编辑选择奖
编辑选择奖
 志“童”道合
 编辑选择奖
编辑选择奖
 编辑选择奖
编辑选择奖
 编辑选择奖
编辑选择奖


 沪公网安备31011502402448
 置顶卡
置顶卡 变色卡
变色卡 千斤顶
千斤顶


