本帖最后由 云天 于 2021-12-3 23:02 编辑
【项目背景】
要说燃脂运动,相信很多人首先会想到“波比跳”,当然啦对于很多新手来说做波比跳并不是特别的容易,所以他们就会选择一种相对比较简单但效果同样很不错的——开合跳!长时间锻炼,需要毅力坚持。但也可以让枯燥的运动,变的有乐趣。今天这个项目让人工智能陪我们一起快乐健身。
【项目设计】
使用Mind+Python模式下加载Google的开源Mediapipe人工智能算法库,识别人体姿态,利用动作中两臂与躯体的夹角及两腿夹角的变化来判断开合跳次数,并通过Pinpong库控制LED灯实时显示次数。
其中使用到了Python文件操作功能,边制作边学习。
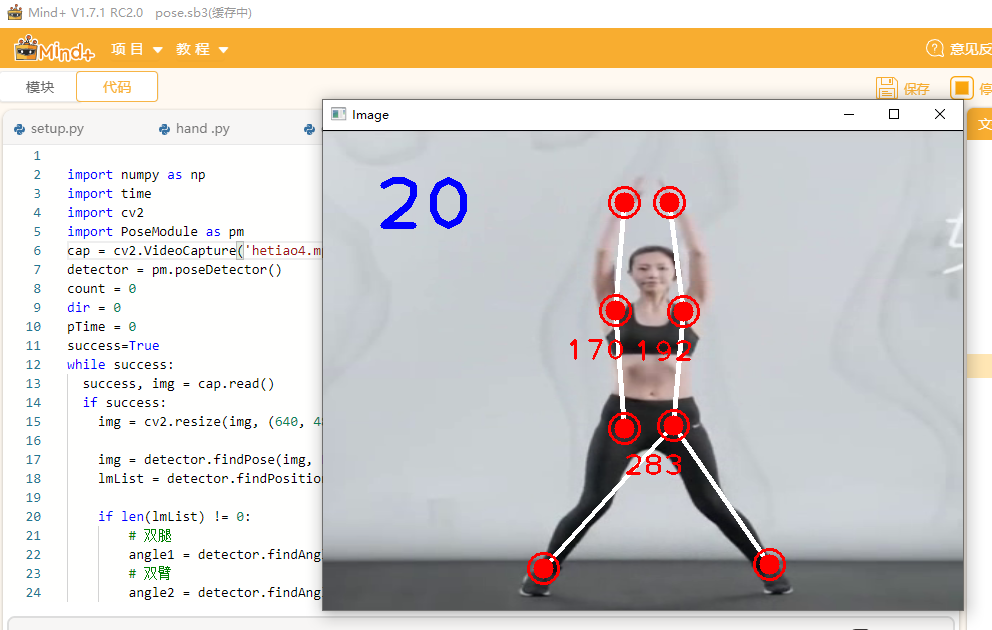
【测试程序】
使用网络视频进行合跳测试,标注关键信息点。
-
- import numpy as np
- import time
- import cv2
- import PoseModule as pm
- cap = cv2.VideoCapture('hetiao4.mp4')
- detector = pm.poseDetector()
- count = 0
- dir = 0
- pTime = 0
- success=True
- while success:
- success, img = cap.read()
- if success:
- img = cv2.resize(img, (640, 480))
-
- img = detector.findPose(img, False)
- lmList = detector.findPosition(img, False)
-
- if len(lmList) != 0:
- # 双腿
- angle1 = detector.findAngle(img, 28, 23, 27)
- # 双臂
- angle2 = detector.findAngle(img, 15, 11, 23)
- angle3 = detector.findAngle(img, 16, 12, 24)
- print(angle1,angle2,angle3)
-
- cTime = time.time()
- fps = 1 / (cTime - pTime)
- pTime = cTime
- cv2.putText(img, str(int(fps)), (50, 100), cv2.FONT_HERSHEY_PLAIN, 5,(255, 0, 0), 5)
- cv2.imshow("Image", img)
- cv2.waitKey(1)
- cap.release()
- cv2.destroyAllWindows()
【获取标准数据】
通过对标准动作检测,获取动作标准数据,并存储在数据文件中。
-
-
-
- import numpy as np
- import time
- import cv2
- import PoseModule as pm
- import os,sys
- cap = cv2.VideoCapture('ht.mp4')
- detector = pm.poseDetector()
- count = 0
- dir = 0
- pTime = 0
- success=True
- angle1=[]
- angle2=[]
- angle3=[]
- def max_min(a):
- h = []
- l = []
-
- for i in range(1, len(a)-1):
- if(a[i-1] < a[i] and a[i+1] < a[i]):
- h.append(a[i])
- elif(a[i-1] > a[i] and a[i+1] > a[i]):
- l.append(a[i])
- if(len(h) == 0):
- h.append(max(a))
- if(len(l) == 0):
- l.append(min(a[a.index(max(a)):]))
-
- print(int(np.mean(h)),int(np.mean(l)))
- return(int(np.mean(h)),int(np.mean(l)))
- while success:
- success, img = cap.read()
- if success:
- img = cv2.resize(img, (640, 480))
-
- img = detector.findPose(img, False)
- lmList = detector.findPosition(img, False)
-
- if len(lmList) != 0:
- # 双腿
- angle1.append( detector.findAngle(img, 28, 23, 27))
- # 双臂
- angle2.append( detector.findAngle(img, 15, 11, 23))
- angle3.append( detector.findAngle(img, 16, 12, 24))
-
-
- cTime = time.time()
- fps = 1 / (cTime - pTime)
- pTime = cTime
- cv2.putText(img, str(int(fps)), (50, 100), cv2.FONT_HERSHEY_PLAIN, 5,(255, 0, 0), 5)
- cv2.imshow("Image", img)
- cv2.waitKey(1)
- a1,b1=max_min(angle1)
- a2,b2=max_min(angle2)
- a3,b3=max_min(angle3)
- fo = open("data.txt", "w")
- fo.write(str(a1)+","+str(b1)+","+str(a2)+","+str(b2)+","+str(a3)+","+str(b3))
- # 关闭文件
- fo.close()
- cap.release()
- cv2.destroyAllWindows()
-
-
调用函数计算出两臂、两腿夹角的最大角度和最小角度,并通过文件操作将数据写入“data.txt”文件中。
-
- a1,b1=max_min(angle1)
- a2,b2=max_min(angle2)
- a3,b3=max_min(angle3)
- fo = open("data.txt", "w")
- fo.write(str(a1)+","+str(b1)+","+str(a2)+","+str(b2)+","+str(a3)+","+str(b3))
【开合跳计数程序】
1、读取标准数据文件,并将数据转换为列表
-
- from pathlib import Path
- import sys
- my_file = Path("data.txt")
- if not my_file.is_file():
- print("没有标准数据文件")
- sys.exit()
- else:
- f = open("data.txt",encoding = "utf-8")
- data=f.read()
- data=data.split(",")
- f.close()
2、利用标准数据对动作进行判定,是否完成一次完整动作,并在屏幕显示
-
- # 双腿夹角
- angle1 = detector.findAngle(img, 28, 23, 27)
- # 双臂与躯干夹角
- angle2 = detector.findAngle(img, 15, 11, 23)
- angle3 = detector.findAngle(img, 16, 12, 24)
- #print(angle1,angle2,angle3)
- per1 = np.interp(angle1, (int(data[1]), int(data[0])), (0, 100))
- per2 = np.interp(angle2, (int(data[3]), int(data[2])), (100, 0))
- per3 = np.interp(angle3, (int(data[5]), int(data[4])), (0, 100))
- light = int(np.interp(angle1, (220, 310), (119, 0)))
- # print(angle, per)
- # 计算个数
- per=per1+per2+per3
- #print(per1,per2,per3)
- if per == 300:
-
- if dir == 0:
- count += 0.5
- dir = 1
- if per == 0:
-
- if dir == 1:
- count += 0.5
- dir = 0
- #print(count)
- cv2.putText(img, str(int(count)), (45, 460), cv2.FONT_HERSHEY_PLAIN, 7,(255, 0, 0), 8)
【LED炫灯显示计数】
1、Pinpong库初始化- from pinpong.board import Board,Pin,NeoPixel
- NEOPIXEL_PIN = Pin.P0
- PIXELS_NUM = 120 #灯数
- Board("microbit").begin() #初始化
- npX = NeoPixel(Pin(NEOPIXEL_PIN), PIXELS_NUM)
2、亮灯显示计数
- light = int(np.interp(int(count)), (0, 120), (0, 120)))
- npX.rainbow(0,light,0,0x0000FF)
【完整程序】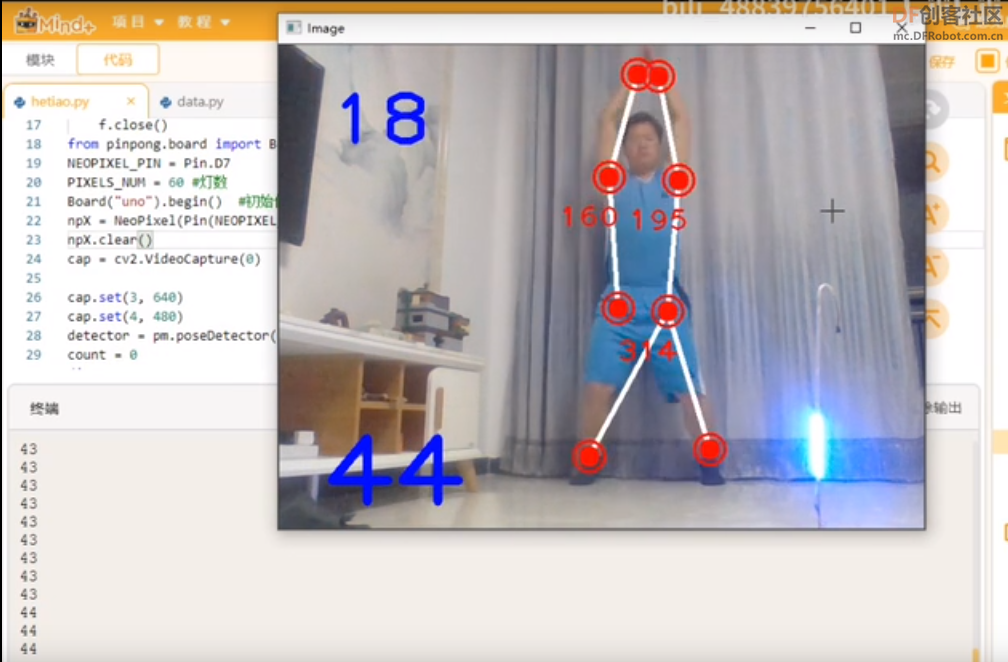
-
-
- import numpy as np
- import time
- import cv2
- import PoseModule as pm
- from pathlib import Path
- import sys
- my_file = Path("data.txt")
- if not my_file.is_file():
- print("没有标准数据文件")
- sys.exit()
- else:
- f = open("data.txt",encoding = "utf-8")
- data=f.read()
- data=data.split(",")
- f.close()
- from pinpong.board import Board,Pin,NeoPixel
- NEOPIXEL_PIN = Pin.P0
- PIXELS_NUM = 120 #灯数
- Board("microbit").begin() #初始化
- npX = NeoPixel(Pin(NEOPIXEL_PIN), PIXELS_NUM)
- cap = cv2.VideoCapture('d.mp4')
-
- cap.set(3, 640)
- cap.set(4, 480)
- detector = pm.poseDetector()
- count = 0
- dir = 0
- pTime = 0
- success=True
-
- while success:
- success, img = cap.read()
- if success:
- img = cv2.resize(img, (640, 480))
-
- img = detector.findPose(img, False)
- lmList = detector.findPosition(img, False)
-
- if len(lmList) != 0:
- # 双腿夹角
- angle1 = detector.findAngle(img, 28, 23, 27)
- # 双臂与躯干夹角
- angle2 = detector.findAngle(img, 15, 11, 23)
- angle3 = detector.findAngle(img, 16, 12, 24)
- #print(angle1,angle2,angle3)
- per1 = np.interp(angle1, (int(data[1]), int(data[0])), (0, 100))
- per2 = np.interp(angle2, (int(data[3]), int(data[2])), (100, 0))
- per3 = np.interp(angle3, (int(data[5]), int(data[4])), (0, 100))
-
- # print(angle, per)
- # 计算个数
- per=per1+per2+per3
- #print(per1,per2,per3)
- if per == 300:
-
- if dir == 0:
- count += 0.5
- dir = 1
- if per == 0:
-
- if dir == 1:
- count += 0.5
- dir = 0
- #print(count)
- light = int(np.interp(int(count)), (0, 120), (0, 120)))
- npX.rainbow(0,light,0,0x0000FF)
- cv2.putText(img, str(int(count)), (45, 460), cv2.FONT_HERSHEY_PLAIN, 7,(255, 0, 0), 8)
- cTime = time.time()
- fps = 1 / (cTime - pTime)
- pTime = cTime
- cv2.putText(img, str(int(fps)), (50, 100), cv2.FONT_HERSHEY_PLAIN, 5,(255, 0, 0), 5)
- cv2.imshow("Image", img)
- cv2.waitKey(1)
- cap.release()
- cv2.destroyAllWindows()
-
【演示视频】
【PoseModule.py】
以上文件所引用的“PoseModule.py”文件。
-
- import math
- import mediapipe as mp
- import cv2
- class poseDetector():
-
- def __init__(self, mode=False, upBody=False, smooth=True,
- detectionCon=0.85, trackCon=0.5):
-
- self.mode = mode
- self.upBody = upBody
- self.smooth = smooth
- self.detectionCon = detectionCon
- self.trackCon = trackCon
-
- self.mpDraw = mp.solutions.drawing_utils
- self.mpPose = mp.solutions.pose
- self.pose = self.mpPose.Pose(self.mode, self.upBody, self.smooth,
- self.detectionCon, self.trackCon)
-
- def findPose(self, img, draw=True):
- imgRGB = cv2.cvtColor(img, cv2.COLOR_BGR2RGB)
- self.results = self.pose.process(imgRGB)
- if self.results.pose_landmarks:
- if draw:
- self.mpDraw.draw_landmarks(img, self.results.pose_landmarks,
- self.mpPose.POSE_CONNECTIONS)
- return img
-
- def findPosition(self, img, draw=True):
- self.lmList = []
- if self.results.pose_landmarks:
- for id, lm in enumerate(self.results.pose_landmarks.landmark):
- h, w, c = img.shape
- # print(id, lm)
- cx, cy = int(lm.x * w), int(lm.y * h)
- self.lmList.append([id, cx, cy])
- if draw:
- cv2.circle(img, (cx, cy), 5, (255, 0, 0), cv2.FILLED)
- return self.lmList
- def midpoint(self,img,p1,p2,draw=True):
- x1, y1 = self.lmList[p1][1:]
- x2, y2 = self.lmList[p2][1:]
- x3=int((x1+x2)/2)
- y3=int((y1+y2)/2)
- if draw:
- cv2.circle(img, (x3, y3), 10, (0, 0, 255), cv2.FILLED)
- cv2.circle(img, (x3, y3), 15, (0, 0, 255), 2)
- point={"x":x3,"y":y3}
- return point
- def findAngle(self, img, p1, p2, p3, draw=True):
-
- # Get the landmarks
- x1, y1 = self.lmList[p1][1:]
- x2, y2 = self.lmList[p2][1:]
- x3, y3 = self.lmList[p3][1:]
-
- # Calculate the Angle
- angle = math.degrees(math.atan2(y3 - y2, x3 - x2) -
- math.atan2(y1 - y2, x1 - x2))
- if angle < 0:
- angle += 360
-
- # print(angle)
-
- # Draw
- if draw:
- cv2.line(img, (x1, y1), (x2, y2), (255, 255, 255), 3)
- cv2.line(img, (x3, y3), (x2, y2), (255, 255, 255), 3)
- cv2.circle(img, (x1, y1), 10, (0, 0, 255), cv2.FILLED)
- cv2.circle(img, (x1, y1), 15, (0, 0, 255), 2)
- cv2.circle(img, (x2, y2), 10, (0, 0, 255), cv2.FILLED)
- cv2.circle(img, (x2, y2), 15, (0, 0, 255), 2)
- cv2.circle(img, (x3, y3), 10, (0, 0, 255), cv2.FILLED)
- cv2.circle(img, (x3, y3), 15, (0, 0, 255), 2)
- cv2.putText(img, str(int(angle)), (x2 - 50, y2 + 50),
- cv2.FONT_HERSHEY_PLAIN, 2, (0, 0, 255), 2)
- return angle
-
-
|


 沪公网安备31011502402448
 置顶卡
置顶卡 变色卡
变色卡 千斤顶
千斤顶
 活跃会员
活跃会员
 宣传大使
宣传大使
 牛X认证
牛X认证
 创客造
创客造
 编辑选择奖
编辑选择奖
 志“童”道合
 编辑选择奖
编辑选择奖
 编辑选择奖
编辑选择奖
 编辑选择奖
编辑选择奖
 编辑选择奖
编辑选择奖


