本帖最后由 aramy 于 2023-8-24 16:08 编辑
上次用Arduino在vscode+platfomid下实现了读取摄像头。成功玩转这个板子,经过两天努力,也解决了死机问题。其实很简单就是开辟任务时给的内存少了!
回到这次试用任务,在申请的时候就是想实现一个目的,那就是做一个自动的宠物投放装置。当猫来了,识别猫、狗,自动投喂食物。投喂食物比较简单,用舵机控制就好。宠物的识别就比较困难,需要用到机器学习才好使。在看乐鑫的官网时,有个esp-who的项目,乐鑫有提供的在esp32上实现了机器学习的例程。其中有一个cat_face_detection的项目,就是用来识别猫脸的工程。
首先将项目拉下来,项目是在github上,想要迅速地拉下来可以使用代理,这样拉取的成功率能大大提高。
- git clone --recursive https://ghproxy.com/https://github.com/espressif/esp-who.git
如果拉取过程中出现了错误,导致部分文件夹没有拉取下来。就进入esp-who文件夹下执行
- git submodule update --init --recursive
确保各个文件夹都拉取成功。
拉取完成后,在cat_face_detection下有三个项目,lcd是在屏幕上显示,我们这个板子没有屏幕,舍弃,termianl是在终端上显示,web是通过浏览器来显示,这里我选用web的项目。
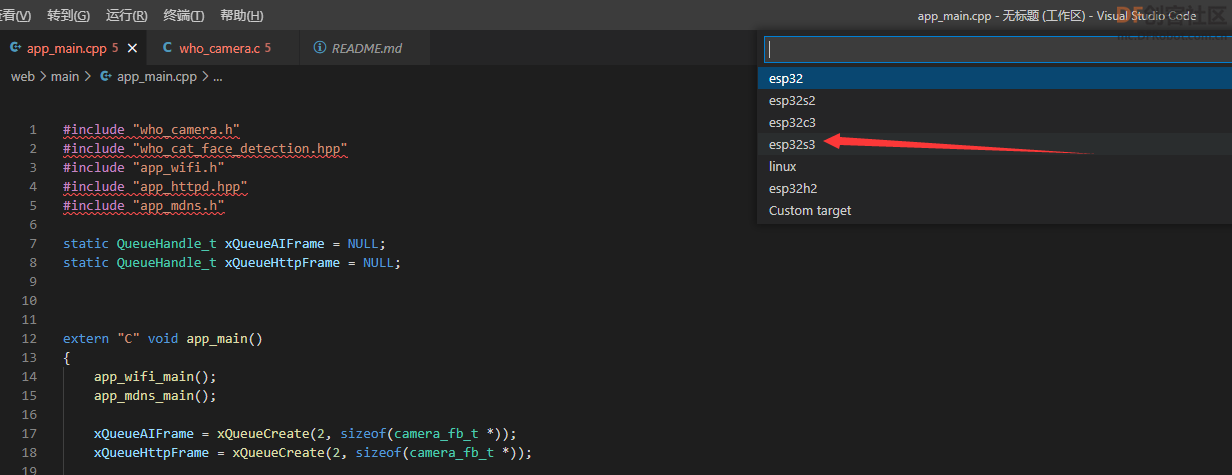
第一步,先修改设备为ESP32-S3
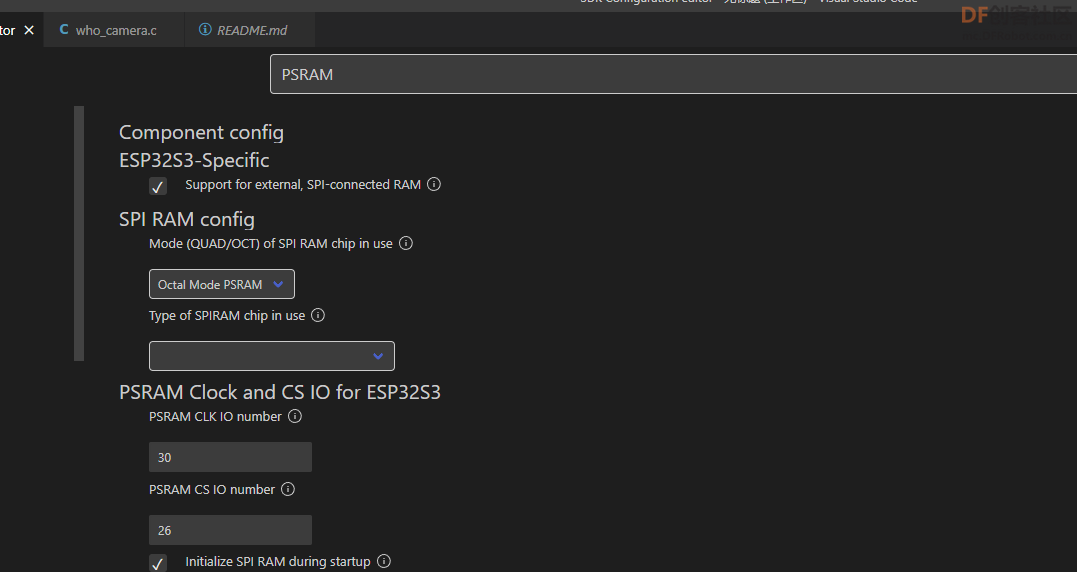
第二步,打开配置页面,修改配置项。这里要注意PSRAM项:
这里芯片类型配置错误,会导致运行时出现这样的错误。
- E (185) quad_psram: PSRAM ID read error: 0x00ffffff
- E (186) cpu_start: Failed to init external RAM!
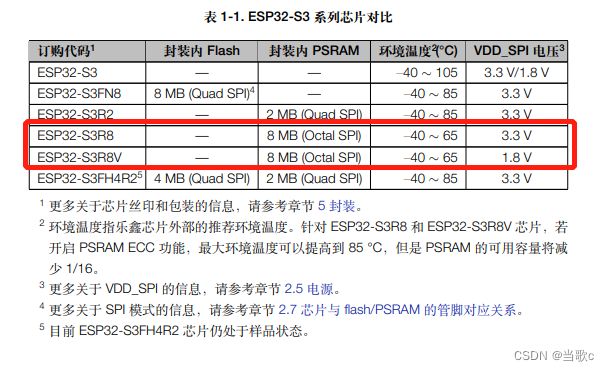
怎么查看芯片集成的PSRAM是什么模式的SPI呢?由于ESP-32S3的PSRAM是集成在封装内的,所以直接查看芯片数据手册,这里摘抄了相关的内容。
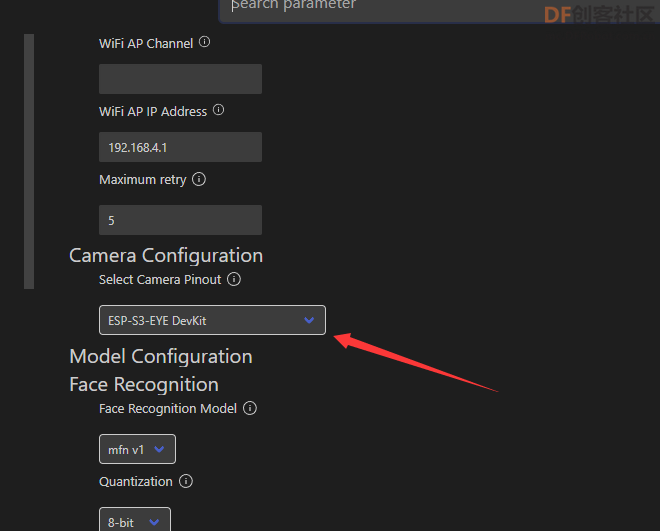
摄像头设置,我选择ESP-S3-EYE,一会就按这个板子去修改摄像头的管脚。在config页面中设置好WIFI的sid和密码。其它部分flash的大小我修改为16M,关闭了语音相关的配置。
先尝试编译,看是否能够编译成功。
编译没有问题后,来查看主函数
- static QueueHandle_t xQueueAIFrame = NULL;
- static QueueHandle_t xQueueHttpFrame = NULL;
-
-
-
- extern "C" void app_main()
- {
- app_wifi_main();
- app_mdns_main();
-
- xQueueAIFrame = xQueueCreate(2, sizeof(camera_fb_t *));
- xQueueHttpFrame = xQueueCreate(2, sizeof(camera_fb_t *));
-
- register_camera(PIXFORMAT_RGB565, FRAMESIZE_QVGA, 2, xQueueAIFrame);
- register_cat_face_detection(xQueueAIFrame, NULL, NULL, xQueueHttpFrame);
- register_httpd(xQueueHttpFrame, NULL, true);
- }
主函数非常简单,一个摄像头注册的方法,一个AI识别的方法,然后一个http服务的方法。顺着摄像头注册的方法找到components\modules\camera\who_camera.c文件。这个文件负责摄像头的初始化。
打开who_camera.h文件,修改摄像头管脚的定义。之前在配置中使用的esp32-s3-eye的配置,这里就修改这个板子对应的管脚配置。
- #elif CONFIG_CAMERA_MODULE_ESP_S3_EYE
- #define CAMERA_MODULE_NAME "ESP-S3-EYE"
- #define CAMERA_PIN_PWDN -1
- #define CAMERA_PIN_RESET -1
-
- #define CAMERA_PIN_VSYNC 6
- #define CAMERA_PIN_HREF 42
- #define CAMERA_PIN_PCLK 5
- #define CAMERA_PIN_XCLK 45
-
- #define CAMERA_PIN_SIOD 1
- #define CAMERA_PIN_SIOC 2
-
- #define CAMERA_PIN_D0 39
- #define CAMERA_PIN_D1 40
- #define CAMERA_PIN_D2 41
- #define CAMERA_PIN_D3 4
- #define CAMERA_PIN_D4 7
- #define CAMERA_PIN_D5 8
- #define CAMERA_PIN_D6 46
- #define CAMERA_PIN_D7 48
然后再回到 who_camera.c文件中,在摄像头启动前,需要先打开一下电源,否则摄像头初始化一定会失败。这里摄像头电源是一颗AXP313A电源芯片控制的,通过IIC与之通讯。所以这里我们添加一段代码,用来打开电源。(需要留意这里是用esp-idf4.4版本编译的,貌似v5版本的i2c写法有点不一样,会编译不过去。)
- #include "who_camera.h"
-
- #include "esp_log.h"
- #include "esp_system.h"
- static const char *TAG = "who_camera";
-
- // ---------------------------------------------
- #include "driver/i2c.h"
- #define AXP313A_ADDR 0x36
- #define I2C_MASTER_SCL_IO 2
- #define I2C_MASTER_SDA_IO 1
- #define I2C_MASTER_NUM 0
- #define I2C_MASTER_TX_BUF_DISABLE 0
- #define I2C_MASTER_RX_BUF_DISABLE 0
- #define I2C_MASTER_FREQ_HZ 400000
- #define I2C_MASTER_TIMEOUT_MS 1000
- static esp_err_t AXP313A_register_write_byte(uint8_t reg_addr, uint8_t data)
- {
- int ret;
- uint8_t write_buf[2] = {reg_addr, data};
-
- ret = i2c_master_write_to_device(I2C_MASTER_NUM, AXP313A_ADDR, write_buf, sizeof(write_buf), I2C_MASTER_TIMEOUT_MS / portTICK_RATE_MS);
-
- return ret;
- }
-
- static esp_err_t i2c_master_init(void)
- {
- int i2c_master_port = I2C_MASTER_NUM;
-
- i2c_config_t conf = {
- .mode = I2C_MODE_MASTER,
- .sda_io_num = I2C_MASTER_SDA_IO,
- .scl_io_num = I2C_MASTER_SCL_IO,
- .sda_pullup_en = GPIO_PULLUP_ENABLE,
- .scl_pullup_en = GPIO_PULLUP_ENABLE,
- .master.clk_speed = I2C_MASTER_FREQ_HZ,
- };
-
- i2c_param_config(i2c_master_port, &conf);
-
- return i2c_driver_install(i2c_master_port, conf.mode, I2C_MASTER_RX_BUF_DISABLE, I2C_MASTER_TX_BUF_DISABLE, 0);
- }
- // ---------------------------------------------
-
- static QueueHandle_t xQueueFrameO = NULL;
-
- static void task_process_handler(void *arg)
- {
- while (true)
- {
- camera_fb_t *frame = esp_camera_fb_get();
- if (frame)
- xQueueSend(xQueueFrameO, &frame, portMAX_DELAY);
- }
- }
-
- void register_camera(const pixformat_t pixel_fromat,
- const framesize_t frame_size,
- const uint8_t fb_count,
- const QueueHandle_t frame_o)
- {
- ESP_LOGI(TAG, "Camera module is %s", CAMERA_MODULE_NAME);
-
- // ~~~~~~~~~~~~~~~~~~~~~~~~~~~~~~~~~~~~~~
- //开启摄像头前,先打开电源
- ESP_ERROR_CHECK(i2c_master_init());
- ESP_LOGI(TAG, "I2C initialized successfully");
- ESP_ERROR_CHECK(AXP313A_register_write_byte(0x00,0x04));
- vTaskDelay(100);
- ESP_ERROR_CHECK(AXP313A_register_write_byte(0x10,0x19));
- ESP_ERROR_CHECK(AXP313A_register_write_byte(0x16,0x07)); //1.2v
- ESP_ERROR_CHECK(AXP313A_register_write_byte(0x17,23)); //2.8v
- ESP_LOGI(TAG, "I2C unitialized successfully");
- vTaskDelay(1000);
- // ~~~~~~~~~~~~~~~~~~~~~~~~~~~~~~~~~~~~~~
-
- #if CONFIG_CAMERA_MODULE_ESP_EYE || CONFIG_CAMERA_MODULE_ESP32_CAM_BOARD
- /* IO13, IO14 is designed for JTAG by default,
- * to use it as generalized input,
- * firstly declair it as pullup input */
- gpio_config_t conf;
- conf.mode = GPIO_MODE_INPUT;
- conf.pull_up_en = GPIO_PULLUP_ENABLE;
- conf.pull_down_en = GPIO_PULLDOWN_DISABLE;
- conf.intr_type = GPIO_INTR_DISABLE;
- conf.pin_bit_mask = 1LL << 13;
- gpio_config(&conf);
- conf.pin_bit_mask = 1LL << 14;
- gpio_config(&conf);
- #endif
-
- camera_config_t config;
- config.ledc_channel = LEDC_CHANNEL_0;
- config.ledc_timer = LEDC_TIMER_0;
- config.pin_d0 = CAMERA_PIN_D0;
- config.pin_d1 = CAMERA_PIN_D1;
- config.pin_d2 = CAMERA_PIN_D2;
- config.pin_d3 = CAMERA_PIN_D3;
- config.pin_d4 = CAMERA_PIN_D4;
- config.pin_d5 = CAMERA_PIN_D5;
- config.pin_d6 = CAMERA_PIN_D6;
- config.pin_d7 = CAMERA_PIN_D7;
- config.pin_xclk = CAMERA_PIN_XCLK;
- config.pin_pclk = CAMERA_PIN_PCLK;
- config.pin_vsync = CAMERA_PIN_VSYNC;
- config.pin_href = CAMERA_PIN_HREF;
- config.pin_sscb_sda = CAMERA_PIN_SIOD;
- config.pin_sscb_scl = CAMERA_PIN_SIOC;
- config.pin_pwdn = CAMERA_PIN_PWDN;
- config.pin_reset = CAMERA_PIN_RESET;
- config.xclk_freq_hz = XCLK_FREQ_HZ;
- config.pixel_format = pixel_fromat;
- config.frame_size = frame_size;
- config.jpeg_quality = 12;
- config.fb_count = fb_count;
- config.fb_location = CAMERA_FB_IN_PSRAM;
- config.grab_mode = CAMERA_GRAB_WHEN_EMPTY;
-
- // camera init
- esp_err_t err = esp_camera_init(&config);
- if (err != ESP_OK)
- {
- ESP_LOGE(TAG, "Camera init failed with error 0x%x", err);
- return;
- }
-
- sensor_t *s = esp_camera_sensor_get();
- s->set_vflip(s, 0); // flip it back
- // initial sensors are flipped vertically and colors are a bit saturated
- if (s->id.PID == OV3660_PID)
- {
- s->set_brightness(s, 1); // up the blightness just a bit
- s->set_saturation(s, -2); // lower the saturation
- }
-
- xQueueFrameO = frame_o;
- xTaskCreatePinnedToCore(task_process_handler, TAG, 2 * 1024, NULL, 5, NULL, 1);
- }
接下来编译、烧写、运行。
- Waiting for the device to reconnect.
- I (1430) who_camera: I2C unitialized successfully
- W (1450) wifi:<ba-add>idx:0 (ifx:0, 0e:0d:9e:22:81:c4), tid:7, ssn:2, winSize:64
- I (2360) esp_netif_handlers: sta ip: 192.168.129.33, mask: 255.255.255.128, gw: 192.168.129.1
- I (2360) camera wifi: got ip:192.168.129.33
- W (2940) wifi:<ba-add>idx:1 (ifx:0, 0e:0d:9e:22:81:c4), tid:0, ssn:0, winSize:64
- I (11430) s3 ll_cam: DMA Channel=4
- I (11430) cam_hal: cam init ok
- I (11430) sccb: pin_sda 1 pin_scl 2
- I (11450) camera: Detected camera at address=0x30
- I (11450) camera: Detected OV2640 camera
- I (11450) camera: Camera PID=0x26 VER=0x42 MIDL=0x7f MIDH=0xa2
- I (11520) s3 ll_cam: node_size: 3840, nodes_per_line: 1, lines_per_node: 6
- I (11520) s3 ll_cam: dma_half_buffer_min: 3840, dma_half_buffer: 15360, lines_per_half_buffer: 24, dma_buffer_size: 30720
- I (11520) cam_hal: buffer_size: 30720, half_buffer_size: 15360, node_buffer_size: 3840, node_cnt: 8, total_cnt: 10
- I (11520) cam_hal: Allocating 153600 Byte frame buffer in PSRAM
- I (11520) cam_hal: Allocating 153600 Byte frame buffer in PSRAM
- I (11520) cam_hal: cam config ok
- I (11520) ov2640: Set PLL: clk_2x: 1, clk_div: 3, pclk_auto: 1, pclk_div: 8
- I (11590) camera_httpd: Starting web server on port: '80'
- I (11590) camera_httpd: Starting stream server on port: '81'
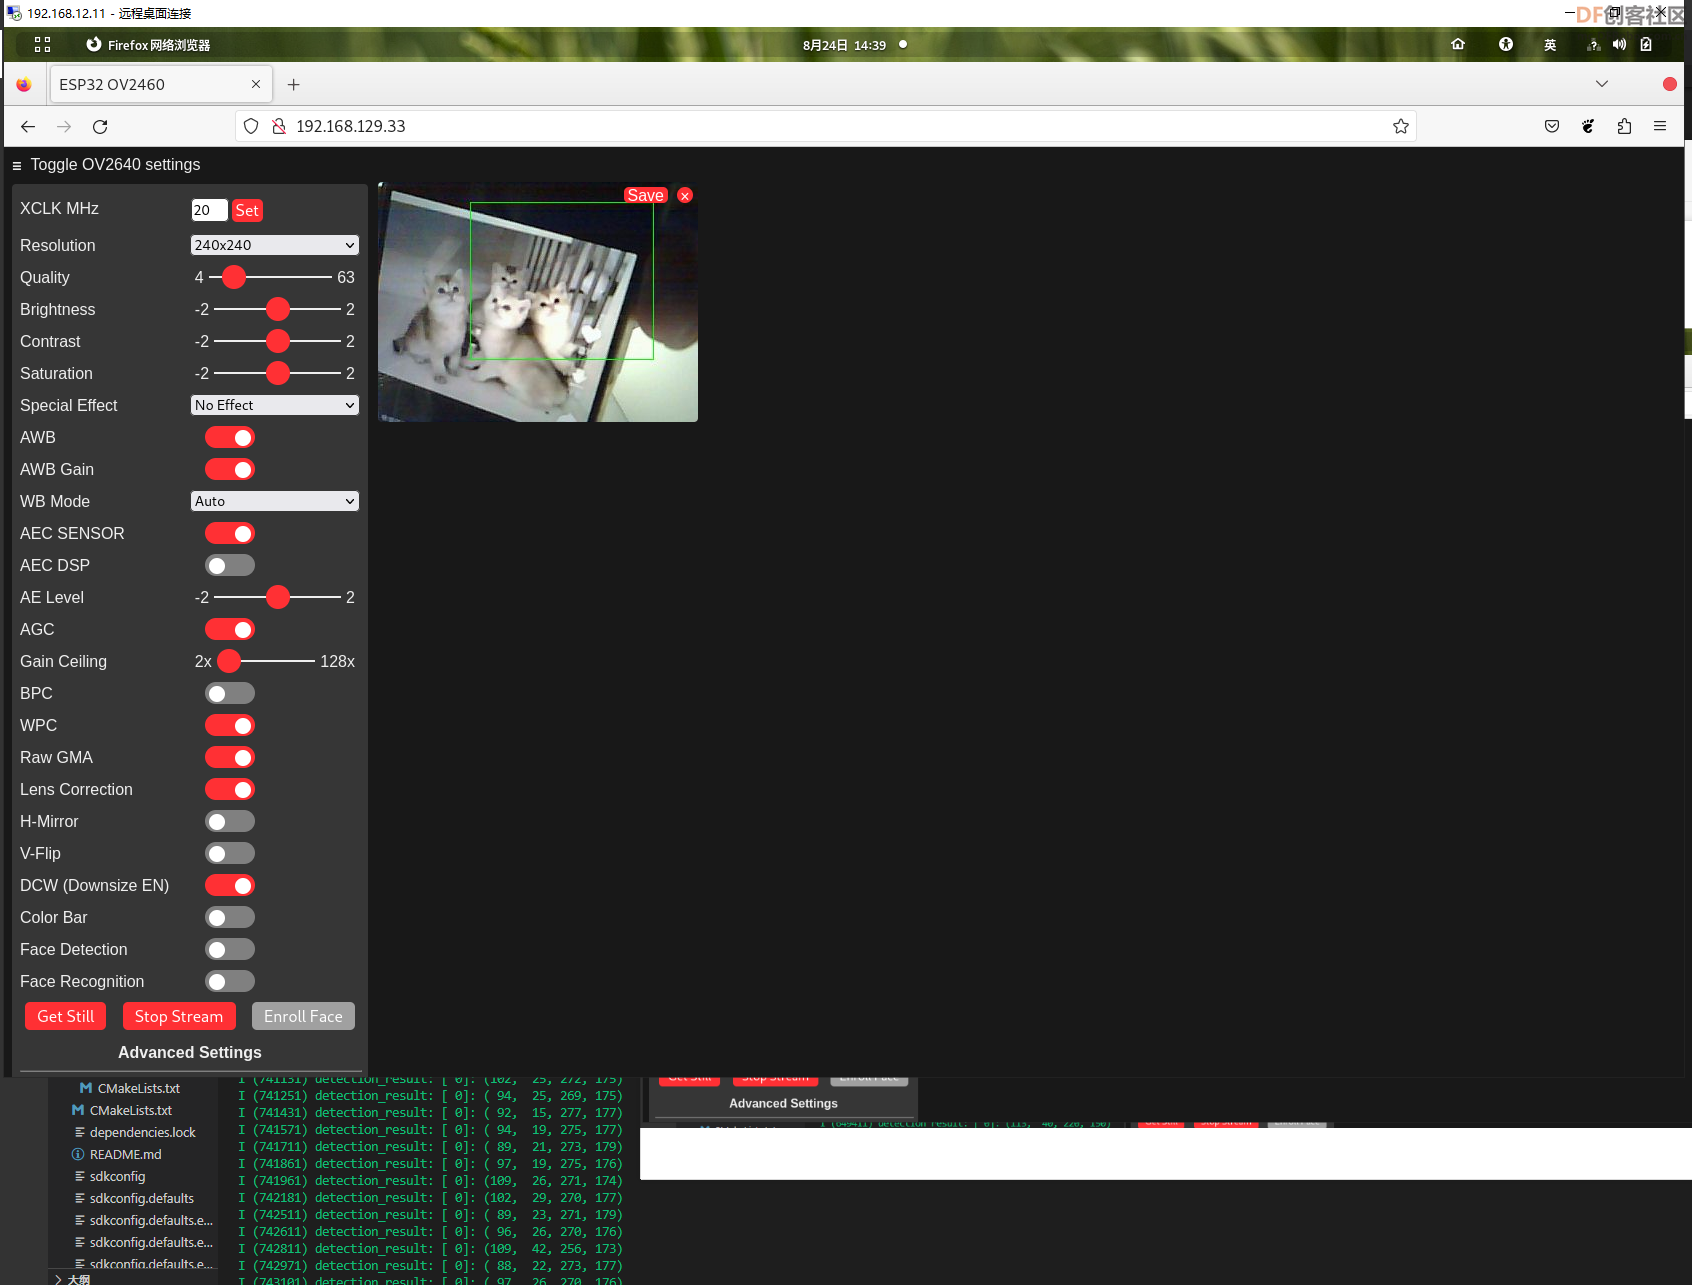
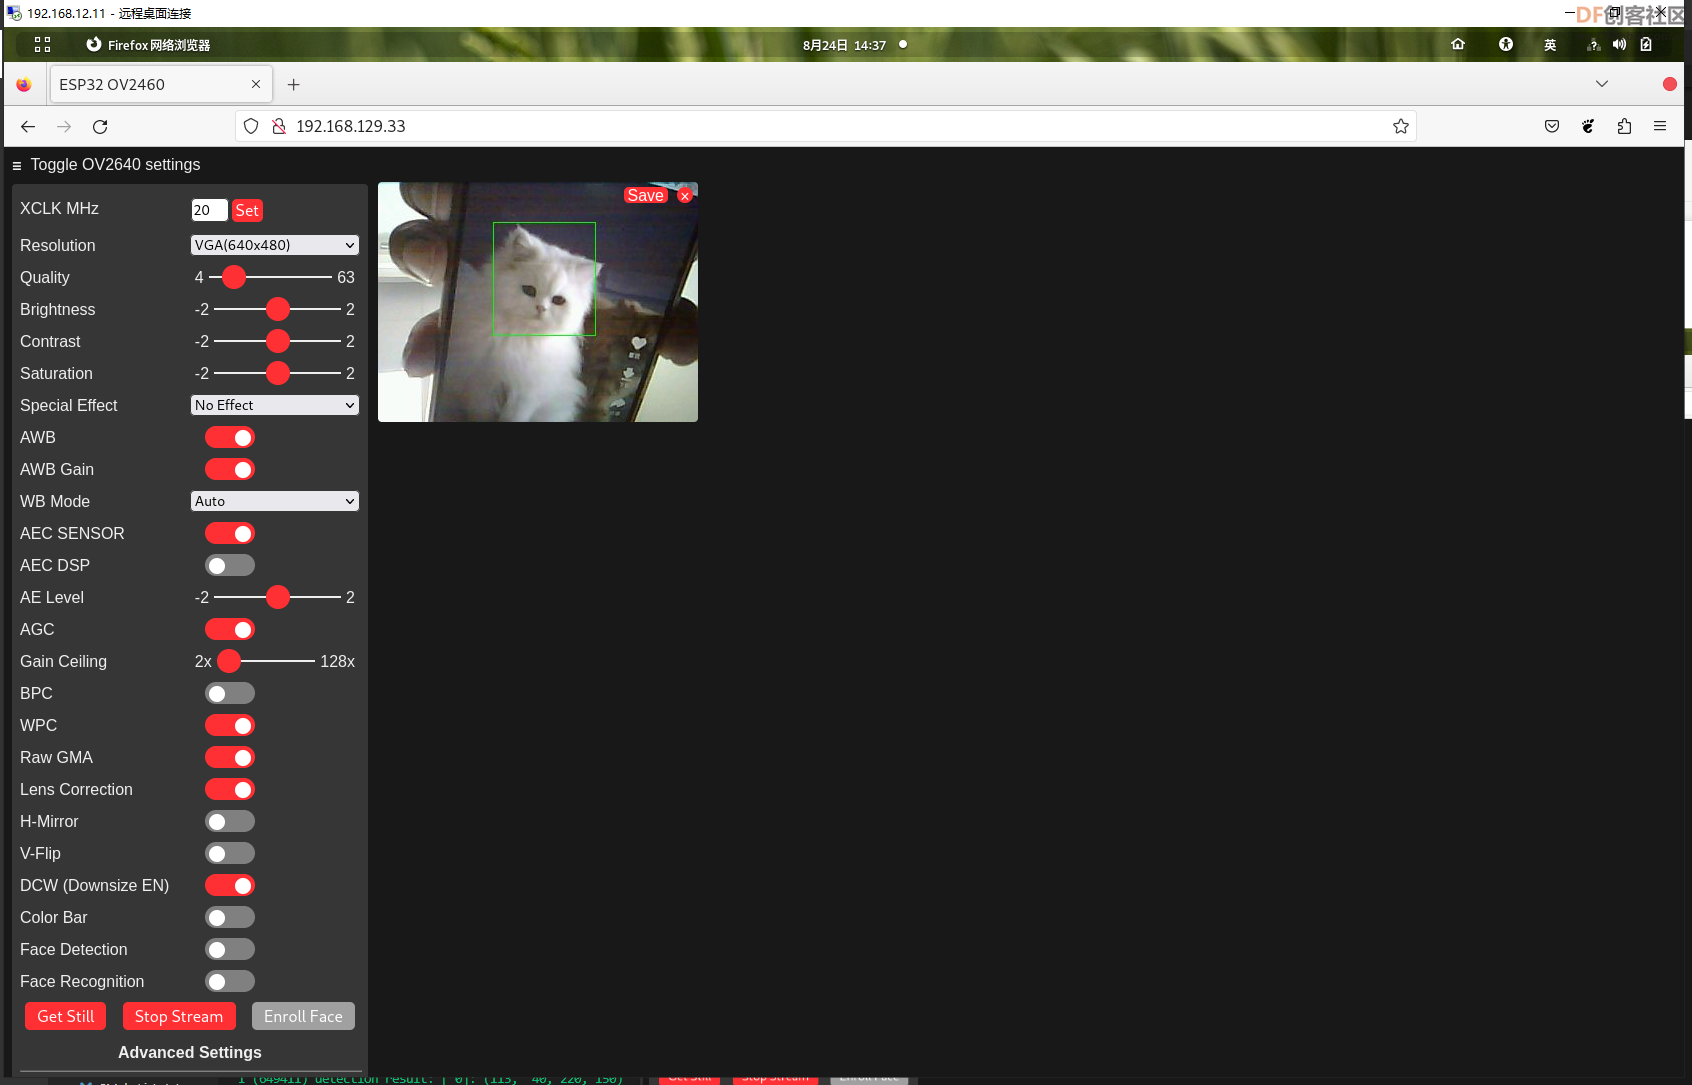
然后打开同一个局域网内的电脑浏览器,用手机打开小猫咪的照片。
FireBeetle 2 ESP32-S3就能够识别出猫咪图片,并且标记出猫咪在图片中的位置啦!
| 


 沪公网安备31011502402448
 置顶卡
置顶卡 变色卡
变色卡 千斤顶
千斤顶


