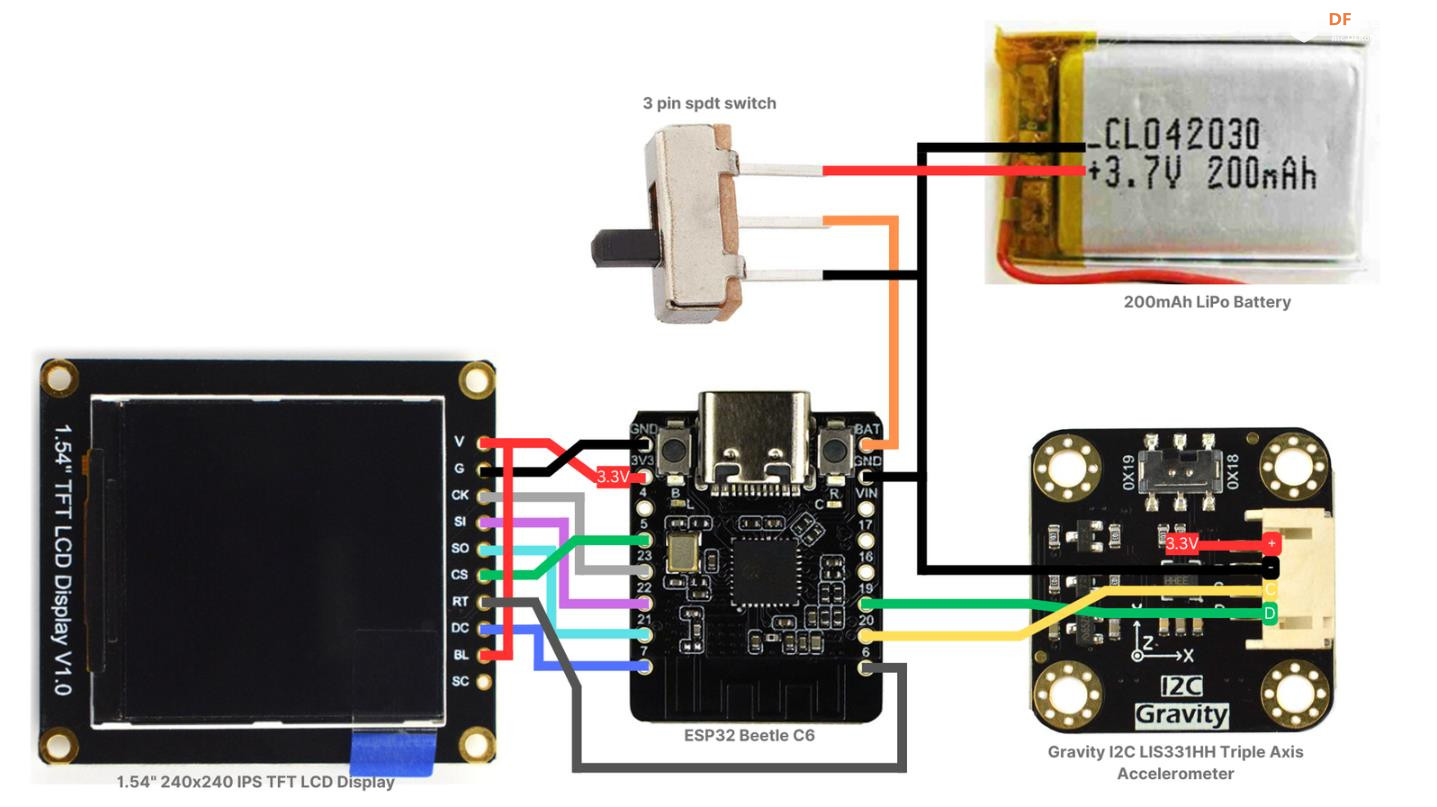
项目代码
- #include <FiltersFromGit.h>
- #include <DFRobot_LIS.h>
- #include "PikoAccelerate.h"
- #include <SPI.h>
- #include <Adafruit_GFX.h>
- #include <Adafruit_ST7789.h>
- #include <AnimatedGIF.h>
- #include "piko_sleep.h"
- #include "piko_idle.h" // Replace with your actual .h gif files
- #include "piko_walk.h"
- #include "piko_jog.h"
- #include "piko_sprint.h"
-
- // Define your MACROS for the LCD
- #define TFT_CS 5
- #define TFT_RST 6
- #define TFT_DC 7
- #define SLEEP_THRESHOLD 10000
-
- //Function declarations:
- void GIFDraw(GIFDRAW *pDraw); //Displays the GIF on the LCD
- void accelerationJob(void); //manages all acceleration absed activities
- void drawProgressBar(int steps) ;//manages the loading bar based of steps
-
- //Object initilisations
- DFRobot_LIS331HH_I2C acce(&Wire, I2C_ACCE_ADDRESS); //creates an accelerometer object that communicates via I2C
- FilterOnePole myAccelerationFilter(LOWPASS, fc); //creates the filter object for accelerometer data
- RunningStatistics myAccelerationStats;//creates an object that continously monitors acceleration mean and std
- Adafruit_ST7789 tft = Adafruit_ST7789(TFT_CS, TFT_DC, TFT_RST);
- AnimatedGIF gif;
-
- //Global vars
- char* overlayText = "0";
-
- unsigned long lastSampleTime = 0;
- unsigned long sampleRate = 20; //ensures samples every ~20ms
- MotionState previousState = NONE; //ensures that the first GIF will run
-
- unsigned long lastFrameTime = 0;
- int frameDelay = 0; //DO NOT CHANGE unknowingly. Ensures playfram function that draws GIF is non-blocking
- int FPS = 9; //Desired frame rate
-
- unsigned long sleeptimeCounter = 0;
- unsigned long lastsleepcheckTime = 0;
-
- bool gifPlaying = false;
-
- // Data arrays (replace with your actual GIF names)
- // THESE MUST BE IN THIS ORDER, since indexed by motionType
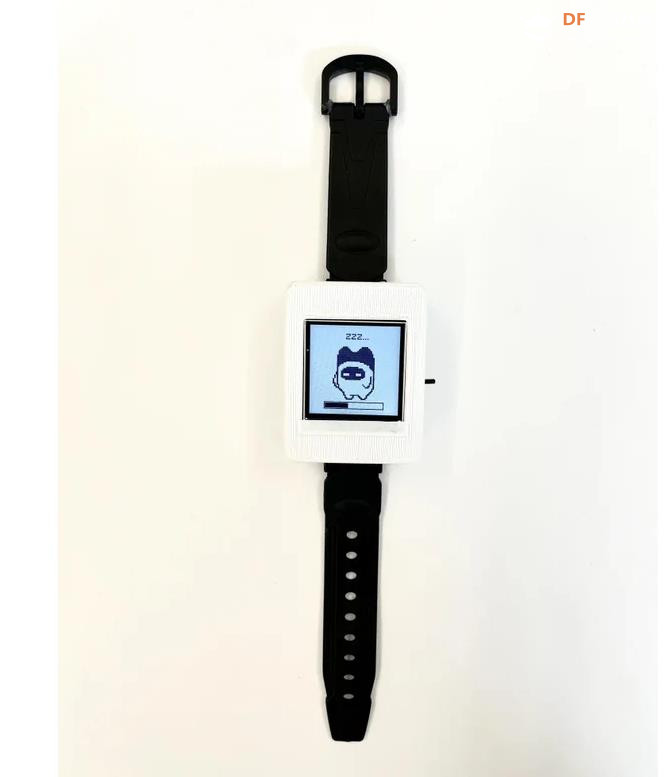
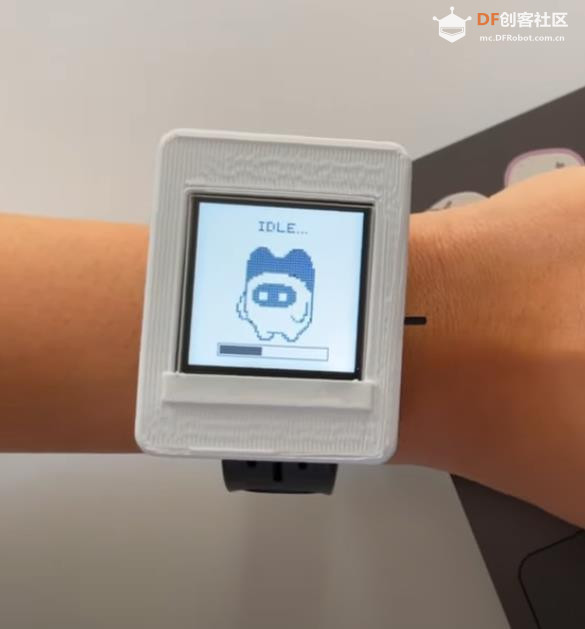
- const uint8_t* gifData[] = { idle_v2, walk_v2, jog_v2, sprint_v2, sleep_v2};
- size_t gifSize[] = { sizeof(idle_v2), sizeof(walk_v2), sizeof(jog_v2),sizeof(sprint_v2), sizeof(sleep_v2)};
-
- const int MAX_STEPS = 200; //Number of steps to fill the progress bar
-
- void setup() {
- //Serial set
- Serial.begin(115200);
- while(!Serial){};
- while(!acce.begin()){
- Serial.println("Initialization failed, please check the connection and I2C address - must be");
- }
-
- //take statistics averages/std's set-up
- myAccelerationStats.setWindowSecs(WINDOW);
- motionType = idling;
-
- //accelerometer set up
- Serial.print("chip id : ");
- Serial.println(acce.getID(),HEX);
- acce.setRange(/*range = */DFRobot_LIS::eLis331hh_12g);
- acce.setAcquireRate(/*rate = */DFRobot_LIS::eNormal_50HZ);
-
- // Initialize display
- tft.init(240, 240); // Use your screen resolution
- tft.setRotation(2); // Adjust rotation if needed
- tft.fillScreen(ST77XX_BLACK);
- tft.setTextColor(ST77XX_WHITE); // Choose your text color
- tft.setTextSize(2); // Adjust as needed
- tft.setCursor(10, 10); // X, Y position
- tft.invertDisplay(false);
-
- // Initialize GIF decoder
- gif.begin(); // No endian flag needed for Adafruit library
- }
-
- void loop() {
-
- unsigned long now = millis();
-
- //Update state every 20ms
- if (now - lastSampleTime >= sampleRate) {
- lastSampleTime = now;
- accelerationJob();
- }
- //Handles if it needs to go into a sleep state.
- if(motionType == idling){
- sleeptimeCounter = sleeptimeCounter+now-lastsleepcheckTime;
- if(sleeptimeCounter>=SLEEP_THRESHOLD){
- motionType=sleeping;
- }
- lastsleepcheckTime = now;
- }
- else{
- sleeptimeCounter=0;
- lastsleepcheckTime = now;
- }
- // If state changed, open new GIF
- if (motionType != previousState) {
- gif.close(); // Close previous GIF
- if (gif.open((uint8_t*)gifData[motionType], gifSize[motionType], GIFDraw)) {
- gifPlaying = true;
- lastFrameTime = now;
- frameDelay = 0;
- previousState = motionType;
- } else {
- Serial.println("Failed to open GIF");
- gifPlaying = false;
- }
- }
-
- // 3. Non-blocking GIF frame playback
- if (gifPlaying && now - lastFrameTime >= 1/FPS) {
- int result = gif.playFrame(false, &frameDelay);
- lastFrameTime = now;
- drawProgressBar(steps);
- if (result == 0) {
- gif.reset(); // Or gifPlaying = false if you don't want to loop
- }
- }
- }
-
-
-
- /********************************************************************************************************************/
- /************************************************Function Definitions************************************************/
- /********************************************************************************************************************/
-
-
- void accelerationJob(void){
-
- //Acceleration Raw Data
- ax = acce.readAccX();
- ay = acce.readAccY();
- az = acce.readAccZ();
-
- a = getMagnitude(ax,ay,az)-1000;
-
- //Filters through Lowpass to remove noise
- myAccelerationFilter.input(a);
- afiltered = myAccelerationFilter.output();
-
- //Get running statistics
- myAccelerationStats.input(afiltered);
- a_ave = myAccelerationStats.mean();
- a_std = myAccelerationStats.sigma();
-
- //Acceleration Logic
- motionType = determineMovementType(a_ave, a_std);
- countSteps(afiltered, motionType);
- }
-
- void GIFDraw(GIFDRAW *pDraw) {
- if (pDraw->y >= tft.height()-37) return; //-37 ensures gif doesn't overdraw on the loading bar
-
- static uint16_t lineBuffer[320]; // Enough for full width
-
- uint8_t *s = pDraw->pPixels;
- uint8_t *pal = (uint8_t *)pDraw->pPalette;
-
- for (int x = 0; x < pDraw->iWidth; x++) {
- if (pDraw->ucHasTransparency && *s == pDraw->ucTransparent) {
- lineBuffer[x] = tft.color565(0, 0, 0); // Optional: treat as black
- s++;
- continue;
- }
- uint8_t index = *s++;
- lineBuffer[x] = tft.color565(pal[index * 3], pal[index * 3 + 1], pal[index * 3 + 2]);
- }
-
- tft.drawRGBBitmap(pDraw->iX, pDraw->iY + pDraw->y, lineBuffer, pDraw->iWidth, 1);
- if (pDraw->y == (pDraw->iHeight - 1)) {
- tft.setTextColor(ST77XX_WHITE, ST77XX_WHITE); // Optional: erase previous text background
- tft.setTextSize(2);
- tft.setCursor(10, 10);
- tft.print(String(steps));
- }
- }
-
- void drawProgressBar(int steps) {
- Serial.println("I am in draw bar fn");
- static int lastFillWidth = -1; // remember the last fill width (ensure static)
-
- int barWidth = 160;
- int barHeight = 18;
- int thickness = 2;
- int bottomPadding = 15;
- int x = (tft.width() - barWidth) / 2;
- int y = tft.height() - barHeight - bottomPadding;
-
- uint16_t barColor = tft.color565(216, 217, 217);
-
- int clampedsteps = constrain(steps,0,MAX_STEPS);
- int fillInset = thickness;
- int fillWidth = map(clampedsteps, 0, MAX_STEPS, 0, barWidth - 2 * fillInset);
-
- // Only redraw if the fill width changed -better speed
- if (fillWidth == lastFillWidth) return;
- lastFillWidth = fillWidth;
-
- // Draw thicker outline via multiple rectangles
- for (int i = 0; i < thickness; i++) {
- tft.drawRect(x - i, y - i, barWidth + 2 * i, barHeight + 2 * i, barColor);
- }
-
- // Clear previous fill area
- tft.fillRect(x + fillInset, y + fillInset, barWidth - 2 * fillInset, barHeight - 2 * fillInset, ST77XX_BLACK);
-
- // Draw current fill
- tft.fillRect(x + fillInset, y + fillInset, fillWidth, barHeight - 2 * fillInset, barColor);
- }
|


 沪公网安备31011502402448
 置顶卡
置顶卡 变色卡
变色卡 千斤顶
千斤顶
 萌萌哒新人
萌萌哒新人
 活跃会员
活跃会员
 宣传大使
宣传大使
 牛X认证
牛X认证
 创作达人
创作达人
 ARD DAY
 摸鱼团员
摸鱼团员
 志“童”道合
 编辑选择奖
编辑选择奖


