一直对平衡车感兴趣,又找来一个平衡车的资料。以下内容主要转帖而来,原文http://www.geek-workshop.com/for ... &highlight=L298
小车整体造型大概是这个样子的
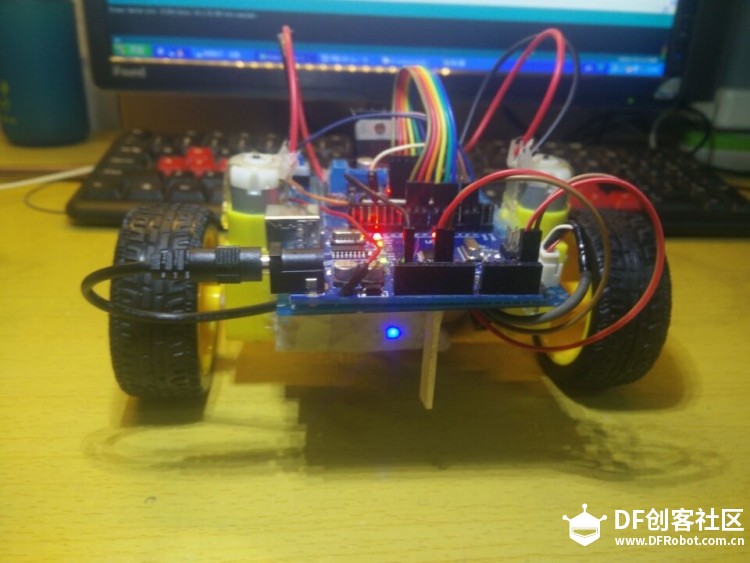
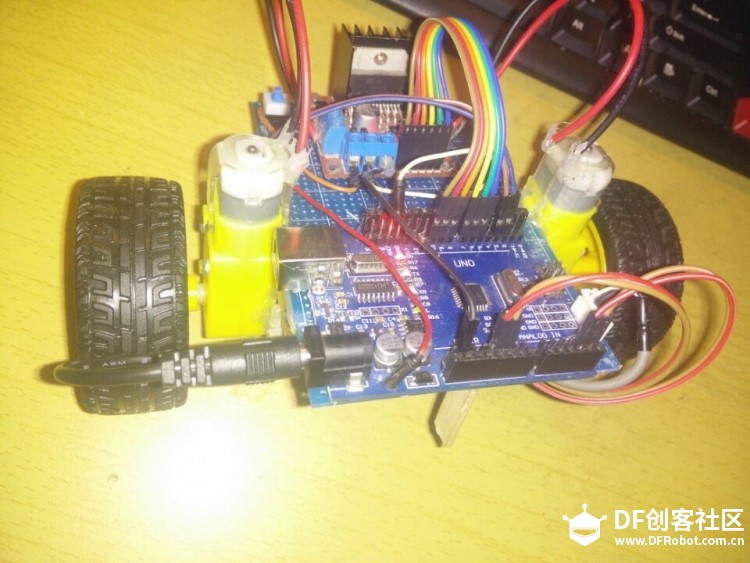
小车可以站住,但是小车抖动比较厉害。
使用的mpu6050,使用的一介互补滤波,得出 角度 angle_x 。虽然原文作者调节了参数,但据说效果还不是很理想。

然后通过 if 语句进行判断 if(angle_x>0) 控制L298n
接下来就是把 angle_x 进行PID 控制。 Input = angle_x;
myPID.Compute();
Serial.print(Output=); 通过PID计算得出 Output 疑惑的是 Output竟然是0

Output=0 这是什么原因呢????
然后把Output当做两个车轮的PWM脉冲,
analogWrite(motor1PWMPin, Output);
analogWrite(motor2PWMPin, Output);
Output=0 ,我测量motor1PWMPin motor2PWMPin两个管脚的电压还都是1.75,不管小车角度怎样,电压都不会改变。 ????
设定小车的静态平衡角度为 Setpoint = 10.0;
初始 Input = 0.0;
myPID.SetSampleTime(100); //采样时间
myPID.SetMode(AUTOMATIC);
PID的调节 PID myPID(&Input, &Output, &Setpoint, 1, 0, -10, DIRECT);
调了几天,没什么效果,真是郁闷。。。
又查了一些资料,可能是电机太水,但是也有看到别人用香蕉电机的,效果也还不错。
斗就斗把,后来加了码盘,用了槽型对射管,对两个轮子进行测速,蓝牙控制准备让小车行走,就使用Arduino uon 的两个外部中断计脉冲的个数,
标志==40的时候 车轮转动一圈,然后当接收到前进的命令的时候,让两个轮子全部正转2圈,但是经过测试 小车一直在保持平衡,所以没时间正转2圈(这样理解可以吧)。 所以 这个控制程序不会写了。。。欢迎大神可提供帮助哦,到时候我也可以去帮帮原作者,装一下大神,哈哈
代码
- #include<Wire.h>
- #include "gyro_accel.h"
- #include "PID_v1.h"
-
- // Defining constants
- #define dt 1 // time difference in milli seconds
- #define rad2degree 57.3 // radian to degree conversion
- #define Filter_gain 0.95 // e.g. angle = angle_gyro*Filter_gain + angle_accel*(1-Filter_gain)
-
- // Global Variables
- unsigned long t = 0; // Time Variables
- float angle_x_gyro=0, angle_y_gyro=0, angle_z_gyro=0, angle_x_accel=0, angle_y_accel=0, angle_z_accel=0, angle_x=0, angle_y=0, angle_z=0;
- char val ;
- int maichong,lefta,leftaa,leftone,righta,rightaa,rightone;
- // DC motor driver with L298N
- const int motor1PWMPin = 10; // PWM Pin of Motor 1
- const int motor1Polarity1 = 9; // Polarity 1 Pin of Motor 1
- const int motor1Polarity2 = 8; // Polarity 2 Pin of Motor 1
- const int motor2PWMPin = 5; // PWM Pin of Motor 2
- const int motor2Polarity1 = 6; // Polarity 1 Pin of Motor 2
- const int motor2Polarity2 = 7; // Polarity 2 Pin of Motor 2
- const int left=0; //码盘
- const int right=1;//码盘
- int ValM1 = 255; // Initial Value for PWM Motor 1
- int ValM2 = 255; // Initial Value for PWM Motor 2
-
- double Setpoint, Input, Output;
-
- PID myPID(&Input, &Output, &Setpoint, 1, 0, -10, DIRECT);
- //PID myPID(&Input, &Output, &Setpoint, 25, 4, -5.5, DIRECT);
- void setup()
- {
- // MPU-6050
- Serial.begin(115200);
- Wire.begin();
- MPU6050_ResetWake();
- MPU6050_SetGains(0,1); // Setting the lows scale
- MPU6050_SetDLPF(0); // Setting the DLPF to inf Bandwidth for calibration
- MPU6050_OffsetCal(); // very important
- MPU6050_SetDLPF(6); // Setting the DLPF to lowest Bandwidth
-
- t = millis();
-
- // DC motor
- pinMode(motor1PWMPin, OUTPUT);
- pinMode(motor1Polarity1, OUTPUT);
- pinMode(motor1Polarity2, OUTPUT);
-
- pinMode(motor2PWMPin, OUTPUT);
- pinMode(motor2Polarity1, OUTPUT);
- pinMode(motor2Polarity2, OUTPUT);
- //0 1 zhongduan
- attachInterrupt(left, jishu1, CHANGE);
- attachInterrupt(right, jishu, CHANGE);
-
-
- // set enablePin of motor 1 high so that motor 1 can turn on
- digitalWrite(motor1PWMPin, HIGH);
- digitalWrite(motor1Polarity1, HIGH);
- digitalWrite(motor1Polarity2, LOW);
-
- // set enablePin of motor 2 high so that motor 2 can turn on
- digitalWrite(motor2PWMPin, HIGH);
- digitalWrite(motor2Polarity1, HIGH);
- digitalWrite(motor2Polarity2, LOW);
-
- Input = 0.0;
- Setpoint = 10.0;
-
- myPID.SetSampleTime(100);
- myPID.SetMode(AUTOMATIC);
-
- }
- void jishu()
- {
- lefta++;
- if(lefta==45)
- {
- lefta=0; //mai chong biao zhi qing ling
- leftone++;//一圈
- }
- }
- void jishu1()
- {
- righta++;
- if(righta==45)
- {
- righta=0; //mai chong biao zhi qing ling
- rightone++;//一圈
- }
- }
- void rightz()//右轮正转
- {
- digitalWrite(motor1PWMPin, HIGH);digitalWrite(motor1Polarity1, HIGH);digitalWrite(motor1Polarity2, LOW);
- }
- void rightf()//右轮反转
- {
- digitalWrite(motor1PWMPin, HIGH);digitalWrite(motor1Polarity1, LOW);digitalWrite(motor1Polarity2, HIGH);
- }
- void leftz()
- {
- digitalWrite(motor2PWMPin, HIGH);digitalWrite(motor2Polarity1, HIGH);digitalWrite(motor2Polarity2, LOW);
- }
- void leftf()
- {
- digitalWrite(motor2PWMPin, HIGH);digitalWrite(motor2Polarity1, LOW);digitalWrite(motor2Polarity2, HIGH);
- }
- void st()//电机停
- {
- digitalWrite(motor1PWMPin, HIGH);digitalWrite(motor1Polarity1, LOW);digitalWrite(motor1Polarity2, LOW);
- digitalWrite(motor2PWMPin, HIGH);digitalWrite(motor2Polarity1, LOW);digitalWrite(motor2Polarity2, LOW);
- }
- void blue()//蓝牙
- {
- if (Serial.available() > 0) {
- val = Serial.read();
- /* if(val == 'A') {
- Serial.println(angle_x); //jiaodu
- }*/
- if(val == 'z') {
- rightz();
- }
- if(val == 'x') {
- rightf();
- }
- if(val == 'c') {
- leftz();
- }
- if(val == 'v') {
- leftf();
- }
- if(val == 'b') {
- st();
- }
- }}
- void loop()
- {
- t = millis();
-
- MPU6050_ReadData();
-
- angle_x_gyro = (gyro_x_scalled*((float)dt/1000)+angle_x);
- angle_y_gyro = (gyro_y_scalled*((float)dt/1000)+angle_y);
- angle_z_gyro = (gyro_z_scalled*((float)dt/1000)+angle_z);
-
- angle_z_accel = atan(accel_z_scalled/(sqrt(accel_y_scalled*accel_y_scalled+accel_x_scalled*accel_x_scalled)))*(float)rad2degree;
- angle_y_accel = -atan(accel_x_scalled/(sqrt(accel_y_scalled*accel_y_scalled+accel_z_scalled*accel_z_scalled)))*(float)rad2degree;
- angle_x_accel = atan(accel_y_scalled/(sqrt(accel_x_scalled*accel_x_scalled+accel_z_scalled*accel_z_scalled)))*(float)rad2degree;
-
- angle_x = Filter_gain*angle_x_gyro+(1-Filter_gain)*angle_x_accel;
- angle_y = Filter_gain*angle_y_gyro+(1-Filter_gain)*angle_y_accel;
- angle_z = Filter_gain*angle_z_gyro+(1-Filter_gain)*angle_z_accel;
-
- digitalWrite(motor1PWMPin, HIGH);
- digitalWrite(motor2PWMPin, HIGH);
-
- Serial.print("\n");Serial.print(" ");Serial.print("angle_x="); Serial.print(angle_x);Serial.print(" ");Serial.print("angle_y=");Serial.print(angle_y);Serial.print(" ");Serial.print("angle_z=");Serial.print(angle_z);
- Serial.print("____"); //串口输出
-
- // change direction is very important 平衡
- if(angle_x>0)
- {
- myPID.SetControllerDirection(REVERSE);
-
- // set enablePin of motor 1 high so that motor 1 can turn on
- digitalWrite(motor1Polarity1, HIGH);
- digitalWrite(motor1Polarity2, LOW);
-
- // set enablePin of motor 2 high so that motor 2 can turn on
- digitalWrite(motor2Polarity1, HIGH);
- digitalWrite(motor2Polarity2, LOW);
- }
- else
- {
- myPID.SetControllerDirection(DIRECT);
- // set enablePin of motor 1 high so that motor 1 can turn on
- digitalWrite(motor1Polarity1, LOW);
- digitalWrite(motor1Polarity2, HIGH);
-
- // set enablePin of motor 2 high so that motor 2 can turn on
- digitalWrite(motor2Polarity1, LOW);
- digitalWrite(motor2Polarity2, HIGH);
- }
-
- Input = angle_x;
- Serial.print("Input=");Serial.print(Input);Serial.print("____");
-
- myPID.Compute();
- Serial.print("Output=");Serial.print(Output);Serial.print("____"); Output 怎么会是0????
-
- analogWrite(motor1PWMPin, Output);
- analogWrite(motor2PWMPin, Output);
-
- Serial.print("Setpoint=");Serial.print(Setpoint); Serial.print("\t");
- Serial.print("left=");Serial.print(lefta);Serial.print(" ");Serial.print(leftone); Serial.print("\t");
- Serial.print("right=");Serial.print(righta);Serial.print(" ");Serial.print(rightone); Serial.print("\t"); //串口输出
- blue();//蓝牙
-
- if(rightone==1) //转动1圈标志
- {
- rightone=0;
- st(); // 停止转动
- }
-
-
- while((millis()-t) < dt)
- {
- // Do nothing
- }

|






曾经想做个超级超级小的平衡车来着:lol学习一下