学习使用串口相机拍摄jpeg并存入SD卡
2016-01-102.4万
AI 快速预览详细 收起
本文介绍了如何使用Arduino UNO、2M_TTL_Camera和SD卡模块,通过串口相机拍摄JPEG照片并存储到SD卡。文章提供了详细的电路连接图和示例代码,包括设置波特率、图像大小等关键参数。适合初学者学习和实践,无需复杂前置技能即可完成。
在网上看到了类似项目,想学习并实现。在这里开一个帖子作为自己的学习记录并和大家交流。
一、资料收集
主要参考LinkSprite上面对于自家相机的使用教程:
1.使用器件包括:
- 1 x Arduino UNO:自己是用的DF家的板子。
- 1 x 2M_TTL_Camera:买的LinkSprite的,大淘宝上面找的。
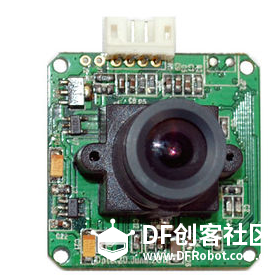 - 1 x SD Card Breakout Board:买的LinkSprite的,大淘宝上面找的。现在已经知道不需要买他家的,但是刚开始的时候怕器件不同代码不能用啊

- 1 x SD card:准备用自己相机的SD卡。
- n x 跳线
2.电路连接
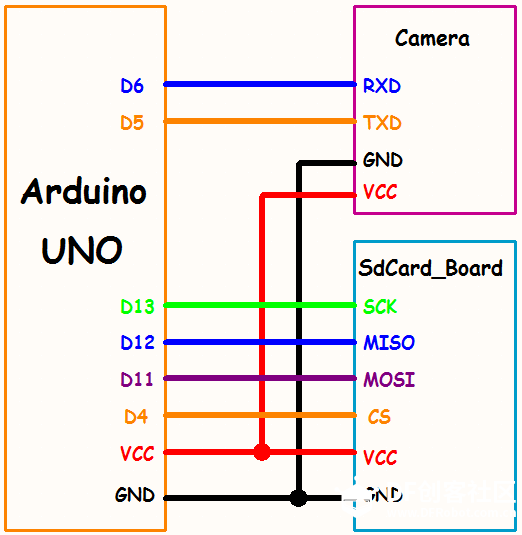
SD Card Breakout Board: - MOSI of SD card breakout –> D11 of Arduino
- MISO of SD card breakout –> D12 of Arduino
- SCK of SD card breakout –> D13 of Arduino
- CS of SD card breakout –> D4 of Arduino
- VCC of SD card breakout –> 5v of Arduino
- 2M_TTL_Camera:
- RXD of 2MP JPEG camera –> D6 of Arduino
- TXD of 2MP JPEG camera –> D5 of Arduino
- VCC of 2MP JPEG camera –> 5v of Arduino
3.示例代码
- //*******************************************************
- // www.linksprite.com
- // Note:
- // 1. SD must be formated to FAT16
- // 2. As the buffer of softserial has 64 bytes,
- // so the code read 32 bytes each time
- // 3. Please add the libaray to the lib path
- //
- // * SD card attached to SPI bus as follows:
- // * MOSI - pin 11
- // * MISO - pin 12
- // * CLK - pin 13
- // * CS - pin 4
- //*******************************************************
- #include <SoftwareSerial.h>
- #include <SPI.h>
- #include <SD.h>
-
- SoftwareSerial mySerial(5,6); // Set Arduino pin 4 and 5 as softserial
-
- byte ZERO = 0x00;
- byte incomingbyte;
- long int j=0,k=0,count=0,i=0x0000;
- uint8_t MH,ML;
- boolean EndFlag=0;
- File myFile;
-
- void SendResetCmd()
- {
- mySerial.write(0x56);
- mySerial.write(ZERO);
- mySerial.write(0x26);
- mySerial.write(ZERO);
- }
-
- /*************************************/
- /* Set ImageSize :
- /* <1> 0x22 : 160*120
- /* <2> 0x11 : 320*240
- /* <3> 0x00 : 640*480
- /* <4> 0x1D : 800*600
- /* <5> 0x1C : 1024*768
- /* <6> 0x1B : 1280*960
- /* <7> 0x21 : 1600*1200
- /************************************/
- void SetImageSizeCmd(byte Size)
- {
- mySerial.write(0x56);
- mySerial.write(ZERO);
- mySerial.write(0x54);
- mySerial.write(0x01);
- mySerial.write(Size);
- }
-
- /*************************************/
- /* Set BaudRate :
- /* <1> 0xAE : 9600
- /* <2> 0x2A : 38400
- /* <3> 0x1C : 57600
- /* <4> 0x0D : 115200
- /* <5> 0xAE : 128000
- /* <6> 0x56 : 256000
- /*************************************/
- void SetBaudRateCmd(byte baudrate)
- {
- mySerial.write(0x56);
- mySerial.write(ZERO);
- mySerial.write(0x24);
- mySerial.write(0x03);
- mySerial.write(0x01);
- mySerial.write(baudrate);
- }
-
- void SendTakePhotoCmd()
- {
- mySerial.write(0x56);
- mySerial.write(ZERO);
- mySerial.write(0x36);
- mySerial.write(0x01);
- mySerial.write(ZERO);
- }
-
- void SendReadDataCmd()
- {
- MH=i/0x100;
- ML=i%0x100;
- mySerial.write(0x56);
- mySerial.write(ZERO);
- mySerial.write(0x32);
- mySerial.write(0x0c);
- mySerial.write(ZERO);
- mySerial.write(0x0a);
- mySerial.write(ZERO);
- mySerial.write(ZERO);
- mySerial.write(MH);
- mySerial.write(ML);
- mySerial.write(ZERO);
- mySerial.write(ZERO);
- mySerial.write(ZERO);
- mySerial.write(0x20);
- mySerial.write(ZERO);
- mySerial.write(0x0a);
- i+=0x20;
- }
-
- void StopTakePhotoCmd()
- {
- mySerial.write(0x56);
- mySerial.write(ZERO);
- mySerial.write(0x36);
- mySerial.write(0x01);
- mySerial.write(0x03);
- }
-
- void setup()
- {
-
- Serial.begin(115200);
- while (!Serial) {
- ; // wait for serial port to connect. Needed for Leonardo only
- }
-
- Serial.print("Initializing SD card...");
- // On the Ethernet Shield, CS is pin 4. It's set as an output by default.
- // Note that even if it's not used as the CS pin, the hardware SS pin
- // (10 on most Arduino boards, 53 on the Mega) must be left as an output
- // or the SD library functions will not work.
- if (!SD.begin(4)) {
- Serial.println("initialization failed!");
- return;
- }
- Serial.println("initialization done.");
- Serial.println("please waiting ....");
- }
-
- void loop()
- {
- byte a[32];
- int ii;
- mySerial.begin(115200);
- delay(200);
- SendResetCmd();//Wait 2-3 second to send take picture command
- delay(2000);
- SetBaudRateCmd(0x2A);
- delay(100);
- mySerial.begin(38400);
- delay(100);
- SetImageSizeCmd(0x21);
- delay(100);
- SendTakePhotoCmd();
- delay(3000);
- while(mySerial.available()>0)
- {
- incomingbyte=mySerial.read();
- }
- myFile = SD.open("pic.jpg", FILE_WRITE); //<strong><span style="color: #ff0000;">The file name should not be too long</span></strong>
- while(!EndFlag)
- {
- j=0;
- k=0;
- count=0;
- SendReadDataCmd();
- delay(5);
- while(mySerial.available()>0)
- {
- incomingbyte=mySerial.read();
- k++;
- delayMicroseconds(100);
- if((k>5)&&(j<32)&&(!EndFlag))
- {
- a[j]=incomingbyte;
- if((a[j-1]==0xFF)&&(a[j]==0xD9)) //tell if the picture is finished
- EndFlag=1;
- j++;
- count++;
- }
- }
-
- for(j=0;j<count;j++)
- {
- if(a[j]<0x10) Serial.print("0");
- Serial.print(a[j],HEX); // observe the image through serial port
- Serial.print(" ");
- }
- for(ii=0; ii<count; ii++)
- myFile.write(a[ii]);
- Serial.println();
- }
- myFile.close();
- Serial.print("Finished writing data to file");
- while(1);
- }
目前自己对于代码中绝大部分还是一知半解,接下来一段时间一边等待器件到来一边更新自己对于这段代码的学习理解。
二、器件准备
由于是新手,所以找器件还是花了时间,本来傻乎乎都要拜托海淘小能手的GF来帮我代购LinkSprite了,后来终于在淘宝上找到了卖的。这里就不贴连接了免得说广告。话说我是先问了DF家有没有jpeg摄像头,结果木有。(还有淘宝上那家DF官方淘宝,是真的么?)
目前摄像头还没到。
三、学习实践过程
2016年1月10日:学习SD卡模块的线路连接和实例代码。学习资料:
1.本论坛中用户“何处不江南”发布的youtubeSD卡教学视频翻译帖子:https://mc.dfrobot.com.cn/forum.php?mod=viewthread&tid=13198;
2.Arduino的IDE中自带的SD的示例程序;
线路连接:
利用公母头跳线将SD卡模块和Arduino板相连。其中:
VCC连接5V;
GND连接GND;
MOSI连接pin11;
MISO连接pin12;
SCK连接pin13;
SS连接pin4(教程和上面的视图中都是CS,不知为何我的SD卡上面是SS?请大牛指点);
代码编译与运行:
运行了Arduino IDE中自带的SD示例程序

一切正常,效果如下图所示:

令人惊奇的是,我实现时清空了我的摄影SD卡,然而程序还是识别出来很多历史信息。通过这个例子程序,可以学习到很多查看SD信息和SD卡中文件的方法,有必要学习的还是。
2016年1月11日:串口摄像头到了,晚上开始继续推进进度。
1.串口摄像头带了连接线,连接线是一端用白色塑料和在一起的,另一端的线头是中空的。串口摄像头的针脚插入白色塑料端,连接线的另外一段用公公线头插入。然后按照连接图连线,针脚不够要用到面包板;
2.编译上面查找的代码并上传到Arduino;
3.点击打开串口触发拍照;
4.发现串口出现都是乱码,原来是串口波特率还是9600,看了下代码,因为:
- void setup()
- {
-
- Serial.begin(115200);
- while (!Serial) {
- ; // wait for serial port to connect. Needed for Leonardo only
- }
所以将串口窗口波特率设置为115200,字符恢复;
5.正在等待结果,大量的16进制代码正在刷屏。然而等了好久了。。。6.怀疑是不是因为SD卡的格式不对。因为自己的卡式FAT32,注释里面显示要FAT16。可是格式化中已经没有FAT16,只有个exFAT,尝试后运行输出SD初始化失败。再加上插入SD卡可以看见PIC.JPG文件,只是没有写入数据。故猜测SD卡格式为FAT32应该还是可以的;
7.于是再次运行代码,持续等。这次就让他放着,不管什么时候总有个头吧,先去做其他事了。
|






taobao上的dfrobot是真的。