

【Arduino】168种传感器模块系列实验(158)---QMC5883L三轴罗盘
2021-01-237.9万
AI 快速预览详细
本文介绍了使用Arduino和QMC5883L三轴罗盘模块进行磁场检测的实验。通过具体的代码和图形编程,详细展示了如何使用该传感器。适合初学者动手实践,能够帮助你理解磁场检测的基本原理和应用。
|
37款传感器与模块的提法,在网络上广泛流传,其实Arduino能够兼容的传感器模块肯定是不止37种的。鉴于本人手头积累了一些传感器和执行器模块,依照实践出真知(一定要动手做)的理念,以学习和交流为目的,这里准备逐一动手试试做实验,不管成功与否,都会记录下来---小小的进步或是搞不定的问题,希望能够抛砖引玉。 【Arduino】168种传感器模块系列实验(资料代码+图形编程+仿真编程) 实验一百五十八:QMC5883L电子指南针罗盘模块 三轴磁场传感器GY-271 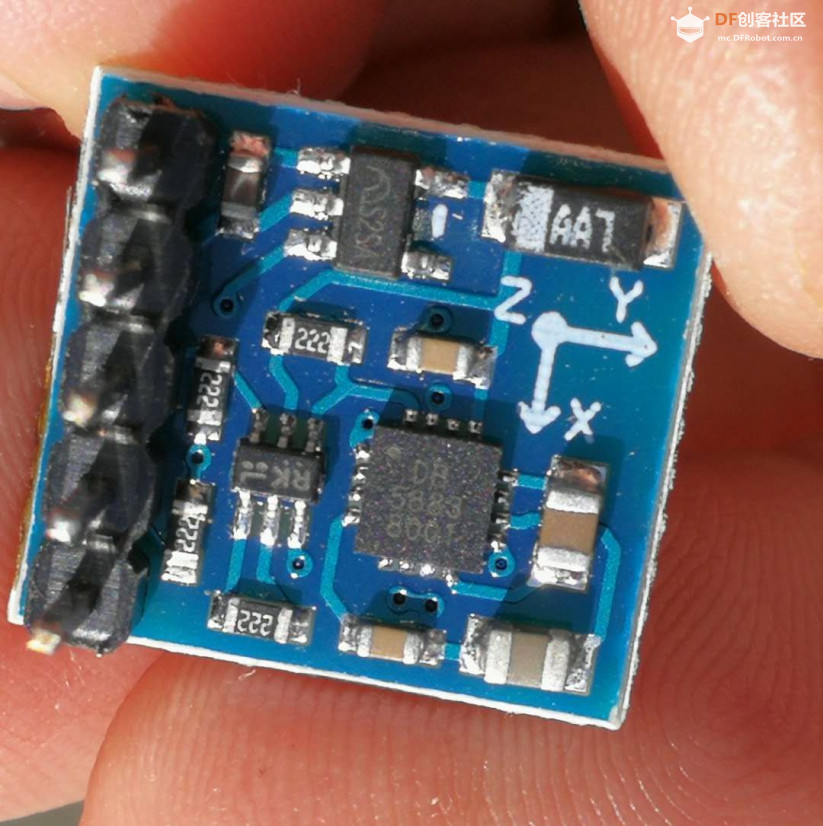 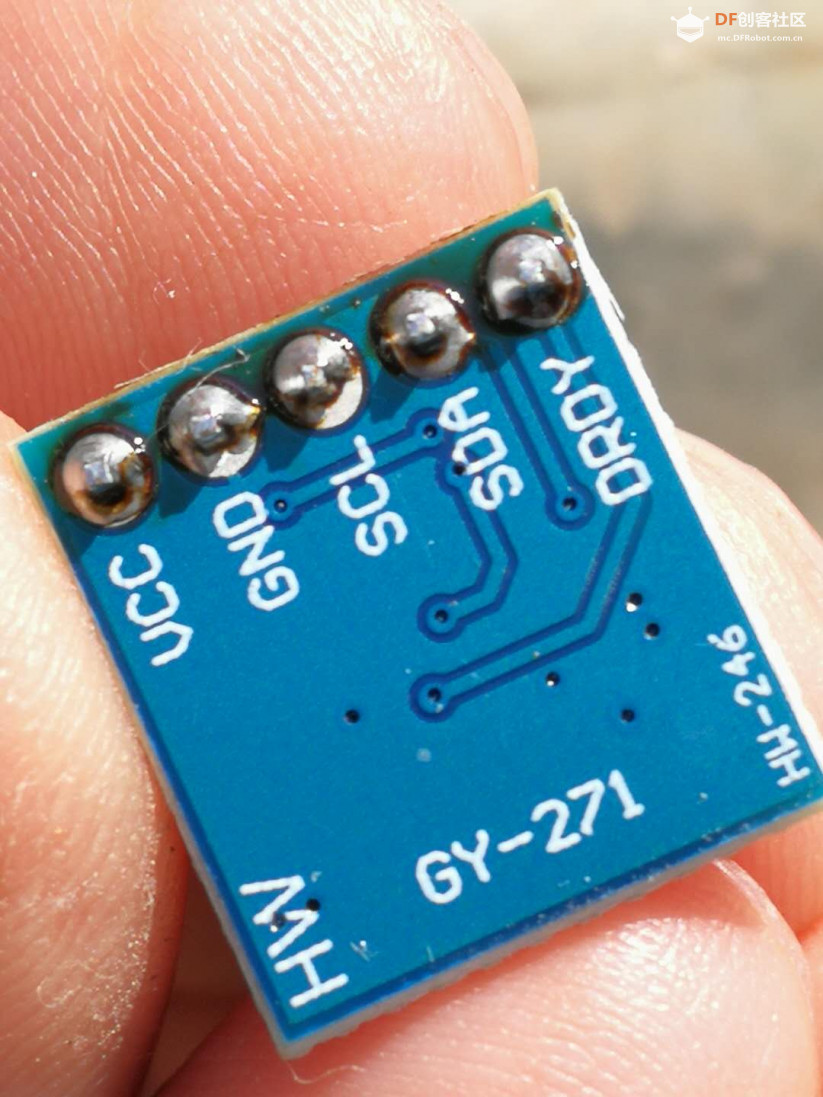 |
实验一百五十八:QMC5883L电子指南针罗盘模块 三轴磁场传感器GY-271
项目十四:QMC5883LCompass三轴磁力计罗盘传感器
实验开源代码
[code]/*
【Arduino】168种传感器模块系列实验(资料代码+图形编程+仿真编程)
实验一百五十八:QMC5883L电子指南针罗盘模块 三轴磁场传感器GY-271
项目十四:QMC5883LCompass三轴磁力计罗盘传感器
实验接线:
5883L-------------- UNO
VCC------------------- 5V
GND------------------- GND
SCL ------------------- A5
SDA------------------- A4
DRDY------------------ N/C
*/
#include
QMC5883LCompass compass;
void setup(void) {
// start serial port
Serial.begin(115200);
Serial.println("\n\n\nQMC5883 磁力计测试");
Serial.println("");
compass.init();
}
void loop() {
int x, y, z, a, b;
char myArray[3];
compass.read();
x = compass.getX();
y = compass.getY();
z = compass.getZ();
a = compass.getAzimuth();
b = compass.getBearing(a);
compass.getDirection(myArray, a);
Serial.print("X: ");
Serial.print(x);
Serial.print(" Y: ");
Serial.print(y);
Serial.print(" Z: ");
Serial.print(z);
Serial.print(" 方位角: ");
Serial.print(a);
Serial.print(" 方位: ");
Serial.print(b);
Serial.print(" 方向: ");
Serial.print(myArray[0]);
Serial.print(myArray[1]);
Serial.print(myArray[2]);
Serial.println();
delay(500);
}[/code]
[font="]
[/font]
实验一百五十八:QMC5883L电子指南针罗盘模块 三轴磁场传感器GY-271
项目十三:尝试不使用驱动库来读取XYZ
实验开源代码
[code]/*
【Arduino】168种传感器模块系列实验(资料代码+图形编程+仿真编程)
实验一百五十八:QMC5883L电子指南针罗盘模块 三轴磁场传感器GY-271
项目十三:尝试不使用驱动库来读取XYZ
实验接线:
5883L-------------- UNO
VCC------------------- 5V
GND------------------- GND
SCL ------------------- A5
SDA------------------- A4
DRDY------------------ N/C
*/
#include
#define HMC5883L_ADDR 0x0D //0011110b, I2C 7bit address of HMC5883
bool haveHMC5883L = false;
bool detectHMC5883L ()
{
// read identification registers
Wire.beginTransmission(HMC5883L_ADDR); //open communication with HMC5883
Wire.write(10); //select Identification register A
Wire.endTransmission();
Wire.requestFrom(HMC5883L_ADDR, 3);
if(3 == Wire.available()) {
char a = Wire.read();
char b = Wire.read();
char c = Wire.read();
if(a == 'H' && b == '4' && c == '3')
return true;
}
return false;
}
void setup()
{
//Initialize Serial and I2C communications
Serial.begin(9600);
Serial.println("GY271 TEST");
Wire.begin();
// lower I2C clock http://www.gammon.com.au/forum/?id=10896
TWBR = 78; // 25 kHz
TWSR |= _BV (TWPS0); // change prescaler
}
void loop()
{
bool detect = detectHMC5883L();
if(!haveHMC5883L)
{
if(detect)
{
haveHMC5883L = true;
Serial.println("We have HMC5883L, moving on");
// Put the HMC5883 IC into the correct operating mode
Wire.beginTransmission(HMC5883L_ADDR); //open communication with HMC5883
Wire.write(0x02); //select mode register
Wire.write(0x00); //continuous measurement mode
Wire.endTransmission();
}
else
{
Serial.println("No HMC5883L detected!");
delay(2000);
return;
}
}
else
{
if(!detect) {
haveHMC5883L = false;
Serial.println("Lost connection to HMC5883L!");
delay(2000);
return;
}
}
int x,y,z; //triple axis data
//Tell the HMC5883 where to begin reading data
Wire.beginTransmission(HMC5883L_ADDR);
Wire.write(0x0D); //select register 3, X MSB register
Wire.endTransmission();
//Read data from each axis, 2 registers per axis
Wire.requestFrom(HMC5883L_ADDR, 6);
if(6<=Wire.available()){
x = Wire.read()<<8; //X msb
x |= Wire.read(); //X lsb
z = Wire.read()<<8; //Z msb
z |= Wire.read(); //Z lsb
y = Wire.read()<<8; //Y msb
y |= Wire.read(); //Y lsb
}
//Print out values of each axis
Serial.print("x: ");
Serial.print(x);
Serial.print(" y: ");
Serial.print(y);
Serial.print(" z: ");
Serial.println(z);
delay(250);
}[/code]
实验一百五十八:QMC5883L电子指南针罗盘模块 三轴磁场传感器GY-271
项目十二:使用简单的代码扫描三轴磁场传感器GY-271的 I2C 地址
实验开源代码
[code]/*
【Arduino】168种传感器模块系列实验(资料代码+图形编程+仿真编程)
实验一百五十八:QMC5883L电子指南针罗盘模块 三轴磁场传感器GY-271
项目十二:使用简单的代码扫描三轴磁场传感器GY-271的 I2C 地址
实验接线:
5883L-------------- UNO
VCC------------------- 5V
GND------------------- GND
SCL ------------------- A5
SDA------------------- A4
DRDY------------------ N/C
*/
#include
void setup()
{
Wire.begin(); // Wire communication begin
Serial.begin(9600); // The baudrate of Serial monitor is set in 9600
while (!Serial); // Waiting for Serial Monitor
Serial.println("\nI2C Scanner");
}
void loop()
{
byte error, address; //variable for error and I2C address
int nDevices;
Serial.println("Scanning...");
nDevices = 0;
for (address = 1; address < 127; address++ )
{
// The i2c_scanner uses the return value of
// the Write.endTransmisstion to see if
// a device did acknowledge to the address.
Wire.beginTransmission(address);
error = Wire.endTransmission();
if (error == 0)
{
Serial.print("I2C device found at address 0x");
if (address < 16)
Serial.print("0");
Serial.print(address, HEX);
Serial.println(" !");
nDevices++;
}
else if (error == 4)
{
Serial.print("Unknown error at address 0x");
if (address < 16)
Serial.print("0");
Serial.println(address, HEX);
}
}
if (nDevices == 0)
Serial.println("No I2C devices found\n");
else
Serial.println("done\n");
delay(5000); // wait 5 seconds for the next I2C scan
}[/code]
实验一百五十八:QMC5883L电子指南针罗盘模块 三轴磁场传感器GY-271
项目十一:使用Adafruit库的HMC5883 磁力计测试
实验开源代码
[code]/*
【Arduino】168种传感器模块系列实验(资料代码+图形编程+仿真编程)
实验一百五十八:QMC5883L电子指南针罗盘模块 三轴磁场传感器GY-271
项目十一:使用Adafruit库的HMC5883 磁力计测试
实验接线:
5883L-------------- UNO
VCC------------------- 5V
GND------------------- GND
SCL ------------------- A5
SDA------------------- A4
DRDY------------------ N/C
*/
#include
#include
#include
/* Assign a unique ID to this sensor at the same time */
Adafruit_HMC5883_Unified mag = Adafruit_HMC5883_Unified(666666);
void displaySensorDetails(void)
{
sensor_t sensor;
mag.getSensor(&sensor);
Serial.println("------------------------------------");
Serial.print ("Sensor: "); Serial.println(sensor.name);
Serial.print ("Driver Ver: "); Serial.println(sensor.version);
Serial.print ("Unique ID: "); Serial.println(sensor.sensor_id);
Serial.print ("Max Value: "); Serial.print(sensor.max_value); Serial.println(" uT");
Serial.print ("Min Value: "); Serial.print(sensor.min_value); Serial.println(" uT");
Serial.print ("Resolution: "); Serial.print(sensor.resolution); Serial.println(" uT");
Serial.println("------------------------------------");
Serial.println("");
delay(500);
}
void setup(void)
{
Serial.begin(9600);
Serial.println("HMC5883 Magnetometer Test"); Serial.println("");
/* Initialise the sensor */
if (!mag.begin())
{
/* There was a problem detecting the HMC5883 ... check your connections */
Serial.println("Ooops, no HMC5883 detected ... Check your wiring!");
while (1);
}
/* Display some basic information on this sensor */
displaySensorDetails();
}
void loop(void)
{
/* Get a new sensor event */
sensors_event_t event;
mag.getEvent(&event);
/* Display the results (magnetic vector values are in micro-Tesla (uT)) */
Serial.print("X: "); Serial.print(event.magnetic.x); Serial.print(" ");
Serial.print("Y: "); Serial.print(event.magnetic.y); Serial.print(" ");
Serial.print("Z: "); Serial.print(event.magnetic.z); Serial.print(" "); Serial.println("uT");
// Hold the module so that Z is pointing 'up' and you can measure the heading with x&y
// Calculate heading when the magnetometer is level, then correct for signs of axis.
float heading = atan2(event.magnetic.y, event.magnetic.x);
// Once you have your heading, you must then add your 'Declination Angle', which is the 'Error' of the magnetic field in your location.
// Find yours here: http://www.magnetic-declination.com/
// Mine is: -13* 2' W, which is ~13 Degrees, or (which we need) 0.22 radians
// If you cannot find your Declination, comment out these two lines, your compass will be slightly off.
float declinationAngle = 0.1;
heading += declinationAngle;
// Correct for when signs are reversed.
if (heading < 0)
heading += 2 * PI;
// Check for wrap due to addition of declination.
if (heading > 2 * PI)
heading -= 2 * PI;
// Convert radians to degrees for readability.
float headingDegrees = heading * 180 / M_PI;
Serial.print("Heading (degrees): "); Serial.println(headingDegrees);
delay(500);
}[/code]
[font="]
项目之十实验说明:这是第二次无法完成磁偏角的校准
第一次是使用QMC5883L的库,这次是使用HMC5883L的库,而实验采用模块的芯片是国产的DB5883L
这是三种有一定差异的不同产家的芯片,估计是在校准程序上有些不能兼容,其他功能还没有发现不兼容的情况。
[/font]
实验一百五十八:QMC5883L电子指南针罗盘模块 三轴磁场传感器GY-271
项目之十:根据当前位置来校正磁偏角
实验开源代码
[code]/*
【Arduino】168种传感器模块系列实验(资料代码+图形编程+仿真编程)
实验一百五十八:QMC5883L电子指南针罗盘模块 三轴磁场传感器GY-271
项目之十:根据当前位置来校正磁偏角
实验接线:
5883L-------------- UNO
VCC------------------- 5V
GND------------------- GND
SCL ------------------- A5
SDA------------------- A4
DRDY------------------ N/C
*/
#include
#include
#include
// Create a compass
HMC5883L_Simple Compass;
void setup() {
Serial.begin(9600);
Wire.begin();
// Magnetic Declination is the correction applied according to your present location
// in order to get True North from Magnetic North, it varies from place to place.
//
// The declination for your area can be obtained from http://www.magnetic-declination.com/
// Take the "Magnetic Declination" line that it gives you in the information,
//
// Examples:
// Christchurch, 23° 35' EAST
// Wellington , 22° 14' EAST
// Dunedin , 25° 8' EAST
// Auckland , 19° 30' EAST
//
Compass.SetDeclination(-0, 23, 'W');
// The device can operate in SINGLE (default) or CONTINUOUS mode
// SINGLE simply means that it takes a reading when you request one
// CONTINUOUS means that it is always taking readings
// for most purposes, SINGLE is what you want.
Compass.SetSamplingMode(COMPASS_CONTINUOUS);
// The scale can be adjusted to one of several levels, you can probably leave it at the default.
// Essentially this controls how sensitive the device is.
// Options are 088, 130 (default), 190, 250, 400, 470, 560, 810
// Specify the option as COMPASS_SCALE_xxx
// Lower values are more sensitive, higher values are less sensitive.
// The default is probably just fine, it works for me. If it seems very noisy
// (jumping around), incrase the scale to a higher one.
Compass.SetScale(COMPASS_SCALE_250);
// The compass has 3 axes, but two of them must be close to parallel to the earth's surface to read it,
// (we do not compensate for tilt, that's a complicated thing) - just like a real compass has a floating
// needle you can imagine the digital compass does too.
//
// To allow you to mount the compass in different ways you can specify the orientation:
// COMPASS_HORIZONTAL_X_NORTH (default), the compass is oriented horizontally, top - side up. when pointing North the X silkscreen arrow will point North
// COMPASS_HORIZONTAL_Y_NORTH, top-side up, Y is the needle,when pointing North the Y silkscreen arrow will point North
// COMPASS_VERTICAL_X_EAST, vertically mounted (tall) looking at the top side, when facing North the X silkscreen arrow will point East
// COMPASS_VERTICAL_Y_WEST, vertically mounted (wide) looking at the top side, when facing North the Y silkscreen arrow will point West
Compass.SetOrientation(COMPASS_HORIZONTAL_X_NORTH);
}
// Our main program loop.
void loop() {
float heading = Compass.GetHeadingDegrees();
Serial.print("Heading: \t");
Serial.println( heading );
delay(500);
}[/code]
[backcolor=rgb(255, 255, 255)][font="]
[/font][/backcolor]
为了从磁北得到真北,它因地而异。
例子:
基督城,东经 23° 35'
惠灵顿 , 22° 14' EAST
但尼丁,东经 25° 8'
奥克兰,东经 19° 30'
您所在地区的磁偏角可以从 http://www.magnetic-declination.com/ 获得
磁北(MN):地磁偏角:当地磁北向实际偏东时,地磁偏角为正,反之为负。
地磁偏角是指地球上任一处的磁北方向和正北方向之间的夹角。当地磁北向实际偏东时,地磁偏角为正,反之为负。地磁偏角在历史上最早由中国北宋科学家沈括记录在著作《梦溪笔谈》中:“方家以磁石磨针锋,则能指南,然常微偏东,不全南也。”而西方最早的记录则在此之后约400年。在地球上不同的地方,地磁偏角一般也不相同。在同一个地方,地磁偏角随着时间的推移也在不断变化。发生磁暴时和在磁力异常地区,如磁铁矿和高压线附近,地磁偏角将会产生急剧变化。在中国大陆的大部分地区,地磁偏角在-10°~+2°之间。在台湾则是-4°~-3°左右。正北(真北TN):