【项目背景】
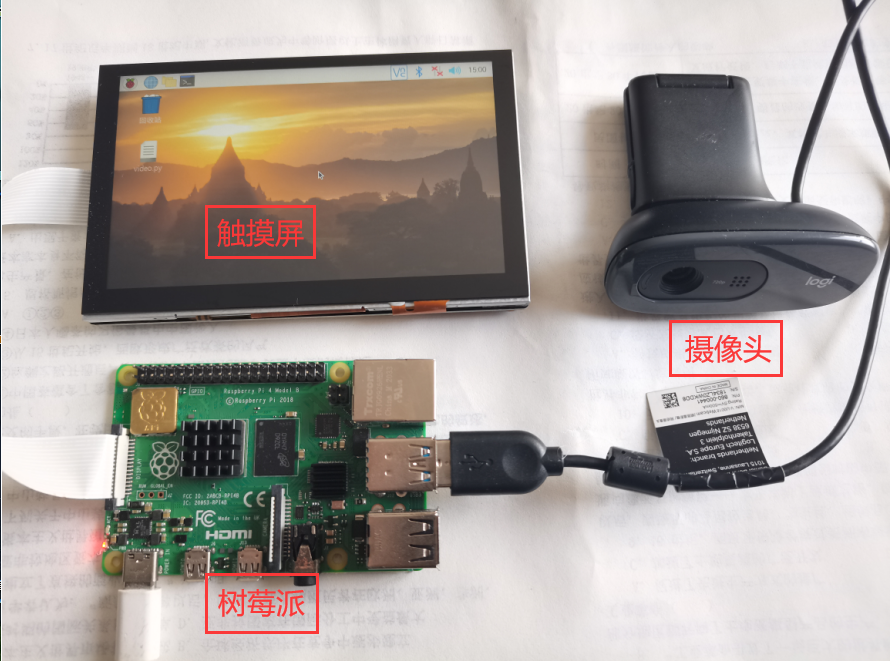
4月份获得了试用树莓派5寸TFT电容式触摸屏的机会,到手后,因工作原因,一直没有去过。这两天有点时间,看了一下Mediapipe官网,发现了“MediaPipe Iris”功能,

可惜,MediaPipe SDK的 python版本是不支持虹膜检测。
这个难不住我。
【项目设计】
先通过MediaPipe的人脸landmark提供了468个点位的人脸点云数据,
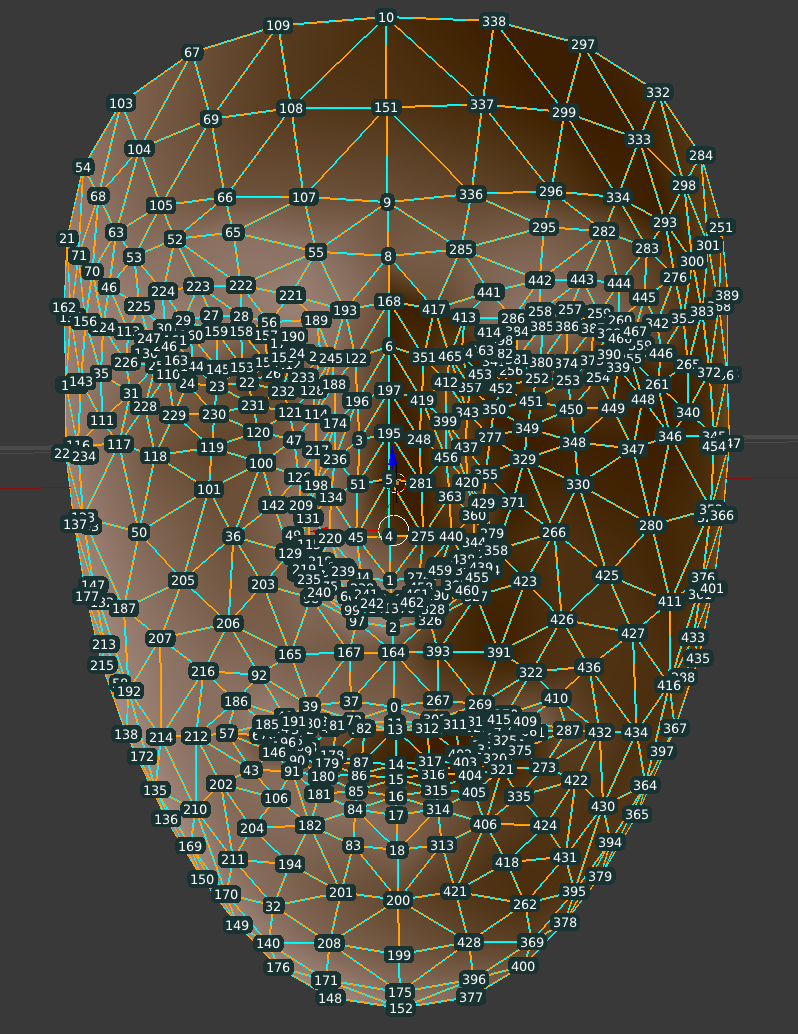
根据编号,很容筛选出左眼与右眼所在的区域所有点,然后完成区域的截取。
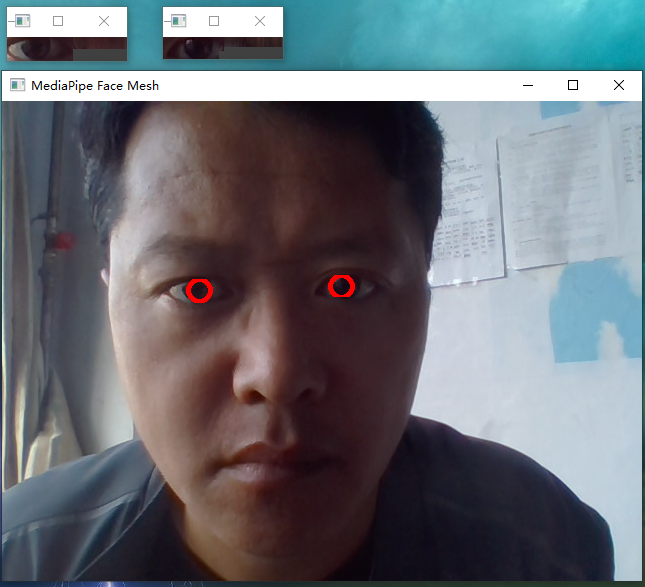
再使用Opencv的cv2.findContours实现瞳孔识别与跟踪。
【程序代码】
1、加载Mediapipe和OpenCV库
- import cv2 as cv2
- import mediapipe as mp
- import numpy as np
2、人脸landmark检测代码如下:
-
- # 导入可视化函数和可视化样式
- mp_drawing=mp.solutions.drawing_utils
- #mp_drawing_styles=mp.solutions.drawing_styles
- # 导入三维人脸关键点检测模型
- mp_face_mesh=mp.solutions.face_mesh
- drawing_spec = mp_drawing.DrawingSpec(thickness=1, circle_radius=1)
- cap = cv2.VideoCapture(0)
- with mp_face_mesh.FaceMesh(
- max_num_faces=4,
- min_detection_confidence=0.5,
- min_tracking_confidence=0.5) as face_mesh:
- while cap.isOpened():
- success, frame = cap.read()
- if not success:
- print("Ignoring empty camera frame.")
- # If loading a video, use 'break' instead of 'continue'.
- break
-
- h, w, c = frame.shape
- # image = cv2.resize(frame, (w //2, h//2))
- # frame = cv2.flip(frame, 1)
- image = np.copy(frame)
- h2, w2, c2 = image.shape
- # To improve performance, optionally mark the image as not writeable to
- # pass by reference.
- image = cv2.cvtColor(image, cv2.COLOR_BGR2RGB)
- results = face_mesh.process(image)
-
- # Draw the face mesh annotations on the image.
- image = cv2.cvtColor(image, cv2.COLOR_RGB2BGR)
- left_eyes = []
- right_eyes = []
- if results.multi_face_landmarks:
- for face_landmarks in results.multi_face_landmarks:
- for idx, landmark in enumerate(face_landmarks.landmark):
-
- if idx == 246 or idx == 159 or idx == 158 or idx == 145 or idx == 153 or idx == 190: # left
- #if idx == 53 or idx == 111: # left
- x1 = np.int(landmark.x * w2)
- y1 = np.int(landmark.y * h2)
- left_eyes.append((x1, y1))
- #cv2.circle(image, (x1, y1), 4, (255, 0, 255), 4, cv2.LINE_AA)
- if idx ==374 or idx == 380 or idx == 385 or idx == 386 or idx == 390 or idx == 414: # right
- #if idx == 276 or idx == 340: # right
- x1 = np.int(landmark.x * w2)
- y1 = np.int(landmark.y * h2)
- right_eyes.append((x1, y1))
- #cv2.circle(image, (x1, y1), 4, (0, 255, 255), 4, cv2.LINE_AA)
- if len(right_eyes)+len(left_eyes)==12:
- #矩形边框(Bounding Rectangle)是说,用一个最小的矩形,把找到的形状包起来。
- right_box = cv2.boundingRect(np.asarray(right_eyes))
-
- left_box = cv2.boundingRect(np.asarray(left_eyes))
-
- detect_iris(image, right_box, left_box)
- cv2.imshow('MediaPipe Face Mesh', image)
- if cv2.waitKey(5) & 0xFF == 27:
- cv2.imwrite("D:/iris_detect_result.png", image)
- break
- cap.release()
- cv2.waitKey(0)
- cv2.destroyAllWindows()
3、虹膜l检测代码如下:
-
- def detect_iris(image, right_box, left_box):
-
- left_roi = image[left_box[1]:left_box[1] + left_box[3], left_box[0]:left_box[0] + left_box[2]]
- cv2.imshow('left_eye', left_roi)
- lh, lw, lc = left_roi.shape
- right_roi = image[right_box[1]:right_box[1]+right_box[3],right_box[0]:right_box[0]+right_box[2]]
- cv2.imshow('right_eye', right_roi)
- rh, rw, rc = right_roi.shape
- if rh>0 and lh>0:
- rows, cols, _ =right_roi.shape #保存视频尺寸以备用
- gray_roi = cv2.cvtColor(right_roi, cv2.COLOR_BGR2GRAY) #转灰度
- gray_roi = cv2.GaussianBlur(gray_roi, (7, 7), 0) #高斯滤波一次
- _, threshold = cv2.threshold(gray_roi, 30, 255, cv2.THRESH_BINARY_INV) #二值化,依据需要改变阈值
- contours, _ = cv2.findContours(threshold, cv2.RETR_TREE, cv2.CHAIN_APPROX_SIMPLE) #画连通域
- contours = sorted(contours, key=lambda x: cv2.contourArea(x), reverse=True)
-
- for cnt in contours:
- (x, y, w, h) = cv2.boundingRect(cnt)
- cv2.circle(right_roi, (x + int(w/2), y + int(h/2)), int(h/2), (0, 0, 255), 3)
- break
-
- rows, cols, _ =left_roi.shape #保存视频尺寸以备用
- gray_roi = cv2.cvtColor(left_roi, cv2.COLOR_BGR2GRAY) #转灰度
- gray_roi = cv2.GaussianBlur(gray_roi, (7, 7), 0) #高斯滤波一次
- _, threshold = cv2.threshold(gray_roi, 30, 255, cv2.THRESH_BINARY_INV) #二值化,依据需要改变阈值
- contours, _ = cv2.findContours(threshold, cv2.RETR_TREE, cv2.CHAIN_APPROX_SIMPLE) #画连通域
- contours = sorted(contours, key=lambda x: cv2.contourArea(x), reverse=True)
-
- for cnt in contours:
- (x, y, w, h) = cv2.boundingRect(cnt)
- cv2.circle(left_roi, (x + int(w/2), y + int(h/2)), int(h/2), (0, 0, 255), 3)
- break
【硬件连接】
【测试图片】


【演示视频】
|