

WIDO板子测试AT命令不好用
2022-08-021.5万
AI 快速预览详细
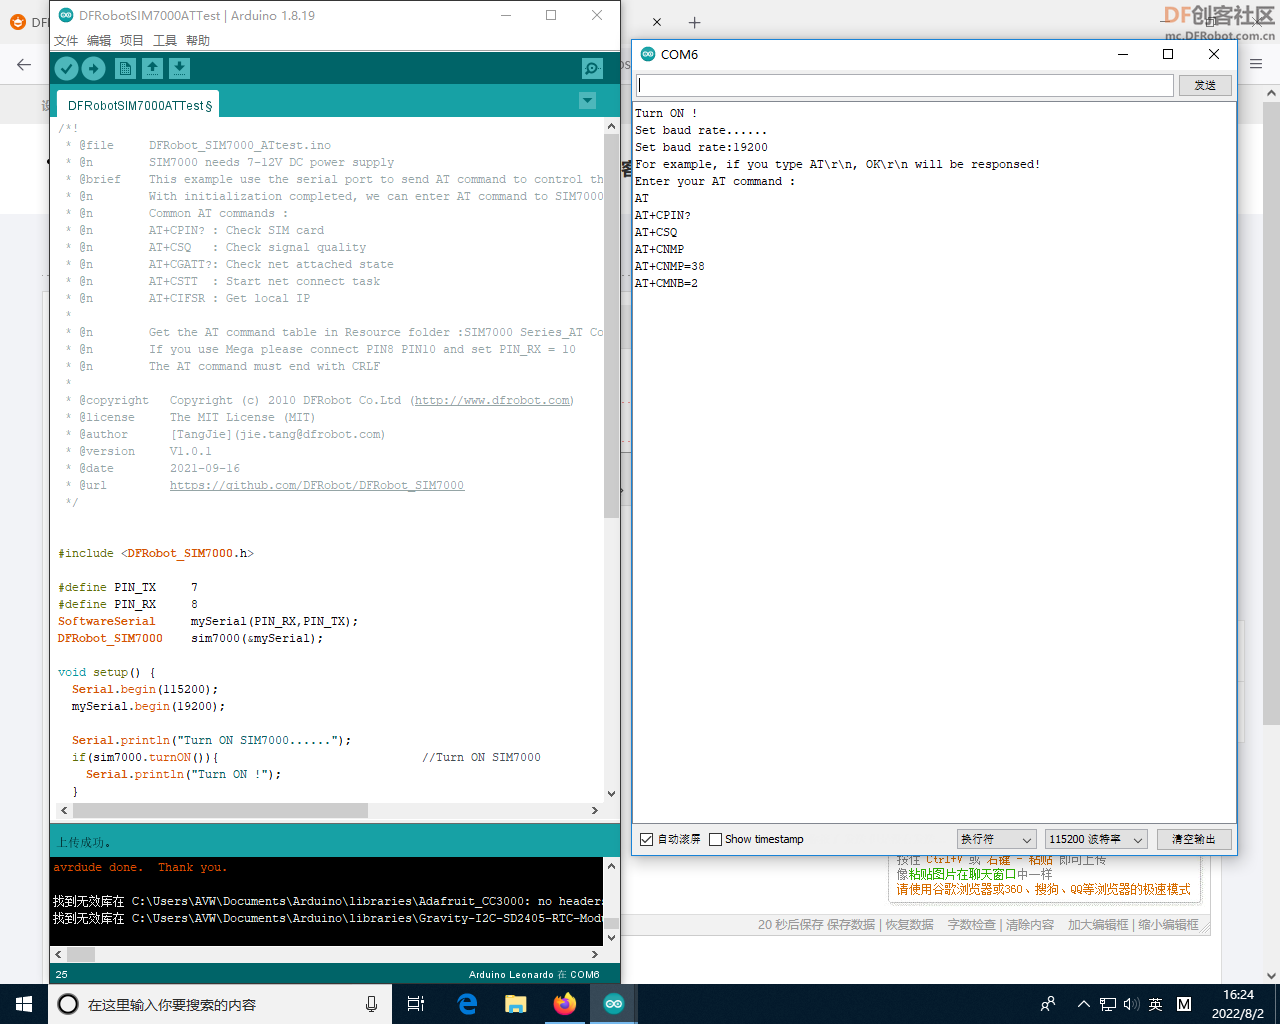
本文介绍了使用WIDO板子和SIM7000C模块进行AT命令测试时遇到的问题及解决方案。通过设置正确的波特率(从115200调整到19200),解决了AT命令无响应的问题。文章提供了详细的代码示例和步骤,帮助用户快速排查故障。
|
我用WIDO板子+sim7000c 测试AT命令不好用。 用的如下的示例。没有反馈呀 /*! * @file DFRobot_SIM7000_ATtest.ino * @N SIM7000 needs 7-12V DC power supply * @brief This example use the serial port to send AT command to control the SIM7000 * @n With initialization completed, we can enter AT command to SIM7000 directly * @n Common AT commands : * @n AT+CPIN? : Check SIM card * @n AT+CSQ : Check signal quality * @n AT+CGATT?: Check net attached state * @n AT+CSTT : Start net connect task * @n AT+CIFSR : Get local IP * * @n Get the AT command table in Resource folder :SIM7000 Series_AT Command Manual_V1.01.pdf * @n If you use Mega please connect PIN8 PIN10 and set PIN_RX = 10 * @n The AT command must end with CRLF * * @copyright Copyright (c) 2010 DFRobot Co.Ltd (http://www.dfrobot.com) * @license The MIT License (MIT) * @author [TangJie](jie.tang@dfrobot.com) * @version V1.0.1 * @date 2021-09-16 * @url https://github.com/DFRobot/DFRobot_SIM7000 */ #include <DFRobot_SIM7000.h> #define PIN_TX 7 #define PIN_RX 8 SoftwareSerial mySerial(PIN_RX,PIN_TX); DFRobot_SIM7000 sim7000(&mySerial); void setup() { Serial.begin(115200); mySerial.begin(19200); Serial.println("Turn ON SIM7000......"); if(sim7000.turnON()){ //Turn ON SIM7000 Serial.println("Turn ON !"); } Serial.println("Set baud rate......"); while(1){ if(sim7000.setBaudRate(19200)){ //Set SIM7000 baud rate from 115200 to 19200 reduce the baud rate to avoid distortion Serial.println("Set baud rate:19200"); break; }else{ Serial.println("Faile to set baud rate"); delay(1000); } } mySerial.begin(19200); Serial.println("For example, if you type AT\\r\\n, OK\\r\\n will be responsed!"); Serial.println("Enter your AT command :"); } void loop() { mySerial.listen(); while(mySerial.available()){ Serial.write(mySerial.read()); } mySerial.flush(); while(Serial.available()){ mySerial.write(Serial.read()); } delay(20); } |
-
TueAugust-202208021969..png (157.34 KB, 下载次数: 5095)


![[每周挑战]造物_造一个可控的元祖高达(RX-78-2)](https://img.dfrobot.com.cn/mc-front/5a4df8dcbf2cab453779e246/dadce46e0f21ce078765576d917d3cf6.jpg?imageView2/1/w/480/h/300/format/webp/q/80)

看了SIM7000C里面的程序,checkSendCmd和sendCmd的具体内容是啥。
[backcolor=rgb(30, 30, 30)][font=Consolas, "][color=#569cd6]bool DFRobot_SIM7000::turnON(void)
{
pinMode(12,OUTPUT);
if(checkSendCmd("AT\r\n", "OK", 100)){
sendCmd("AT+CPOWD=1\r\n");
delay(4000);
}
delay(100);
digitalWrite(12, HIGH);
delay(1000);
digitalWrite(12, LOW);
delay(7000);
if(checkSendCmd("AT\r\n", "OK", 100)){
return true;
}else{
return false;
}
}
[/font][/backcolor][/color]
2.GSM天线帮看看可以么,图里面的,还是必须要用PCB板的那个;
3.外部电源用了一个开关电源,输出电流应该没问题;
4.我用的就是at的示例代码。
另外我用GetPosition的示例,初始化都好用。但最后就是Wrong data try again,还是硬件上有问题?
wido板加了外部供电10v的,net灯也闪了。也不行呢。