

【花雕动手做】看见声音,基于Arduino系列音乐可视器(28)
2022-10-122.7万
精华项目
AI 快速预览详细
本文介绍了基于Arduino的音乐频谱可视器项目。作者从最简单的方案开始,逐步积累音乐频谱可视化的资料,并尝试各种方案,最终形成实用好玩的音乐可视器项目。文中提到使用102只乒乓球进行圆柱体螺旋排列,探索音乐可视化的新方式。适合零基础新手和音乐可视化爱好者。
|
偶然心血来潮,想要做一个音乐可视化的系列专题。这个专题的难度有点高,涉及面也比较广泛,相关的FFT和FHT等算法也相当复杂,不过还是打算从最简单的开始,实际动手做做试验,耐心尝试一下各种方案,逐步积累些有用的音乐频谱可视化的资料,也会争取成型一些实用好玩的音乐可视器项目。 在TB上收了100只乒乓球,加上赠送2只,一共102只,可选的排列方式有二种,一种是10X10平面排列,还有一种是圆柱体螺旋排列,目前准备试下后一个方案。 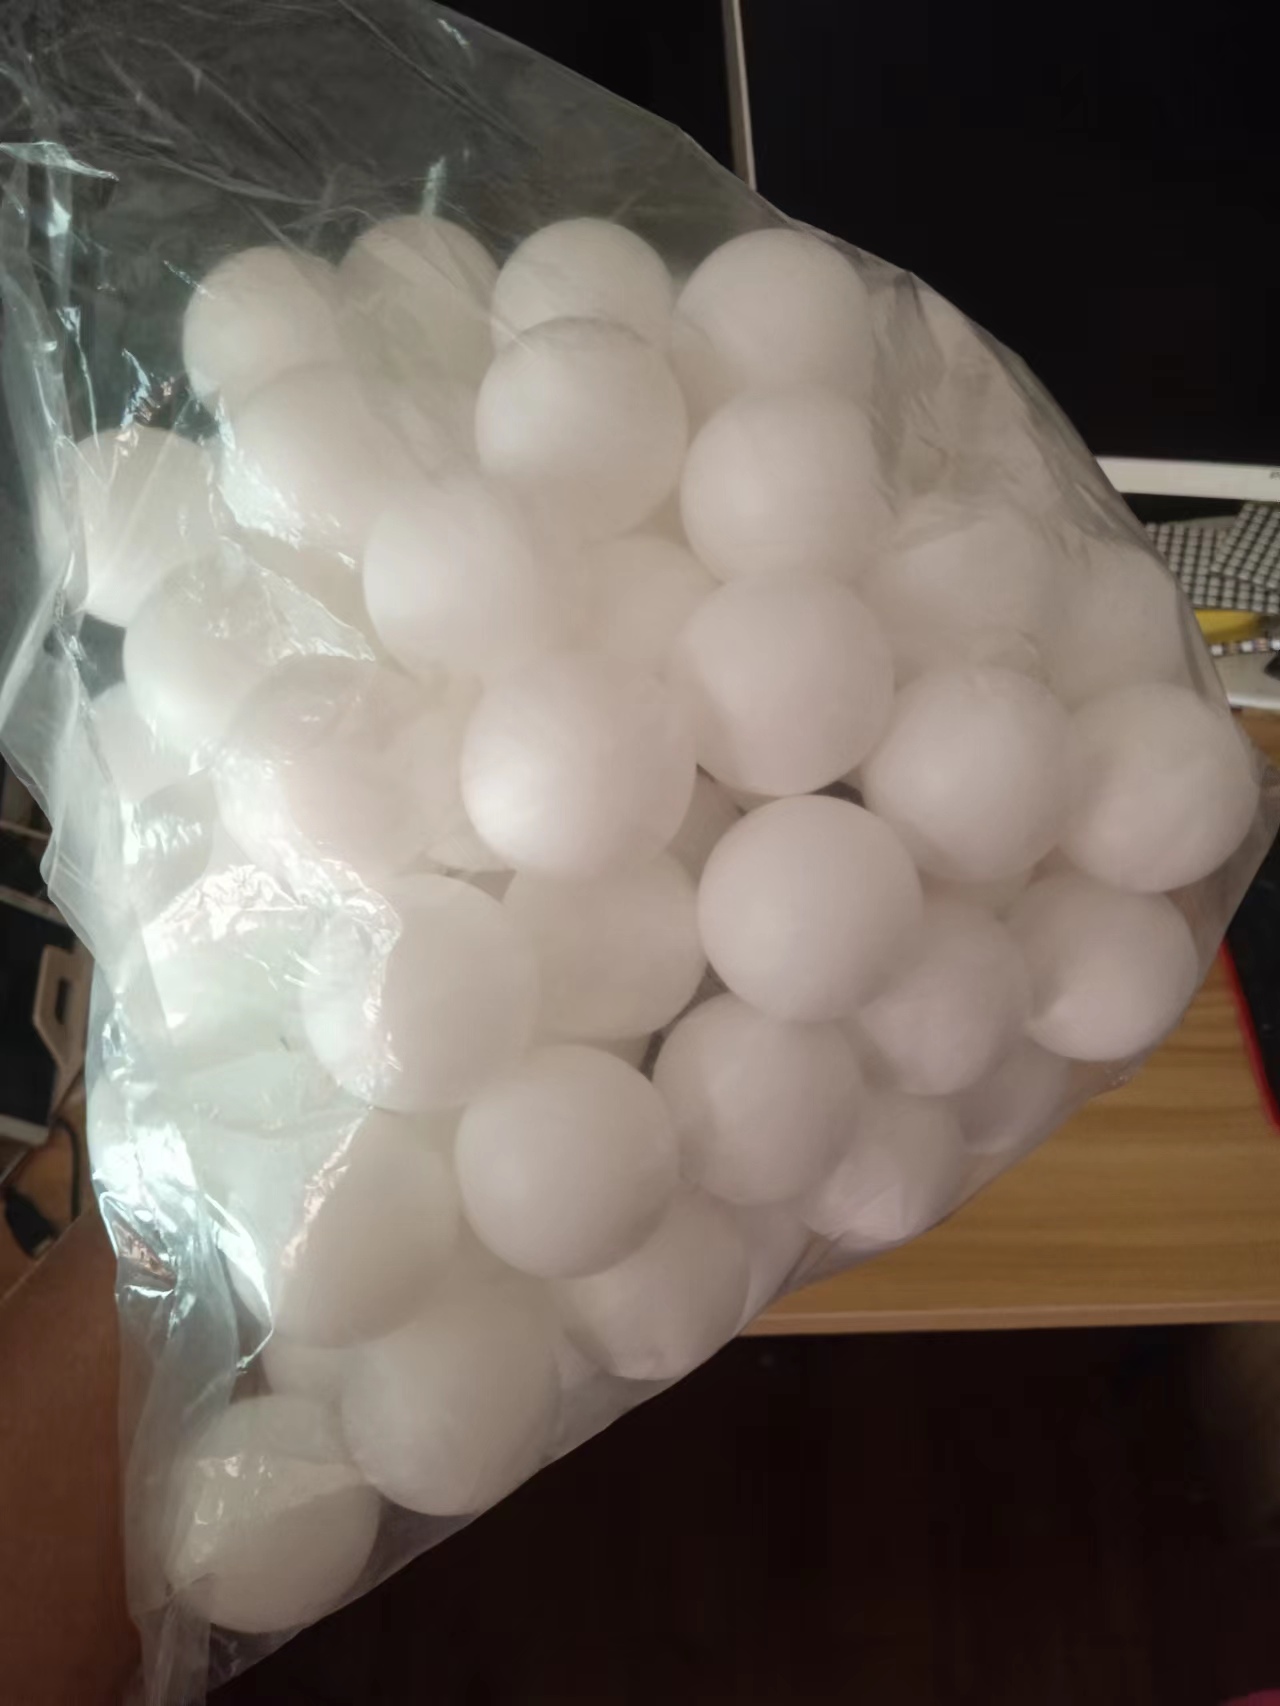 |

优酷:
B站:https://www.bilibili.com/video/B ... 87403d97f8d3cc0b7e5
[media=x,500,375]https://www.bilibili.com/video/BV1qN4y1w775/?vd_source=98c6b1fc23b2787403d97f8d3cc0b7e5[/media]
优酷:https://v.youku.com/v_show/id_XNTkxMDExNTg2NA==.html?spm=a2hcb.playlsit.page.1
B站:https://www.bilibili.com/video/BV1AD4y1C7vx/?vd_source=98c6b1fc23b2787403d97f8d3cc0b7e5
[media=x,500,375]https://v.youku.com/v_show/id_XNTkxMDExNTg2NA==.html?spm=a2hcb.playlsit.page.1[/media]
优酷:https://v.youku.com/v_show/id_XNTkxMTcxMTIwOA==.html?spm=a2hcb.playlsit.page.3
B站:https://www.bilibili.com/video/BV1UG411j7p9/?vd_source=98c6b1fc23b2787403d97f8d3cc0b7e5
[media=x,500,375]https://v.youku.com/v_show/id_XNTkxMTcxMTIwOA==.html?spm=a2hcb.playlsit.page.3[/media]
项目程序之三:多彩MegunoLink音乐节拍灯
模块接线:WS2812B接D6
MAX4466 UNO
VCC 5V
GND GND
OUT A0
[code]/*
【花雕动手做】有趣好玩的音乐可视化系列项目(28)--LED乒乓球灯
项目程序之三:多彩MegunoLink音乐节拍灯
模块接线:WS2812B接D6
MAX4466 UNO
VCC 5V
GND GND
OUT A0
*/
#include
#include
#include
#define N_PIXELS 101
#define MIC_PIN A0
#define LED_PIN 6
#define NOISE 10
#define TOP (N_PIXELS+2)
#define LED_TYPE WS2811
#define BRIGHTNESS 10
#define COLOR_ORDER GRB
CRGB leds[N_PIXELS];
int lvl = 0, minLvl = 0, maxLvl = 10;
ExponentialFilter
void setup() {
FastLED.addLeds
FastLED.setBrightness(BRIGHTNESS);
}
void loop() {
int n, height;
n = analogRead(MIC_PIN);
n = abs(1023 - n);
n = (n <= NOISE) ? 0 : abs(n - NOISE);
ADCFilter.Filter(n);
lvl = ADCFilter.Current();
// Serial.print(n);
// Serial.print(" ");
// Serial.println(lvl);
height = TOP * (lvl - minLvl) / (long)(maxLvl - minLvl);
if (height < 0L) height = 0;
else if (height > TOP) height = TOP;
for (uint8_t i = 0; i < N_PIXELS; i++) {
if (i >= height) leds[i] = CRGB(0, 0, 0);
else leds[i] = Wheel( map( i, 0, N_PIXELS - 1, 30, 150 ) );
}
FastLED.show();
}
CRGB Wheel(byte WheelPos) {
if (WheelPos < 85)
return CRGB(WheelPos * 3, 255 - WheelPos * 3, 0);
else if (WheelPos < 170) {
WheelPos -= 85;
return CRGB(255 - WheelPos * 3, 0, WheelPos * 3);
} else {
WheelPos -= 170;
return CRGB(0, WheelPos * 3, 255 - WheelPos * 3);
}
}[/code]
输出是直流耦合的。当输出信号处于静止状态时,它将位于 Vcc/2。如果 Vcc 为 5V,则输出将为 2.5V。如果输出需要交流耦合,可以在输出引脚和它驱动的电路的输入之间增加一个100uF的电容。
背面的小型单圈电位器可让您将增益从 25x 调整到 125x。逆时针旋转电位器会增加增益,而逆时针旋转会降低增益。
是微功率运算放大器,经过优化,可用作麦克风前置放大器。它们提供了优化的增益带宽产品与电源电流的理想组合,以及超小型封装中实现低电压工件环境。 MAX4466具有增益稳定特性,仅需24μA的电源电流即可提供200kHz的增益带宽。经过解压缩,可实现+5V/V的最小稳定增益,并提供600KHZ增益带宽。此外这些放大器具有轨到轨输出,高 AVOL ,以及出色的电源抑制和共模抑制比,适合在嘈杂环境中工作。广泛应用于蜂窝电话、数字复读装置、耳机、助听器、麦克风前置放大器、便携计算机和语音识别系统中。
[backcolor=rgb(255, 255, 255)][font=Tahoma, "]MAX4466模块特点[/font][/backcolor]
[backcolor=rgb(255, 255, 255)][font=Tahoma, "]电源电压:+2.4V至+5.5V(可直接接STM/ARDUNIO/树莓派等开发板)[/font][/backcolor]
[backcolor=rgb(255, 255, 255)][font=Tahoma, "]电源抑制比:112dB[/font][/backcolor]
[backcolor=rgb(255, 255, 255)][font=Tahoma, "]共模抑制比:126dB[/font][/backcolor]
[backcolor=rgb(255, 255, 255)][font=Tahoma, "]AVOL:125dB(RL = 100kΩ) 轨到轨输出[/font][/backcolor]
[backcolor=rgb(255, 255, 255)][font=Tahoma, "]静态电源电流:24μA[/font][/backcolor]
[backcolor=rgb(255, 255, 255)][font=Tahoma, "]增益带宽:600kHz[/font][/backcolor]
[backcolor=rgb(255, 255, 255)][font=Tahoma, "]尺寸:20.8mm x 13.8mm x 7.5mm/0.8 x 0.5 x 0.3inch[/font][/backcolor]
[backcolor=rgb(255, 255, 255)][font=Tahoma, "]
[/font][/backcolor]
优酷:https://v.youku.com/v_show/id_XNTkxMTY4OTUxNg==.html?spm=a2hcb.playlsit.page.3
B站:https://www.bilibili.com/video/B ... 87403d97f8d3cc0b7e5
[media=x,500,375]https://www.bilibili.com/video/BV1km4y1A7Tn/?vd_source=98c6b1fc23b2787403d97f8d3cc0b7e5[/media]
项目程序之二:NeoPixel 环形灯测试程序
模块接线:WS2812B接D6
MAX4466 UNO
VCC 5V
GND GND
OUT A0
[code]/*
【花雕动手做】有趣好玩的音乐可视化系列项目(28)--LED乒乓球灯
项目程序之二:NeoPixel 环形灯测试程序
模块接线:WS2812B接D6
MAX4466 UNO
VCC 5V
GND GND
OUT A0
*/
#include
#ifdef __AVR__
#include
#endif
// Which pin on the Arduino is connected to the NeoPixels?
// On a Trinket or Gemma we suggest changing this to 1:
#define LED_PIN 6
// How many NeoPixels are attached to the Arduino?
#define LED_COUNT 101
// Declare our NeoPixel strip object:
Adafruit_NeoPixel strip(LED_COUNT, LED_PIN, NEO_GRB + NEO_KHZ800);
// Argument 1 = Number of pixels in NeoPixel strip
// Argument 2 = Arduino pin number (most are valid)
// Argument 3 = Pixel type flags, add together as needed:
// NEO_KHZ800 800 KHz bitstream (most NeoPixel products w/WS2812 LEDs)
// NEO_KHZ400 400 KHz (classic 'v1' (not v2) FLORA pixels, WS2811 drivers)
// NEO_GRB Pixels are wired for GRB bitstream (most NeoPixel products)
// NEO_RGB Pixels are wired for RGB bitstream (v1 FLORA pixels, not v2)
// NEO_RGBW Pixels are wired for RGBW bitstream (NeoPixel RGBW products)
// setup() function -- runs once at startup --------------------------------
void setup() {
// These lines are specifically to support the Adafruit Trinket 5V 16 MHz.
// Any other board, you can remove this part (but no harm leaving it):
#if defined(__AVR_ATtiny85__) && (F_CPU == 16000000)
clock_prescale_set(clock_div_1);
#endif
// END of Trinket-specific code.
strip.begin(); // INITIALIZE NeoPixel strip object (REQUIRED)
strip.show(); // Turn OFF all pixels ASAP
strip.setBrightness(150); // Set BRIGHTNESS to about 1/5 (max = 255)
}
// loop() function -- runs repeatedly as long as board is on ---------------
void loop() {
// Fill along the length of the strip in various colors...
colorWipe(strip.Color(255, 0, 0), 250); // Red
colorWipe(strip.Color( 0, 255, 0), 250); // Green
colorWipe(strip.Color( 0, 0, 255), 250); // Blue
// Do a theater marquee effect in various colors...
theaterChase(strip.Color(127, 127, 127), 250); // White, half brightness
theaterChase(strip.Color(127, 0, 0), 250); // Red, half brightness
theaterChase(strip.Color( 0, 0, 127), 250); // Blue, half brightness
rainbow(10); // Flowing rainbow cycle along the whole strip
theaterChaseRainbow(50); // Rainbow-enhanced theaterChase variant
}
// Some functions of our own for creating animated effects -----------------
// Fill strip pixels one after another with a color. Strip is NOT cleared
// first; anything there will be covered pixel by pixel. Pass in color
// (as a single 'packed' 32-bit value, which you can get by calling
// strip.Color(red, green, blue) as shown in the loop() function above),
// and a delay time (in milliseconds) between pixels.
void colorWipe(uint32_t color, int wait) {
for (int i = 0; i < strip.numPixels(); i++) { // For each pixel in strip...
strip.setPixelColor(i, color); // Set pixel's color (in RAM)
strip.show(); // Update strip to match
delay(30); // Pause for a moment
}
}
// Theater-marquee-style chasing lights. Pass in a color (32-bit value,
// a la strip.Color(r,g,b) as mentioned above), and a delay time (in ms)
// between frames.
void theaterChase(uint32_t color, int wait) {
for (int a = 0; a < 20; a++) { // Repeat 10 times...
for (int b = 0; b < 3; b++) { // 'b' counts from 0 to 2...
strip.clear(); // Set all pixels in RAM to 0 (off)
// 'c' counts up from 'b' to end of strip in steps of 3...
for (int c = b; c < strip.numPixels(); c += 3) {
strip.setPixelColor(c, color); // Set pixel 'c' to value 'color'
}
strip.show(); // Update strip with new contents
delay(30); // Pause for a moment
}
}
}
// Rainbow cycle along whole strip. Pass delay time (in ms) between frames.
void rainbow(int wait) {
// Hue of first pixel runs 5 complete loops through the color wheel.
// Color wheel has a range of 65536 but it's OK if we roll over, so
// just count from 0 to 5*65536. Adding 256 to firstPixelHue each time
// means we'll make 5*65536/256 = 1280 passes through this outer loop:
for (long firstPixelHue = 0; firstPixelHue < 2 * 65536; firstPixelHue += 256) {
for (int i = 0; i < strip.numPixels(); i++) { // For each pixel in strip...
// Offset pixel hue by an amount to make one full revolution of the
// color wheel (range of 65536) along the length of the strip
// (strip.numPixels() steps):
int pixelHue = firstPixelHue + (i * 65536L / strip.numPixels());
// strip.ColorHSV() can take 1 or 3 arguments: a hue (0 to 65535) or
// optionally add saturation and value (brightness) (each 0 to 255).
// Here we're using just the single-argument hue variant. The result
// is passed through strip.gamma32() to provide 'truer' colors
// before assigning to each pixel:
strip.setPixelColor(i, strip.gamma32(strip.ColorHSV(pixelHue)));
}
strip.show(); // Update strip with new contents
delay(2); // Pause for a moment
}
}
// Rainbow-enhanced theater marquee. Pass delay time (in ms) between frames.
void theaterChaseRainbow(int wait) {
int firstPixelHue = 0; // First pixel starts at red (hue 0)
for (int a = 0; a < 30; a++) { // Repeat 30 times...
for (int b = 0; b < 3; b++) { // 'b' counts from 0 to 2...
strip.clear(); // Set all pixels in RAM to 0 (off)
// 'c' counts up from 'b' to end of strip in increments of 3...
for (int c = b; c < strip.numPixels(); c += 3) {
// hue of pixel 'c' is offset by an amount to make one full
// revolution of the color wheel (range 65536) along the length
// of the strip (strip.numPixels() steps):
int hue = firstPixelHue + c * 65536L / strip.numPixels();
uint32_t color = strip.gamma32(strip.ColorHSV(hue)); // hue -> RGB
strip.setPixelColor(c, color); // Set pixel 'c' to value 'color'
}
strip.show(); // Update strip with new contents
delay(50); // Pause for a moment
firstPixelHue += 65536 / 90; // One cycle of color wheel over 90 frames
}
}
}[/code]
项目程序之一:绿色单灯循环测试
模块接线:WS2812B接D6
MAX4466 UNO
VCC 5V
GND GND
OUT D6
[code]/*
【花雕动手做】有趣好玩的音乐可视化系列项目(28)--LED乒乓球灯
项目程序之一:绿色单灯循环测试
模块接线:WS2812B接D6
MAX4466 UNO
VCC 5V
GND GND
OUT D6
*/
#include
#define PIN 6
#define MAX_LED 101
#define ADD true
#define SUB false
int val = 0;
boolean stat = ADD;
Adafruit_NeoPixel strip = Adafruit_NeoPixel( MAX_LED, PIN, NEO_RGB + NEO_KHZ800 );
void setup() {
strip.begin();
strip.show();
}
void loop() {
uint8_t i, a = 0;
uint32_t color = strip.Color(255, 100, 0);
while (a < 102)
{
for (i = 0; i < 101; i++)
{
if (i == a) strip.setPixelColor(i, color);
else strip.setPixelColor(i, 0);
}
strip.show();
delay(20);
a++;
}
}[/code]