随着人工智能技术的飞速进步,计算机视觉领域取得了长足的进步,物体检测、图像分割、姿态估计等任务得到了广泛的关注。YOLO(You Only Look Once)系列算法作为物体检测领域的杰出代表,以其速度快、准确率高而广受欢迎。本文将详细介绍如何在计算机上快速运行 YOLOv8 实现检测、分割和姿态估计。通过阅读本文,您将快速了解如何在 Windows 系统上安装、配置和运行 YOLOv8 进行实时识别,为实际应用打下坚实的基础。
安装环境
- 个人电脑:ThinkPad AMD
- 操作系统:Windows 11 x64
- 软件:Python 3.11
- 环境:Anaconda
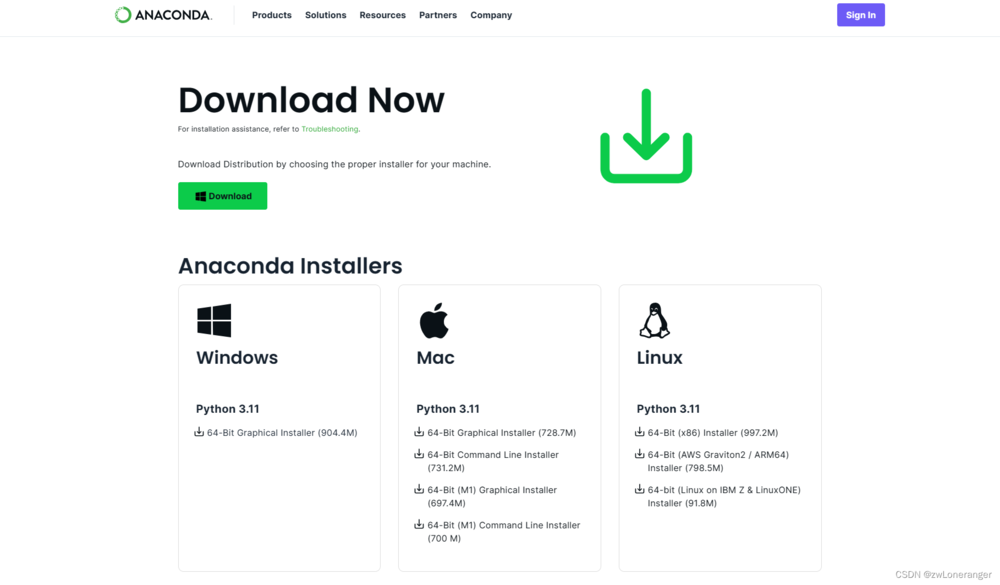
1.下载Anaconda3:
网址:https://www.anaconda.com/download/success
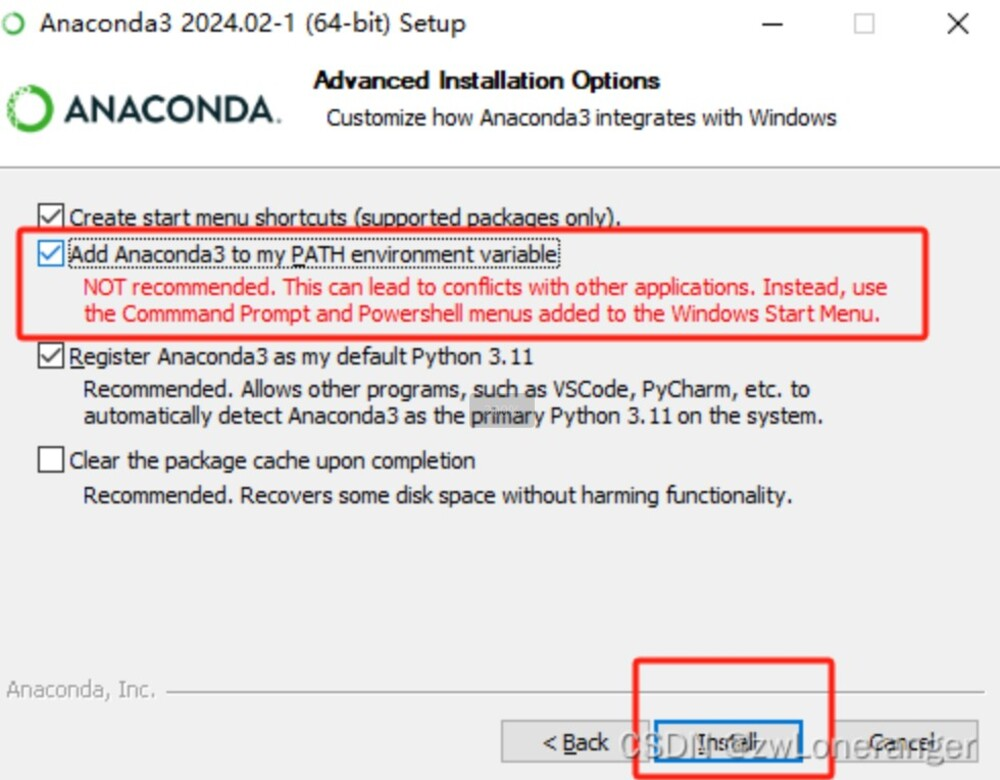
2.安装Anaconda3
我选择的安装目录是:D:\Anaconda\Anaconda3。勾选‘将 Anaconda3 添加到我的 PATH 环境变量中’,将 Anaconda 添加到环境变量中。
3. 验证安装
请打开PowerShell并输入命令conda -V。
如果您没有看到错误:
‘conda’ 不是内部或外部命令,也不是可运行程序或批处理文件
表示安装成功。如果安装时没有将 Anaconda 添加到环境变量中,则需要手动添加 Anaconda 环境变量。
4.创建并激活虚拟环境
YOLOv8 可以使用官方提供的库,YOLOv10 的部署步骤与上述1-3步相同,详细部署说明请参考:https://github.com/THU-MIG/yolov10。 - Bash
- #create new environment
- conda create -n yolo8test python==3.8
- #activate environment
- conda activate yolo8test
- # Install the ultralytics package from PyPI
- pip install ultralytics
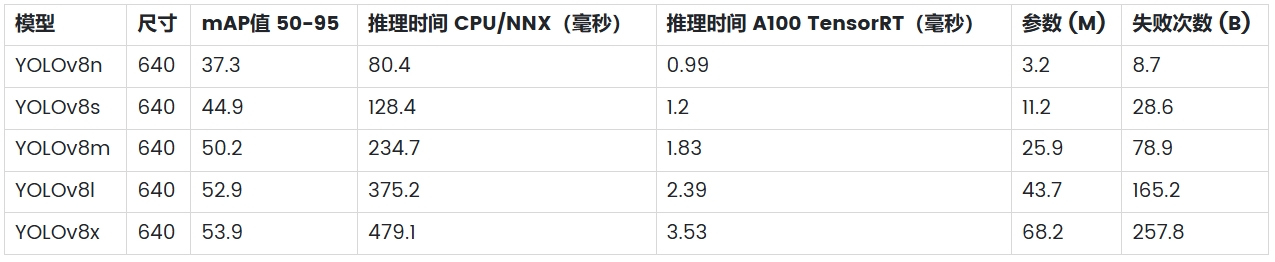
不同模型性能比较
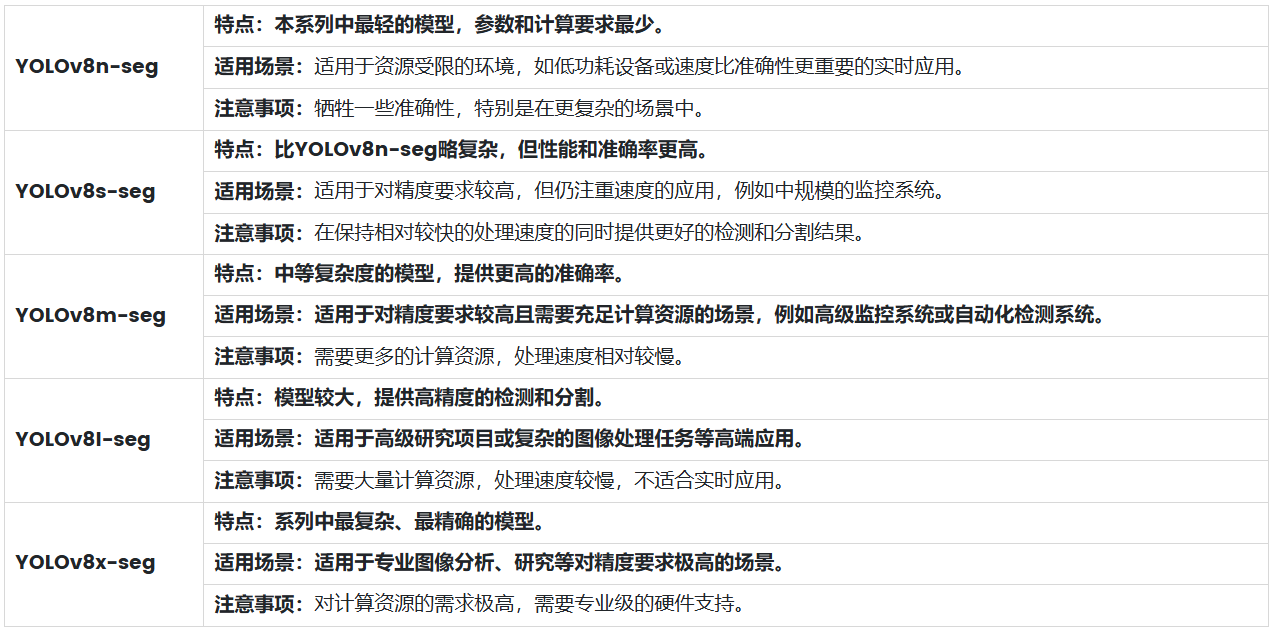
官网提供了多种尺寸的YOLOv8模型,参数对比如下表:
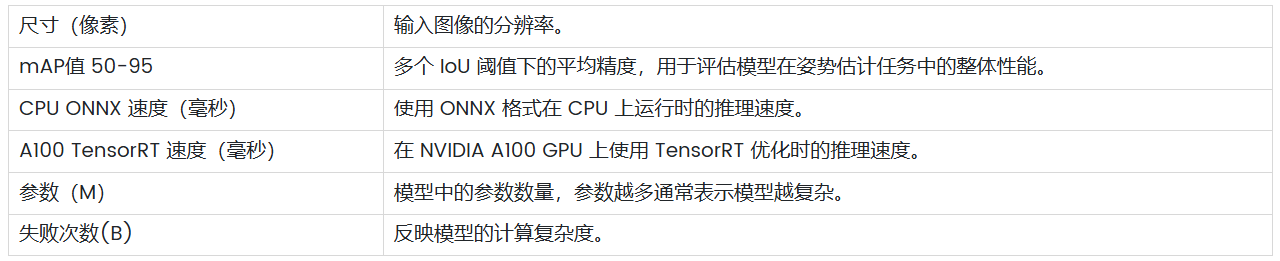
参数解释
以YOLOv8分割对象分割模型为例,这些模型的复杂度、参数数量、计算要求、准确率、速度等各有不同,适用于不同的应用场景。
物体检测
代码: - Python
- import cv2
- import time
- import torch
- from ultralytics import YOLO
-
- # load YOLOv8n
- model = YOLO('yolov8n.pt')
- cap = cv2.VideoCapture(0)
-
- if not cap.isOpened():
- print("error")
- exit()
-
- width = int(cap.get(cv2.CAP_PROP_FRAME_WIDTH))
- height = int(cap.get(cv2.CAP_PROP_FRAME_HEIGHT))
-
- prev_time = 0
- fps = 0
- while True:
-
- ret, frame = cap.read()
-
- if not ret:
- print("error")
- break
-
- results = model(frame, device='cpu')
-
- for result in results:
- boxes = result.boxes.xyxy.cpu().numpy()
- confidences = result.boxes.conf.cpu().numpy()
- class_ids = result.boxes.cls.cpu().numpy().astype(int)
- for i in range(len(boxes)):
- box = boxes[i]
- x1, y1, x2, y2 = map(int, box[:4])
- confidence = confidences[i]
- class_id = class_ids[i]
- label = result.names[class_id]
- cv2.rectangle(frame, (x1, y1), (x2, y2), (0, 255, 0), 2)
- cv2.putText(frame, f'{label} {confidence:.2f}', (x1, y1 - 10),
- cv2.FONT_HERSHEY_SIMPLEX, 0.9, (36, 255, 12), 2)
-
- curr_time = time.time()
- fps = 1 / (curr_time - prev_time)
- prev_time = curr_time
-
- cv2.putText(frame, f'FPS: {fps:.2f}', (10, 30), cv2.FONT_HERSHEY_SIMPLEX, 1, (0, 255, 0), 2)
- cv2.imshow('YOLOv8n Real-time', frame)
- if cv2.waitKey(1) & 0xFF == ord('q'):
- break
-
- cap.release()
- cv2.destroyAllWindows()
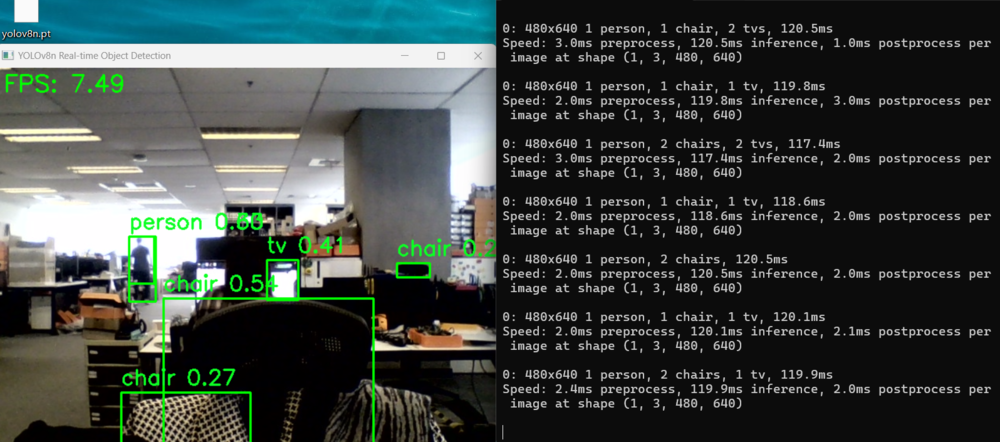
将代码保存为名为“yolov8ndet.py”的 Python 文件并运行它。
- Bash
- python yolov8ndet.py
使用YOLOv8n模型测试性能:运行速度为7.49.
 - Python
- import cv2
- import time
- # import torch
- from ultralytics import YOLO
- from PIL import Image
- import numpy as np
-
- model = YOLO('yolov8n-seg.pt')
- cap = cv2.VideoCapture(0)
-
- if not cap.isOpened():
- print("error")
- exit()
-
- width = int(cap.get(cv2.CAP_PROP_FRAME_WIDTH))
- height = int(cap.get(cv2.CAP_PROP_FRAME_HEIGHT))
-
-
- prev_time = 0
- fps = 0
-
- while True:
-
- ret, frame = cap.read()
- if not ret:
- print("error")
- break
- results = model(frame, device='cpu')
- for result in results:
-
- pil_image = Image.fromarray(results[0].plot()[:, :, ::-1])
- frame = np.array(pil_image)
-
- boxes = result.boxes.xyxy.cpu().numpy()
- confidences = result.boxes.conf.cpu().numpy()
- class_ids = result.boxes.cls.cpu().numpy().astype(int)
-
- for i in range(len(boxes)):
- box = boxes[i]
- x1, y1, x2, y2 = map(int, box[:4])
- confidence = confidences[i]
- class_id = class_ids[i]
- label = result.names[class_id]
-
- curr_time = time.time()
- fps = 1 / (curr_time - prev_time)
- prev_time = curr_time
-
- cv2.putText(frame, f'FPS: {fps:.2f}', (10, 30), cv2.FONT_HERSHEY_SIMPLEX, 1, (0, 255, 0), 2)
- cv2.imshow('YOLOv8n Real-time', frame)
-
-
- if cv2.waitKey(1) & 0xFF == ord('q'):
- break
-
- cap.release()
- cv2.destroyAllWindows()
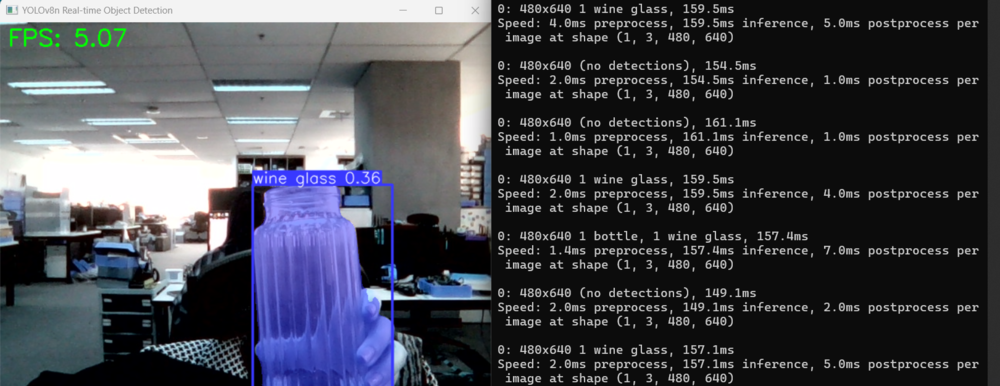
将代码保存为名为“yolov8nseg.py”的 Python 文件并运行它。
- Bash
- python yolov8nseg.py
使用YOLOv8n模型测试性能:运行速度为5.07。
 - Python
- import cv2
- import time
- from ultralytics import YOLO
- from PIL import Image
- import numpy as np
-
- model = YOLO('yolov8n-pose.pt')
- cap = cv2.VideoCapture(0)
-
- width = int(cap.get(cv2.CAP_PROP_FRAME_WIDTH))
- height = int(cap.get(cv2.CAP_PROP_FRAME_HEIGHT))
-
- prev_time = 0
- fps = 0
- while True:
-
- ret, frame = cap.read()
- if not ret:
- print("error")
- break
-
-
- results = model(frame, device='cpu')
-
- for result in results:
- pil_image = Image.fromarray(results[0].plot())
- frame = np.array(pil_image)
- boxes = result.boxes.xyxy.cpu().numpy()
- confidences = result.boxes.conf.cpu().numpy()
- class_ids = result.boxes.cls.cpu().numpy().astype(int)
-
- for i in range(len(boxes)):
- box = boxes[i]
- x1, y1, x2, y2 = map(int, box[:4])
- confidence = confidences[i]
- class_id = class_ids[i]
- label = result.names[class_id]
- curr_time = time.time()
- fps = 1 / (curr_time - prev_time)
- prev_time = curr_time
- frame = cv2.resize(frame, (640, 480))
-
- cv2.putText(frame, f'FPS: {fps:.2f}', (10, 30), cv2.FONT_HERSHEY_SIMPLEX, 1, (0, 255, 0), 2)
- cv2.imshow('YOLOv8n Real-time', frame)
- if cv2.waitKey(1) & 0xFF == ord('q'):
- break
-
- cap.release()
- cv2.destroyAllWindows()
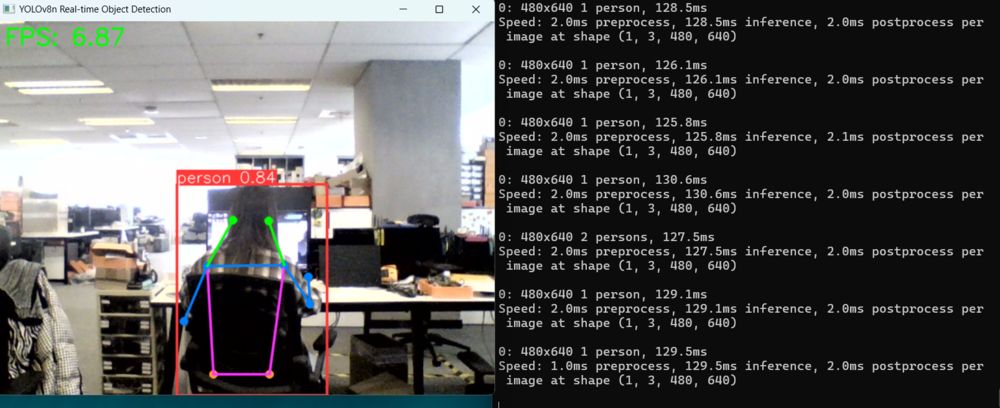
将代码保存为名为“yolov8npos.py”的 Python 文件并运行它。
- Bash
- python yolov8npos.py
使用YOLOv8n模型测试性能:运行速度为6.87。
概括
本文详细介绍了如何在计算机上快速运行 YOLOv8,涵盖检测、分割、定向边界框 (OBB)、分类、跟踪和姿态估计等功能。通过讲解 YOLOv8 的安装、配置和使用,相信您已经掌握了这款强大工具的基本操作。在实际应用中,YOLOv8 将为您提供高效、准确的计算机视觉体验,帮助您在人工智能领域取得更好的成果。随着技术的不断进步,YOLOv8 有望在未来发挥更大的作用,为计算机视觉领域带来更多的创新和突破。
如果本文对您有所帮助,欢迎您继续关注我们的更多更新。接下来,我们将深入研究 YOLOv10 的测试,我们热切期待您的期待。
|