

【Arduino 动手做】使用 ESP32 实现互联网控制的 LED 灯带
2025-06-222023
AI 快速预览详细
本教程介绍如何使用 ESP32 和 Arduino IDE 创建由 Web 浏览器控制的 WS2812 LED 灯带。ESP32 运行一个 HTTP 服务器,支持多种 LED 主题,并可通过本地网络和互联网访问。通过安装 NeoPixelBus 库和 Husarnet IDF for ESP32,配置 Wi-Fi 凭据,将项目上传到 ESP32 开发板,即可通过 Web UI 控制 LED 灯带。
|
使用 ESP32 控制 RGB LED 灯带,该灯带托管一个用 Arduino 框架编写的 HTTP 服务器。可在本地网络和互联网上工作。 介绍 在本教程中,我将向您展示如何使用 ESP32 和 Arduino IDE 创建由 Web 浏览器控制的 WS2812 LED 灯带。 ESP32 正在运行一个 HTTP 服务器,每次点击按钮时主题都会更改。该 HTTP 服务器可通过本地网络和互联网访问。 默认情况下有 5 个 LED 主题可用: 彩虹 白色光泽 红色光芒 只有白色 离开 但是您可以轻松添加您能想象到的任何主题(和代码:)。 在源代码中,我们使用单独的 FreeRTOS 任务来处理 HTTP 服务器和 LED 灯带主题 - 由于该代码清晰、易于理解和修改。 准备硬件 接线非常简单: 1. 将 5V 直流电源连接到 LED 灯带。本教程中使用的 LED 灯带包含 60 个像素,长度为 1 米,每米电流消耗为 3.5 A。请根据您使用的像素数量购买合适的 5V 直流电源转换器。 2. 将 ESP32 连接到 LED 灯带: LED 灯带仅包含 3 个输入引脚:+5V、GND和Din。ESP32 由 3.3V 供电,这得益于板载 LDO 线性稳压器。将电源连接到 LDO 输入引脚 - 在我的开发板上,它被称为V5,但在您的开发板上,它的名称可能不同。将 LED 灯带数据输入引脚连接Din到G12开发板上的引脚。 准备 ESP32 固件 借助Husarnet ,LED 灯带不仅可以通过局域网控制,还可以通过互联网控制。Husarnet 提供了经过修改的 ESP32-IDF,因此您可以使用与 ESP32 标准 Arduino 软件包几乎相同的 API。Husarnet 还可以轻松与 Arduino IDE 集成。 现在打开 Arduino IDE,并按照以下说明步骤操作: 1.在Arduino IDE中安装NeoPixelBus库: 打开Tools -> Manage Libraries 搜索NeoPixelBus by Makuna 点击Install按钮 2. 安装 Husarnet IDF for ESP32: 打开File -> Preferences 在附加董事会管理器 URL 字段中添加此链接: https://github.com/husarnet/ardu ... ge_esp32_index.json 3. 安装 ESP32 开发板 打开Tools -> Board: "..." -> Boards Manager ... 搜索esp32-husarnet 点击Install按钮 我们在此添加了一个针对 ESP32 的官方 Arduino 核心的修改版(主要涉及 IPv6 支持相关更改)- https://github.com/husarnet/arduino-esp32 。如果您之前安装过原版 Arduino 核心,建议您删除系统中所有其他适用于 ESP32 的 Arduino 核心。 4.选择ESP32开发板: 打开Tools -> Board "..." 选择ESP32 Dev Module部分ESP32 Arduino 4. 运行演示: 克隆项目代码: git clone https://github.com/DominikN/ESP32_ledstrip_webserver.git 修改第 9 行,设置 LED 灯带的像素数量。此代码旨在根据此处定义的像素数量自动缩放 LED 主题。 // How many NeoPixels are attached to the Arduino? #define NUMPIXELS 60 修改第 22 至 33 行以添加您的 Wi-Fi 网络凭据。在这里添加多个网络凭据非常方便——如果您将项目移动到不同的物理目的地,则无需每次都重新编程 ESP32。 将 LED 灯带的输入数据引脚连接到G12ESP32 开发板的引脚 将项目上传到您的 ESP32 开发板(根据您的开发板,您需要按“BOOT”按钮,或在闪烁时将 Pin0 或 IO0 短接至 GND) 在 Arduino IDE 中打开Tools -> Serial Monitor并等待 ESP32 连接到 Wi-Fi 网络。几秒钟后,您应该会看到类似这样的链接(代码中串行端口的默认波特率为 115200): [10009675] Visit https://app.husarnet.com/husarne ... f3ee4a9xxxxyyyyzzzz to configure the device . 复制该链接并在网络浏览器中打开它 为您的设备命名(例如 ledstrip),单击Add to network并选择Create new network- 并为其命名(例如 ledstripnet) 打开ledstripnet并左键单击ledstrip元素 选择Make the Web UI public并单击update按钮 在网络Info栏中,ledstripnet您应该会看到Web UI一个按钮,上面有一个指向控制面板的公共链接。每次通过该链接为 ESP32 开发板供电时,您都可以访问 Web UI 来控制 LED 灯带。 5.(可选)改进 - 如果您不想让任何公共链接指向您的 ESP32,您需要将您的笔记本电脑添加到“ledstripnet”网络: 在你的 Linux 设备上安装 Husarnet(https://docs.husarnet.com/getting-started/ )并将其添加到你的网络 在您的 Linux 设备上打开 Web 浏览器并将地址写入具有 8000 端口的 ESP32,例如。http://ledstrip:8000 概括 为您的 ESP32 创建可访问互联网的 Web 用户界面非常简单。该 Wi-Fi 模块集成了大量的 RAM 和闪存,结合 FreeRTOS,您可以轻松托管 HTTP 服务器来控制任何您想要控制的东西。LED 灯带就是一个很好的例子 :)。 我希望你会喜欢这个项目!:)  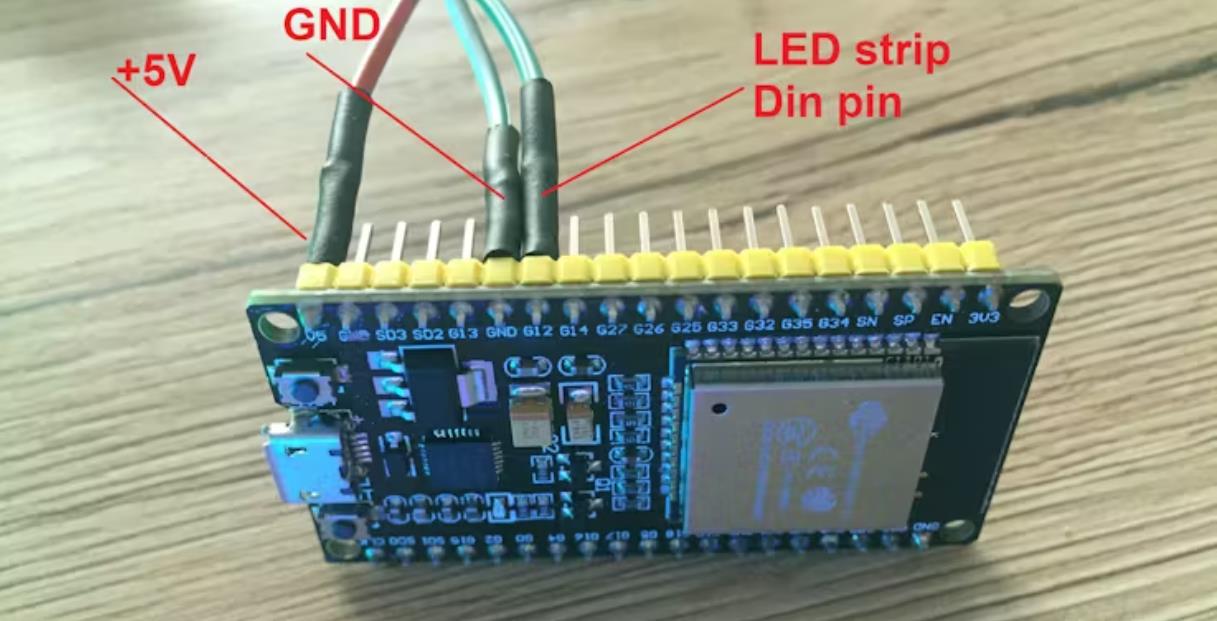 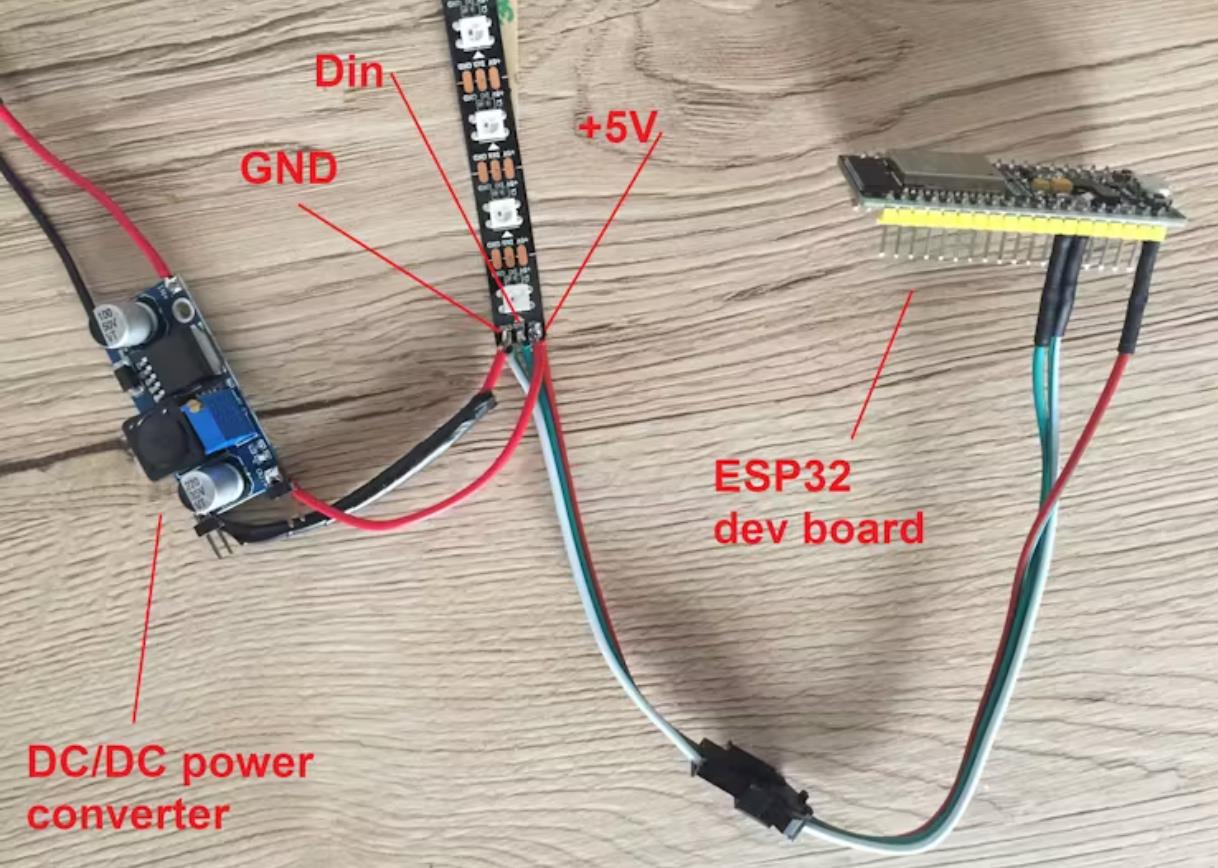 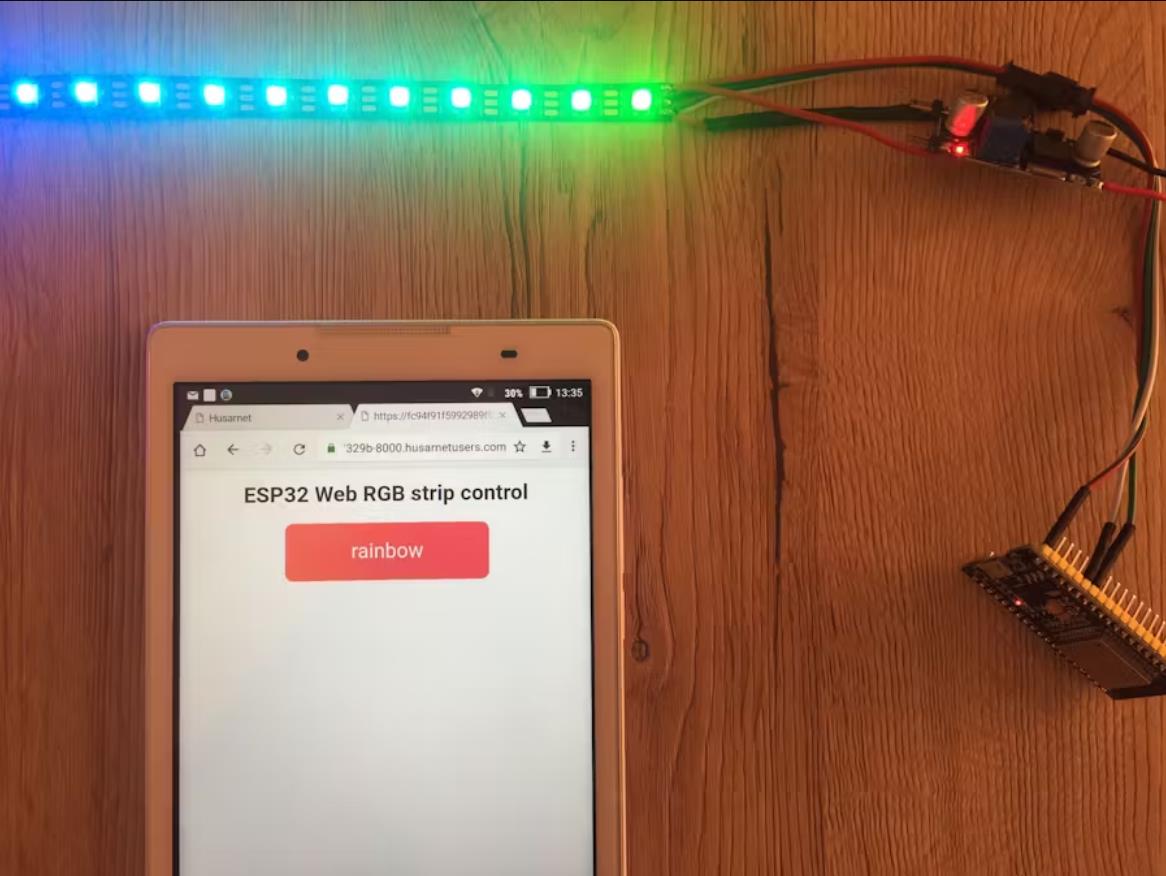 |


项目链接:https://www.hackster.io/donowak/internet-controlled-led-strip-using-esp32-arduino-2ca8a9
项目作者:多米尼克
项目视频 :https://www.youtube.com/watch?v=qtcwGlR5Vmc
项目代码:https://www.hackster.io/code_files/228004/download
https://github.com/DominikN/ESP32_ledstrip_webserver
[code]#include
#include
#include
// Which pin on the Arduino is connected to the NeoPixels?
#define PIN 12
// How many NeoPixels are attached to the Arduino?
#define NUMPIXELS 60
NeoPixelBus
uint8_t red = 0;
uint8_t green = 0;
uint8_t blue = 0;
int j = 0;
#define NUM_NETWORKS 4
// Add your networks credentials here
const char* ssidTab[NUM_NETWORKS] = {
"wifi-network-1",
"wifi-network-2",
"wifi-network-3",
"wifi-network-4"
};
const char* passwordTab[NUM_NETWORKS] = {
"wifi-pass-1",
"wifi-pass-2",
"wifi-pass-3",
"wifi-pass-4"
};
HusarnetServer server(8000);
String header;
void setup() {
Serial.begin(115200);
strip.Begin();
strip.Show();
bool connectedSuccess = 0;
for (int i = 0; i < NUM_NETWORKS; i++) {
Serial.print("Connecting to ");
Serial.println(ssidTab[i]);
WiFi.begin(ssidTab[i], passwordTab[i]);
for (int j = 0; j < 10; j++) {
if (WiFi.status() != WL_CONNECTED) {
delay(500);
Serial.print(".");
} else {
connectedSuccess = true;
}
}
Serial.println("");
if (connectedSuccess == true) {
break;
}
}
if (connectedSuccess == false) {
Serial.println("WiFi network unreachable");
while (1) {
;
}
}
Serial.println("");
Serial.println("WiFi connected.");
Serial.println("IP address: ");
Serial.println(WiFi.localIP());
Husarnet.selfHostedSetup("default");
// Husarnet.join(husarnetJoinCode, hostName); // alternative way, to clicking a link from a terminal. Visit app.husarnet.com -> network -> add element -> join code tab.
Husarnet.start();
server.begin();
xTaskCreate(
taskLED, /* Task function. */
"taskLED", /* String with name of task. */
10000, /* Stack size in bytes. */
NULL, /* Parameter passed as input of the task */
2, /* Priority of the task. */
NULL); /* Task handle. */
xTaskCreate(
taskWifi, /* Task function. */
"taskWifi", /* String with name of task. */
10000, /* Stack size in bytes. */
NULL, /* Parameter passed as input of the task */
1, /* Priority of the task. */
NULL); /* Task handle. */
}
void rainbow(int j) {
int k = 0;
int l = 0;
int m = 0;
for (int i = 0; i < NUMPIXELS; i++) {
if ( ( i >= 0 ) && ( i < NUMPIXELS * 1 / 3 ) ) {
red = 255 * k / (NUMPIXELS / 3);
green = 0;
blue = 255 - (255 * k / (NUMPIXELS / 3) );
k++;
}
if ( ( i >= NUMPIXELS * 1 / 3 ) && ( i < NUMPIXELS * 2 / 3 ) ) {
red = 255 - (255 * l / (NUMPIXELS / 3) );
green = 255 * l / (NUMPIXELS / 3);
blue = 0;
l++;
}
if ( ( i >= NUMPIXELS * 2 / 3 ) && ( i < NUMPIXELS * 3 / 3 ) ) {
red = 0;
green = 255 - (255 * m / (NUMPIXELS / 3) );
blue = 255 * m / (NUMPIXELS / 3);
m++;
}
strip.SetPixelColor((i + j) % NUMPIXELS, RgbColor(red, green, blue));
}
strip.Show();
delay(50);
}
void white_shine(int j) {
int k = 0;
int l = 0;
int m = 0;
for (int i = 0; i < NUMPIXELS; i++) {
if ( ( i >= 0 ) && ( i < NUMPIXELS * 1 / 3 ) ) {
red = 255 * k / (NUMPIXELS / 3);
green = 255 * k / (NUMPIXELS / 3);
blue = 255 * k / (NUMPIXELS / 3);
k++;
}
if ( ( i >= NUMPIXELS * 1 / 3 ) && ( i < NUMPIXELS * 2 / 3 ) ) {
red = 255 - (255 * l / (NUMPIXELS / 3) );
green = 255 - (255 * l / (NUMPIXELS / 3) );
blue = 255 - (255 * l / (NUMPIXELS / 3) );
l++;
}
if ( ( i >= NUMPIXELS * 2 / 3 ) && ( i < NUMPIXELS * 3 / 3 ) ) {
red = 0;
green = 0;
blue = 0;
m++;
}
Serial.printf("\r\n[R,G,B] = [%d,%d,%d]", red, green, blue);
strip.SetPixelColor((i + j) % NUMPIXELS, RgbColor(red, green, blue));
}
strip.Show();
delay(40);
}
void red_shine(int j) {
int k = 0;
int l = 0;
int m = 0;
for (int i = 0; i < NUMPIXELS; i++) {
if ( ( i >= 0 ) && ( i < NUMPIXELS * 1 / 3 ) ) {
red = 255;
green = 255 - 255 * k / (NUMPIXELS / 3);
blue = 255 - 255 * k / (NUMPIXELS / 3);
k++;
}
if ( ( i >= NUMPIXELS * 1 / 3 ) && ( i < NUMPIXELS * 2 / 3 ) ) {
red = 255;
green = (255 * l / (NUMPIXELS / 3) );
blue = (255 * l / (NUMPIXELS / 3) );
l++;
}
if ( ( i >= NUMPIXELS * 2 / 3 ) && ( i < NUMPIXELS * 3 / 3 ) ) {
red = 255;
green = 255;
blue = 255;
m++;
}
strip.SetPixelColor((i + j) % NUMPIXELS, RgbColor(red, green, blue));
}
strip.Show();
delay(40);
}
void led_white()
{
for (int i = 0; i < NUMPIXELS; i++) {
red = 255;
green = 255;
blue = 255;
strip.SetPixelColor((i + j) % NUMPIXELS, RgbColor(red, green, blue));
}
delay(5);
strip.Show();
}
void led_off() {
for (int i = 0; i < NUMPIXELS; i++) {
red = 0;
green = 0;
blue = 0;
strip.SetPixelColor((i + j) % NUMPIXELS, RgbColor(red, green, blue));
}
delay(100);
strip.Show();
}
char* getModeName(uint8_t modeNo) {
switch (modeNo) {
case 0:
return "rainbow";
case 1:
return "white shine";
case 2:
return "red shine";
case 3:
return "only white";
case 4:
return "off";
}
return "error";
}
uint8_t modeRGB = 0;
void taskLED( void * parameter )
{
while (1) {
switch (modeRGB) {
case 0:
rainbow(j++);
break;
case 1:
white_shine(j++);
break;
case 2:
red_shine(j++);
break;
case 3:
led_white();
break;
case 4:
led_off();
break;
default:
rainbow(j++);
break;
}
if (j >= NUMPIXELS) {
j = 0;
}
}
Serial.println("Ending task LED");
vTaskDelete( NULL );
}
void loop() {
while (1) {
delay(1000);
}
}
static const char* htmlHead = R"rawText(
)rawText";
void taskWifi( void * parameter ) {
while (1) {
HusarnetClient client = server.available();
if (client) {
Serial.println("New Client.");
String currentLine = "";
Serial.printf("connected: %d\n", (int)client.connected());
while (client.connected()) {
if (client.available()) {
char c = client.read();
// Serial.write(c);
header += c;
if (c == '\n') {
if (currentLine.length() == 0) {
client.println("HTTP/1.1 200 OK");
client.println("Content-type:text/html");
client.println("Connection: close");
client.println();
if (header.indexOf("GET /0") >= 0) {
modeRGB = 1;
}
if (header.indexOf("GET /1") >= 0) {
modeRGB = 2;
}
if (header.indexOf("GET /2") >= 0) {
modeRGB = 3;
}
if (header.indexOf("GET /3") >= 0) {
modeRGB = 4;
}
if (header.indexOf("GET /4") >= 0) {
modeRGB = 0;
}
// Head
client.println("");
client.println(htmlHead);
// Body
client.println("
ESP32 Web RGB strip control
");client.print("
client.print(modeRGB);
");client.print("\">
client.println("");
client.println();
break;
} else {
currentLine = "";
}
} else if (c != '\r') {
currentLine += c;
}
}
}
header = "";
client.stop();
Serial.println("Client disconnected.");
Serial.println("");
}
}
}[/code]