本帖最后由 PY学习笔记 于 2025-8-10 14:48 编辑
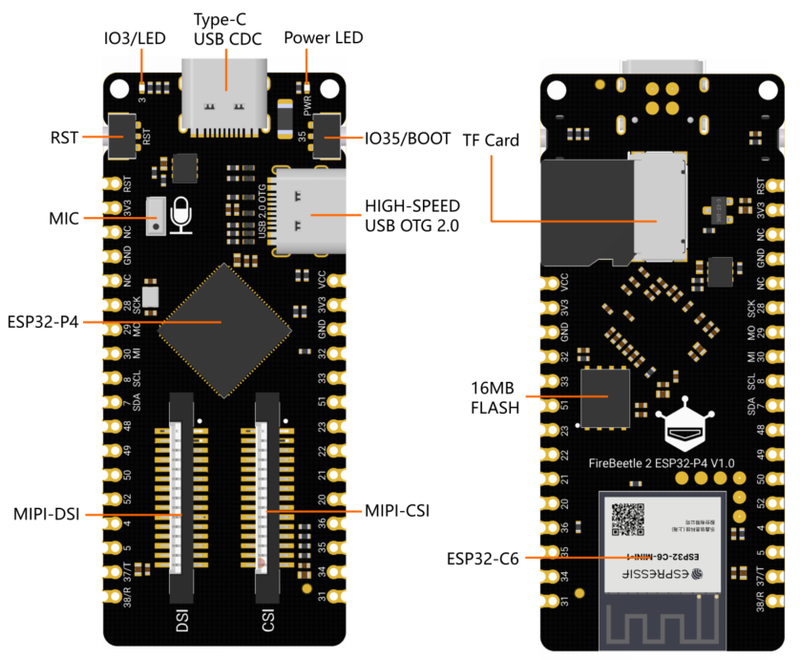
近期,dfrobot出了一款新的开发板——FireBeetle 2 ESP32-P4,板载ESP32P4,虽然没有内置的WIFI和BLE,但是它的性能十分的高,所以很有幸能体验到这款开发板 1.开发板介绍FireBeetle 2 ESP32-P4有很多种外设: Type-C USB CDC:Type-C USB烧录、调试接口 IO3/LED:板载LED引脚 Power LED:主板电源指示灯 RST:复位按键 IO35/BOOT:IO引脚/BOOT按键 MIC: MEMS PDM麦克风 HIGH-SPEED USB OTG 2.0: Type-C高速USB OTG 2.0 ESP32-P4:ESP32-P4芯片 MIPI-DSI: 两通道MIPI-DSI屏幕(兼容树莓派4B DSI屏幕线序) MIPI-CSI: 两通道MIPI-DSI屏幕(兼容树莓派4B CSI摄像头线序) TF Card: TF卡插槽 16MB FLASH: 16MB Flash存储 ESP32-C6:ESP32-C6-MINI-1模组,通过SDIO与ESP32-P4连接,用于扩展WiFi、蓝牙
2.绑定AI相关模块在github上面,有一个大佬分享了一个将EspDL绑定到micropython中,但是还少了一个猫咪识别的模型,所以自己做了一个,仓库地址如下: 接着需要将驱动也绑定进来,修改~/esp/micropython.cmake如下:
- include(${CMAKE_CURRENT_LIST_DIR}/micropython_csi_camera/micropython.cmake)
- include(${CMAKE_CURRENT_LIST_DIR}/mp_jpeg/src/micropython.cmake)
- include(${CMAKE_CURRENT_LIST_DIR}/mp_esp_dl_models/src/micropython.cmake)
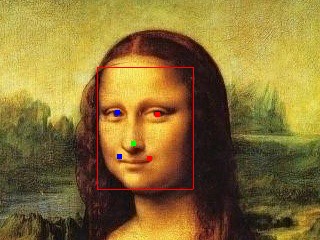
再次编译即可使用。 3.体验AI相关模块首先是人脸检测: - from espdl import FaceDetector
- from jpeg import Decoder, Encoder
-
- decoder = Decoder()
- # 捕获并处理图像
- img = open("human_face.jpg", "rb").read() # 捕获原始图像(通常是JPEG格式)
- wh = decoder.get_img_info(img)# 获取图像的宽度和高度
- # 获取图像的宽度和高度
- width, height = wh
- encoder = Encoder(width=width, height=height, pixel_format="RGB888")
- face_detector = FaceDetector(width=width, height=height)
-
-
- framebuffer = decoder.decode(img) # 转换为RGB888格式
- # 将memoryview转换为bytearray以便修改
- framebuffer = bytearray(framebuffer)
- # 运行人脸检测
- results = face_detector.run(framebuffer)
-
- # 绘制边框
- def draw_rectangle(buffer, width, height, x, y, w, h, list1, color=(255, 0, 0)):
- """
- 在RGB888格式的图像缓冲区上绘制矩形边框
- :param buffer: 图像缓冲区
- :param width: 图像宽度
- :param height: 图像高度
- :param x: 边框左上角的x坐标
- :param y: 边框左上角的y坐标
- :param w: 边框宽度
- :param h: 边框高度
- :param color: 边框颜色(RGB格式)
- """
- # 辅助函数:设置单个像素的颜色
- def set_pixel(buffer, width, x, y, color):
- offset = (y * width + x) * 3
- buffer[offset] = color[0] # R
- buffer[offset + 1] = color[1] # G
- buffer[offset + 2] = color[2] # B
-
- # 辅助函数:绘制更大的点
- def draw_large_dot(buffer, width, x, y, color, size=3):
- for i in range(x - size, x + size + 1):
- for j in range(y - size, y + size + 1):
- if 0 <= i < width and 0 <= j < height:
- set_pixel(buffer, width, i, j, color)
-
- # 绘制上边框
- for i in range(x, x + w):
- if 0 <= i < width and 0 <= y < height:
- set_pixel(buffer, width, i, y, color)
-
- # 绘制下边框
- for i in range(x, x + w):
- if 0 <= i < width and 0 <= y + h < height:
- set_pixel(buffer, width, i, y + h, color)
-
- # 绘制左边框
- for j in range(y, y + h):
- if 0 <= j < height and 0 <= x < width:
- set_pixel(buffer, width, x, j, color)
-
- # 绘制右边框
- for j in range(y, y + h):
- if 0 <= j < height and 0 <= x + w < width:
- set_pixel(buffer, width, x + w, j, color)
-
- # 绘制特征点
- if list1:
- draw_large_dot(buffer, width, list1[0], list1[1], (0, 0, 255), size=2)
- draw_large_dot(buffer, width, list1[2], list1[3], (0, 0, 255), size=2)
- draw_large_dot(buffer, width, list1[4], list1[5], (0, 255, 0), size=2)
- draw_large_dot(buffer, width, list1[6], list1[7], (255, 0, 0), size=2)
- draw_large_dot(buffer, width, list1[8], list1[9], (255, 0, 0), size=2)
- if results:
- # 在图像上绘制人脸边框
- for face in results:
- print(face)
- x1, y1, x2, y2 = face['box']
- draw_rectangle(framebuffer, width, height, x1, y1, x2 - x1, y2 - y1, face['features'], color=(255, 0, 0)) # 使用红色边框
-
- # 将带有边框的图像重新编码为JPEG格式并保存
- marked_img = encoder.encode(framebuffer)
- with open("marked_image.jpg", "wb") as f:
- f.write(marked_img)</span>
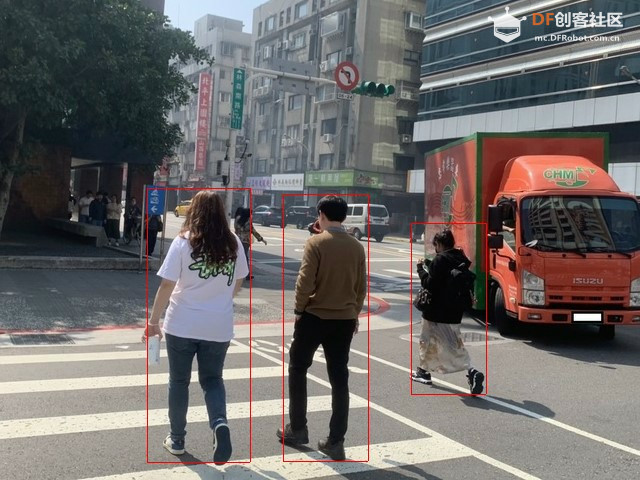
行人检测: - from espdl import HumanDetector
- from jpeg import Decoder, Encoder
-
-
- decoder = Decoder()
- encoder = Encoder(width=640, height=480,pixel_format="RGB888")
- human_detector = HumanDetector(width=640, height=480)
-
- # 捕获并处理图像
- img = open("pedestrian.jpg", "rb").read() # 捕获原始图像(通常是JPEG格式)
- framebuffer = decoder.decode(img) # 转换为RGB888格式
- # 将memoryview转换为bytearray以便修改
- framebuffer = bytearray(framebuffer)
- # 运行行人检测
- results = human_detector.run(framebuffer)
-
- # 绘制边框
- def draw_rectangle(buffer, width, height, x, y, w, h, color=(255, 0, 0)):
- """
- 在RGB888格式的图像缓冲区上绘制矩形边框
- :param buffer: 图像缓冲区
- :param width: 图像宽度
- :param height: 图像高度
- :param x: 边框左上角的x坐标
- :param y: 边框左上角的y坐标
- :param w: 边框宽度
- :param h: 边框高度
- :param color: 边框颜色(RGB格式)
- """
- # 辅助函数:设置单个像素的颜色
- def set_pixel(buffer, width, x, y, color):
- offset = (y * width + x) * 3
- buffer[offset] = color[0] # R
- buffer[offset + 1] = color[1] # G
- buffer[offset + 2] = color[2] # B
-
- # 绘制上边框
- for i in range(x, x + w):
- if 0 <= i < width and 0 <= y < height:
- set_pixel(buffer, width, i, y, color)
-
- # 绘制下边框
- for i in range(x, x + w):
- if 0 <= i < width and 0 <= y + h < height:
- set_pixel(buffer, width, i, y + h, color)
-
- # 绘制左边框
- for j in range(y, y + h):
- if 0 <= j < height and 0 <= x < width:
- set_pixel(buffer, width, x, j, color)
-
- # 绘制右边框
- for j in range(y, y + h):
- if 0 <= j < height and 0 <= x + w < width:
- set_pixel(buffer, width, x + w, j, color)
-
- # 在图像上绘制边框
- for face in results:
- print(face)
- x1, y1, x2, y2 = face['box']
- draw_rectangle(framebuffer, 640, 480, x1, y1, x2-x1, y2-y1, color=(255, 0, 0)) # 使用红色边框
-
- # 将带有边框的图像重新编码为JPEG格式并保存
- marked_img = encoder.encode(framebuffer)
- with open("marked_image1.jpg", "wb") as f:
- f.write(marked_img)
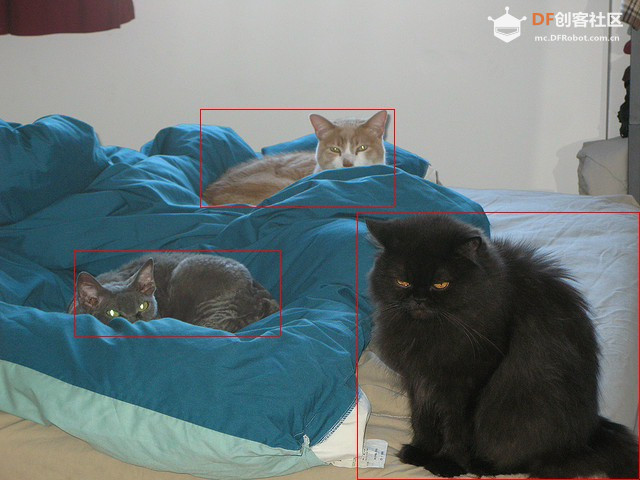
 猫咪检测: - from espdl import CatDetector
- from jpeg import Decoder, Encoder
-
- decoder = Decoder()
- # 捕获并处理图像
- img = open("cat.jpg", "rb").read() # 捕获原始图像(通常是JPEG格式)
- wh = decoder.get_img_info(img)# 获取图像的宽度和高度
- # 获取图像的宽度和高度
- width, height = wh
- encoder = Encoder(width=width, height=height, pixel_format="RGB888")
- cat_detector = CatDetector(width=width, height=height)
-
-
- framebuffer = decoder.decode(img) # 转换为RGB888格式
- # 将memoryview转换为bytearray以便修改
- framebuffer = bytearray(framebuffer)
- # 运行猫咪检测
- results = cat_detector.run(framebuffer)
-
- # 绘制边框
- def draw_rectangle(buffer, width, height, x, y, w, h, list1, color=(255, 0, 0)):
- """
- 在RGB888格式的图像缓冲区上绘制矩形边框
- :param buffer: 图像缓冲区
- :param width: 图像宽度
- :param height: 图像高度
- :param x: 边框左上角的x坐标
- :param y: 边框左上角的y坐标
- :param w: 边框宽度
- :param h: 边框高度
- :param color: 边框颜色(RGB格式)
- """
- # 辅助函数:设置单个像素的颜色
- def set_pixel(buffer, width, x, y, color):
- offset = (y * width + x) * 3
- buffer[offset] = color[0] # R
- buffer[offset + 1] = color[1] # G
- buffer[offset + 2] = color[2] # B
-
- # 辅助函数:绘制更大的点
- def draw_large_dot(buffer, width, x, y, color, size=3):
- for i in range(x - size, x + size + 1):
- for j in range(y - size, y + size + 1):
- if 0 <= i < width and 0 <= j < height:
- set_pixel(buffer, width, i, j, color)
-
- # 绘制上边框
- for i in range(x, x + w):
- if 0 <= i < width and 0 <= y < height:
- set_pixel(buffer, width, i, y, color)
-
- # 绘制下边框
- for i in range(x, x + w):
- if 0 <= i < width and 0 <= y + h < height:
- set_pixel(buffer, width, i, y + h, color)
-
- # 绘制左边框
- for j in range(y, y + h):
- if 0 <= j < height and 0 <= x < width:
- set_pixel(buffer, width, x, j, color)
-
- # 绘制右边框
- for j in range(y, y + h):
- if 0 <= j < height and 0 <= x + w < width:
- set_pixel(buffer, width, x + w, j, color)
-
- # 绘制特征点
- if list1:
- draw_large_dot(buffer, width, list1[0], list1[1], (0, 0, 255), size=2)
- draw_large_dot(buffer, width, list1[2], list1[3], (0, 0, 255), size=2)
- draw_large_dot(buffer, width, list1[4], list1[5], (0, 255, 0), size=2)
- draw_large_dot(buffer, width, list1[6], list1[7], (255, 0, 0), size=2)
- draw_large_dot(buffer, width, list1[8], list1[9], (255, 0, 0), size=2)
- if results:
- # 在图像上绘制边框
- for face in results:
- print(face)
- x1, y1, x2, y2 = face['box']
- draw_rectangle(framebuffer, width, height, x1, y1, x2 - x1, y2 - y1, None, color=(255, 0, 0)) # 使用红色边框
-
- # 将带有边框的图像重新编码为JPEG格式并保存
- marked_img = encoder.encode(framebuffer)
- with open("marked_image4.jpg", "wb") as f:
- f.write(marked_img)
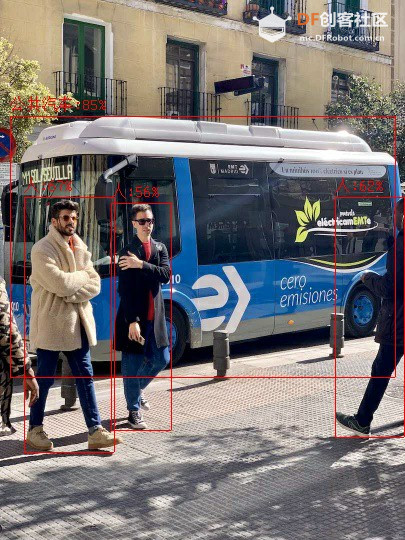
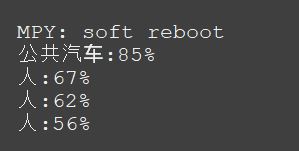
 yolo11分类: - from espdl import CocoDetector
- from jpeg import Decoder, Encoder
- from myufont import CustomBMFont
- from machine import Pin,SDCard
- import os
- sd = SDCard(slot=0,width=4, sck=43, cmd=44, data=(39, 40, 41, 42))
- os.mount(sd, '/sd')
- decoder = Decoder()
- encoder = Encoder(width=405, height=540,pixel_format="RGB888")
- face_detector = CocoDetector(width=405, height=540)
- MSCOCO_CLASSES = [
- "人", "自行车", "汽车", "摩托车", "飞机", "公共汽车", "火车", "卡车", "船", "交通灯",
- "消防栓", "消防水带", "停车计时器", "长椅", "鸟", "猫", "狗", "马", "羊", "牛",
- "大象", "熊", "斑马", "长颈鹿", "背包", "伞", "手提包", "领带", "行李箱", "飞盘",
- "滑雪板", "滑雪杖", "滑板", "冲浪板", "网球拍", "瓶子", "酒杯", "杯子", "刀叉", "碗",
- "香蕉", "苹果", "三明治", "橙子", "西兰花", "胡萝卜", "热狗", "披萨", "甜甜圈", "蛋糕",
- "椅子", "沙发", "盆栽", "床", "餐桌", "马桶", "电视", "笔记本电脑", "鼠标", "遥控器",
- "键盘", "手机", "微波炉", "烤箱", "烤面包机", "水槽", "冰箱", "书", "时钟", "花瓶",
- "剪刀", "泰迪熊", "吹风机", "牙刷"
- ]
- font = CustomBMFont('/sd/text_full_16px_2312.v3.bmf')
- # 捕获并处理图像
- img = open("bus.jpg", "rb").read() # 捕获原始图像(通常是JPEG格式)
- framebuffer = decoder.decode(img) # 转换为RGB888格式
- # 将memoryview转换为bytearray以便修改
- framebuffer = bytearray(framebuffer)
- # 运行人脸检测
- results = face_detector.run(framebuffer)
-
- # 绘制边框
- def draw_rectangle(buffer, width, height, x, y, w, h,font,label, color=(255, 0, 0)):
- """
- 在RGB888格式的图像缓冲区上绘制矩形边框
- :param buffer: 图像缓冲区
- :param width: 图像宽度
- :param height: 图像高度
- :param x: 边框左上角的x坐标
- :param y: 边框左上角的y坐标
- :param w: 边框宽度
- :param h: 边框高度
- :param color: 边框颜色(RGB格式)
- """
- # 辅助函数:设置单个像素的颜色
- def set_pixel(buffer, width, x, y, color):
- offset = (y * width + x) * 3
- buffer[offset] = color[0] # R
- buffer[offset + 1] = color[1] # G
- buffer[offset + 2] = color[2] # B
- def is_chinese(ch):
- """判断一个字符是否为中文字符"""
- if '\u4e00' <= ch <= '\u9fff' or \
- '\u3400' <= ch <= '\u4dbf' or \
- '\u20000' <= ch <= '\u2a6df':
- return True
- return False
- def text(font, text, x_start, y_start, color,spacing=0, line_spacing=0, max_width=width):
- font_size = font.font_size
- bytes_per_row = (font_size + 7) // 8 # 每行占用的字节数
- x, y = x_start, y_start
-
- for char in text:
- # 处理换行符
- if char == '\n':
- y += font_size + line_spacing
- x = x_start
- continue
- if char == '\r':
- x += 2*font_size
- continue
- # 获取字符宽度(中文字符全宽,ASCII字符半宽)
- char_width = font_size if is_chinese(char) else font_size // 2
-
- # 检查是否需要换行
- if max_width is not None and x + char_width > x_start + max_width:
- y += font_size + line_spacing
- x = x_start
-
- # 获取字符位图
- bitmap = font.get_char_bitmap(char)
-
- # 绘制字符
- for row in range(font_size):
- for col in range(char_width if not is_chinese(char) else font_size):
- byte_idx = row * bytes_per_row + col // 8
- bit_mask = 0x80 >> (col % 8)
-
- if byte_idx < len(bitmap) and (bitmap[byte_idx] & bit_mask):
- set_pixel(framebuffer,max_width,x + col, y + row, color)
-
- # 移动到下一个字符位置
- x += char_width + spacing
- # 绘制上边框
- for i in range(x, x + w):
- if 0 <= i < width and 0 <= y < height:
- set_pixel(buffer, width, i, y, color)
-
- # 绘制下边框
- for i in range(x, x + w):
- if 0 <= i < width and 0 <= y + h < height:
- set_pixel(buffer, width, i, y + h, color)
-
- # 绘制左边框
- for j in range(y, y + h):
- if 0 <= j < height and 0 <= x < width:
- set_pixel(buffer, width, x, j, color)
-
- # 绘制右边框
- for j in range(y, y + h):
- if 0 <= j < height and 0 <= x + w < width:
- set_pixel(buffer, width, x + w, j, color)
- text(font,label, x, y-20, color)
-
- # 在图像上绘制人脸边框
- for face in results:
- #print(face)
- x1, y1, x2, y2 = face['box']
- label = MSCOCO_CLASSES[face['category']]+":"+str(int(face['score']*100))+"%"
- draw_rectangle(framebuffer, 405, 540, x1, y1, x2-x1, y2-y1,font,label) # 使用红色边框
- print(label)
- # 将带有边框的图像重新编码为JPEG格式并保存
- marked_img = encoder.encode(framebuffer)
- with open("marked_image2.jpg", "wb") as f:
- f.write(marked_img)
|


 沪公网安备31011502402448


 置顶卡
置顶卡 变色卡
变色卡 千斤顶
千斤顶


