一、OpenCV人脸识别之一:数据收集和预处理
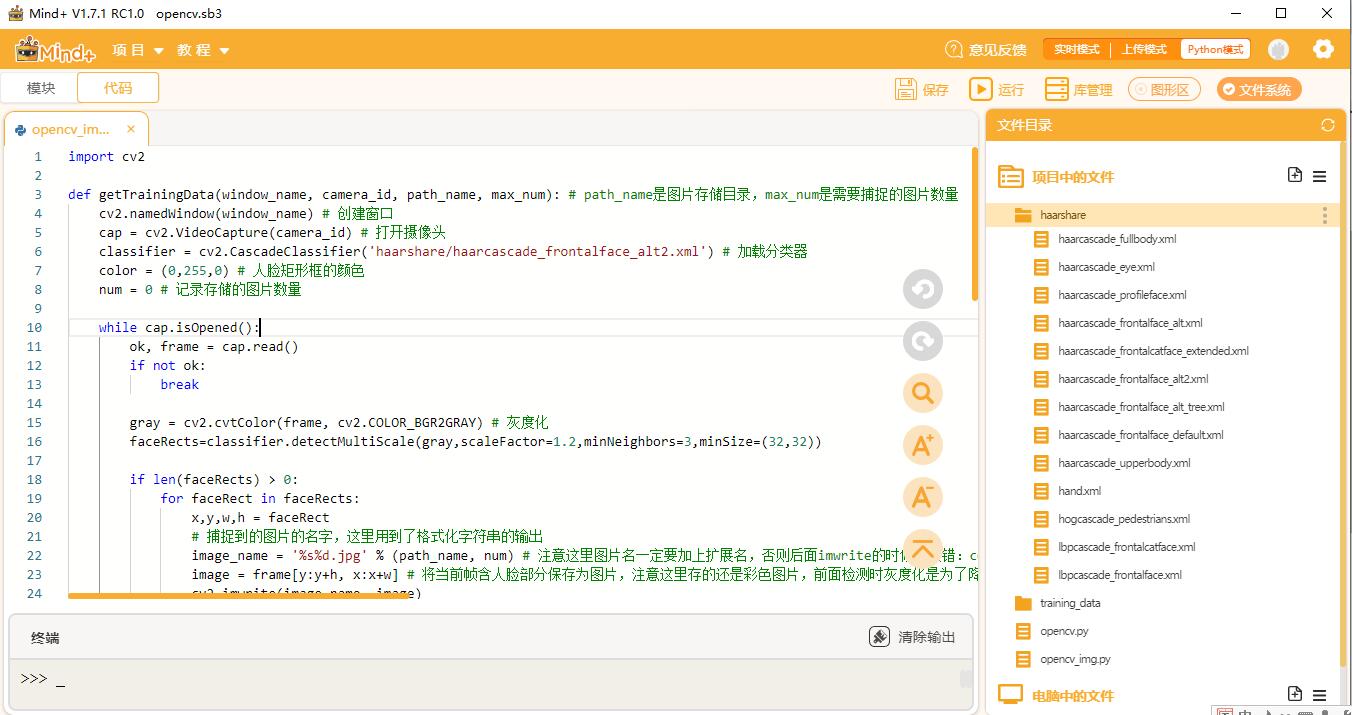
程序的功能就是打开电脑摄像头,采集自己100张人脸图片
-
- import cv2
-
- def getTrainingData(window_name, camera_id, path_name, max_num): # path_name是图片存储目录,max_num是需要捕捉的图片数量
- cv2.namedWindow(window_name) # 创建窗口
- cap = cv2.VideoCapture(camera_id) # 打开摄像头
- classifier = cv2.CascadeClassifier('haarshare/haarcascade_frontalface_alt2.xml') # 加载分类器
- color = (0,255,0) # 人脸矩形框的颜色
- num = 0 # 记录存储的图片数量
-
- while cap.isOpened():
- ok, frame = cap.read()
- if not ok:
- break
-
- gray = cv2.cvtColor(frame, cv2.COLOR_BGR2GRAY) # 灰度化
- faceRects=classifier.detectMultiScale(gray,scaleFactor=1.2,minNeighbors=3,minSize=(32,32))
-
- if len(faceRects) > 0:
- for faceRect in faceRects:
- x,y,w,h = faceRect
- # 捕捉到的图片的名字,这里用到了格式化字符串的输出
- image_name = '%s%d.jpg' % (path_name, num) # 注意这里图片名一定要加上扩展名,否则后面imwrite的时候会报错:could not find a writer for the specified extension in function cv::imwrite_ 参考:https://stackoverflow.com/questions/9868963/cvimwrite-could-not-find-a-writer-for-the-specified-extension
- image = frame[y:y+h, x:x+w] # 将当前帧含人脸部分保存为图片,注意这里存的还是彩色图片,前面检测时灰度化是为了降低计算量;这里访问的是从y位开始到y+h-1位
- cv2.imwrite(image_name, image)
-
- num += 1
- # 超过指定最大保存数量则退出循环
- if num > max_num:
- break
-
- cv2.rectangle(frame, (x,y), (x+w,y+h), color, 2) # 画出矩形框
- font = cv2.FONT_HERSHEY_SIMPLEX # 获取内置字体
- cv2.putText(frame, ('%d'%num), (x+30, y+30), font, 1, (255,0,255), 4) # 调用函数,对人脸坐标位置,添加一个(x+30,y+30)的矩形框用于显示当前捕捉到了多少人脸图片
- if num > max_num:
- break
- cv2.imshow(window_name, frame)
- c = cv2.waitKey(10)
- if c & 0xFF == ord('q'):
- break
-
- cap.release()#释放摄像头并销毁所有窗口
- cv2.destroyAllWindows()
- print('Finished.')
- #主函数
- if __name__ =='__main__':
- print ('catching your face and writting into disk...')
- getTrainingData('getTrainData',0,'training_data/',100) # 注意这里的training_data_xx 文件夹就在程序工作目录下
二、模型训练
-
- #import OpenCV module
- import cv2
- #import os module for reading training data directories and paths
- import os
- #import numpy to convert python lists to numpy arrays as
- #it is needed by OpenCV face recognizers
- import numpy as np
-
- #使用OpenCV用来检测脸部的函数
- def detect_face(img):
- #将测试图像转换为灰度图像,因为opencv人脸检测器需要灰度图像
- gray = cv2.cvtColor(img, cv2.COLOR_BGR2GRAY)
-
- #加载OpenCV人脸检测器,我正在使用的是快速的LBP
- #还有一个更准确但缓慢的Haar分类器
- face_cascade = cv2.CascadeClassifier('haarshare/lbpcascade_frontalface.xml')
-
- #让我们检测多尺度(一些图像可能比其他图像更接近相机)图像
- #结果是一张脸的列表
- faces = face_cascade.detectMultiScale(gray, scaleFactor=1.2, minNeighbors=5);
-
- #如果未检测到面部,则返回原始图像
- if (len(faces) == 0):
- return None, None
-
- #假设只有一张脸,
- #提取面部区域
- (x, y, w, h) = faces[0]
-
- #只返回图像的正面部分
- return gray[y:y+w, x:x+h], faces[0]
- #该功能将读取所有人的训练图像,从每个图像检测人脸
- #并将返回两个完全相同大小的列表,一个列表
- # 每张脸的脸部和另一列标签
- def prepare_training_data(data_folder_path):
-
- #------STEP-1--------
- #获取数据文件夹中的目录(每个主题的一个目录)
- dirs = os.listdir(data_folder_path)
-
- #列表来保存所有主题的面孔
- faces = []
- #列表以保存所有主题的标签
- labels = []
-
- #让我们浏览每个目录并阅读其中的图像
- for dir_name in dirs:
-
- #我们的主题目录以字母's'开头
- #如果有的话,忽略任何不相关的目录
- if not dir_name.startswith("s"):
- continue;
-
- #------STEP-2--------
- #从dir_name中提取主题的标签号
- #目录名称格式= slabel
- #,所以从dir_name中删除字母''会给我们标签
- label = int(dir_name.replace("s", ""))
-
- #建立包含当前主题主题图像的目录路径
- #sample subject_dir_path = "training-data/s1"
- subject_dir_path = data_folder_path + "/" + dir_name
-
- #获取给定主题目录内的图像名称
- subject_images_names = os.listdir(subject_dir_path)
-
- #------STEP-3--------
- #浏览每个图片的名称,阅读图片,
- #检测脸部并将脸部添加到脸部列表
- for image_name in subject_images_names:
-
- #忽略.DS_Store之类的系统文件
- if image_name.startswith("."):
- continue;
-
- #建立图像路径
- #sample image path = training-data/s1/1.pgm
- image_path = subject_dir_path + "/" + image_name
-
- #阅读图像
- image = cv2.imread(image_path)
-
- #显示图像窗口以显示图像
- cv2.imshow("Training on image...", image)
- cv2.waitKey(100)
-
- #侦测脸部
- face, rect = detect_face(image)
-
- #------STEP-4--------
- #为了本教程的目的
- #我们将忽略未检测到的脸部
- if face is not None:
- #将脸添加到脸部列表
- faces.append(face)
- #为这张脸添加标签
- labels.append(label)
-
- cv2.destroyAllWindows()
- cv2.waitKey(1)
- cv2.destroyAllWindows()
-
- return faces, labels
- #让我们先准备好我们的训练数据
- #数据将在两个相同大小的列表中
- #一个列表将包含所有的面孔
- #数据将在两个相同大小的列表中
- print("Preparing data...")
- faces, labels = prepare_training_data("training_data")
- print("Data prepared")
-
- #打印总面和标签
- print("Total faces: ", len(faces))
- print("Total labels: ", len(labels))
- print("Preparing train....")
- face_recognizer = cv2.face.LBPHFaceRecognizer_create()
- face_recognizer.train(faces, np.array(labels))
- face_recognizer.write('trainer.yml')
- print("faces trained. Exiting Program")
-
生成trainer.yml人脸模型。
【识别人脸】
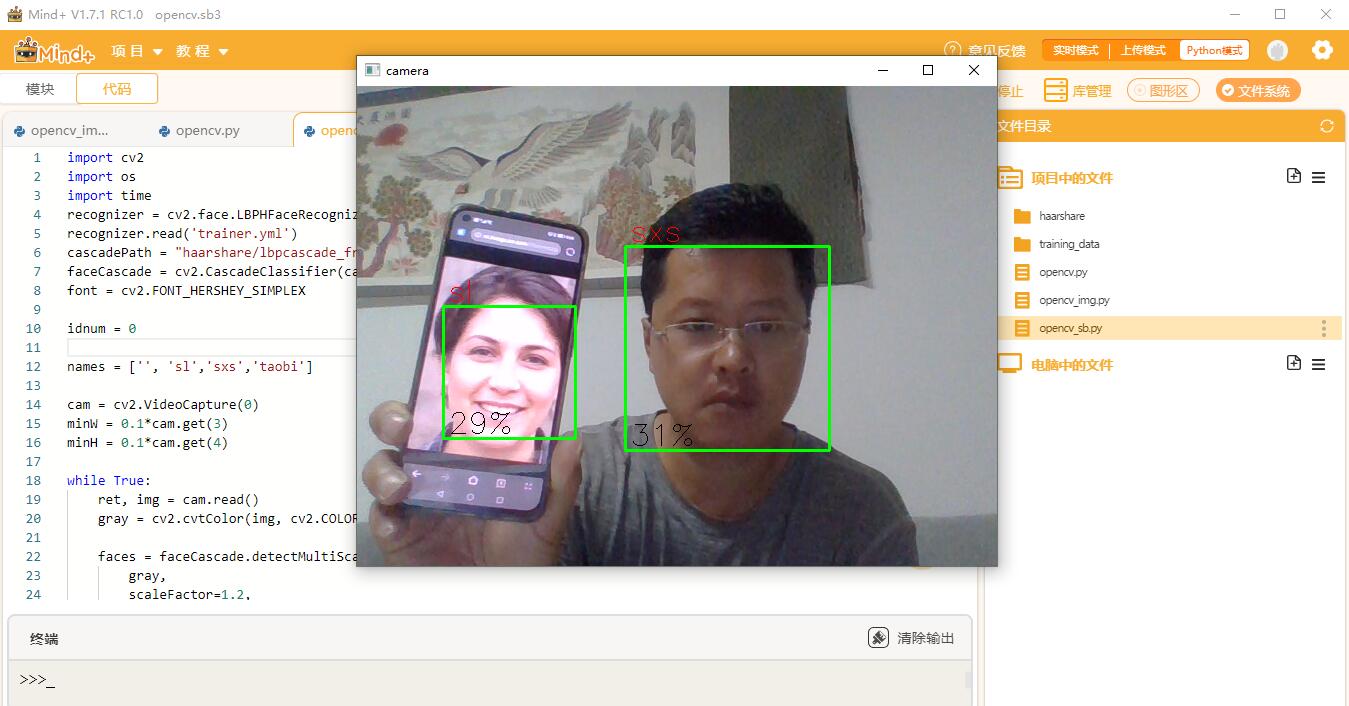
简单说下流程: - 打开摄像头。
- 加载人脸检测器,加载人脸模型。
- 人脸检测
- 把检测到的人脸与人脸模型里面的对比,找出这是谁的脸。
- 如果人脸是自己的,显示自己的名字。
-
- import cv2
- import os
- import time
- recognizer = cv2.face.LBPHFaceRecognizer_create()
- recognizer.read('trainer.yml')
- cascadePath = "haarshare/lbpcascade_frontalface.xml"
- faceCascade = cv2.CascadeClassifier(cascadePath)
- font = cv2.FONT_HERSHEY_SIMPLEX
-
- idnum = 0
-
- names = ['', 'sl','sxs','taobi']
-
- cam = cv2.VideoCapture(0)
- minW = 0.1*cam.get(3)
- minH = 0.1*cam.get(4)
-
- while True:
- ret, img = cam.read()
- gray = cv2.cvtColor(img, cv2.COLOR_BGR2GRAY)
-
- faces = faceCascade.detectMultiScale(
- gray,
- scaleFactor=1.2,
- minNeighbors=5,
- minSize=(int(minW), int(minH))
- )
-
- for (x, y, w, h) in faces:
- cv2.rectangle(img, (x, y), (x+w, y+h), (0, 255, 0), 2)
- idnum, confidence = recognizer.predict(gray[y:y+h, x:x+w])
-
- if confidence < 100:
- idnum = names[idnum]
- confidence = "{0}%".format(round(100 - confidence))
- else:
- idnum = "unknown"
- confidence = "{0}%".format(round(100 - confidence))
-
- cv2.putText(img, str(idnum), (x+5, y-5), font, 1, (0, 0, 255), 1)
- cv2.putText(img, str(confidence), (x+5, y+h-5), font, 1, (0, 0, 0), 1)
-
- cv2.imshow('camera', img)
- k = cv2.waitKey(10)
- if k == 27:
- break
-
- cam.release()
- cv2.destroyAllWindows()
-
- # def draw_rectangle(img, rect):
- # (x, y, w, h) = rect
- # cv2.rectangle(img, (x, y), (x+w, y+h), (0, 255, 0), 2)
-
- # #function to draw text on give image starting from
- # #passed (x, y) coordinates.
- # def draw_text(img, text, x, y):
- # cv2.putText(img, text, (x, y), cv2.FONT_HERSHEY_PLAIN, 1.5, (0, 255, 0), 2)
-
- # def detect_face(img):
- # #convert the test image to gray image as opencv face detector expects gray images
- # gray = cv2.cvtColor(img, cv2.COLOR_BGR2GRAY)
- # cascadePath = 'opencv-files/lbpcascade_frontalface.xml'
- # face_cascade = cv2.CascadeClassifier(cascadePath)
- # #load OpenCV face detector, I am using LBP which is fast
- # #there is also a more accurate but slow Haar classifier
- # #face_cascade = cv2.CascadeClassifier('opencv-files/haarcascade_frontalface_alt.xml')
-
- # #let's detect multiscale (some images may be closer to camera than others) images
- # #result is a list of faces
- # faces = face_cascade.detectMultiScale(gray, scaleFactor=1.2, minNeighbors=5);
- # #if no faces are detected then return original img
- # print(len(faces))
- # if (len(faces) == 0):
- # return None, None
-
- # #under the assumption that there will be only one face,
- # #extract the face area
- # (x, y, w, h) = faces[0]
-
- # #return only the face part of the image
- # return gray[y:y+w, x:x+h], faces[0]
-
-
- # face_recognizer = cv2.face.LBPHFaceRecognizer_create()
- # face_recognizer.read('trainer.yml')
- # names = ['', 'Bob','xxx','Taotaotao']
- # print("Predicting images...")
-
- # #load test images
- # test_img = cv2.imread("1.jpg")
- # #perform a prediction
- # img = test_img.copy()
- # start=time.clock()
- # face, rect = detect_face(img)
- # label, confidence = face_recognizer.predict(face)
- # label_text = names[label]
- # end=time.clock()
- # draw_rectangle(img, rect)
- # draw_text(img, label_text, rect[0], rect[1]-5)
-
- # print("Prediction complete time %s"%(end-start))
-
- # #display both images
- # cv2.imshow("0000", cv2.resize(img, (400, 500)))
- # cv2.waitKey(3600)
- # cv2.destroyAllWindows()
-
|


 老墨34924
 陈德熹1212