一:前言
前文我们大致介绍了Beetle ESP32-C3的上手使用,作为ESP生态的一个芯片,它的软件部分,乐鑫科技这几年也在不断完善。 DF又在此基础上进行了一定的设计,整体上来说使用起来还是比较丝滑的。本文我们继续来聊聊其主打的WiFi功能。(如想了解前文请点击链接:)
【Beetle ESP32-C3试用(一)】点灯是最好的体验
二:WiFi连接
为了使用的通用性,本文使用Arduino进行编码测试,首先我们来看下,在Arduino里如何进行WiFi连接:
#include <WiFi.h>

//修改WIFI名称以及密码
const char* ssid = "********";//WIFI名称
const char* password = "********";//WIFI密码

void setup() {
  Serial.begin(115200);
  WiFi.begin(ssid, password);
  Serial.println("Connecting");

  //判断WIFI是否连接
  while(WiFi.status() != WL_CONNECTED) {
    delay(500);
    Serial.print(".");
  }
  Serial.println("");
  Serial.print("Connected to WiFi network with IP Address: ");
  Serial.println(WiFi.localIP());
}

unsigned long lastTime = 0;
//设置每10秒显示测试数据
unsigned long timerDelay = 10000;

void loop() {
  if ((millis() - lastTime) > timerDelay) {
    //检测WIFI是否已经连接
    if(WiFi.status()== WL_CONNECTED){
      Serial.print("WiFi Connected:");
      Serial.println(WiFi.localIP());
    }
    else {
      Serial.println("WiFi Disconnected");
    }
    lastTime = millis();
  }
}
WiFi的连接方式,和一般的WiFi芯片连接方式类似,我们可以直接刷入以上代码进行测试(因为加入了每10S的连接测试,所以代码稍长):
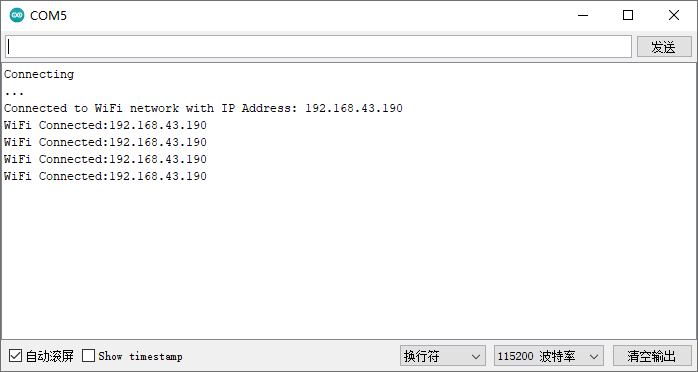
经长时间测试,模块还是比较稳定的。
三:WiFi界Hello World
3.1: http连接
连接WiFi后,获取天气预报是比较常规的做法。为了连接天气预报的API,我们需要先定义HTTP请求的函数,当然要先引入httpclient的头函数: #include <HTTPClient.h>
#include <HTTPClient.h>
String httpGETRequest(const char* serverName) {
  //...省略代码
  //返回获得的数据用于Json处理
  return payload;
}
笔者使用的是 https://www.sojson.com/api/weather.html,这个网站的API,读者如有需要请自行查阅文档:

3.2 :JSON解析
因为大部分的API返回的都是JSON数据,所以我们在Arduino里引入JSON库,进行解析。
3.2.1 Arduino_JSON库
您需要安装Arduino_JSON库。通过 Arduino IDE Tools -> Manage Libraries 中输入 Arduino_JSON 并安装该库:

3.2.2 JSON解析
为了解析返回的JSON数据,我们需要进行如下操作:
#include <Arduino_JSON.h>

JSONVar myObject = JSON.parse(jsonBuffer);
//判断解析是否成功
if (JSON.typeof(myObject) == "undefined") {
    Serial.println("Parsing input failed!");
    return;
}
Serial.print("JSON object = ");
Serial.println(myObject);

Serial.print("城市: ");
Serial.println(myObject["cityInfo"]["city"]);
Serial.print("时间: ");
Serial.println(myObject["time"]);
Serial.print("温度: ");
Serial.print(myObject["data"]["wendu"]);
Serial.print(",湿度: ");
Serial.println(myObject["data"]["shidu"]);
解析后的数据:

完整代码如下(WiFi的ssid和password请自行修改):
#include <WiFi.h>
#include <HTTPClient.h>
#include <Arduino_JSON.h>

//修改WIFI名称以及密码
const char* ssid = "********";//WIFI名称
const char* password = "********";//WIFI密码

void setup() {
  Serial.begin(115200);
  WiFi.begin(ssid, password);
  Serial.println("Connecting");

  //判断WIFI是否连接
  while(WiFi.status() != WL_CONNECTED) {
    delay(500);
    Serial.print(".");
  }
  Serial.println("");
  Serial.print("Connected to WiFi network with IP Address: ");
  Serial.println(WiFi.localIP());
}

unsigned long lastTime = 0;
//设置每5秒显示测试数据
unsigned long timerDelay = 5000;

//北京城市代码
String city = "101010100";
//天气预报API
String serverPath = "http://t.weather.sojson.com/api/weather/city/" + city;
String jsonBuffer;

void loop() {
  if ((millis() - lastTime) > timerDelay) {
    //检测WIFI是否已经连接
    if(WiFi.status()== WL_CONNECTED){
      jsonBuffer = httpGETRequest(serverPath.c_str());
      // Serial.println(jsonBuffer);
      //将解析的Json对象值储存在Jsonu缓冲区中
      JSONVar myObject = JSON.parse(jsonBuffer);

      //判断解析是否成功
      if (JSON.typeof(myObject) == "undefined") {
        Serial.println("Parsing input failed!");
        return;
      }
/*
      Serial.print("JSON object = ");
      Serial.println(myObject);*/
      Serial.print("城市: ");
      Serial.println(myObject["cityInfo"]["city"]);
      Serial.print("时间: ");
      Serial.println(myObject["time"]);
      Serial.print("温度: ");
      Serial.print(myObject["data"]["wendu"]);
      Serial.print(",湿度: ");
      Serial.println(myObject["data"]["shidu"]);
    }
    else {
      Serial.println("WiFi Disconnected");
    }
    lastTime = millis();
  }

}

String httpGETRequest(const char* serverName) {
  WiFiClient client;
  HTTPClient http;

  //连接网址
  http.begin(client, serverName);

  //发送HTTP站点请求
  int httpResponseCode = http.GET();

  //该数组用于储存获得的数据
  String payload = "{}";

  //将获得的数据放入数组
  if (httpResponseCode>0) {
    // Serial.print("HTTP Response code: ");
    // Serial.println(httpResponseCode);
    payload = http.getString();
  }
  else {
    Serial.print("Error code: ");
    Serial.println(httpResponseCode);
  }

  //释放资源
  http.end();

  //返回获得的数据用于Json处理
  return payload;
}
四:总结
使用Beetle ESP32-C3芯片进行WiFi连接还是比较方便的。整个测试过程数据稳定,理论上能进行长时间的真实环境使用。
建议DF开发部门进行整合库的开发,如http函数,使得使用更加方便。