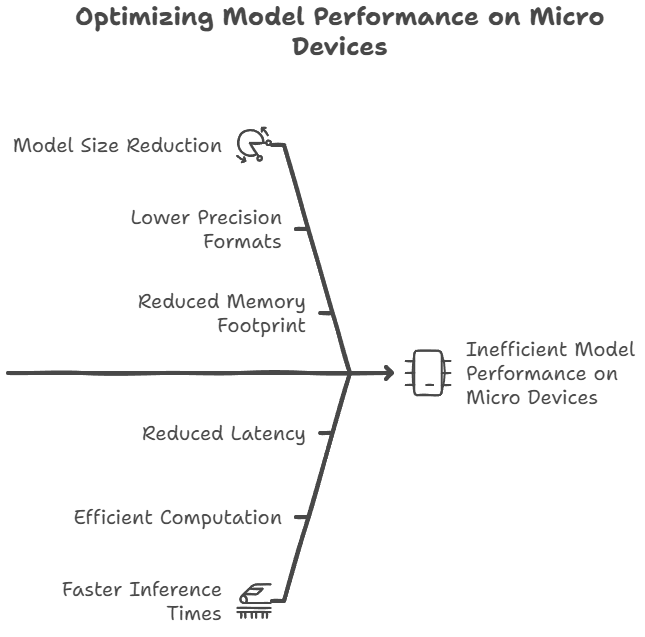
(图源:
https://github.com/johnosbb/MicroTFLite)[/align]
TinyML开发流程(软件Arduino IDE、硬件行空板K10)
数据采集:
- 创建一个 Arduino Sketch 用于从传感器或其他输入设备收集数据,以形成模型训练所需的数据集。
定义与训练模型:
- 在 TensorFlow 开发环境中(如 Google Colab)定义一个深度神经网络模型(DNN),并使用采集到的数据对模型进行训练。
模型转换与保存:
- 将训练好的模型转换为 TensorFlow Lite 格式,并保存为 model.h 文件,其中包含模型的二进制表示(Flat Buffer 格式)。
部署推理代码:
- 在 Arduino IDE 中准备推理代码,包含以下步骤:
- 引入必要头文件(如 TensorFlow Lite Micro 和模型文件 model.h)。
- 定义 TensorArena(内存缓冲区)。
- 初始化模型。
- 设置输入数据并运行推理。
- 读取推理输出。
测试与优化:
- 通过串口调试工具查看推理结果,并根据需要优化模型性能。
MicroTFLite介绍
MicroTFLite 是一个为 Arduino 设计的 TensorFlow Lite Micro 库,旨在简化在 Arduino 板上使用 TensorFlow Lite Micro 的过程。MicroTFLite库适用于各种任务,如分类、回归、预测。
1. 特点
- Arduino 风格的 API:MicroTFLite 提供了典型的 Arduino 风格的 API,避免了在 Arduino 代码中使用指针或其他 C++ 语法构造,这使得它更适合 Arduino 开发者使用。
- 支持量化数据和浮点数据:该库能够处理量化数据和原始浮点值,根据模型的元数据自动检测适当的处理方式。
- 调试功能:提供了多个函数来帮助开发者了解模型部署的过程,并在调试模型问题时提供帮助。
2. 目标平台
MicroTFLite 适用于多种嵌入式设备,包括:
- Arduino Nano 系列(如 Nano 33 BLE、Nano ESP32)
- Arduino Nicla、Portenta 系列
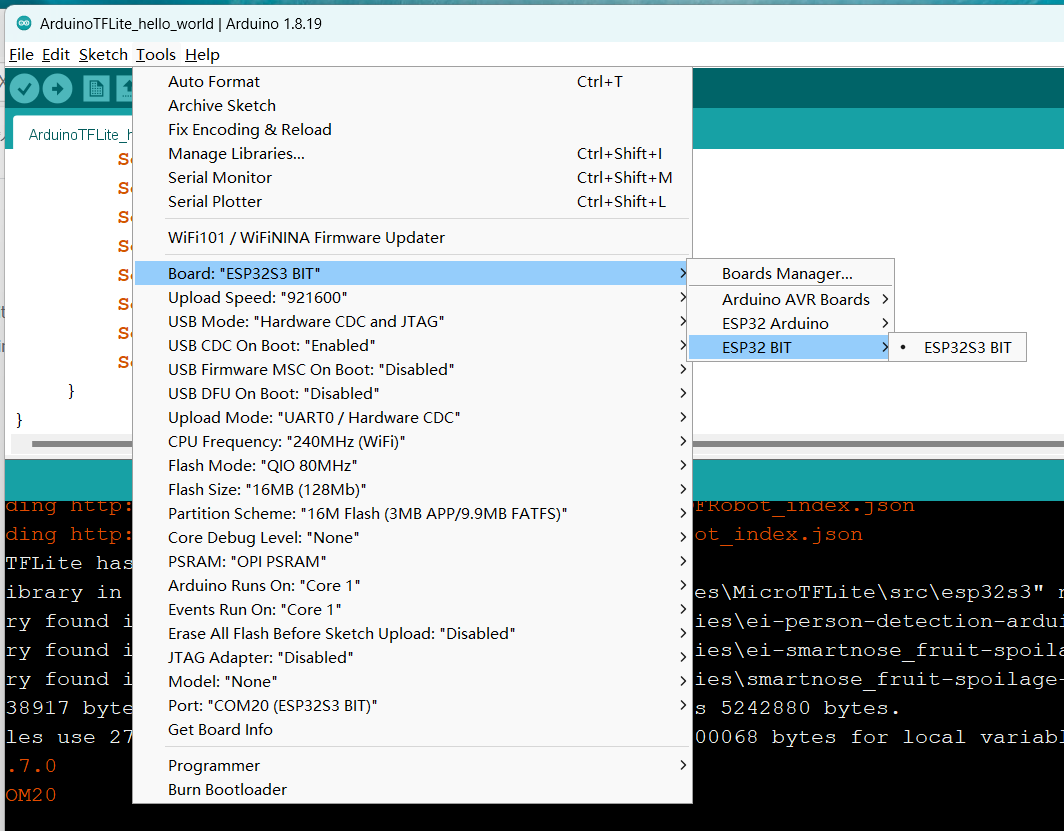
- ESP32 和 Arduino Giga R1 WiFi
3. MicroTFLite支持的算子
MicroTFLite 支持多种常见的机器学习算子:
- 卷积与池化:
- 二维卷积(CONV_2D)、深度可分离卷积(DEPTHWISE_CONV_2D)
- 最大池化(MAX_POOL_2D)、平均池化(AVERAGE_POOL_2D)
- 全连接层:FULLY_CONNECTED
- 激活函数:
4. MicroTFLite API一览
- 模型初始化和部署
- 初始化模型:通过
ModelInit() 函数,可以初始化 TensorFlow Lite 模型和解释器。这包括加载模型数据和分配必要的内存空间(如 tensorArena).
- 加载模型文件:支持从二进制文件(如
model.h)中加载预训练的 TensorFlow Lite 模型,使其能够在 Arduino 设备上运行.
- 输入和输出处理
- 设置输入数据:使用
ModelSetInput() 函数可以将输入数据设置到模型的输入张量中。该函数还支持量化处理,能够根据模型的量化参数自动调整输入值.
- 获取输出结果:通过
ModelGetOutput() 函数可以读取模型推理后的输出结果。这使得开发者能够获取模型的预测值或分类结果.
- 推理和调试
- 运行推理:调用
ModelRunInference() 函数可以启动模型的推理过程。该函数执行模型的前向传播,生成输出结果.
- 打印张量信息:提供了多个函数来打印模型的张量信息,如
ModelPrintInputTensorDimensions()和 ModelPrintOutputTensorDimensions(),这些函数可以帮助开发者了解输入和输出张量的维度.
- 调试和调试信息:
ModelPrintTensorQuantizationParams() 函数可以打印输入和输出张量的量化参数,这对于调试量化模型非常有用。ModelPrintMetadata()函数可以打印模型的元数据信息,如描述和版本,帮助开发者了解模型的基本信息.
MicroTFLite安装
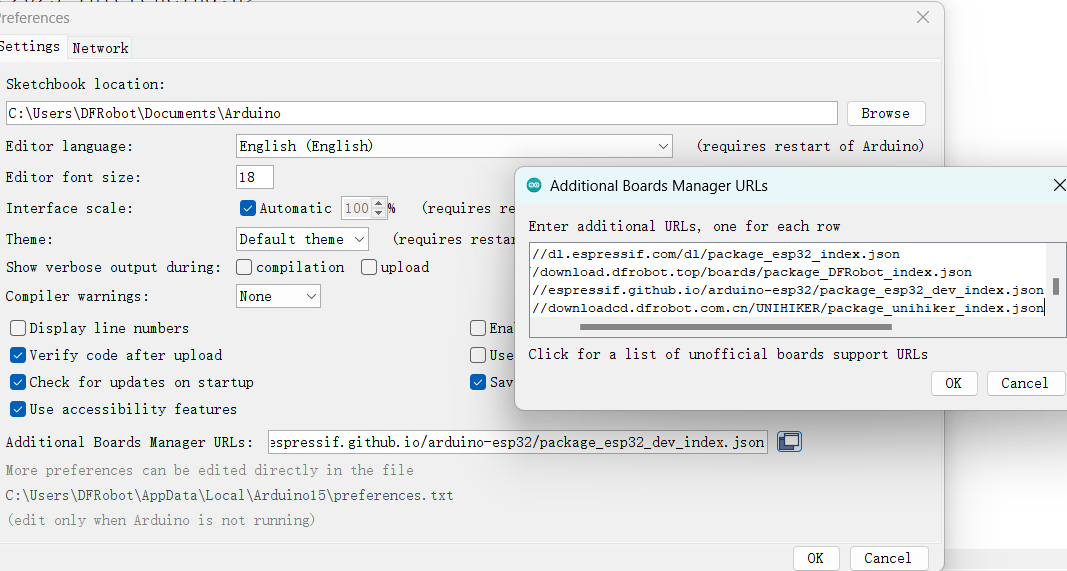
1. arduinoIDE 1.8.19 preferences安装行空板K10环境
https://downloadcd.dfrobot.com.cn/UNIHIKER/package_unihiker_index.json
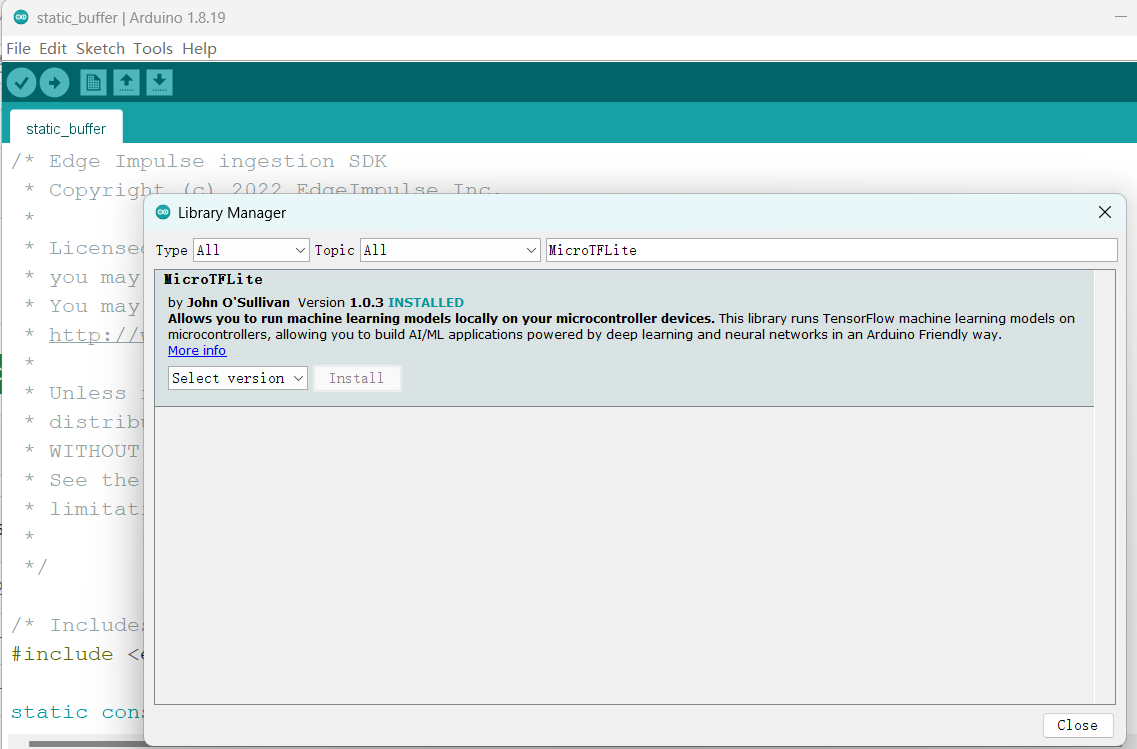
2. Library Manager搜索MicroTFLite安装
3. 示例测试:通过传感器数据实时预测工业设备故障
ArduinoLite_preventive_maintenance项目使用的是一个前馈神经网络架构,包含输入层、两个 Dropout 层、一个隐藏层和输出层,处理二元分类任务。使用 binary_crossentropy 作为损失函数和 adam 优化器进行训练,支持类别权重调整和早停回调,确保在类别不平衡时仍能有效训练。示例中使用了随机数模拟的传感器数据,比如转速、温度、振动、电流。为了减少模型大小,此模型量化成int8。
这个程序的主要功能是:
- 模拟采集设备的各项参数(转速、温度、振动、电流)
- 使用这些参数进行故障预测
- 同时通过预设的阈值进行实际故障判断
- 比较预测结果和实际故障情况,统计预测准确度
量化作用和影响:TensorFlow Lite for Microcontrollers (TFLM) 的量化是将模型中的数据从浮点数(float32)转换为整数(int8)的过程。
- 减少模型大小:量化将模型中的浮点数转换为整数,显著减少了模型的存储需求。
- 提高计算效率:在资源受限的设备上,整数计算通常比浮点计算更高效。整数运算器(如 ARM Cortex-M 的 DSP 扩展)可以更快地执行整数乘法和加法等操作,从而提高模型的推理速度.
- 精度损失:量化会引入一定的精度损失,因为整数表示无法完全精确地表示浮点数。然而,通过合理的量化策略和模型优化,可以在保持较高精度的同时实现显著的性能提升.
/* Copyright 2024 John O'Sullivan, TensorFlow Authors. All Rights Reserved.

这是一个使用 MicroTFLite 库运行 TensorFlow Lite 模型的示例程序
主要用于设备的预防性维护,通过传感器数据预测可能的故障

更多信息请参考库文档:
https://github.com/johnosbb/MicroTFLite

Licensed under the Apache License, Version 2.0 (the "License");
... 许可证信息 ...
==============================================================================*/

#include <MicroTFLite.h>
#include "model.h"

// 特征数据的统计信息(缩放和平衡前):
// 转速(RPM) - 平均值: 1603.866, 标准差: 195.843
// 温度(°C) - 平均值: 24.354, 标准差: 4.987
// 振动(g) - 平均值: 0.120, 标准差: 0.020
// 电流(A) - 平均值: 3.494, 标准差: 0.308
constexpr float tMean = 24.354f;      // 温度平均值
constexpr float rpmMean = 1603.866f;  // 转速平均值
constexpr float vMean = 0.120f;       // 振动平均值
constexpr float cMean = 3.494f;       // 电流平均值
constexpr float tStd = 4.987f;        // 温度标准差
constexpr float rpmStd = 195.843f;    // 转速标准差
constexpr float vStd = 0.020f;        // 振动标准差
constexpr float cStd = 0.308f;        // 电流标准差

// 定义故障条件的阈值
const float highTempThreshold = 30.0f;            // 温度过高阈值(摄氏度)
const float lowRpmThreshold = 1500.0f;            // 转速过低阈值
const float highVibrationThreshold = 0.60f;       // 振动过高阈值(g)
const float abnormalCurrentLowThreshold = 0.2f;   // 电流过低阈值(安培)
const float abnormalCurrentHighThreshold = 10.8f; // 电流过高阈值(安培)

// 预测统计计数器
int totalPredictions = 0;
int truePositives = 0;
int falsePositives = 0;
int trueNegatives = 0;
int falseNegatives = 0;
float rollingAccuracy = 0.0f;// 滚动计算的准确率
bool showStatistics = false; // 是否显示统计信息

// 为TensorFlow Lite分配内存
constexpr int kTensorArenaSize = 4 * 1024;
alignas(16) uint8_t tensorArena[kTensorArenaSize];

void setup() {
    // 初始化串口通信并等待串口监视器打开
    Serial.begin(115200);
    while (!Serial);
    delay(5000);
    Serial.println("Preventative Maintenance Example.");
    Serial.println("Initializing TensorFlow Lite Micro Interpreter...");

    // 初始化TensorFlow Lite模型
    if (!ModelInit(model, tensorArena, kTensorArenaSize)) {
        Serial.println("Model initialization failed!");
        while (true);
    }
    Serial.println("Model initialization done.");
    ModelPrintMetadata();
    ModelPrintTensorQuantizationParams();
    ModelPrintTensorInfo();
}

// 使用Box-Muller变换生成正态分布的随机值
float GenerateRandomValue(float mean, float stddev) {
    float u1 = random(0, 10000) / 10000.0f;
    float u2 = random(0, 10000) / 10000.0f;
    // Box-Muller变换生成正态分布值
    float z0 = sqrt(-2.0f * log(u1)) * cos(2.0f * PI * u2);
    float value = mean + z0 * stddev;
    return value;
}

// 模拟读取传感器数据的函数
float ReadRpm() {
    return GenerateRandomValue(rpmMean, rpmStd);
}

float ReadVibration() {
    return GenerateRandomValue(vMean, vStd);
}

float ReadTemperature() {
    return GenerateRandomValue(tMean, tStd);
}

float ReadCurrent() {
    return GenerateRandomValue(cMean, cStd);
}

// 检查是否存在故障条件
bool CheckFailureConditions(float temperature, float rpm, float vibration, float current) {
    bool conditionMet = false;
    String failureReason = "";

    // 检查各项参数是否超过阈值
    if (temperature > highTempThreshold) {
        conditionMet = true;
        failureReason += "温度过高; ";
    }
    if (rpm < lowRpmThreshold) {
        conditionMet = true;
        failureReason += "转速过低; ";
    }
    if (vibration > highVibrationThreshold) {
        conditionMet = true;
        failureReason += "振动过大; ";
    }
    if (current < abnormalCurrentLowThreshold) {
        conditionMet = true;
        failureReason += "电流过低; ";
    }
    if (current > abnormalCurrentHighThreshold) {
        conditionMet = true;
        failureReason += "电流过高; ";
    }

    if (conditionMet) {
        Serial.print("注意:传感器读数表明可能存在故障。原因: ");
        Serial.println(failureReason);
    }

    return conditionMet;
}

void loop() {
    // 读取传感器数据(这里使用模拟数据)
    float rpm = ReadRpm();
    float temperature = ReadTemperature();
    float current = ReadCurrent();
    float vibration = ReadVibration();
    bool inputSetFailed = false;

    // 检查实际故障条件
    bool actualFailure = CheckFailureConditions(temperature, rpm, vibration, current);

    // 数据标准化处理
    float temperatureN = (temperature - tMean) / tStd;
    float rpmN = (rpm - rpmMean) / rpmStd;
    float currentN = (current - cMean) / cStd;
    float vibrationN = (vibration - vMean) / vStd;

    // 将数据输入到模型中
    if (!ModelSetInput(temperatureN, 0))
        inputSetFailed = true;
    if (!ModelSetInput(rpmN, 1))
        inputSetFailed = true;
    if (!ModelSetInput(currentN, 2))
        inputSetFailed = true;
    if (!ModelSetInput(vibrationN, 3))
        inputSetFailed = true;

    // 运行模型推理
    if (!ModelRunInference()) {
        Serial.println("模型推理失败!");
        return;
    }

    // 获取模型输出结果
    float prediction = ModelGetOutput(0);
    bool predictedFailure = (prediction > 0.50f); // 预测值>0.5表示可能发生故障

    // 更新预测统计信息
    if (predictedFailure && actualFailure) {
        truePositives++;
    } else if (predictedFailure && !actualFailure) {
        falsePositives++;
        showStatistics = true;
    } else if (!predictedFailure && actualFailure) {
        falseNegatives++;
        showStatistics = true;
    } else if (!predictedFailure && !actualFailure) {
        trueNegatives++;
    }

    totalPredictions++;

    // 计算滚动准确率
    rollingAccuracy = (float)(truePositives + trueNegatives) / totalPredictions * 100.0f;

    // 当出现假阳性或假阴性时显示统计信息
    if (showStatistics) {
        Serial.println("-----------------------------");
        Serial.print("预测置信度: ");
        Serial.println(prediction);
        Serial.print("预测是否故障: ");
        Serial.println(predictedFailure);
        Serial.print("实际是否故障: ");
        Serial.println(actualFailure);
        Serial.print("转速: ");
        Serial.print(rpm);
        Serial.print(" | 温度: ");
        Serial.print(temperature);
        Serial.print(" °C");
        Serial.print(" | 电流: ");
        Serial.print(current);
        Serial.print(" A");
        Serial.print(" | 振动: ");
        Serial.print(vibration);
        Serial.print(" m/s^2\n");
        Serial.println("总预测次数: " + String(totalPredictions) +
                      ", 真阳性: " + String(truePositives) +
                      ", 假阳性: " + String(falsePositives) +
                      ", 真阴性: " + String(trueNegatives) +
                      ", 假阴性: " + String(falseNegatives) +
                      ", 准确率(%): " + String(rollingAccuracy));

        showStatistics = false;
    }

    delay(10000); // 等待10秒后进行下一次检测
}
5. k10编译结果:程序占了很少的存储空间和动态内存
Sketch uses 539913 bytes (10%) of program storage space. Maximum is 5242880 bytes.
Global variables use 29740 bytes (9%) of dynamic memory, leaving 297940 bytes for local variables.
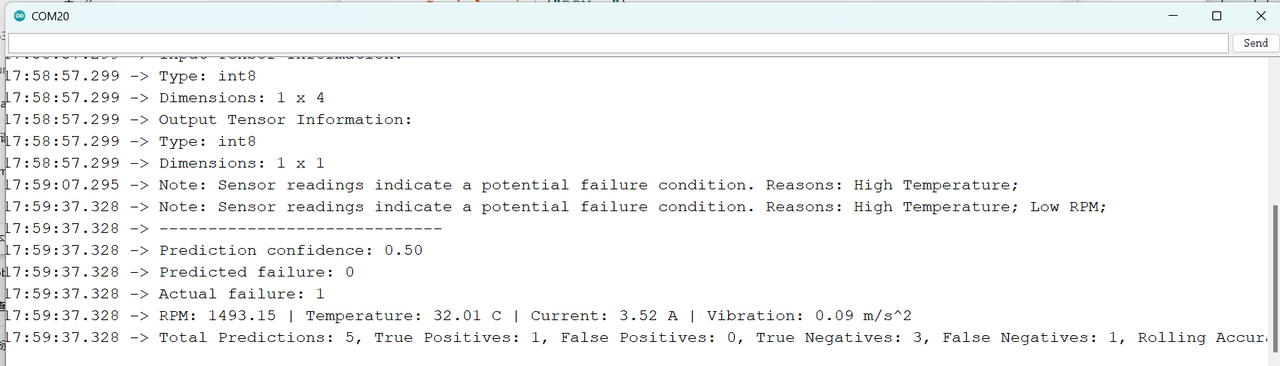
6. 串口监视器输出:
- 转速(RPM):
1493.15
- 温度(Temperature):
32.01°C
- 电流(Current):
3.52 A
- 振动(Vibration):
0.09 m/s^2
在 7:59:07.295,串口输出指出传感器读数显示潜在的故障条件,原因是高温(High Temperature)。在 7:59:37.328,串口输出再次指出潜在的故障条件,原因包括高温和低转速。
自己训练模型并部署
1. PC上安装python环境
从 Python 官网下载并安装 Python 3.6 或更高版本:Python 官网
2. PC上安装TensorFlow和NumPy库
打开终端(Windows 上为命令提示符,macOS 或 Linux 上为终端),然后运行以下命令来安装所需的库:
# 安装 TensorFlow 2.x(默认为最新版本)
pip install tensorflow
# 安装 NumPy
pip install numpy
3. 定义简单的回归网络,生成模型后再转换成C文件
目标:输入为1到5的数字,输出为其平方值
终端上运行test.py文件:
python test.py
生成的模型文件下载链接:https://github.com/polamaxu/TFLM
代码详情:
"""
环境要求:
- Python 3.6+
- TensorFlow 2.x
- NumPy

功能说明:
这个程序演示了一个简单的回归模型,用于预测数字的平方值。
包含模型训练、保存、转换为TFLite格式,以及生成C数组三个主要步骤。
"""

import tensorflow as tf
import numpy as np

# 1. 准备训练数据
# 创建一个简单的数据集:输入为1到5的数字,输出为其平方值
x_train = np.array([[1], [2], [3], [4], [5]], dtype=np.float32)
y_train = np.square(x_train)  # 计算平方值作为目标输出

# 2. 定义模型
# 使用Sequential API创建一个简单的模型
# Lambda层直接实现了平方运算,无需训练参数
model = tf.keras.Sequential([
    tf.keras.layers.Input(shape=(1,), name='input_layer'),
    tf.keras.layers.Lambda(lambda x: x ** 2, name='square_layer')
])

# 3. 编译模型
# 注:由于使用Lambda层直接计算平方,实际上不需要训练
model.compile(optimizer='sgd', loss='mean_squared_error')

# 4. 测试模型性能
print("测试结果:")
for x in x_train:
    y_pred = model.predict([x])
    print(f"输入:{x[0]}, 预测输出:{y_pred[0][0]}")

# 5. 保存模型
# 将模型保存为HDF5格式
model.save('./saved_model.h5')

# 6. 转换为TFLite格式
# TFLite格式更适合在嵌入式设备上运行
converter = tf.lite.TFLiteConverter.from_keras_model(model)
tflite_model = converter.convert()

# 保存TFLite模型
with open('./model.tflite', 'wb') as f:
    f.write(tflite_model)

# 7. 将TFLite模型转换为C数组
def convert_tflite_to_c_array(tflite_model_path, c_file_path):
    """
    将TFLite模型文件转换为C语言数组格式

    参数:
        tflite_model_path: TFLite模型文件路径
        c_file_path: 输出的C头文件路径
    """
    with open(tflite_model_path, 'rb') as file:
        content = file.read()

    with open(c_file_path, 'w') as file:
        file.write('const unsigned char model_data[] = {')
        for i, val in enumerate(content):
            if i % 12 == 0:  # 每12个数字换行,提高可读性
                file.write('\n  ')
            file.write('0x{:02x}, '.format(val))
        file.write('\n};\n')
        file.write('const int model_data_len = {};\n'.format(len(content)))

if __name__ == '__main__':
    convert_tflite_to_c_array('./model.tflite', './model_data.h'
4. 将生成的模型文件上传至K10硬件,通过MicroTFLite库进行推理操作。
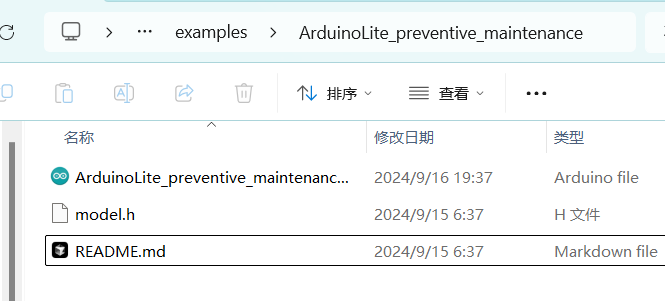
将训练生成的model.h与ino文件放在同一个文件夹中,在arduinoIDE软件中上传程序
#include <MicroTFLite.h>
#include "model.h" // Import model data

// Define memory area for storing intermediate tensors
constexpr int kTensorArenaSize = 2 * 1024; // Adjust based on model size
alignas(16) uint8_t tensorArena[kTensorArenaSize];

void setup() {
  // Initialize serial communication
  Serial.begin(9600);

  // Initialize model
  if (!ModelInit(model, tensorArena, kTensorArenaSize)) {
    Serial.println("Model initialization failed!");
    while (true); // Stop execution if initialization fails
  }

  Serial.println("Model initialization done.");
  ModelPrintMetadata();
  ModelPrintTensorInfo();
  ModelPrintInputTensorDimensions(); // Print input tensor dimensions
  ModelPrintOutputTensorDimensions(); // Print output tensor dimensions
}

void loop() {
  float input_value = 3.0; // Test input value

  // Display the input value
  Serial.print("Input value: ");
  Serial.println(input_value);

  // Set input value to the model
  if (!ModelSetInput(input_value, 0)) { // Set the first input
    Serial.println("Failed to set input value!");
    return;
  }

  // Run inference
  if (!ModelRunInference()) {
    Serial.println("Inference failed!");
    return;
  }

  // Get the model's output
  float prediction = ModelGetOutput(0);

  // Print the output result (predicted square value)
  Serial.print("Predicted output: ");
  Serial.println(prediction);

  delay(2000); // Run every 2 seconds
}
5. k10编译结果:程序占了很少的存储空间和动态内存
Sketch uses 530373 bytes (10%) of program storage space. Maximum is 5242880 bytes.
Global variables use 28492 bytes (8%) of dynamic memory, leaving 299188 bytes for local variables. Maximum is 327680 bytes.
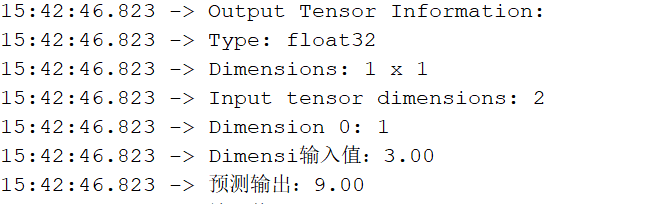
6. k10输出:
结论
MicroTFLite 库为嵌入式开发者提供了高效的工具,使得在资源受限平台(如 K10)上运行机器学习模型变得简单易行。从模型训练到部署推理,开发者可以快速完成 TinyML 项目,推动智能嵌入式设备的发展。
如果你有想要了解的,也请告诉我们,我们会推出更多 tinyml 项目教程。
参考
- https://github.com/tensorflow/tflite-micro
- https://github.com/johnosbb/MicroTFLite
- https://github.com/polamaxu/TFLM