在科技飞速发展的当下,智能安防领域正经历着一场革命性的变革。今天,我要为大家揭开一款极具创新性的智能安保系统的神秘面纱,它融合了前沿的 ESP32 S3 AI 摄像头模块技术,为我们的安全保驾护航。你是否曾为传统安保系统的滞后性和低效率而烦恼?是否渴望拥有一套能够实时监测、精准识别、快速响应的智能安保解决方案?这款基于 ESP32 S3 AI 摄像头模块的智能安保系统,正是你一直在寻找的答案。它凭借着强大的 AI 处理能力、出色的图像识别技术以及高效的网络通信功能,能够在复杂的环境中精准捕捉异常,第一时间发出警报,让潜在的安全威胁无所遁形。接下来,就让我们一同深入了解这款智能安保系统的神奇之处吧!
智能安保系统中涉及ESP32-S3 AI相关功能的一些示例C语言代码,涵盖了前端感知(摄像头图像采集、麦克风音频采集)、数据传输(Wi-Fi连接)、AI处理(简单图像特征提取示例)等部分功能。应用中可能需要根据需求进行调整和完善,并且完整实现智能安保系统还会涉及更多复杂的逻辑和代码。
一、准备工作 2.打开软件,点击工具,点击第2栏的首选项(如图) 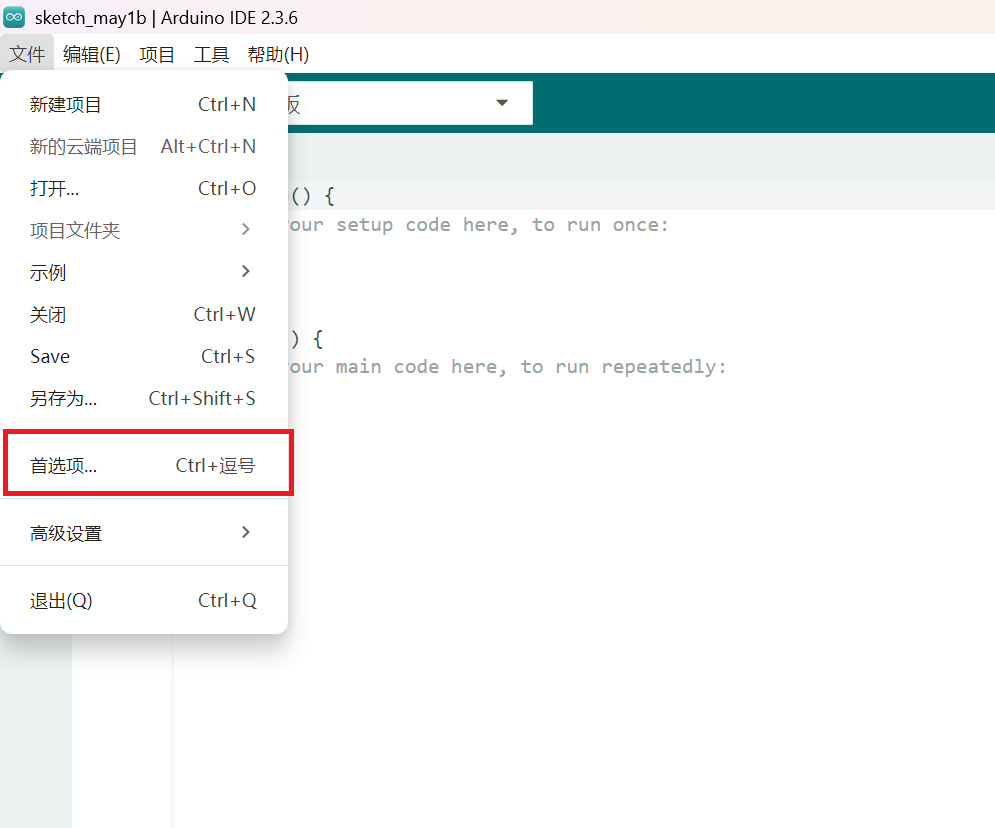
3.选择语言(重启软件后生效),输入链接,点击确定 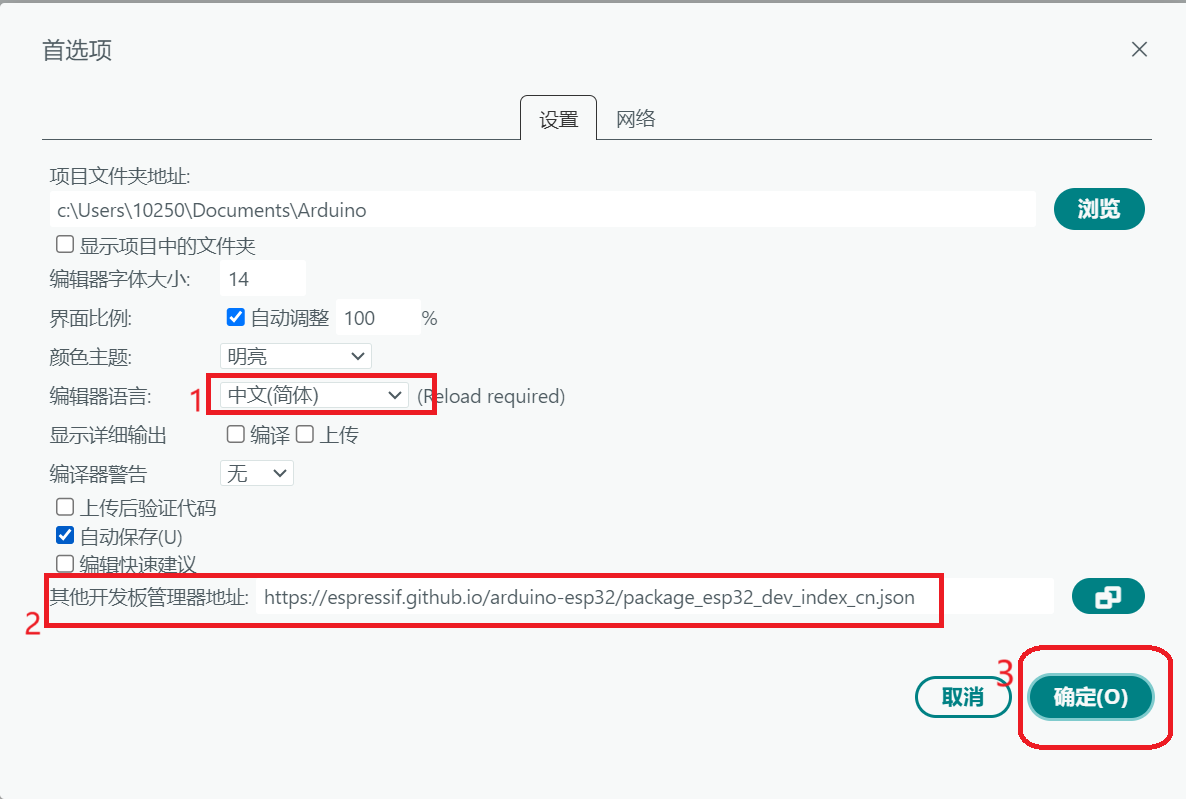
4.安装开发板(如图按顺序点击) 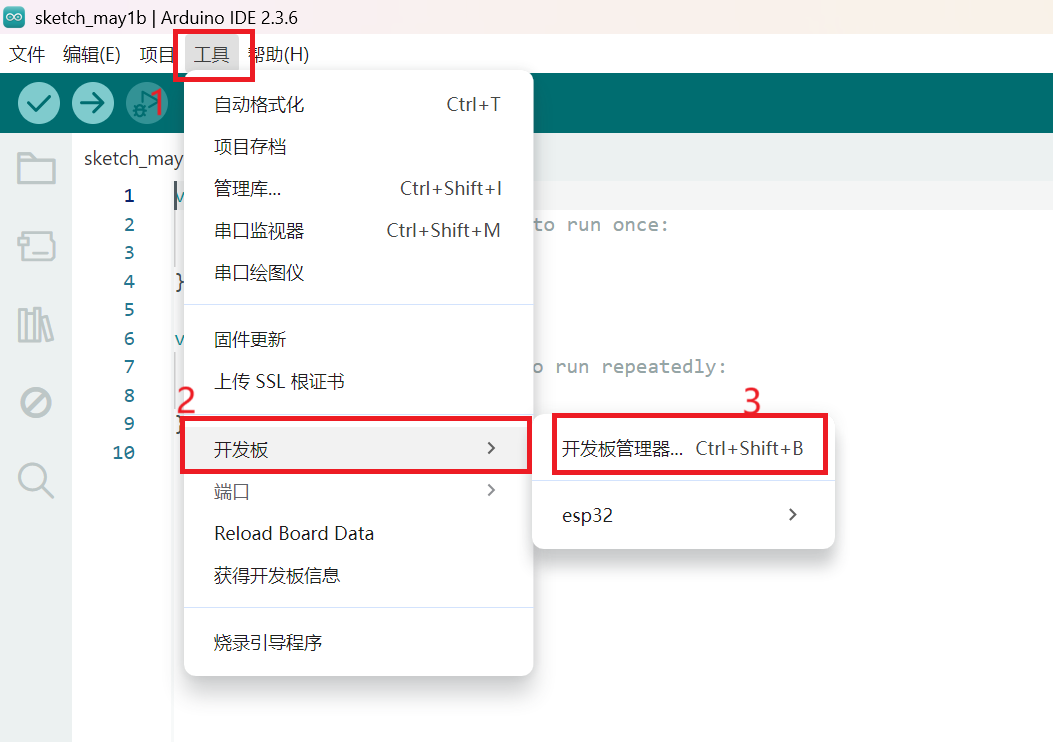
找到esp32,并点击安装(我这里已经安装完成) 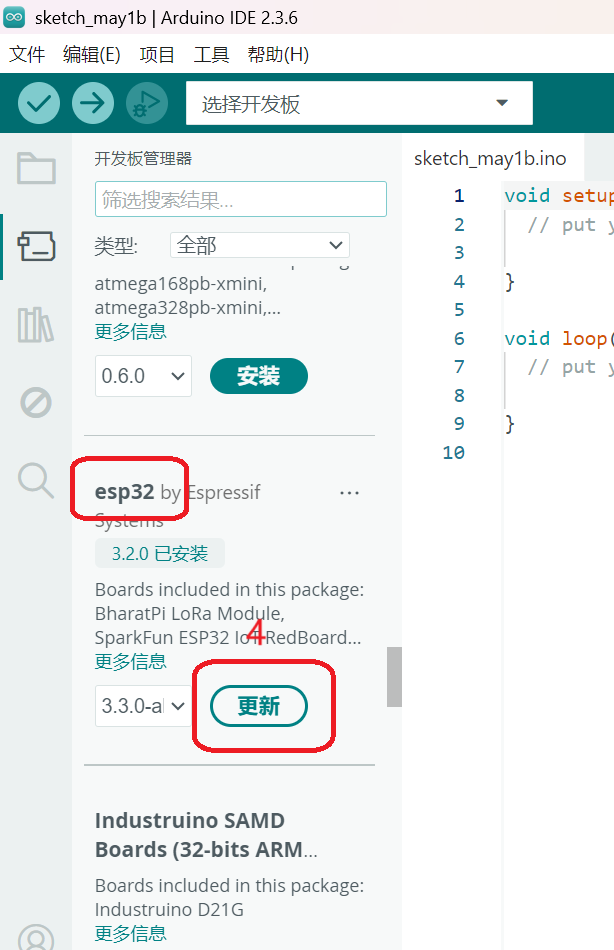
二、编写程序 1.引入ESP32 开发所需的标准库和 ESP-IDF 库,包括网络、日志、GPIO、SPI、I2S 和 Wi - Fi 相关的库。定义相关配置(WiFi账号密码需自行修改)
- <font face="微软雅黑" size="2">#include <stdio.h>
- #include <string.h>
- #include <stdlib.h>
- #include "nvs_flash.h"
- #include "esp_netif.h"
- #include "esp_event.h"
- #include "esp_log.h"
- #include "driver/gpio.h"
- #include "driver/spi_master.h"
- #include "driver/i2s.h"
- #include "esp_wifi.h"
- #include "ip4_addr.h"
-
- // 日志标签
- static const char* TAG = "ESP32-S3_Security_System";
-
- // Wi-Fi配置信息
- #define EXAMPLE_ESP_WIFI_SSID "your_wifi_ssid"
- #define EXAMPLE_ESP_WIFI_PASS "your_wifi_password"
-
- // 摄像头相关SPI配置
- #define CAMERA_MCLK_PIN 19
- #define CAMERA_HREF_PIN 23
- #define CAMERA_VSYNC_PIN 25
- #define CAMERA_DATA_OUT_PIN 26
- #define CAMERA_PCLK_PIN 27
- #define CAMERA_XCLK_PIN 0
- #define CAMERA_PWDN_PIN 32
- #define CAMERA_RESET_PIN 33
-
- // 麦克风I2S配置
- #define I2S_MCK_PIN 0
- #define I2S_BCK_PIN 2
- #define I2S_LRCK_PIN 3
- #define I2S_DO_PIN 4
- #define I2S_DI_PIN 5</font>
2.[color=rgba(0, 0, 0, 0.85)]对输入的 RGB 图像数据进行灰度化处理,将每个像素的 R、G、B 分量转换为灰度值,并更新图像数据。 - <font face="微软雅黑" size="2">// 简单图像特征提取示例(这里只是简单的灰度化处理)
- void simple_image_feature_extraction(uint8_t* image_data, int width, int height) {
- for (int i = 0; i < width * height; i++) {
- // 简单的灰度化公式:Y = 0.299 * R + 0.587 * G + 0.114 * B
- // 这里假设图像是RGB格式,且每个像素占3个字节
- uint8_t r = image_data[i * 3];
- uint8_t g = image_data[i * 3 + 1];
- uint8_t b = image_data[i * 3 + 2];
- uint8_t gray = (uint8_t)(0.299 * r + 0.587 * g + 0.114 * b);
- image_data[i * 3] = gray;
- image_data[i * 3 + 1] = gray;
- image_data[i * 3 + 2] = gray;
- }
- }</font>
3.然后处理 Wi - Fi 和 IP 相关的事件。当 Wi - Fi 启动时,尝试连接到 Wi - Fi;当 Wi - Fi 断开连接时,尝试重新连接;当获取到 IP 地址时,输出日志信息。 - <font face="微软雅黑" size="2">// Wi-Fi连接事件处理回调函数
- static void event_handler(void* arg, esp_event_base_t event_base,
- int32_t event_id, void* event_data)
- {
- if (event_base == WIFI_EVENT) {
- switch (event_id) {
- case WIFI_EVENT_STA_START:
- esp_wifi_connect();
- break;
- case WIFI_EVENT_STA_DISCONNECTED:
- ESP_LOGW(TAG, "Wi-Fi disconnected, trying to reconnect...");
- esp_wifi_connect();
- break;
- }
- } else if (event_base == IP_EVENT && event_id == IP_EVENT_STA_GOT_IP) {
- ip_event_got_ip_t* event = (ip_event_got_ip_t*) event_data;
- ESP_LOGI(TAG, "Got IP: " IPSTR, IP2STR(&event->ip_info.ip));
- }
- }</font>
4.初始化 Wi - Fi 连接。包括初始化网络接口、创建事件循环、创建默认的 Wi - Fi STA 模式,注册事件处理函数,设置 Wi - Fi 配置并启动 Wi - Fi。 - <font face="微软雅黑" size="2">// 初始化Wi-Fi连接
- void wifi_init_sta(void)
- {
- esp_netif_init();
- esp_event_loop_create_default();
- esp_netif_create_default_wifi_sta();
-
- wifi_init_config_t cfg = WIFI_INIT_CONFIG_DEFAULT();
- esp_wifi_init(&cfg);
-
- esp_event_handler_instance_register(WIFI_EVENT, ESP_EVENT_ANY_ID,
- &event_handler, NULL, NULL);
- esp_event_handler_instance_register(IP_EVENT, IP_EVENT_STA_GOT_IP,
- &event_handler, NULL, NULL);
-
- wifi_config_t wifi_config = {
- .sta = {
- .ssid = EXAMPLE_ESP_WIFI_SSID,
- .password = EXAMPLE_ESP_WIFI_PASS,
- .threshold.authmode = WIFI_AUTH_WPA2_PSK,
- .sae_pwe_h2e = WPA3_SAE_PWE_BOTH,
- },
- };
- esp_wifi_set_mode(WIFI_MODE_STA);
- esp_wifi_set_config(ESP_IF_WIFI_STA, &wifi_config);
- esp_wifi_start();
- }</font>
5.初始化摄像头 - <font face="微软雅黑" size="2">// 初始化摄像头
- void camera_init(void) {
- gpio_config_t io_conf = {};
- // 输出引脚配置
- io_conf.mode = GPIO_MODE_OUTPUT;
- io_conf.pin_bit_mask = (1ULL << CAMERA_MCLK_PIN) | (1ULL << CAMERA_XCLK_PIN) |
- (1ULL << CAMERA_PWDN_PIN) | (1ULL << CAMERA_RESET_PIN);
- gpio_config(&io_conf);
-
- // 输入引脚配置
- io_conf.mode = GPIO_MODE_INPUT;
- io_conf.pin_bit_mask = (1ULL << CAMERA_HREF_PIN) | (1ULL << CAMERA_VSYNC_PIN) |
- (1ULL << CAMERA_DATA_OUT_PIN) | (1ULL << CAMERA_PCLK_PIN);
- gpio_config(&io_conf);
-
- ESP_LOGI(TAG, "Camera initialized");
- }</font>
6.初始化麦克风 - <font face="微软雅黑" size="2">// 初始化麦克风I2S
- void microphone_init(void) {
- i2s_config_t i2s_config = {
- .mode = (i2s_mode_t)(I2S_MODE_MASTER | I2S_MODE_RX),
- .sample_rate = 44100,
- .bits_per_sample = I2S_BITS_PER_SAMPLE_16BIT,
- .channel_format = I2S_CHANNEL_FMT_ONLY_LEFT,
- .communication_format = I2S_COMM_FORMAT_I2S,
- .intr_alloc_flags = ESP_INTR_FLAG_LEVEL1,
- .dma_buf_count = 8,
- .dma_buf_len = 64,
- .use_apll = false,
- .tx_desc_auto_clear = true,
- .fixed_mclk = I2S_MCK_PIN,
- };
-
- i2s_pin_config_t pin_config = {
- .bck_io_num = I2S_BCK_PIN,
- .ws_io_num = I2S_LRCK_PIN,
- .data_in_num = I2S_DO_PIN,
- .data_out_num = I2S_DI_PIN,
- };
-
- esp_err_t err = i2s_driver_install(I2S_NUM_0, &i2s_config, 0, NULL);
- if (err != ESP_OK) {
- ESP_LOGE(TAG, "Failed to install I2S driver: %s", esp_err_to_name(err));
- return;
- }
-
- err = i2s_set_pin(I2S_NUM_0, &pin_config);
- if (err != ESP_OK) {
- ESP_LOGE(TAG, "Failed to set I2S pins: %s", esp_err_to_name(err));
- i2s_driver_uninstall(I2S_NUM_0);
- return;
- }
-
- ESP_LOGI(TAG, "Microphone initialized");
- }</font>
7.采集摄像头图像数据示例函数(这里简单做了一个程序,实际使用请查看相关教程DFRobot DFR1154 ESP32-S3 AI CAM使用教程)- void capture_camera_image(uint8_t* buffer, int width, int height) {
- for (int i = 0; i < width * height * 3; i++) {
- buffer[i] = rand() % 256;
- }
- ESP_LOGI(TAG, "Camera image captured");
- }
采集麦克风音频数据示例函数
- void capture_microphone_audio(int16_t* buffer, int buffer_size) {
- for (int i = 0; i < buffer_size; i++) {
- buffer[i] = rand() % 32768 - 16384;
- }
- ESP_LOGI(TAG, "Microphone audio captured");
- }
8.编写主程序
- void app_main(void)
- {
- // 初始化NVS
- esp_err_t ret = nvs_flash_init();
- if (ret == ESP_ERR_NVS_NO_FREE_PAGES || ret == ESP_ERR_NVS_NEW_VERSION_FOUND) {
- ESP_ERROR_CHECK(nvs_flash_erase());
- ret = nvs_flash_init();
- }
- ESP_ERROR_CHECK(ret);
-
- // 初始化随机数种子
- srand(esp_random());
-
- // 初始化Wi-Fi连接
- wifi_init_sta();
-
- // 初始化摄像头
- camera_init();
-
- // 初始化麦克风
- microphone_init();
-
- // 定义图像和音频数据缓冲区
- const int image_width = 640;
- const int image_height = 480;
- uint8_t* camera_image_buffer = (uint8_t*)malloc(image_width * image_height * 3);
- if (camera_image_buffer == NULL) {
- ESP_LOGE(TAG, "Failed to allocate memory for camera image buffer");
- return;
- }
-
- const int audio_buffer_size = 1024;
- int16_t* microphone_audio_buffer = (int16_t*)malloc(audio_buffer_size * sizeof(int16_t));
- if (microphone_audio_buffer == NULL) {
- ESP_LOGE(TAG, "Failed to allocate memory for microphone audio buffer");
- free(camera_image_buffer);
- return;
- }
-
- while (1) {
- // 采集摄像头图像数据
- capture_camera_image(camera_image_buffer, image_width, image_height);
- // 进行简单的图像特征提取
- simple_image_feature_extraction(camera_image_buffer, image_width, image_height);
- // 采集麦克风音频数据
- capture_microphone_audio(microphone_audio_buffer, audio_buffer_size);
- // 这里可以添加将数据发送到云端或进行进一步AI处理的代码
- // 例如通过网络发送数据等
- vTaskDelay(pdMS_TO_TICKS(1000));
- }
-
- // 释放内存
- free(camera_image_buffer);
- free(microphone_audio_buffer);
- }
9.所有程序(部分需自主修改)
- #include <stdio.h>
- #include <string.h>
- #include <stdlib.h>
- #include "nvs_flash.h"
- #include "esp_netif.h"
- #include "esp_event.h"
- #include "esp_log.h"
- #include "driver/gpio.h"
- #include "driver/spi_master.h"
- #include "driver/i2s.h"
- #include "esp_wifi.h"
- #include "ip4_addr.h"
-
- // 日志标签
- static const char* TAG = "ESP32-S3_Security_System";
-
- // Wi-Fi配置信息
- #define EXAMPLE_ESP_WIFI_SSID "your_wifi_ssid"
- #define EXAMPLE_ESP_WIFI_PASS "your_wifi_password"
-
- // 摄像头相关SPI配置
- #define CAMERA_MCLK_PIN 19
- #define CAMERA_HREF_PIN 23
- #define CAMERA_VSYNC_PIN 25
- #define CAMERA_DATA_OUT_PIN 26
- #define CAMERA_PCLK_PIN 27
- #define CAMERA_XCLK_PIN 0
- #define CAMERA_PWDN_PIN 32
- #define CAMERA_RESET_PIN 33
-
- // 麦克风I2S配置
- #define I2S_MCK_PIN 0
- #define I2S_BCK_PIN 2
- #define I2S_LRCK_PIN 3
- #define I2S_DO_PIN 4
- #define I2S_DI_PIN 5
-
- // 简单图像特征提取示例(这里只是简单的灰度化处理)
- void simple_image_feature_extraction(uint8_t* image_data, int width, int height) {
- for (int i = 0; i < width * height; i++) {
- // 简单的灰度化公式:Y = 0.299 * R + 0.587 * G + 0.114 * B
- // 这里假设图像是RGB格式,且每个像素占3个字节
- uint8_t r = image_data[i * 3];
- uint8_t g = image_data[i * 3 + 1];
- uint8_t b = image_data[i * 3 + 2];
- uint8_t gray = (uint8_t)(0.299 * r + 0.587 * g + 0.114 * b);
- image_data[i * 3] = gray;
- image_data[i * 3 + 1] = gray;
- image_data[i * 3 + 2] = gray;
- }
- }
-
- // Wi-Fi连接事件处理回调函数
- static void event_handler(void* arg, esp_event_base_t event_base,
- int32_t event_id, void* event_data)
- {
- if (event_base == WIFI_EVENT) {
- switch (event_id) {
- case WIFI_EVENT_STA_START:
- esp_wifi_connect();
- break;
- case WIFI_EVENT_STA_DISCONNECTED:
- ESP_LOGW(TAG, "Wi-Fi disconnected, trying to reconnect...");
- esp_wifi_connect();
- break;
- }
- } else if (event_base == IP_EVENT && event_id == IP_EVENT_STA_GOT_IP) {
- ip_event_got_ip_t* event = (ip_event_got_ip_t*) event_data;
- ESP_LOGI(TAG, "Got IP: " IPSTR, IP2STR(&event->ip_info.ip));
- }
- }
-
- // 初始化Wi-Fi连接
- void wifi_init_sta(void)
- {
- esp_netif_init();
- esp_event_loop_create_default();
- esp_netif_create_default_wifi_sta();
-
- wifi_init_config_t cfg = WIFI_INIT_CONFIG_DEFAULT();
- esp_wifi_init(&cfg);
-
- esp_event_handler_instance_register(WIFI_EVENT, ESP_EVENT_ANY_ID,
- &event_handler, NULL, NULL);
- esp_event_handler_instance_register(IP_EVENT, IP_EVENT_STA_GOT_IP,
- &event_handler, NULL, NULL);
-
- wifi_config_t wifi_config = {
- .sta = {
- .ssid = EXAMPLE_ESP_WIFI_SSID,
- .password = EXAMPLE_ESP_WIFI_PASS,
- .threshold.authmode = WIFI_AUTH_WPA2_PSK,
- .sae_pwe_h2e = WPA3_SAE_PWE_BOTH,
- },
- };
- esp_wifi_set_mode(WIFI_MODE_STA);
- esp_wifi_set_config(ESP_IF_WIFI_STA, &wifi_config);
- esp_wifi_start();
- }
-
- // 初始化摄像头
- void camera_init(void) {
- gpio_config_t io_conf = {};
- // 输出引脚配置
- io_conf.mode = GPIO_MODE_OUTPUT;
- io_conf.pin_bit_mask = (1ULL << CAMERA_MCLK_PIN) | (1ULL << CAMERA_XCLK_PIN) |
- (1ULL << CAMERA_PWDN_PIN) | (1ULL << CAMERA_RESET_PIN);
- gpio_config(&io_conf);
-
- // 输入引脚配置
- io_conf.mode = GPIO_MODE_INPUT;
- io_conf.pin_bit_mask = (1ULL << CAMERA_HREF_PIN) | (1ULL << CAMERA_VSYNC_PIN) |
- (1ULL << CAMERA_DATA_OUT_PIN) | (1ULL << CAMERA_PCLK_PIN);
- gpio_config(&io_conf);
-
- ESP_LOGI(TAG, "Camera initialized");
- }
-
- // 初始化麦克风I2S
- void microphone_init(void) {
- i2s_config_t i2s_config = {
- .mode = (i2s_mode_t)(I2S_MODE_MASTER | I2S_MODE_RX),
- .sample_rate = 44100,
- .bits_per_sample = I2S_BITS_PER_SAMPLE_16BIT,
- .channel_format = I2S_CHANNEL_FMT_ONLY_LEFT,
- .communication_format = I2S_COMM_FORMAT_I2S,
- .intr_alloc_flags = ESP_INTR_FLAG_LEVEL1,
- .dma_buf_count = 8,
- .dma_buf_len = 64,
- .use_apll = false,
- .tx_desc_auto_clear = true,
- .fixed_mclk = I2S_MCK_PIN,
- };
-
- i2s_pin_config_t pin_config = {
- .bck_io_num = I2S_BCK_PIN,
- .ws_io_num = I2S_LRCK_PIN,
- .data_in_num = I2S_DO_PIN,
- .data_out_num = I2S_DI_PIN,
- };
-
- esp_err_t err = i2s_driver_install(I2S_NUM_0, &i2s_config, 0, NULL);
- if (err != ESP_OK) {
- ESP_LOGE(TAG, "Failed to install I2S driver: %s", esp_err_to_name(err));
- return;
- }
-
- err = i2s_set_pin(I2S_NUM_0, &pin_config);
- if (err != ESP_OK) {
- ESP_LOGE(TAG, "Failed to set I2S pins: %s", esp_err_to_name(err));
- i2s_driver_uninstall(I2S_NUM_0);
- return;
- }
-
- ESP_LOGI(TAG, "Microphone initialized");
- }
-
- // 采集摄像头图像数据示例函数
- // 这里只是简单模拟获取图像数据,实际需要更复杂的摄像头驱动操作
- void capture_camera_image(uint8_t* buffer, int width, int height) {
- for (int i = 0; i < width * height * 3; i++) {
- buffer[i] = rand() % 256;
- }
- ESP_LOGI(TAG, "Camera image captured");
- }
-
- // 采集麦克风音频数据示例函数
- // 这里只是简单模拟获取音频数据,实际需要更复杂的I2S驱动操作
- void capture_microphone_audio(int16_t* buffer, int buffer_size) {
- for (int i = 0; i < buffer_size; i++) {
- buffer[i] = rand() % 32768 - 16384;
- }
- ESP_LOGI(TAG, "Microphone audio captured");
- }
-
- void app_main(void)
- {
- // 初始化NVS
- esp_err_t ret = nvs_flash_init();
- if (ret == ESP_ERR_NVS_NO_FREE_PAGES || ret == ESP_ERR_NVS_NEW_VERSION_FOUND) {
- ESP_ERROR_CHECK(nvs_flash_erase());
- ret = nvs_flash_init();
- }
- ESP_ERROR_CHECK(ret);
-
- // 初始化随机数种子
- srand(esp_random());
-
- // 初始化Wi-Fi连接
- wifi_init_sta();
-
- // 初始化摄像头
- camera_init();
-
- // 初始化麦克风
- microphone_init();
-
- // 定义图像和音频数据缓冲区
- const int image_width = 640;
- const int image_height = 480;
- uint8_t* camera_image_buffer = (uint8_t*)malloc(image_width * image_height * 3);
- if (camera_image_buffer == NULL) {
- ESP_LOGE(TAG, "Failed to allocate memory for camera image buffer");
- return;
- }
-
- const int audio_buffer_size = 1024;
- int16_t* microphone_audio_buffer = (int16_t*)malloc(audio_buffer_size * sizeof(int16_t));
- if (microphone_audio_buffer == NULL) {
- ESP_LOGE(TAG, "Failed to allocate memory for microphone audio buffer");
- free(camera_image_buffer);
- return;
- }
-
- while (1) {
- // 采集摄像头图像数据
- capture_camera_image(camera_image_buffer, image_width, image_height);
- // 进行简单的图像特征提取
- simple_image_feature_extraction(camera_image_buffer, image_width, image_height);
- // 采集麦克风音频数据
- capture_microphone_audio(microphone_audio_buffer, audio_buffer_size);
- // 这里可以添加将数据发送到云端或进行进一步AI处理的代码
- // 例如通过网络发送数据等
- vTaskDelay(pdMS_TO_TICKS(1000));
- }
-
- // 释放内存
- free(camera_image_buffer);
- free(microphone_audio_buffer);
- }
三.最后我们可以在程序中加入自己训练的智能体(我不会训练AI所以我花钱找人训练了一个,这里就不分享了哈,还请见谅)。由于我也是初学者,程序中可能会有少许问题,大家可以检查修改。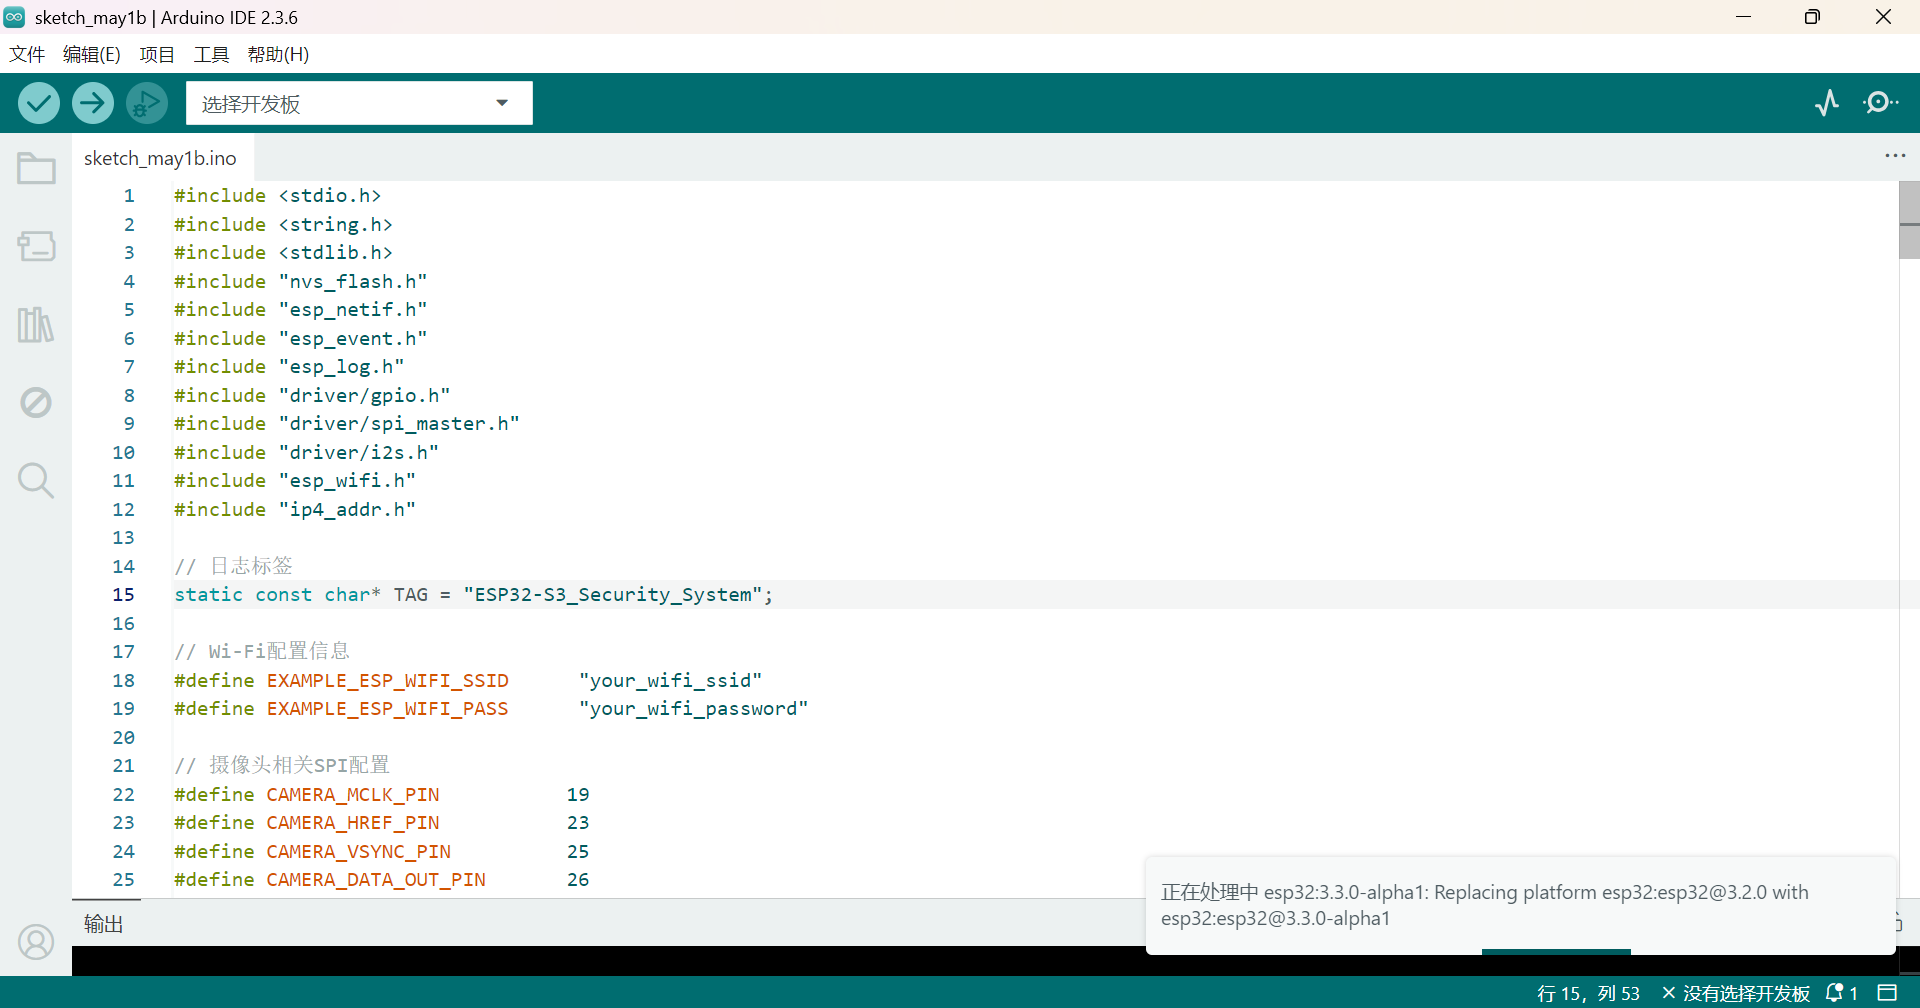
最后连接esp32 s3 ai模块,上传程序。
四.附件
在这里,我自己设计了一个激光切割的外壳供参考 智能安保.zip 智能安保.zip
就此,完!欢迎交流。
|