

【行空板K10】自定义楷体点阵显示彩色汉字
板载字库芯片只有宋体?
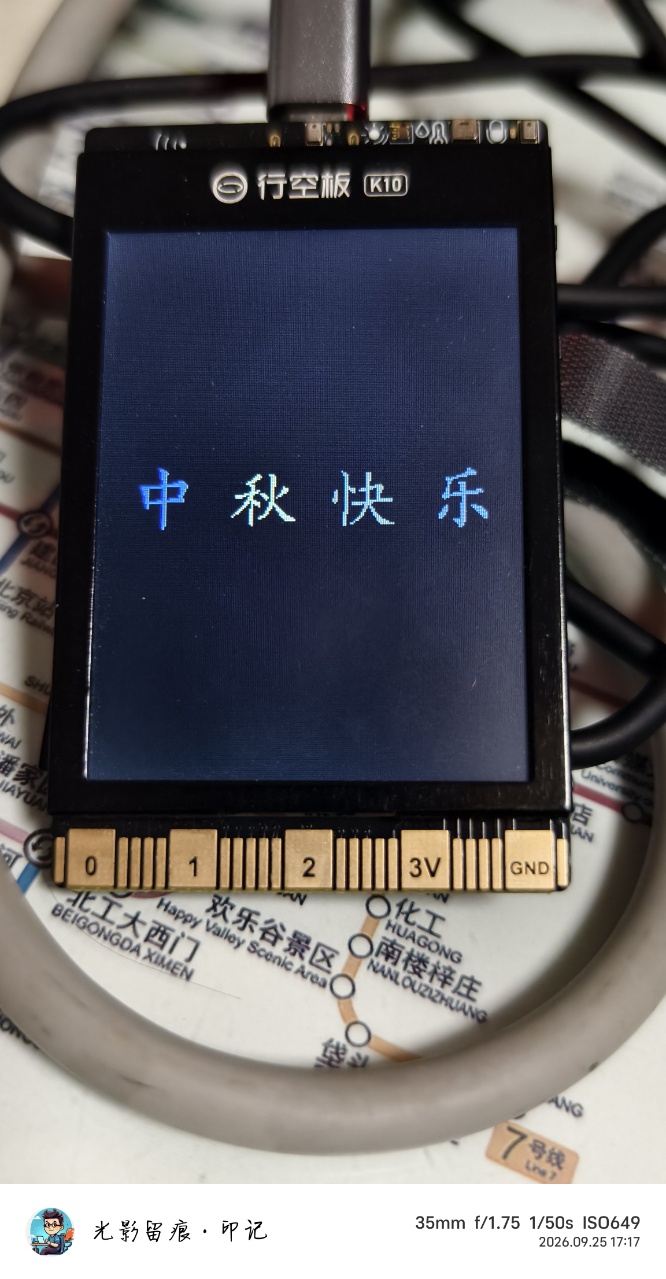
canvasText没法给每个字单独上色?本文带你用「点阵取模 + RGB565 转换 +canvasDrawBitmap」三步在行空板 K10 上显示楷体「中秋快乐」,每个字颜色随机、每 2 秒循环变化。
一、先说痛点
行空板 K10 自带一块 240×320 TFT 彩屏,由 LVGL 驱动,中文字形来自板载的 GT30L24A3W 汉字字库芯片。unihiker_k10 库把字体回调写死成 my_custom_font_24 → GBK_24_GetData,也就是说:
- 默认只有宋体,想要楷体、黑体、艺术字?芯片里没有。
Canvas::canvasText(text, x, y, color)一次只能给整段文本设一个颜色,没法让「中」「秋」「快」「乐」四个字各显一种颜色。
要同时解决「换字体」和「每字独立配色」两个需求,最直接的办法是:自己生成点阵,自己画到屏幕上。
二、整体思路
系统楷体 .ttf ──PIL 渲染──▶ 1-bit 单色点阵(.c 数组)
│
▼
遍历像素,前景/背景转 RGB565
│
▼
canvasDrawBitmap(RGB565 真彩色位图)
关键在于 K10 的 `canvasDrawBitmap` 吃的是 **RGB565 真彩色**位图(`LV_IMG_CF_TRUE_COLOR`,每像素 2 字节),不是单色点阵。所以中间要做一次「单色点阵 → RGB565」的转换,而且这里有个**大坑**——字节序。

## 三、第一步:生成楷体点阵数据

我用了一个开源取模脚本 `font_converter.py`(来自[ `chinese-font-ssd1306` 技能](https://gitcode.com/zealsoft/chinese-font-ssd1306),原本针对 SSD1306 OLED,但取模逻辑通用)。它用 Pillow 把系统字体渲染成 **1-bit、MSB first、行优先**的点阵,输出 C 代码。

命令一行:

```bash
python font_converter.py -t "中秋快乐" -f 楷体 -s 40 --prefix kaiti -o kaiti_font.c
参数说明:
| 参数 | 含义 |
|---|---|
-t |
要转换的文本 |
-f |
字体名(PIL 能识别的系统字体名,如 楷体、宋体、黑体) |
-s |
字号,单位像素(这里 40,即 40×40) |
--prefix |
输出符号前缀,避免重名 |
-o |
输出 C 文件名 |
生成的 kaiti_font.c 长这样:
typedef struct {
    uint16_t char_code;    // Unicode 编码
    uint8_t width;         // 字符宽度
    uint8_t height;        // 字符高度
    const uint8_t *data;   // 点阵数据指针
} CharInfo;

const unsigned char kaiti_char_0000[200] = { 0x00, 0x00, ... };  // '中'
const unsigned char kaiti_char_0001[200] = { ... };              // '秋'
const unsigned char kaiti_char_0002[200] = { ... };              // '快'
const unsigned char kaiti_char_0003[200] = { ... };              // '乐'

const CharInfo kaiti_chars[4] = {
    { 0x4E2D, 40, 40, kaiti_char_0000 },  // 中
    { 0x79CB, 40, 40, kaiti_char_0001 },  // 秋
    { 0x5FEB, 40, 40, kaiti_char_0002 },  // 快
    { 0x4E50, 40, 40, kaiti_char_0003 },  // 乐
};

const CharInfo* kaiti_find_char(uint16_t code) { ... }
40×40 的字,每行 (40+7)/8 = 5 字节,共 40×5 = 200 字节,正好对上。
四、第二步:理解点阵数据格式
点阵是 1-bit、MSB first、行优先排列。要取像素 (x, y):
int rowBytes = (width + 7) / 8;          // 每行字节数
uint8_t byteVal = data[y * rowBytes + x / 8];
bool pixel = (byteVal >> (7 - x % 8)) & 1;  // MSB 在前,所以高位对应 x=0
pixel == 1 是前景(字的笔画),pixel == 0 是背景。
五、第三步:单色点阵转 RGB565(重点 + 大坑)
5.1 canvasDrawBitmap 要什么
看库源码 unihiker_k10.cpp:680:
void Canvas::canvasDrawBitmap(int16_t x, int16_t y, int16_t w, int16_t h, const uint8_t* bitmap) {
    lv_img_dsc_t image;
    image.data_size = w * h * 2;              // 每像素 2 字节
    image.header.cf = LV_IMG_CF_TRUE_COLOR;  // 真彩色
    image.data = bitmap;
    this->canvasDrawImage(x, y, &image);
}
每像素 2 字节,格式 LV_IMG_CF_TRUE_COLOR,即数据要和 LVGL 内部 lv_color_t 的内存布局一致。
5.2 LV_COLOR_16_SWAP = 1 的坑
打开 lv_conf.h:
#define LV_COLOR_DEPTH 16
#define LV_COLOR_16_SWAP 1   // ← 关键!
LV_COLOR_16_SWAP = 1 是给 SPI 屏用的——ESP32 是小端,SPI 发送是大端,所以 LVGL 在内存里把 RGB565 的两个字节交换着存。这意味着 LV_IMG_CF_TRUE_COLOR 的位图数据也必须按交换后的字节序写。
推导结论:位图缓冲里每个像素 2 字节,要按大端存 RGB565(高字节在前):
uint16_t v = ((r >> 3) << 11) | ((g >> 2) << 5) | (b >> 3);  // 标准 RGB565
buf[2*i]     = (v >> 8) & 0xFF;   // 高字节在前
buf[2*i + 1] = v & 0xFF;          // 低字节在后
如果你忘了交换,红蓝会互换、颜色全乱;如果按小端存,屏幕会花屏。这是整个流程里最容易翻车的地方。
5.3 转换函数
把上面两点合起来,单色点阵 → RGB565 大端位图:
uint16_t toRgb565(uint8_t r, uint8_t g, uint8_t b) {
    return ((uint16_t)(r >> 3) << 11) | ((uint16_t)(g >> 2) << 5) | (b >> 3);
}

void drawCharBitmap(const CharInfo* ci, int x, int y, uint32_t color) {
    uint8_t r = (color >> 16) & 0xFF;
    uint8_t g = (color >> 8) & 0xFF;
    uint8_t b = color & 0xFF;
    uint16_t fg = toRgb565(r, g, b);   // 前景色
    uint16_t bg = toRgb565(0, 0, 0);   // 背景色(黑)
    int rowBytes = (ci->width + 7) / 8;
    int idx = 0;
    for (int row = 0; row < ci->height; row++) {
        for (int col = 0; col < ci->width; col++) {
            uint8_t byteVal = ci->data[row * rowBytes + col / 8];
            bool pixel = (byteVal >> (7 - col % 8)) & 1;
            uint16_t v = pixel ? fg : bg;
            bitmapBuf[idx++] = (v >> 8) & 0xFF;   // 大端:高字节先
            bitmapBuf[idx++] = v & 0xFF;
        }
    }
    k10.canvas->canvasDrawBitmap(x, y, ci->width, ci->height, bitmapBuf);
}
六、第四步:完整代码与效果
6.1 文件结构
src/
├── main.cpp        // 主程序
├── kaiti_font.h    // 点阵声明(extern "C" 包装)
└── kaiti_font.c    // 点阵数据(取模脚本生成)
kaiti_font.h 用 extern "C" 包一下,让 C++ 能调 C 编译的点阵数据:
#pragma once
#include <stdint.h>
#ifdef __cplusplus
extern "C" {
#endif

typedef struct {
    uint16_t char_code;
    uint8_t width;
    uint8_t height;
    const uint8_t *data;
} CharInfo;

extern const CharInfo kaiti_chars[4];
const CharInfo* kaiti_find_char(uint16_t code);

#ifdef __cplusplus
}
#endif
6.2 main.cpp
#include "unihiker_k10.h"
#include "kaiti_font.h"

UNIHIKER_K10 k10;
uint8_t screenDir = 2;  // 0/2 竖屏 240×320

const uint16_t charCodes[4] = {0x4E2D, 0x79CB, 0x5FEB, 0x4E50};  // 中秋快乐
const int charCount = 4;
const int fontSize = 40;
const int charGap = 16;
const int textY = (320 - fontSize) / 2;  // 垂直居中

uint8_t bitmapBuf[fontSize * fontSize * 2];

uint16_t toRgb565(uint8_t r, uint8_t g, uint8_t b) {
    return ((uint16_t)(r >> 3) << 11) | ((uint16_t)(g >> 2) << 5) | (b >> 3);
}

uint32_t randomBrightColor() {
    uint8_t r = random(0x40, 0x100);
    uint8_t g = random(0x40, 0x100);
    uint8_t b = random(0x40, 0x100);
    return ((uint32_t)r << 16) | ((uint32_t)g << 8) | b;
}

void drawCharBitmap(const CharInfo* ci, int x, int y, uint32_t color) {
    uint8_t r = (color >> 16) & 0xFF;
    uint8_t g = (color >> 8) & 0xFF;
    uint8_t b = color & 0xFF;
    uint16_t fg = toRgb565(r, g, b);
    uint16_t bg = toRgb565(0, 0, 0);
    int rowBytes = (ci->width + 7) / 8;
    int idx = 0;
    for (int row = 0; row < ci->height; row++) {
        for (int col = 0; col < ci->width; col++) {
            uint8_t byteVal = ci->data[row * rowBytes + col / 8];
            bool pixel = (byteVal >> (7 - col % 8)) & 1;
            uint16_t v = pixel ? fg : bg;
            bitmapBuf[idx++] = (v >> 8) & 0xFF;
            bitmapBuf[idx++] = v & 0xFF;
        }
    }
    k10.canvas->canvasDrawBitmap(x, y, ci->width, ci->height, bitmapBuf);
}

void drawGreeting() {
    int totalWidth = charCount * fontSize + (charCount - 1) * charGap;
    int startX = (240 - totalWidth) / 2;  // 水平居中

    k10.canvas->canvasClear();
    for (int i = 0; i < charCount; i++) {
        const CharInfo* ci = kaiti_find_char(charCodes[i]);
        if (ci) {
            uint32_t color = randomBrightColor();
            drawCharBitmap(ci, startX + i * (fontSize + charGap), textY, color);
        }
    }
    k10.canvas->updateCanvas();
}

void setup() {
    k10.begin();
    k10.initScreen(screenDir);
    k10.creatCanvas();
    k10.setScreenBackground(0x000000);
    randomSeed(millis());
    drawGreeting();
}

void loop() {
    delay(2000);
    drawGreeting();
}
6.3 效果
屏幕中央显示楷体「中秋快乐」四个大字,每个字一种随机亮色(避免太暗看不清,RGB 下限取 0x40),黑色背景。每 2 秒 canvasClear + 重绘 + updateCanvas,颜色循环刷新。
七、踩坑记录
坑 1:LV_COLOR_16_SWAP 字节序
最隐蔽的坑。canvasDrawBitmap 传 LV_IMG_CF_TRUE_COLOR 数据,必须和 lv_color_t 内存布局一致。K10 的 lv_conf.h 里 LV_COLOR_16_SWAP = 1,所以位图要按大端存 RGB565(高字节在前)。按小端存会花屏,忘了交换会红蓝对调。
排查方法:先填一个纯红 RGB565 = 0xF800 的全屏位图,看屏幕是不是红;如果是蓝,就是字节序反了。
坑 2:C/C++ 混编要 extern "C"
kaiti_font.c 是 C 文件,main.cpp 是 C++。直接 extern 声明会因 C++ 的 name mangling 链接失败。用 extern "C" 包住声明即可,PlatformIO 会分别用 C 和 C++ 编译器编译对应文件。
坑 3:点阵位序 MSB first
不同取模工具的位序不同(有的 LSB first)。font_converter.py 是 MSB first,即 x=0 对应字节最高位。用 (byte >> (7 - x % 8)) & 1 取像素。如果你的点阵是 LSB first,要改成 (byte >> (x % 8)) & 1,否则字会左右镜像。
坑 4:工程路径不能含中文
PlatformIO 用 xtensa 链接器,中文路径会导致 ld.exe: cannot open map file .../firmware.map: No such file or directory。工程要放在纯英文路径下。
八、总结
| 需求 | 默认方案 | 本文方案 |
|---|---|---|
| 换字体(楷体等) | 不支持,字库芯片只有宋体 | 取模脚本生成任意字体点阵 |
| 每字独立配色 | canvasText 只能整段一色 |
逐字 canvasDrawBitmap |
| 显示任意图形文字 | 受限 | 点阵即像素,自由度最高 |
核心就三步:取模 → 转 RGB565(注意字节序)→ canvasDrawBitmap。这套方法不依赖字库芯片,理论上任何能取模的字体(楷体、黑体、甚至手写体)都能上 K10 屏幕,每个字还能单独配色。中秋佳节,给 K10 换个楷体「中秋快乐」,仪式感拉满。
参考
- 行空板 K10 PlatformIO 环境准备:https://www.unihiker.com.cn/wiki/k10/platform_io_prepare
- LVGL 颜色格式文档:
LV_IMG_CF_TRUE_COLOR与LV_COLOR_16_SWAP说明 - 取模脚本:
chinese-font-ssd1306技能scripts/font_converter.py(基于 Pillow): https://gitcode.com/zealsoft/chinese-font-ssd1306



确实惊艳不少