|
23863| 24
|
[高级教程] 有屏的地方就有BadApple,试问掌控板的极限在哪里 |

|
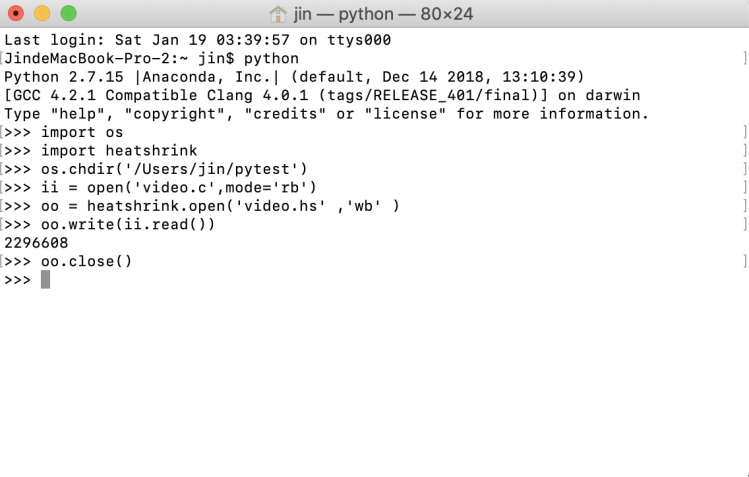
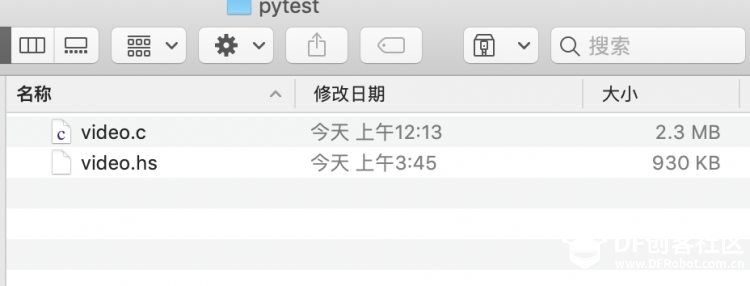
有屏的地方就有Bad Apple  最近在论坛自己挖了个坑,本想就这样过去,版主都发话了,后来发现论坛玩掌控板的人还是很多的,特别是老师多了起来,本来掌控板的硬件测试还没完成,准备再潜水一段时间,后来发现大家对掌控板这块屏幕很有兴趣,和microbit相比oled屏确实强大了很多,不过围绕这个屏幕,10张图片有9张是做宣传用的(展示学校名字,展示老师名字,展示机构名字)。 那么今天就来拿这块0.96的屏幕和我自己挖的坑来做文章。 不说废话了,先上车,看完片子再说。 通过标题大家已经大概知道这次是做badapple了,这个视频大家相信或多或少都听过,论坛之前也有人在其他平台上实现。 不过大多数嵌入式平台的badapple一般都只是写一个串口程序,然后从电脑使用串口程序发送数据流实现。 但是本次的重点来了全脱机只用掌控板播放整个mv。只用移动电源供电! 是的,你没有看错,整个视频全程3分多钟,每秒30帧。 敲黑板了,整个视频文件有多大呢? 掌控板的屏幕分辨率为128*64,假设我们每帧只使用最简单的黑白图像, 那么一帧的数据大小是:128*64/8=1024Byte=1KB 那么一秒的数据大小是:1K*30=30K 那么全片的数据大小是:30K*218=6540K=6.54M 我自己挖的坑,掌控板上ESP32wroom的flash只有4M,而且在查询了开发文档后,esp32的SPIFFS文件系统真的很先进不能存储超过1M的文件! 看样子似乎是个不可能的任务。不过稍微有点常识的人都知道有一种操作叫压缩。 首先,获得图像,badapple的原版视频因为只有黑白两色,所以很适合在各种点阵屏上显示,所以就有了有屏的地方就有badapple的梗。通过vlc播放器把mp4视频帧提取出来,然后photoshop批处理成128*64的位图(黑白、拉伸)。然后用那个image2lcd转成bitmap,(首先吐槽一下,论坛里的image2lcd都是2.X版的3.X版本加入了批量处理功能,真的可以升级一下了)。 接下来就是在压缩上动脑筋128*64屏幕有一个很大的特点就是长宽比2:1,这样可以整除的比例可以使用一种很原始的简单图像处理方法,插值压缩,俗称隔行扫描,不过这个比例是竖直方向的扫描,即实际只存储64*64的数据还有拉伸到128*64的特征数据。不细讲了。其结果很直接我生成的文件只有2.2M了。不过很遗憾依然超过了1M。虽然在电脑上6M的2进制位图压缩成jpg几乎只有几K,但是我们要考虑嵌入式平台往往不如电脑性能强,硬把电脑的压缩算法拿到嵌入式平台上不太现实。查了一下嵌入式平台比较流行和高效的压缩算法,除了掌控micropython自带库里的zlib(这货压缩力度还是不够,且资源占用略高,怕影响主程序)外,一个名字叫heatshrink压缩算法进入眼眶,控制在100K sram占用上,号称Arduino都能流畅使用。在电脑上python下(2.7,我再吐槽一下这个压缩算法的python库很不友好,需要Cpython交叉编译,python2下你不可能找到传说中的vc-build-tool,python3下错误百出,后来在mac平台下python2.7编译完成)。可以看到最终文件只有930K左右,符合了SPIFSS文件系统的要求。   好吧一切准备就绪开始开工了,这么复杂的活,图形化编程是不指望了,那就上python吧。 不对mpython加入外部库要从port里改固件(我的天,我只想看个片)。那么能用来加入外部库开发掌控的只剩下arduino IDE了(不要和我说嵌入式,不要和我说rtos,这次我不玩了,我要简单的)。 Arduino IDE需要简单设置一下,主要是ESP32 Core模块等,arduino如何加入esp32硬件支持就不细讲了,论坛里也有大家可以搜一下。然后装上esp32能支持的屏幕库,还有hs压缩库(这两个库下面的压缩包里有)。 全部布置完后,还有一个插件需要安装“ESP32 Sketch Data Upload”,大家自己搜索一下,它的作用是把项目文件夹下data文件夹里的文件上传到ESP32的flash里。 主程序在下面大家可以看一下(本人写代码习惯不好,代码很乱,见谅)。 [mw_shl_code=applescript,true]// Bad Apple for mPythonBoard | 2019 by fats114 | MIT-License. #include "FS.h" #include "SPIFFS.h" #include "SH1106.h" #include "heatshrink_decoder.h" #include "mpythonlogo.h" // Hints: // * After uploading to ESP32, also do "ESP32 Sketch Data Upload" from Arduino SH1106 display (0x3c, 23, 22); //SH1106 is also adapt SSD1106(SHAN ZHAI) //in fact there is a faster mode but need one more brzo_i2c lib **** //powerfull mpythonboard it can work with vbr #if HEATSHRINK_DYNAMIC_ALLOC #error HEATSHRINK_DYNAMIC_ALLOC must be false for static allocation test suite. #endif static heatshrink_decoder hsd; // global storage for putPixels int16_t curr_x = 0; int16_t curr_y = 0; // global storage for decodeRLE int32_t runlength = -1; int32_t c_to_dup = -1; void listDir(fs::FS &fs, const char * dirname, uint8_t levels){ Serial.printf("Listing directory: %s\n", dirname); File root = fs.open(dirname); if(!root){ Serial.println("Failed to open directory"); return; } if(!root.isDirectory()){ Serial.println("Not a directory"); return; } File file = root.openNextFile(); while(file){ if(file.isDirectory()){ Serial.print(" DIR : "); Serial.println(file.name()); if(levels){ listDir(fs, file.name(), levels -1); } } else { Serial.print(" FILE: "); Serial.print(file.name()); Serial.print(" SIZE: "); Serial.println(file.size()); } file = root.openNextFile(); } } uint32_t lastRefresh = 0; void putPixels(uint8_t c, int32_t len) { uint8_t b = 0; while(len--) { b = 128; for(int i=0; i<8; i++) { if(c & b) { display.setColor(WHITE); } else { display.setColor(BLACK); } b >>= 1; display.setPixel(curr_x, curr_y); curr_x++; if(curr_x >= 128) { curr_x = 0; curr_y++; if(curr_y >= 64) { curr_y = 0; display.display(); //display.clear(); // 30 fps target rate if(digitalRead(0)) while((millis() - lastRefresh) < 33) ; lastRefresh = millis(); } } } } } void decodeRLE(uint8_t c) { if(c_to_dup == -1) { if((c == 0x55) || (c == 0xaa)) { c_to_dup = c; } else { putPixels(c, 1); } } else { if(runlength == -1) { if(c == 0) { putPixels(c_to_dup & 0xff, 1); c_to_dup = -1; } else if((c & 0x80) == 0) { if(c_to_dup == 0x55) { putPixels(0, c); } else { putPixels(255, c); } c_to_dup = -1; } else { runlength = c & 0x7f; } } else { runlength = runlength | (c << 7); if(c_to_dup == 0x55) { putPixels(0, runlength); } else { putPixels(255, runlength); } c_to_dup = -1; runlength = -1; } } } #define RLEBUFSIZE 4096 #define READBUFSIZE 2048 void readFile(fs::FS &fs, const char * path){ static uint8_t rle_buf[RLEBUFSIZE]; size_t rle_bufhead = 0; size_t rle_size = 0; size_t filelen = 0; size_t filesize; static uint8_t compbuf[READBUFSIZE]; Serial.printf("Reading file: %s\n", path); File file = fs.open(path); if(!file || file.isDirectory()){ Serial.println("Failed to open file for reading"); display.drawStringMaxWidth(0, 10, 128, "File open error. Upload video.hs using ESP32 Sketch Upload."); display.display(); return; } filelen = file.size(); filesize = filelen; Serial.printf("File size: %d\n", filelen); // init display, putPixels and decodeRLE display.clear(); display.display(); curr_x = 0; curr_y = 0; runlength = -1; c_to_dup = -1; lastRefresh = millis(); // init decoder heatshrink_decoder_reset(&hsd); size_t count = 0; uint32_t sunk = 0; size_t toRead; size_t toSink = 0; uint32_t sinkHead = 0; // Go through file... while(filelen) { if(toSink == 0) { toRead = filelen; if(toRead > READBUFSIZE) toRead = READBUFSIZE; file.read(compbuf, toRead); filelen -= toRead; toSink = toRead; sinkHead = 0; } // uncompress buffer HSD_sink_res sres; sres = heatshrink_decoder_sink(&hsd, &compbuf[sinkHead], toSink, &count); //Serial.print("^^ sinked "); //Serial.println(count); toSink -= count; sinkHead = count; sunk += count; if (sunk == filesize) { heatshrink_decoder_finish(&hsd); } HSD_poll_res pres; do { rle_size = 0; pres = heatshrink_decoder_poll(&hsd, rle_buf, RLEBUFSIZE, &rle_size); //Serial.print("^^ polled "); //Serial.println(rle_size); if(pres < 0) { Serial.print("POLL ERR! "); Serial.println(pres); return; } rle_bufhead = 0; while(rle_size) { rle_size--; if(rle_bufhead >= RLEBUFSIZE) { Serial.println("RLE_SIZE ERR!"); return; } decodeRLE(rle_buf[rle_bufhead++]); } } while (pres == HSDR_POLL_MORE); } file.close(); Serial.println("Done."); } void setup(){ Serial.begin(115200); // Reset for some displays pinMode(16,OUTPUT); digitalWrite(16, LOW); delay(50); digitalWrite(16, HIGH); display.init(); display.flipScreenVertically (); display.clear(); display.setTextAlignment (TEXT_ALIGN_LEFT); display.setFont(ArialMT_Plain_10); display.setColor(WHITE); display.drawString(0, 0, "Loading wait... "); display.display(); if(!SPIFFS.begin()){ Serial.println("SPIFFS mount failed"); display.drawStringMaxWidth(0, 10, 128, "SPIFFS mount failed. Upload video.hs using ESP32 Sketch Upload."); display.display(); return; } display.clear(); display.drawFastImage(0, 0, mpythonlogo_width, mpythonlogo_height, mpythonlogo_bits); display.flipScreenVertically (); display.display(); delay(1000); display.clear(); pinMode(0, INPUT_PULLUP); Serial.print("totalBytes(): "); Serial.println(SPIFFS.totalBytes()); Serial.print("usedBytes(): "); Serial.println(SPIFFS.usedBytes()); listDir(SPIFFS, "/", 0); readFile(SPIFFS, "/video.hs"); display.clear(); display.drawFastImage(0, 0, mpythonlogo_width, mpythonlogo_height, mpythonlogo_bits); display.flipScreenVertically (); display.display(); //No Zuo No Die //Serial.print("Format SPIFSS? (enter y for yes): "); // while(!Serial.available()) ; //if(Serial.read() == 'y') { // bool ret = SPIFFS.format(); // if(ret) Serial.println("Success. "); else Serial.println("FAILED! "); //} else { // Serial.println("Aborted."); //} } void loop(){ }[/mw_shl_code] 主要思路很简单,读文件、解压、缓冲、插值、发送到屏幕缓存然后不停重复。很耗CPU的操作,虽然esp32是双核的,但是实际程序只能用到单核(别问我为什么,什么多线程也是只能用到一核,另一个核心是给rtos保证实时的),反正没想到过能有多快。一开始甚至为了能正常播放,想过跳帧,后来测试了就发现完全是多虑了,ESP32处理能力有多强,大家看视频就知道了,我通过限制刷新帧率,才能正常播放,按下a键解锁后,ESP32满血播放速度至少3-5倍(和视频加速无关,可以看秒表走动速度)。至此真正的感受到ESP32的强大!我至今没看到其他应用能显示出esp32比arduino强那么多的。同时测试了100帧的播放时间,ESP32比ESP8266块太多。 掌控板的设计不可谓不用心良苦,强大的硬件,简单易懂的入门平台,从幼儿园到大学的创客项目都能承载,好了不多说了,今天先到这里吧,晚安。 |

1.08 MB, 下载次数: 15085
|
麻烦问下,编译出现了这种错误,怎么解决呀~ Arduino:1.8.8 (Windows 7), 开发板:"ESP32 Dev Module, Disabled, Default, 240MHz (WiFi/BT), QIO, 40MHz, 4MB (32Mb), 921600, None" C:\Users\Administrator\Desktop\Arduino\badapple\badapple.ino: In function 'void setup()': badapple:237:88: error: invalid conversion from 'char*' to 'const uint8_t* {aka const unsigned char*}' [-fpermissive] display.drawFastImage(0, 0, mpythonlogo_width, mpythonlogo_height, mpythonlogo_bits); ^ In file included from D:\Desktop\libraries\ESP8266_and_ESP32_Oled_Driver_for_SSD1306_display\src/SH1106Wire.h:34:0, from D:\Desktop\libraries\ESP8266_and_ESP32_Oled_Driver_for_SSD1306_display\src/SH1106.h:33, from C:\Users\Administrator\Desktop\Arduino\badapple\badapple.ino:4: D:\Desktop\libraries\ESP8266_and_ESP32_Oled_Driver_for_SSD1306_display\src/OLEDDisplay.h:172:10: note: initializing argument 5 of 'void OLEDDisplay::drawFastImage(int16_t, int16_t, int16_t, int16_t, const uint8_t*)' void drawFastImage(int16_t x, int16_t y, int16_t width, int16_t height, const uint8_t *image); ^ badapple:250:88: error: invalid conversion from 'char*' to 'const uint8_t* {aka const unsigned char*}' [-fpermissive] display.drawFastImage(0, 0, mpythonlogo_width, mpythonlogo_height, mpythonlogo_bits); ^ In file included from D:\Desktop\libraries\ESP8266_and_ESP32_Oled_Driver_for_SSD1306_display\src/SH1106Wire.h:34:0, from D:\Desktop\libraries\ESP8266_and_ESP32_Oled_Driver_for_SSD1306_display\src/SH1106.h:33, from C:\Users\Administrator\Desktop\Arduino\badapple\badapple.ino:4: D:\Desktop\libraries\ESP8266_and_ESP32_Oled_Driver_for_SSD1306_display\src/OLEDDisplay.h:172:10: note: initializing argument 5 of 'void OLEDDisplay::drawFastImage(int16_t, int16_t, int16_t, int16_t, const uint8_t*)' void drawFastImage(int16_t x, int16_t y, int16_t width, int16_t height, const uint8_t *image); ^ exit status 1 invalid conversion from 'char*' to 'const uint8_t* {aka const unsigned char*}' [-fpermissive] |
fats114 发表于 2019-1-19 21:48 这个频率我没动过,怎么改呀,谢谢啦 |
fats114 发表于 2019-1-19 22:55 大佬,那个库的安装名的截图可以发下吗?我这里库太多,HS和支持屏幕的库搜索不到 |
 沪公网安备31011502402448
© 2013-2026 Comsenz Inc. Powered by Discuz! X3.4 Licensed