|
3220| 0
|
【TinkerNode】智能农业大棚温湿度云端监控——第二部分 |
|
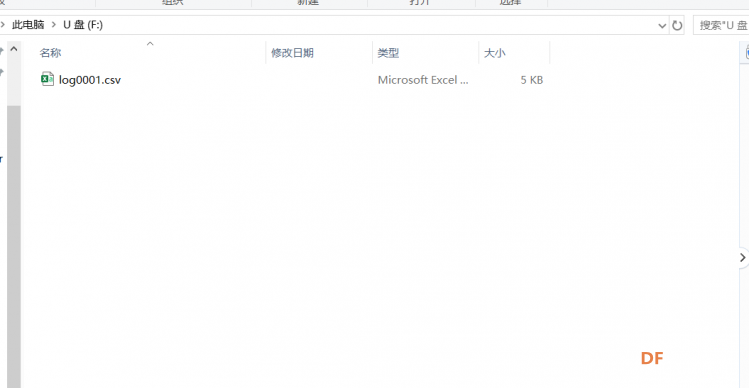
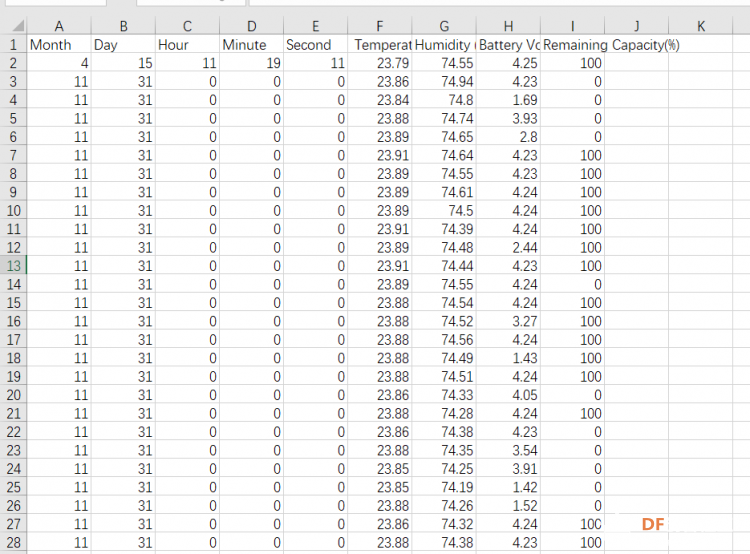
接着上一节来说,当我们得到了数据以后,我们可以对数据做一个收集和处理。这里就不得不提TinkerNode的微型U盘系统了。 TinkerNode除了可以将数据发送到云平台以外。它还自带了一个微型U盘,我们可以将数据记录到这个U盘中,形成一个日志管理。 这次我们就将之前收集到的温湿度以及收集的时间都形成一个日志,记录到我们的U盘当中去。 一、编写程序: 在编写自己的程序之前,我们可以先跑一下TinkerNode中的样例代码。之后再来编写我们自己的程序。关于TinkerNode中的样例代码我们需要注意以下几点: 1. 每次跑datalogger的样例,程序会自动依次检查U盘根目录是否存在文件“log0001.csv”,“log0002.csv”,“log0003.csv”…,并在首次遇到不产生冲突的文件名创建一个新的csv文件。 例如U盘根目录没有任何以“logxxxx.csv”形式命名的文件(xxxx为4位数流水码,从“0001”开始,一直到“9999”),则从“log0001.csv”开始创建一个新的csv文件,并在里面逐条记录数据。 若已有“log0001.csv”,“log0002.csv”,“log0003.csv”程序会自动生成“log0004.csv”,并在里面记录数据。 2. 上述逻辑能保证每次程序运行记录的数据都分散在不同的文件夹中,避免混乱,但也会产生过多零碎的文件。(后面我们自己编写相应的程序,保证每次的记录都在同一个文件中)。 了解了这些以后,就可以编写我们自己需要的程序了: 除了正常检测温湿度,并且将数据写入到csv文件中以外。我们还需要实现的功能是: 1. 每次程序运行时,都是在同一个文件中写入数据。 2. 按下板载set按键就停止文件数据写入,再次按下set键就恢复数据的写入。(这里我们用板载的LED是否闪烁来进行判断) [mw_shl_code=c,false] #include <DFRobot_SHT3x.h> #include "FS.h" #include "FFat.h" #include "DFRobot_BC20.h" #include <DFRobot_NeoPixel.h> //DFRobot_SHT3x sht3x(&Wire,/*address=*/0x45,/*RST=*/4); DFRobot_SHT3x sht3x; #define ButtonPin 13 #define BEGIN true #define PAUSE false static uint32_t nextTime = 0; bool nowStatus = BEGIN; String filePath = "/log.csv"; String tempStr = ""; // Items of the log table String tableItem = "Month,Day,Hour,Minute,Second, Temperature (C),Humidity (%RH),Battery Voltage(V),Remaining Capacity(%)"; DFRobot_BC20 myBC20; bool checkFile(fs::FS &fs, const char * path) { Serial.printf("Check file: %s\r\n", path); File file = fs.open(path); if (!file || file.isDirectory()) { return false; } return true; } void writeFile(fs::FS &fs, const char * path, const char * message) { Serial.printf("Writing file: %s\r\n", path); File file = fs.open(path, FILE_WRITE); if (!file) { Serial.println("- failed to open file for writing"); return; } if (file.print(message)) { Serial.println("- file written"); } else { Serial.println("- frite failed"); } } void appendFile(fs::FS &fs, const char * path, const char * message) { Serial.printf("Appending to file: %s\r\n", path); File file = fs.open(path, FILE_APPEND); if (!file) { Serial.println("- failed to open file for appending"); return; } if (file.print(message)) { Serial.println("- message appended"); } else { Serial.println("- append failed"); } } void setup() { //set rgb_led RGB_LED.begin(); Serial.begin(9600); pinMode(ButtonPin, INPUT); attachInterrupt(ButtonPin, IntFun, CHANGE); Serial.print("Starting the BC20.Please wait. . . "); while (!myBC20.powerOn()) { delay(1000); Serial.print("."); } Serial.println("BC20 started successfully !"); while (!myBC20.checkNBCard()) { Serial.println("Please insert the NB card !"); delay(1000); } Serial.println("Waitting for access ..."); while (myBC20.getGATT() == 0) { Serial.print("."); delay(1000); } Serial.println("Waiting for NB time..."); while ( myBC20.getCLK()) { if (sCLK.Year > 2000) { break; } Serial.print("."); delay(1000); } FFat.format(); if (!FFat.begin()) { Serial.println("FFat Mount Failed"); return; } char fileNameNum[4]; sprintf(fileNameNum,"%04d",1); String nowFileName = (char *)fileNameNum; filePath = "/log"+nowFileName+".csv"; if (!checkFile(FFat, filePath.c_str() )) { Serial.println("Create a log.csv file"); writeFile(FFat, filePath.c_str(), tableItem.c_str()); appendFile(FFat, filePath.c_str(), "\r\n"); Serial.print(filePath.c_str()); Serial.println(" cteated!"); } Serial.println("Log begin..."); while (sht3x.begin() != 0) { Serial.println("Failed to Initialize the chip, please confirm the wire connection"); delay(1000); } Serial.print("Chip serial number"); Serial.println(sht3x.readSerialNumber()); /** * softReset Send command resets via IIC, enter the chip's default mode single-measure mode, * turn off the heater, and clear the alert of the ALERT pin. * @return Read the register status to determine whether the command was executed successfully, * and return true indicates success. */ if(!sht3x.softReset()){ Serial.println("Failed to Initialize the chip...."); } Serial.println("------------------Read adta in single measurement mode-----------------------"); } void loop() { myBC20.getCLK(); // Add one line of record to the log // For more items (String type), add here... tempStr = ""+ (String)sCLK.Month + "," + (String)sCLK.Day + "," + (String)sCLK.Hour + "," + (String)sCLK.Minute + "," + (String)sCLK.Second + "," + (String)sht3x.getTemperatureC() +"," + (String)sht3x.getHumidityRH() +"," + (String)Battery.getVoltage() +"," + (String)Battery.VoltageToSOC() + "\r\n"; Serial.println(tableItem.c_str()); Serial.println(tempStr); if(nowStatus == BEGIN){ appendFile(FFat, filePath.c_str(), tempStr.c_str()); //write file scuccess , fast flash the RGB_LED; RGB_LED.setColor(RED); for(int i = 0; i < 5; i++){ RGB_LED.FastFlash(); //Each fast flash is 0.1s on, 0.1s off } Serial.println(); }else{ Serial.println(); Serial.println("Now it is paused. If you need to save the record, please press the SET button."); } delay(10000); } void IntFun() { if(digitalRead(ButtonPin) == HIGH){ if(millis() - nextTime > 100){ nowStatus = !nowStatus; } } nextTime = millis(); }[/mw_shl_code] 在我们编写的程序中,我们进行了的文件读写的检测。当程序在正常的检测数据、写入数据的时候。每次程序写入数据都会触发板载的LED灯闪烁。 当我们按下板载的set键后,就会暂停写入文件操作的执行。这个时候,灯就不会再出现闪烁。我们可以放心的进行断电操作。 当文件写入完毕后,可以发现。在我们的F盘中已经存在了写入的文件。打开这个csv文件,即可看到我们记录下来的数据。包括了,时间信息、温湿度信息、电池电压电量信息等。 (需要注意的是:U盘中的文件并不是实时更新的。必须要进行断电后,再次插入才能显示出来。)   如上图所示,我们的数据已经被记录到了表格中,非常的方便。 datalogger的使用到这里就结束了,接下来我们将数据发送到阿里云,实现与云平台的通讯。详情请见第三部分——与阿里云的通讯。 |
 沪公网安备31011502402448
© 2013-2026 Comsenz Inc. Powered by Discuz! X3.4 Licensed