|
4910| 1
|
[项目] Kindle + Raspberry Pi = PC |
|
PC还可以怎么组装?只要你有个Kindle和树莓派,便可改造成一台小PC。这个上手难度会高很多,但挑战越多,乐趣也越大。一台越狱的Kindle 加上一个外接键盘,树莓派作为处理中心,Kindle 作为显示器,看起来是不是像一台小PC,虽然只能实现远古的命令行模式,在Kindle上Hack一下,至少会提高不少逼格。 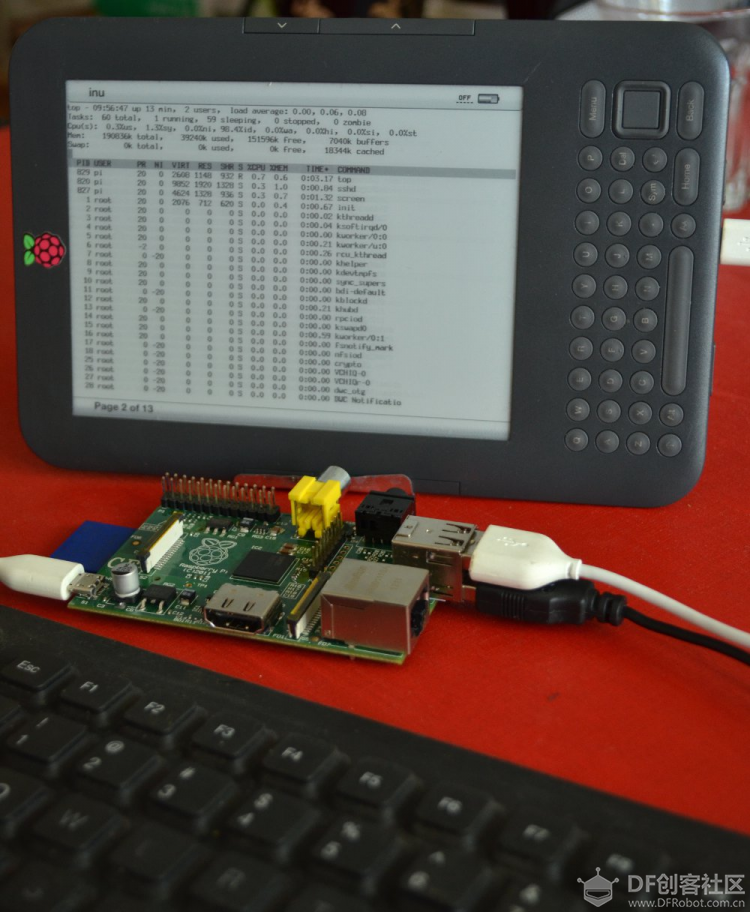 点击【来源】查看实现方法 点击【来源】查看实现方法KindleBerry Pi I am happy to announce that this article got published in Hacker monthly We left our little studio in the Kootenays last July to travel throughout Europe, travelling to discover new media, spiritual centers, art, design and open source initiative. I decided to go really minimal on the computer gear stuff, so I only packed my Kindle, a camera, an android phone and of course my Raspberry Pi! 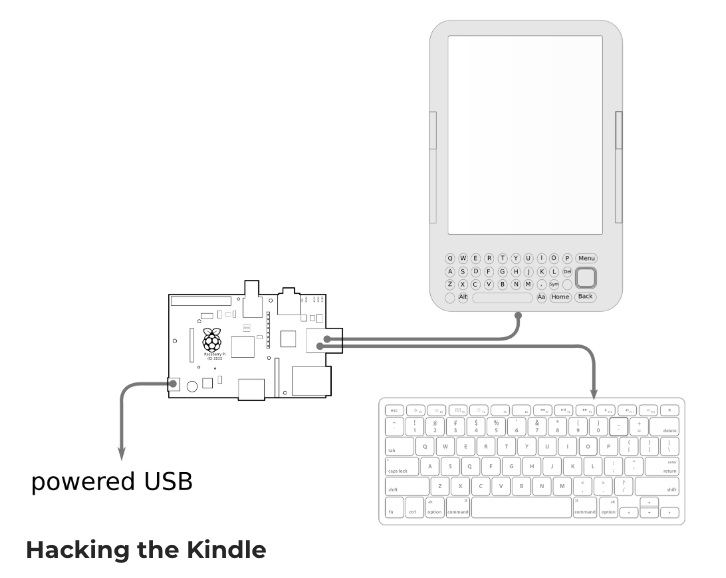 The KindleBerry Pi! The Raspberry Pi, although a beautiful project and quite an electronic feat, it can be a bit limiting as the main production machine, but I convinced myself I could use it as my main travelling computer. The plan was, using a Kindle as a screen, connecting it to the processing power of the Raspberry Pi while using an external keyboard to work comfortably. Since connecting an external keyboard to the Kindle seemed impossible at that point, I needed to use the Raspberry Pi as the ‘hub’. The tinkering started and the KindleBerry Pi was soon to be born. Although I ended up buying a laptop while travelling, all that dreaming and tinkering ended up working nicely, creating a really portable development platform. At the least, it has become a proof of concept that could be used for other similar projects. So here is how you can create your very own KindleBerry Pi! Let's get startedWhat you will need to do this hack:
Hacking the Kindle DISCLAIMER – you can brick (render unusable) your Kindle doing so, these are just pointers and I take no responsibility whatever you do with your kindle, or your life… The first part, connecting the Kindle to the Raspberry Pi is simple enough. Jail break the Kindle , install a terminal emulator like this oneand then install UsbNetwork. Make sure the usbNetwork is enable, Connect the devices trough USB, do a quick ifconfig usb0 192.168.2.1 and Voila, I can login into the Raspberry Pi with no problem, using the great display of the Kindle but sadly also using it’s limiting keyboard. The main challenge now is to use the keyboard connected to the Rasberry Pi instead of the Kindle’s. This is where the magic of gnu screen comes in play! Screen is a terminal multiplexer, if you don’t know what a terminal is, well, I am not sure why you are reading this article in the first place, but let say ‘screen is a terminal on steroid’. One of the nice function of screen is that you can be multiple user on the same ‘screen’ session, for lets say you want to monitor what people do when they connect to your computer trough ssh, or if you want to… well… screencast in a terminal environment (whatever enjoyment that would give you). Anyhow, I am not sure why there is a multiuser mode, but it is that ability that make the KindleBerry Pi possible. So what happen here, is that using the keyboard connected to the Raspberry Pi, you will login into the Raspberry pi with the Kindle and then share the same ‘screen’ session so that you can use the keyboard connected on the Raspberry Pi. You will still need to use the Kindle keyboard to create that first connection, but once your connected, you can use your mail keyboard. Although gnu screen come and save the day, to automate the whole process there are few more steps to be done. Usb network for the Raspberry Pi First, we want to be able to use USB networking when connecting Kindle. When the Kindle is on usbNetworking, it assigns the IP 192.168.2.2 to its USB port. We then need the Raspberry Pi to assign its USB port the IP 192.168.2.1 and that has to be automatic. To do so, the first step is to add to your /etc/network/interfaces : [mw_shl_code=applescript,true]allow-hotplug usb0 Automatic login on the Raspberry Pimapping hotplug script grep map usb0 iface usb0 inet static address 192.168.2.1 netmask 255.255.255.0 broadcast 192.168.2.255 up iptables -I INPUT 1 -s 192.168.2.1 -j ACCEPT[/mw_shl_code] Now we need the Raspberry Pi to 1) make sure one user login automatically and 2) have a screen multiuser session started at boot time. We will be using the same user for the login at boot time and login with the Kindle. For the automatic login on boot, on Debian (which is one of the main builds of the Raspberry Pi) you have to ; [mw_shl_code=applescript,true]vim /etc/inittab[/mw_shl_code] (or using any other editor) and comment out: [mw_shl_code=applescript,true]#1:234:respawn:/sbin/getty 3840 tty1 [/mw_shl_code] [mw_shl_code=applescript,true]1:2345:respawn:/bin/login -f YOUR_USER_NAME tty1/dev/tty1 2< & 1 [/prettify] <i> My code prettifyer adds some #038; code that you can omit </i> <strong>EDIT: Some reader have mention that using this code instead work for them:</strong> [prettify]1:2345:respawn/sbin/agetty -a YOUR_USER_NAME -8 -s 38500 tty1 linux [/mw_shl_code] That should do the trick, now lets make sure screen start automatically, when the Raspberry Pi starts and whenever you login from the kindle. Bashrc We now have to make sure that the user which is automatically logged in will starts a screen session, but we also have to make sure that when you log in with the Kindle, you don’t start another screen session but actually join the already started screen session. Mileage might vary depending on your system here, so experiment with the code, but most of it should be in the .bash_profile. There are probably many other ways to go about it (use the bashrc and bash_profile or have more than one user etc…) but this is one of the solutions that I came up with. Here are my .bash_profile: [mw_shl_code=applescript,true]if [ -z “$&;STY” ]; then exec screen -xR fi[/mw_shl_code] So once it’s all in place, you should be able to fire up your KindleBerry Pi, once the boot sequence is done, you can connect the Kindle in UsbNetwork mode through USB, moving into your shell and ssh into the Raspberry Pi. From there you should be able to use the keyboard connected in the Raspberry Pi, and see the result on the Kindle! For some reason sometimes I have to fiddle with the screen session, killing the extra one and the connecting to the main one. You probably can work some simple passwordless ssh with the authentication key, to save some time and add some cute scripting to simplify the whole connection process, but once you are connected you can then start using the Raspberry Pi keyboard. There is actually a lot of improvement that could be done with this hack, so feel free to send your ideas! |
 萌萌哒新人
萌萌哒新人
 活跃会员
活跃会员


© 2013-2024 Comsenz Inc. Powered by Discuz! X3.4 Licensed

 置顶卡
置顶卡 变色卡
变色卡 千斤顶
千斤顶


