|
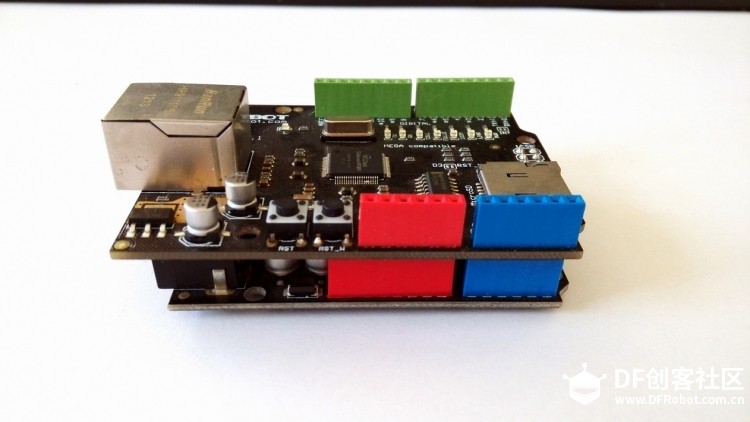
作为网络时代的居民,怎么能不了解物联网呢?物联网简单点说,就是物物相连的互联网。它是以互联网为核心延伸和扩展的网络,使得用户端延伸和扩展到了任何物品,物品之间能进行信息交换和通信。如图1所示,只要你的路由器连接了互联网,你就可以通过手机App远程控制你的灯,就像在家里控制一样,不论你身处国内还是国外。 图1 通过App控制灯 今天我们就使用Arduino+W5100网络扩展板,结合Yeelink平台,实现通过手机App和网页远程控制LED的开关。 器材 2. PLA 3D打印耗材(直径1.75mm,白色) 3. Arduino Uno 4. W5100 DFR0125 5. LED红色 6. 220Ω电阻
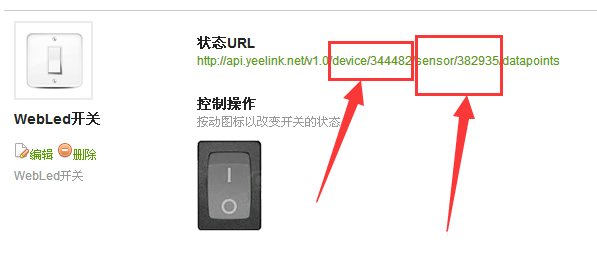
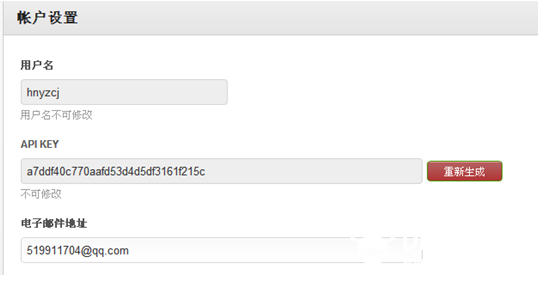
制作过程 1.用户注册 2.添加设备和传感器 登录Yeelink平台,单击用户头像进入用户中心,然后单击“我的设备”→“添加新设备”进入设置设备界面,按要求填写有关设备的情况(见图2)。 图2添加新设备 当完成新设备“WebLed”的添加后,单击“管理设备”进入“WebLed”设备管理界面(见图3),下方有“添加传感器”按钮,可为该设备添加一个传感器并设置其属性。在本例中,传感器类型请选择为“开关”,设置完成后保存即可。 图3 添加传感器 (3)线路连接 本次数据连线较为简单,将W5100网络拓展板对应叠加插在Arduino Uno上,LED(数字口5)与电阻的连接LED正极。 (4)加载库文件 安装Yeelink Sdk,进入Yeelink官网下载Yeelink Sdk,下载完成后解压,并将文件夹复制到Arduino安装目录下的Libraries目录下,例如:“D:\Arduino-1.0.5\Libraries”,复制完成之后重启Arduino软件,即可使用Yeelink的库。 注意事项: a.这里尤其请注意将文件夹名中的下划线去掉,否则会出现无法调用库的编译错误。 b解压到Arduino安装目录下的Libraries目录下必须是根目录文件夹,不能再包含文件夹。 否则一样会出现无法调用库的编译错误。 (5)烧录程序. 将以下代码复制到Arduino编译器中,注意修改用户API号,设备号和传感器号后,将程序刷入控制板。API编号在“账户”——“我的账户设置”中查看。 代码
- #include <SPI.h>
- #include <Ethernet.h>
- #include <Wire.h>
- #include <math.h>
-
- byte buff[2];// for yeelink api
- #define APIKEY "a7ddf40c770aafd53d4d5df3161f215c" // 此处替换为你自己的API Key
- #define DEVICEID 344482 // 此处替换为你的设备编号
- #define SENSORID1 382935 // 此处替换为你的传感器编号
- // assign a MAC address for the ethernet controller.
- byte mac[] = { 0x00, 0x1D, 0x72, 0x82, 0x35, 0x9D};
- // initialize the library instance:
- EthernetClient client ;
- char server[] = "api.yeelink.net"; // name address for yeelink API
- unsigned long lastConnectionTime = 0; // last time you connected to the server, in milliseconds
- boolean lastConnected = false; // state of the connection last time through the main loop
- const unsigned long postingInterval = 3*1000; // delay between 2 datapoints, 30s
- String returnValue = "";
- boolean ResponseBegin = false;
-
- void setup() {
- pinMode(5, OUTPUT);
- Wire.begin();
- // start serial port:
- Serial.begin(57600);
-
- // start the Ethernet connection with DHCP:
- if (Ethernet.begin(mac) == 0) {
- Serial.println("Failed to configure Ethernet using DHCP");
- for(;;)
- ;
- }
- else {
- Serial.println("Ethernet configuration OK");
- }
- }
-
- void loop() {
- // if there's incoming data from the net connection.
- // send it out the serial port. This is for debugging
- // purposes only:
-
- if (client.available()) {
- char c = client.read();
- // Serial.print(c);
- if (c == '{')
- ResponseBegin = true;
- else if (c == '}')
- ResponseBegin = false;
- if (ResponseBegin)
- returnValue += c;
- }
- if (returnValue.length() !=0 && (ResponseBegin == false))
- {
- Serial.println(returnValue);
-
- if (returnValue.charAt(returnValue.length() - 1) == '1') {
- Serial.println("turn on the LED");
- digitalWrite(5, HIGH);
- }
- else if(returnValue.charAt(returnValue.length() - 1) == '0') {
- Serial.println("turn off the LED");
- digitalWrite(5, LOW);
- }
- returnValue = "";
- }
- // if there's no net connection, but there was one last time
- // through the loop, then stop the client:
- if (!client.connected() && lastConnected) {
- Serial.println();
- Serial.println("disconnecting.");
- client.stop();
- }
-
- // if you're not connected, and ten seconds have passed since
- // your last connection, then connect again and send data:
- if(!client.connected() && (millis() - lastConnectionTime > postingInterval)) {
- // read sensor data, replace with your code
- //int sensorReading = readLightSensor();
- Serial.print("yeelink:");
- //get data from server
- getData();
- }
- // store the state of the connection for next time through
- // the loop:
- lastConnected = client.connected();
- }
-
- // this method makes a HTTP connection to the server and get data back
- void getData(void) {
- // if there's a successful connection:
- if (client.connect(server, 80)) {
- Serial.println("connecting...");
- // send the HTTP GET request:
-
- client.print("GET /v1.0/device/");
- client.print(DEVICEID);
- client.print("/sensor/");
- client.print(SENSORID1);
- client.print("/datapoints");
- client.println(" HTTP/1.1");
- client.println("Host: api.yeelink.net");
- client.print("Accept: *");
- client.print("/");
- client.println("*");
- client.print("U-ApiKey: ");
- client.println(APIKEY);
- client.println("Content-Length: 0");
- client.println("Connection: close");
- client.println();
- Serial.println("print get done.");
-
- }
- else {
- // if you couldn't make a connection:
- Serial.println("connection failed");
- Serial.println();
- Serial.println("disconnecting.");
- client.stop();
- }
- // note the time that the connection was made or attempted:
- lastConnectionTime = millis();
- }
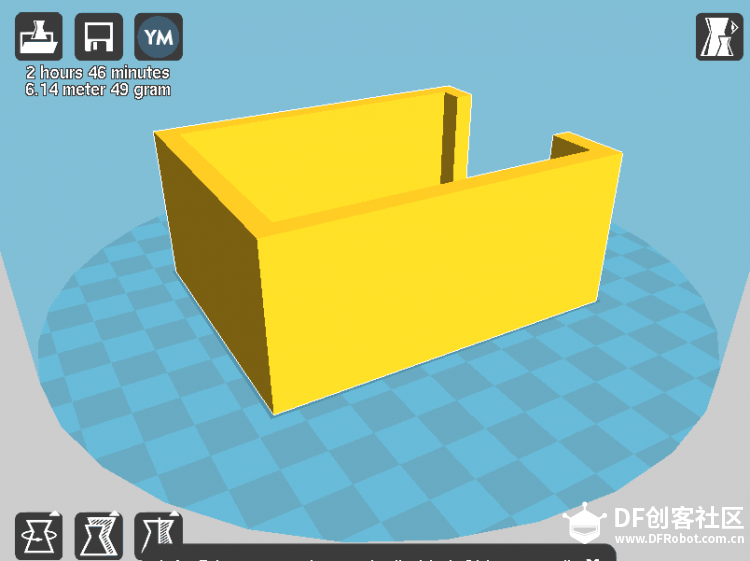
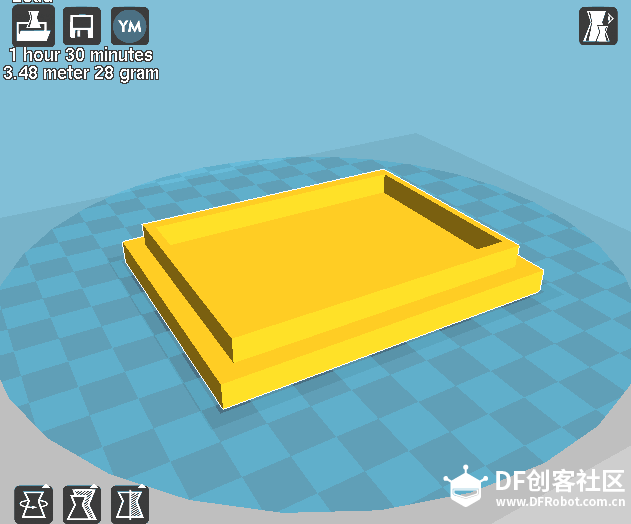
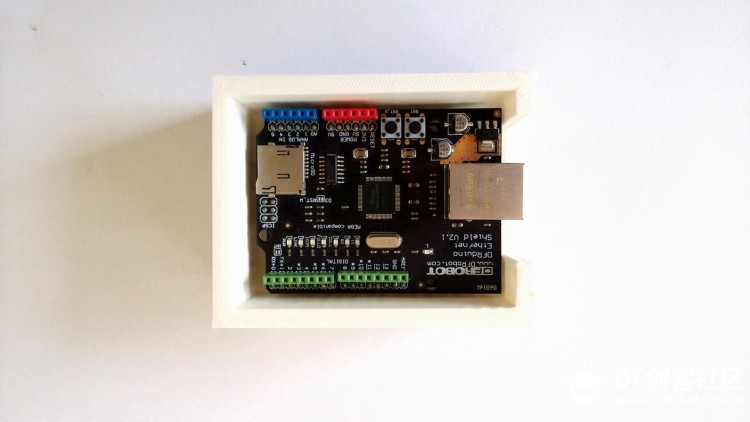
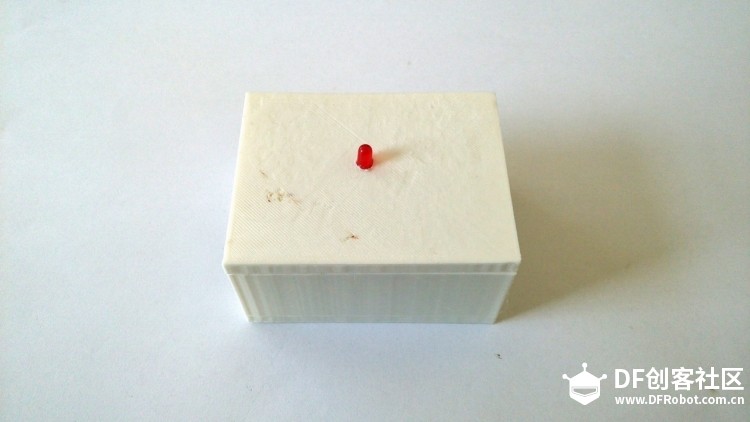
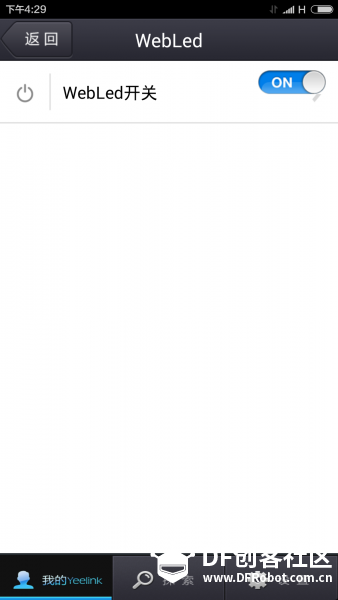
(6)制作外壳 使用Sketchup为WebLed设计制作一个外壳,具体模型文件如下。 将叠加后的板子放入打印件中,将红色LED固定在顶盖上。 (7)测试运行. 将网线插入W5100网口,给Arduino Uno上电。分别用手机客户端、网页客户端和打开和关闭LED。
(8)任务拓展. 也许你觉得这个LED不是很亮,那就弄个亮的吧,完全可以通过下面的设备来做一盏更亮的WebLed。 下图中的灯与上面的没有本质区别,都是通过网络来进行开关,只不过通过继电器外接了大电流设备。如果你胆大点完全可以弄个交流设备的灯来玩玩,接线如下,这里不再详细介绍。
| 


 沪公网安备31011502402448

 置顶卡
置顶卡 变色卡
变色卡 千斤顶
千斤顶

 ,,,,
,,,,
 萌萌哒新人
萌萌哒新人
 活跃会员
活跃会员
 宣传大使
宣传大使
 版主限定
版主限定
 牛X认证
牛X认证
 创作达人
创作达人
 小蘑菇
小蘑菇
 蘑菇人
蘑菇人
 蘑菇老人
蘑菇老人
 荣誉教师
荣誉教师
 编辑选择奖
编辑选择奖
 编辑选择奖
编辑选择奖
 编辑选择奖
编辑选择奖
 ARD DAY
 编辑选择奖
编辑选择奖
 创客造
创客造
 编辑选择奖
编辑选择奖
 编辑选择奖
编辑选择奖
 编辑选择奖
编辑选择奖
 编辑选择奖
编辑选择奖


