|
6066| 0
|
[入门] 【研究开源机器臂】(3):低成本实现200多元实现,开源... |
|
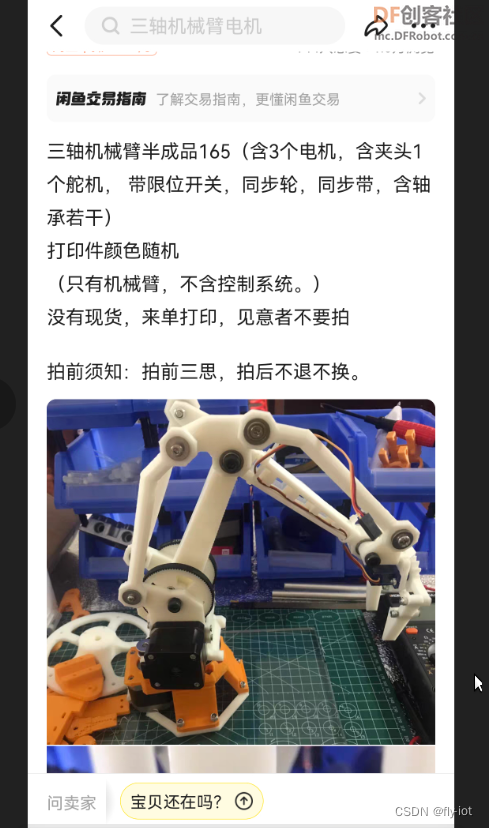
[color=rgba(0, 0, 0, 0.75)]开源机械臂资料 [color=rgba(0, 0, 0, 0.75)] 文章分类: [color=rgba(0, 0, 0, 0.75)]1,首先是设备购买机械臂 170 - 180 左右,大家可以去小黄鱼去找找 [color=rgba(0, 0, 0, 0.75)] [color=rgba(0, 0, 0, 0.75)]2,控制方案,使用Wemos D1 R32 ESP32 +Arduino CNC Shield v3 进行设备控制,成本 30 元 [color=rgba(0, 0, 0, 0.75)] https://detail.1688.com/offer/656424665619.html
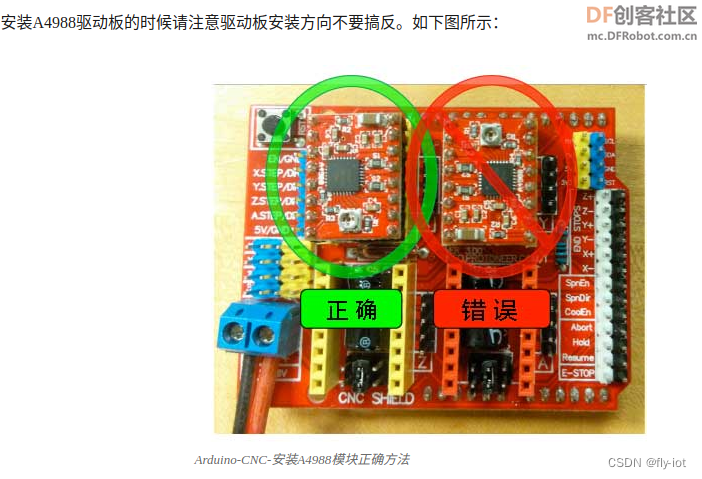
v3 雕刻机扩展板+ A4988套件 21 元: [color=rgba(0, 0, 0, 0.75)]
[color=rgba(0, 0, 0, 0.75)]3,控制方案,参考太极创客 文章,使用AccelStepper库 进行控制 [color=rgba(0, 0, 0, 0.75)] http://www.taichi-maker.com/homepage/reference-index/motor-reference-index/arduino-cnc-shield/#other-pins
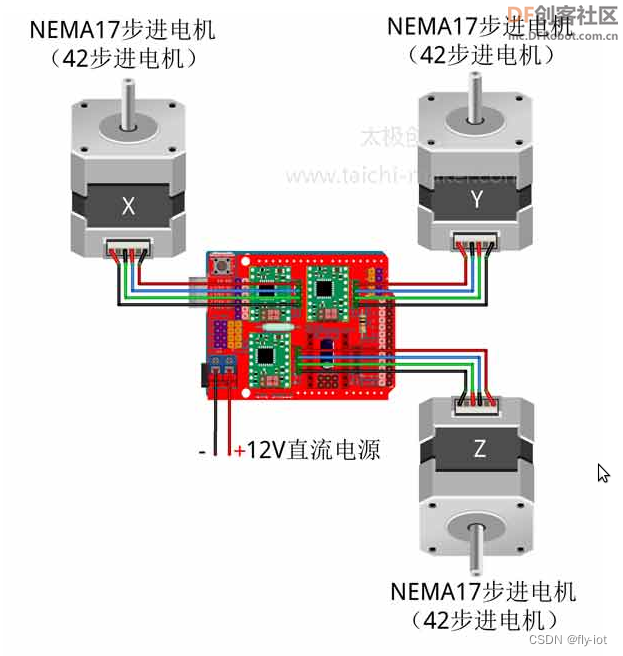
[color=rgba(0, 0, 0, 0.75)] 需要一个 12 v 的供电电源,高电压会导致抖动。 42 步进电机电压是 12 v。 [color=rgba(0, 0, 0, 0.75)]4,演示控制的全部控制代码,只适用Wemos D1 R32 ESP32 +Arduino CNC Shield v3 这个方案的引脚 [color=rgba(0, 0, 0, 0.75)] 因为是特别针对 Wemos D1 R32 ESP32 +Arduino CNC Shield v3 这个进行的引脚配置。 [color=rgba(0, 0, 0, 0.75)] http://www.taichi-maker.com/homepage/reference-index/motor-reference-index/arduino-cnc-shield/#other-pins [color=rgba(0, 0, 0, 0.75)] 主要是引脚的不同,其他都一样。 [color=rgba(0, 0, 0, 0.75)] 选择 wemos d1 r32 版本: [color=rgba(0, 0, 0, 0.75)]Arduino Uno CNC ShieldD1 R32 - ESP32 D0 RXRX0 D1 TXTX0 D2 X-STEPIO26 D3 Y-STEPIO25 D4 Z-STEPIO17 D5 X-DIRIO16 D6 Y-DIRIO27 D7 Z-DIRIO14 D8 ENIO12 拆掉CNC板子上的10K上拉电阻 D9 X-、X+IO13 D10 Y-、Y+IO05 D11 Z-、Z+IO23 D12 A-STEP、SpinEnIO19 D13 A-DIR、SpinDirIO18 [color=rgba(0, 0, 0, 0.75)]
[color=rgba(0, 0, 0, 0.75)]/*Arduino CNC电机扩展板驱动4个NEMA17步进电机示例程序http://www.taichi-maker.com/homepage/reference-index/motor-reference-index/arduino-cnc-shield/#other-pinsBy 太极创客(http://www.taichi-maker.com)2019-03-10 @2023.09.09 修改,只适配 Wemos D1 R32 ESP32 +Arduino CNC Shield v3 方案*/#include <AccelStepper.h> //本示例程序使用AccelStepper库 // 定义电机控制用常量const int enablePin = 12; // 使能控制引脚 const int xdirPin = 16; // x方向控制引脚const int ydirPin = 27; // y方向控制引脚const int zdirPin = 14; // z方向控制引脚const int xstepPin = 26; // x步进控制引脚const int ystepPin = 25; // y步进控制引脚const int zstepPin = 17; // z步进控制引脚const int moveSteps = 100; //测试电机运行使用的运行步数const int stepperMaxSpeed = 550;const int stepperAcceleration = 55;AccelStepper stepper1(1,xstepPin,xdirPin);//建立步进电机对象1AccelStepper stepper2(1,ystepPin,ydirPin);//建立步进电机对象2AccelStepper stepper3(1,zstepPin,zdirPin);//建立步进电机对象3void setup() { Serial.begin(115200); pinMode(xstepPin,OUTPUT); // Arduino控制A4988x步进引脚为输出模式 pinMode(xdirPin,OUTPUT); // Arduino控制A4988x方向引脚为输出模式 pinMode(ystepPin,OUTPUT); // Arduino控制A4988y步进引脚为输出模式 pinMode(ydirPin,OUTPUT); // Arduino控制A4988y方向引脚为输出模式 pinMode(zstepPin,OUTPUT); // Arduino控制A4988z步进引脚为输出模式 pinMode(zdirPin,OUTPUT); // Arduino控制A4988z方向引脚为输出模式 pinMode(enablePin,OUTPUT); // Arduino控制A4988使能引脚为输出模式 digitalWrite(enablePin,LOW); // 将使能控制引脚设置为低电平从而让 // 电机驱动板进入工作状态 stepper1.setMaxSpeed(stepperMaxSpeed); // 设置电机最大速度 stepper1.setAcceleration(stepperAcceleration); // 设置电机加速度 stepper2.setMaxSpeed(stepperMaxSpeed); // 设置电机最大速度 stepper2.setAcceleration(stepperAcceleration); // 设置电机加速度 stepper3.setMaxSpeed(stepperMaxSpeed); // 设置电机最大速度 stepper3.setAcceleration(stepperAcceleration); // 设置电机加速度 pinMode(2, OUTPUT);} void loop() { // 控制步进电机1往复运动 if (stepper1.currentPosition() == 0 ){ stepper1.moveTo(moveSteps); digitalWrite(2, HIGH); // turn LED on } else if ( stepper1.currentPosition() == moveSteps ){ stepper1.moveTo(0); digitalWrite(2, LOW); // turn LED off } // 控制步进电机2往复运动 if ( stepper2.currentPosition() == 0 ){ stepper2.moveTo(moveSteps); } else if ( stepper2.currentPosition() == moveSteps ){ stepper2.moveTo(0); } // 控制步进电机3往复运动 if ( stepper3.currentPosition() == 0 ){ stepper3.moveTo(moveSteps); } else if ( stepper3.currentPosition() == moveSteps ){ stepper3.moveTo(0); } stepper1.run(); // 1号电机运行 stepper2.run(); // 2号电机运行 stepper3.run(); // 3号电机运行 } [color=rgba(0, 0, 0, 0.75)]5,运行效果,说明和视频演示 [color=rgba(0, 0, 0, 0.75)] https://www.bilibili.com/video/BV1uP41187EJ/ [color=rgba(0, 0, 0, 0.75)] [color=rgba(0, 0, 0, 0.75)]6,总结 [color=rgba(0, 0, 0, 0.75)] 低成本实现200多元实现,终于调试好了。 [color=rgba(0, 0, 0, 0.75)] 目前还有一点抖动,估计是电压过高导致的,使用了24v电压,但是 42 电机估计只能用12v 电压。 |


 沪公网安备31011502402448
© 2013-2026 Comsenz Inc. Powered by Discuz! X3.4 Licensed


 置顶卡
置顶卡 变色卡
变色卡 千斤顶
千斤顶


