|
12481| 15
|
[已解决] X-Board使用问题 |
|
X-Board继电器板,https://www.dfrobot.com.cn/goods-686.html 运行样例程序时串口监视器上没有任何输出,不知何故? 为了测试,写了一段简单的程序,读模拟口的值然后在串口打印,不启用网络功能,一起正常,如果启用网络功能,立刻死机。 是不是Ethernet和串口冲突?但是把串口的输出全部取消,用mac地址加固定ip地址的方式启用Ethernet,在浏览器访问给X-Board设定的ip地址,提示无法访问。 请用过X-borad(继电器板)的大侠给点指导。 |
本帖最后由 lilin16821 于 2014-7-16 15:13 编辑 mickey 发表于 2014-7-16 14:29 谢谢回复,你提到的代码如下: while (!Serial) { ; // wait for serial port to connect. Needed for Leonardo only } 注释掉后结果是一样的。 这段代码在自己写的测试程序中用或不用,似乎对串口通信的影响不大,目前看还是网络功能问题。 DFROBOT的人能用X-Board板试试吗? |
lilin16821 发表于 2014-7-16 15:08 这个板子没有人用过吗? |
|
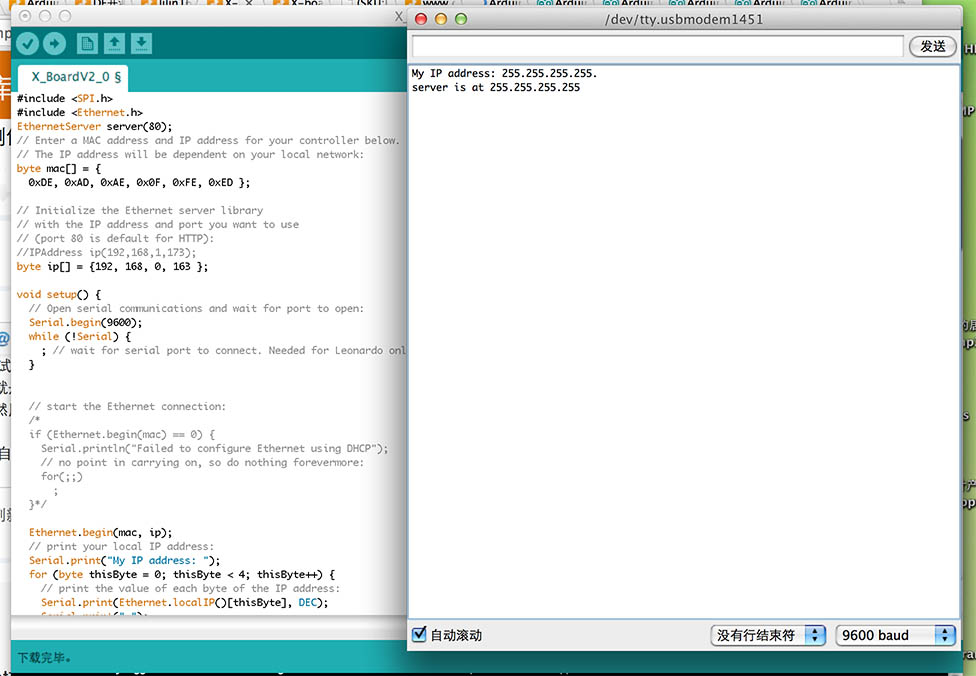
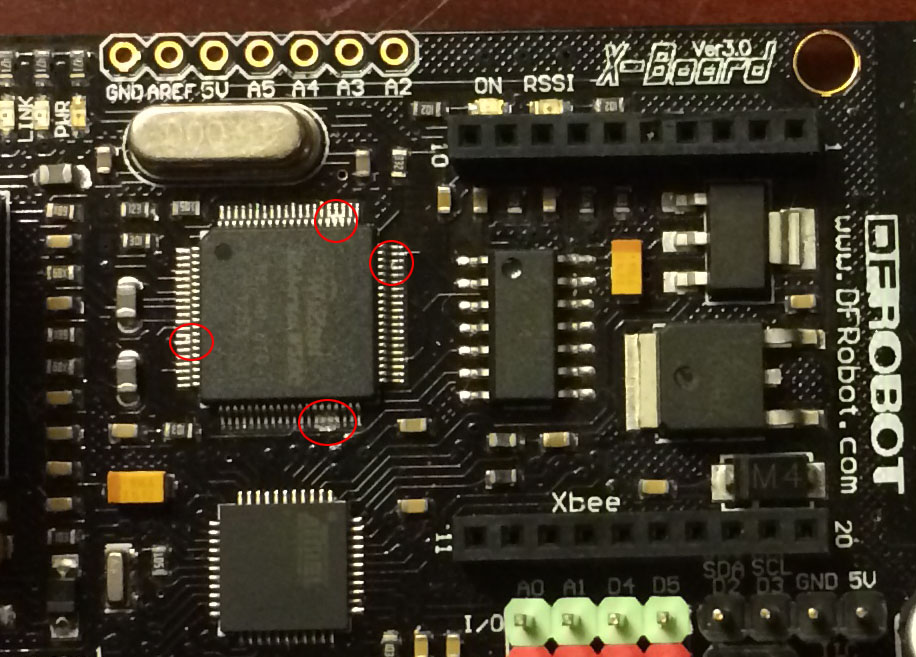
谢谢回复,一直在忙,没有顾上测试,今天又认真测试了一下,结果仍然是失败,总结如下: 一、采用Ethernet.begin(mac),也就是试图DHCP取得ip地址,如果连接DHCP服务器,系统将死机,串口没有输出 二、采用Ethernet.begin(mac),仍然用DHCP取得ip地址,如果没有DHCP服务器,串口输出提示“Failed to configure Ethernet using DHCP”,这个应该是正常的。 三、采用Ethernet.begin(mac, ip),自设置ip地址的话,然后立刻打印ip地址,结果如下:  这就是最奇怪的地方了,IP地址被设置成了255.255.255.255。 代码如下: /* DFRobot X-board V2 Sample Code A simple web server with DHPC capbabilty. 1)Get IP address from router automatically 2)Show the value of the analog input pins created 28 Sep 2012 by Ricky */ #include <SPI.h> #include <Ethernet.h> EthernetServer server(80); // Enter a MAC address and IP address for your controller below. // The IP address will be dependent on your local network: byte mac[] = { 0xDE, 0xAD, 0xAE, 0x0F, 0xFE, 0xED }; // Initialize the Ethernet server library // with the IP address and port you want to use // (port 80 is default for HTTP): //IPAddress ip(192,168,1,173); byte ip[] = {192, 168, 0, 163 }; void setup() { // Open serial communications and wait for port to open: Serial.begin(9600); while (!Serial) { ; // wait for serial port to connect. Needed for Leonardo only } // start the Ethernet connection: /* if (Ethernet.begin(mac) == 0) { Serial.println("Failed to configure Ethernet using DHCP"); // no point in carrying on, so do nothing forevermore: for(;;) ; }*/ Ethernet.begin(mac, ip); // print your local IP address: Serial.print("My IP address: "); for (byte thisByte = 0; thisByte < 4; thisByte++) { // print the value of each byte of the IP address: Serial.print(Ethernet.localIP()[thisByte], DEC); Serial.print("."); } Serial.println(); // start the Ethernet connection and the server: server.begin(); Serial.print("server is at "); Serial.println(Ethernet.localIP()); } void loop() { // listen for incoming clients EthernetClient client = server.available(); if (client) { Serial.println("new client"); // an http request ends with a blank line boolean currentLineIsBlank = true; while (client.connected()) { if (client.available()) { char c = client.read(); Serial.write(c); // if you've gotten to the end of the line (received a newline // character) and the line is blank, the http request has ended, // so you can send a reply if (c == '\n' && currentLineIsBlank) { // send a standard http response header client.println("HTTP/1.1 200 OK"); client.println("Content-Type: text/html"); client.println("Connnection: close"); client.println(); client.println("<!DOCTYPE HTML>"); client.println("<html>"); // add a meta refresh tag, so the browser pulls again every 5 seconds: client.println("<meta http-equiv=\"refresh\" content=\"5\">"); client.println("<link rel=\"stylesheet\" type=\"text/css\" href=\"http://www.dfrobot.com/ihome/stylesheet/stylesheet.css\" />"); client.println("<center> <a href=\"http://www.dfrobot.com\"><img src=\"http://alturl.com/qf6vz\"></a> </center> "); client.println("<br />"); client.println("<div>"); // output the value of each analog input pin for (int analogChannel = 0; analogChannel < 6; analogChannel++) { int sensorReading = analogRead(analogChannel); client.print("analog input "); client.print(analogChannel); client.print(" is "); client.print(sensorReading); client.println("<br />"); } // output the value of each digital input pin for (int digitalChannel = 2; digitalChannel < 10; digitalChannel++) { int sensorReading = digitalRead(digitalChannel); if(digitalChannel!=7&&digitalChannel!=8) { client.print("Digital input "); client.print(digitalChannel); client.print(" is "); client.print(sensorReading); client.println("<br />"); } else { client.print("Relay "); client.print(digitalChannel); client.print(" is "); client.print(sensorReading); client.println("<br />"); } } client.println("</div>"); client.println("</html>"); break; } if (c == '\n') { // you're starting a new line currentLineIsBlank = true; } else if (c != '\r') { // you've gotten a character on the current line currentLineIsBlank = false; } } } // give the web browser time to receive the data delay(1); // close the connection: client.stop(); Serial.println("client disonnected"); } } 测试无果后,到Arduino.cc上去看Ethernet.h的说明,在Ethernet.begin()说明中看到这么一句: “mac: the MAC (Media access control) address for the device (array of 6 bytes). this is the Ethernet hardware address of your shield. Newer Arduino Ethernet Shields include a sticker with the device's MAC address. For older shields, choose your own.” 于是猜测,是不是我的板子是新的,MAC地址要用真实地址,不能自己设置?但是我已经找不到“sticker”了,不知道地址是什么? 然后,不明白的事情出现了,我仔细观察板子,发现5100芯片的引脚上有几处焊接粘连点,附照片如下,请DFRobot的人帮忙判断一下,图片中红色圈内的焊接粘连是正常的还是不正常的,5100下面的Atmel焊接就没有这种粘连。  |
|
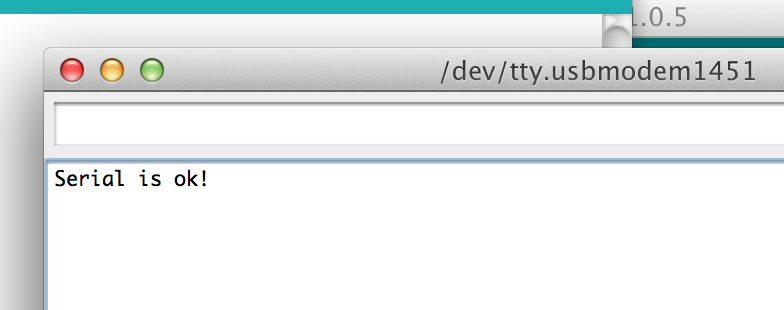
我认为网络没有问题,其他设备都工作的很好(网络上有笔记本、台式机、手机、iPad等是DHCP设备,AppleTV、NSA等固定IP设备)。我用5200板子(从UNO上扩展出来的)也是没有问题的。 测试了你提供的代码,我在串口初始化成功后打印了一句“Serial is ok!”,然后继续初始化网口,结果显示: My IP address: 0.0.0.0. server is at 0.0.0.0  如果采用DHCP,输出了“Serial is ok!”后,就没有任何输出了。  我觉得即便是网络问题,设置固定IP也是应该可以设置的,有IP冲突等网络问题也应该只是影响通讯,但是现在是设置固定IP的时候会设置成0.0.0.0,而DHCP又没有任何响应。 有点要崩溃的感觉。用这块板子是要搭建一个很重要的应用原型测试,请尽快提供帮助,让我能继续下去。 |
本帖最后由 lilin16821 于 2014-8-1 01:28 编辑 Phoebe 发表于 2014-7-31 14:55 就是上面你们提供的代码,我只是在while循环后面加了两句: Serial.println("Serial is ok!"); delay(1000); 其实不加也是一样的,我加了只是想测试串口是否设置正常。 /* DFRobot X-board V2 Sample Code A simple web server with DHPC capbabilty. 1)Get IP address from router automatically 2)Show the value of the analog input pins created 28 Sep 2012 by Ricky */ #include <SPI.h> #include <Ethernet.h> //EthernetServer server(80); // Enter a MAC address and IP address for your controller below. // The IP address will be dependent on your local network: byte mac[] = { 0xDE, 0xCD, 0xAE, 0x0F, 0xFE, 0xED }; // Initialize the Ethernet server library // with the IP address and port you want to use // (port 80 is default for HTTP): //IPAddress //byte ip[] = {192, 168, 0, 169 }; IPAddress ip(192,168,1, 210); //byte ip[] = {192, 168, 0, 167 }; void setup() { delay(3000); // for debugging, a little delay makes things easier, for use, delete delay. // Open serial communications and wait for port to open: Serial.begin(9600); while (!Serial) { ; // wait for serial port to connect. Needed for Leonardo only } Serial.println("Serial is ok!"); delay(1000); // start the Ethernet connection: /* if (Ethernet.begin(mac) == 0) { Serial.println("Failed to configure Ethernet using DHCP"); // no point in carrying on, so do nothing forevermore: for(;;) ; } */ Ethernet.begin(mac,ip); // print your local IP address: Serial.print("My IP address: "); for (byte thisByte = 0; thisByte < 4; thisByte++) { // print the value of each byte of the IP address: Serial.print(Ethernet.localIP()[thisByte], DEC); Serial.print("."); } Serial.println(); // start the Ethernet connection and the server: //server.begin(); Serial.print("server is at "); Serial.println(Ethernet.localIP()); } void loop() { } |
Phoebe 发表于 2014-8-1 18:35 终于,终于,谢谢,谢谢! |
 沪公网安备31011502402448
© 2013-2026 Comsenz Inc. Powered by Discuz! X3.4 Licensed