|
4696| 0
|
[官方案例教程] 智能家居——智能插座 |
|
本帖最后由 螺丝钉yy 于 2019-7-3 16:03 编辑 强迫症,  我猜很多人或多或少都有一点吧,只是严重程度的差别。是不是有人在出门后,在电梯间或者其他地方突然想起门是否关好了。为了确保安全又得折回去看一看是不是将门关上了。既费时间也费精力。想不想通过手机或者网页方式提醒:门没关上。这样的话就可以知道门是不是关好了,如果没有关好,可以通过关联设备将门关上,这些都可以由阿里平台和入门套件实现。这样的生活是不是很智能呢! 所需材料: 我猜很多人或多或少都有一点吧,只是严重程度的差别。是不是有人在出门后,在电梯间或者其他地方突然想起门是否关好了。为了确保安全又得折回去看一看是不是将门关上了。既费时间也费精力。想不想通过手机或者网页方式提醒:门没关上。这样的话就可以知道门是不是关好了,如果没有关好,可以通过关联设备将门关上,这些都可以由阿里平台和入门套件实现。这样的生活是不是很智能呢! 所需材料:阿里云lot入门套件 x1 智能手机 x1 门锁用到的是阿里云lot入门套件里面的电磁锁,电磁锁的工作电压12v,所以需要外接12v的电压,电流要达到1A以上,当没有电的时候,门锁打开,当有电是门锁关上。所以我们需要用到继电器。电磁锁的具体使用方法可参考https://www.dfrobot.com.cn/goods-1948.html 开启我们的智能之旅 一、创建产品、设备 打开阿里云物联网平台:https://iot.aliyun.com/ 创建产品,名为智能门锁,在这多说两句,我建议选择类别为自定义品类,我发现有些人选择其他的选项,也不是不可以,但是阿里云平台就会给你默认参数,无法进行修改,对后面的项目操作不方便。 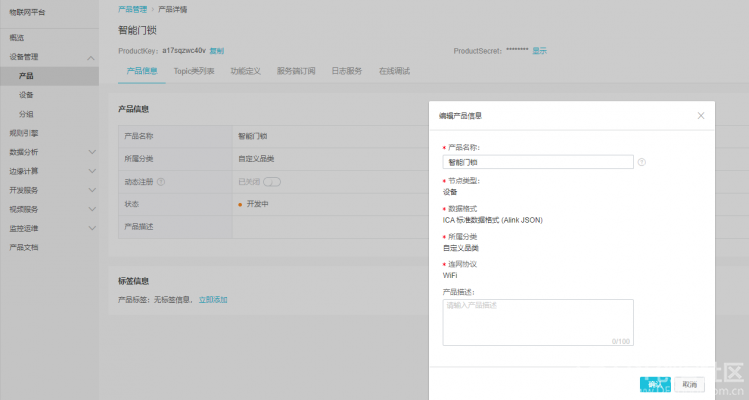 自定义功能。名称为:门锁状态,标识符为:LockStatus,数据类型:bool型,0表示关门,1表示开门。 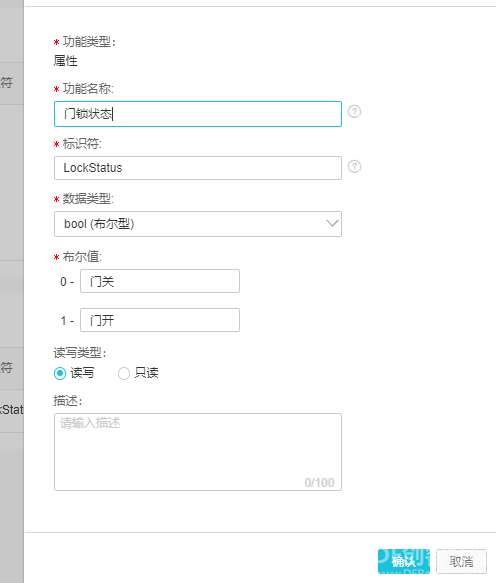 创建设备。隶属于智能门锁产品下,名为Lock。 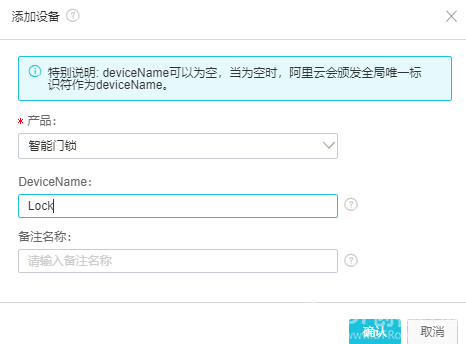 二、程序 继电器是设置引脚插入D2口,电磁锁是读取信息,插入D3口。 示例程序 [mw_shl_code=applescript,true]#include <WiFi.h> #include <PubSubClient.h> #include <ArduinoJson.h> #include "DFRobot_Aliyun.h" #define SET_DOOR_PIN D2 #define READ_DOOR_PIN D3 /*配置WIFI名和密码*/ const char * WIFI_SSID = "WIFI_SSID"; const char * WIFI_PASSWORD = "WIFI_PASSWORD"; /*配置设备证书信息*/ String ProductKey = "you Product Key"; String ClientId = "12345"; String DeviceName = "you Device Name"; String DeviceSecret = "you Device Secret"; /*配置域名和端口号*/ String ALIYUN_SERVER = "iot-as-mqtt.cn-shanghai.aliyuncs.com"; uint16_t PORT = 1883; /*需要操作的产品标识符*/ String Identifier = "you Identifier"; /*需要上报和订阅的两个TOPIC*/ const char * subTopic = "you sub Topic";//****set const char * pubTopic = "you pub Topic";//******post DFRobot_Aliyun myAliyun; WiFiClient espClient; PubSubClient client(espClient); uint8_t readDoorStatus(){ return digitalRead(READ_DOOR_PIN); } static void openDoor(){ digitalWrite(SET_DOOR_PIN, HIGH); delay(500); digitalWrite(SET_DOOR_PIN, LOW); } void connectWiFi(){ Serial.print("Connecting to "); Serial.println(WIFI_SSID); WiFi.begin(WIFI_SSID,WIFI_PASSWORD); while(WiFi.status() != WL_CONNECTED){ delay(500); Serial.print("."); } Serial.println(); Serial.println("WiFi connected"); Serial.print("IP Adderss: "); Serial.println(WiFi.localIP()); } void callback(char * topic, byte * payload, unsigned int len){ Serial.print("Recevice ["); Serial.print(topic); Serial.print("] "); for (int i = 0; i < len; i++){ Serial.print((char)payload); } Serial.println(); StaticJsonBuffer<300> jsonBuffer; JsonObject& root = jsonBuffer.parseObject((const char *)payload); if(!root.success()){ Serial.println("parseObject() failed"); return; } uint8_t DoorStatus = root["params"][Identifier]; Serial.print("readDoorStatus="); Serial.print(DoorStatus); if(DoorStatus == 1){ openDoor(); } } void ConnectAliyun(){ while(!client.connected()){ Serial.print("Attempting MQTT connection..."); /*根据自动计算的用户名和密码连接到Alinyun的设备,不需要更改*/ if(client.connect(myAliyun.client_id,myAliyun.username,myAliyun.password)){ Serial.println("connected"); client.subscribe(subTopic); }else{ Serial.print("failed, rc="); Serial.print(client.state()); Serial.println(" try again in 5 seconds"); delay(5000); } } } void setup(){ Serial.begin(115200); pinMode(SET_DOOR_PIN,OUTPUT); pinMode(READ_DOOR_PIN,INPUT_PULLUP); digitalWrite(SET_DOOR_PIN, LOW); /*连接WIFI*/ connectWiFi(); /*初始化Alinyun的配置,可自动计算用户名和密码*/ myAliyun.init(ALIYUN_SERVER,ProductKey,ClientId,DeviceName,DeviceSecret); client.setServer(myAliyun.mqtt_server,PORT); /*设置回调函数,当收到订阅信息时会执行回调函数*/ client.setCallback(callback); /*连接到Aliyun*/ ConnectAliyun(); /*上报门锁状态信息*/ client.publish(pubTopic,("{\"id\":"+ClientId+",\"params\":{\""+Identifier+"\":"+readDoorStatus()+"},\"method\":\"thing.event.property.post\"}").c_str()); } uint8_t tempDoorStatus = 0; uint8_t lastDoorStatus = 0; void loop(){ if(!client.connected()){ ConnectAliyun(); } tempDoorStatus = readDoorStatus(); if(tempDoorStatus != lastDoorStatus){ lastDoorStatus = tempDoorStatus; /*上报门锁状态信息*/ client.publish(pubTopic,("{\"id\":"+ClientId+",\"params\":{\""+Identifier+"\":"+tempDoorStatus+"},\"method\":\"thing.event.property.post\"}").c_str()); delay(500); } client.loop(); }[/mw_shl_code] 将wifi部分改成自己现有的IP 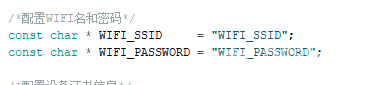 将设备的三元组信息粘贴到相应的位置 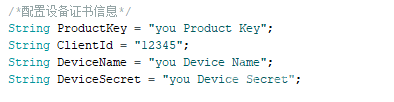 将标识符和上报和订阅的topic进行替换   topic替换的成阿里云平台上的产品智能门锁的前两个数据 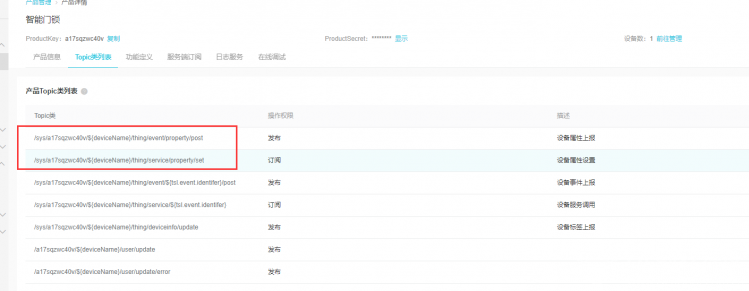 最后编译,下载程序。 三、创建移动应用服务 进入阿里云平台开发服务的lot studio,创建移动应用服务,隶属于智能家居项目下。 将“自定义新增页1”改为智能门锁,用鼠标将可视化组建下的文字、开关控件拖动到中间的页面上 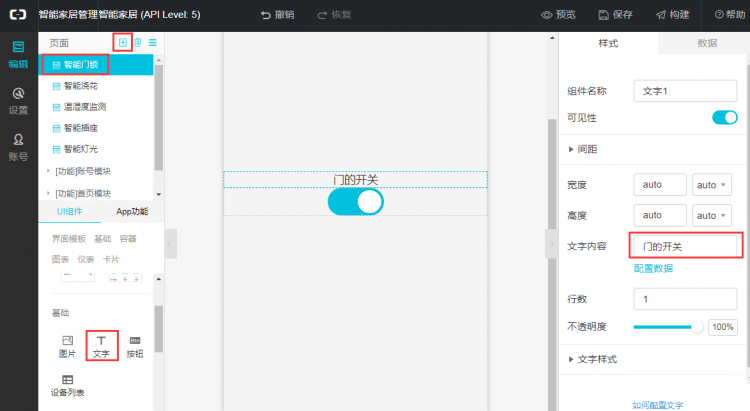 对门的开关进行配置数据,选择产品,设备,属性状态。 然后对首页模块的列表页进行配置,链接到智能门锁。 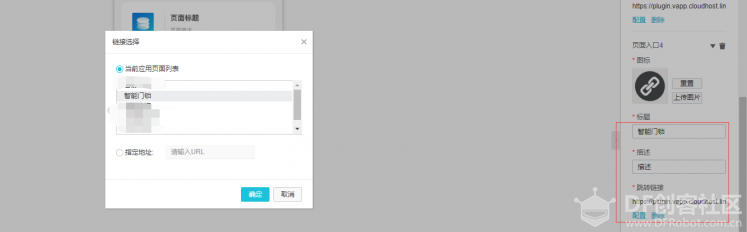 然后点击报存,构建二维码,成功后你就试下你的门锁能不能智能打开了,如果可以,你试下自动关上如何实现。 |


 沪公网安备31011502402448
© 2013-2026 Comsenz Inc. Powered by Discuz! X3.4 Licensed

 置顶卡
置顶卡 变色卡
变色卡 千斤顶
千斤顶


