本帖最后由 云天 于 2021-12-1 15:49 编辑
【项目背景】
跳绳是一个很好的健身项目,为了获知所跳个数,有的跳绳上会有计数器。但这也只能跳完这后看到,能不能在跳的过程中就能看到,这样能让我们坚持跳的更多,更有趣味性。
【项目设计】
通过Mind+Python模式下加载Google的开源Mediapipe人工智能算法库,识别人体姿态,来判断跳绳次数,并通过Pinpong库控制LED灯实时显示次数。
【测试程序】
测试程序中,使用人体姿态23,24两坐标点中点与标准点的比较来确认跳绳完成程度。

-
- import numpy as np
- import time
- import cv2
- import PoseModule as pm
- cap = cv2.VideoCapture("tiaosheng.mp4")
- detector = pm.poseDetector()
- count = 0
- dir = 0
- pTime = 0
- success=True
- point_sd=0
- while success:
- success, img = cap.read()
- if success:
- img = cv2.resize(img, (640, 480))
-
- img = detector.findPose(img, False)
- lmList = detector.findPosition(img, False)
-
- if len(lmList) != 0:
-
- point = detector.midpoint(img, 24, 23)
- if point_sd==0:
- point_sd=point
- print(point_sd["y"])
- # 计算个数
- print(point["y"])
- if point["y"]> point_sd["y"]+15:
-
- if dir == 0:
- count += 0.5
- dir = 1
- if point["y"]<point_sd["y"]+5:
-
- if dir == 1:
- count += 0.5
- dir = 0
- #print(count)
- cv2.putText(img, str(int(count)), (45, 460), cv2.FONT_HERSHEY_PLAIN, 7,(255, 0, 0), 8)
- cTime = time.time()
- fps = 1 / (cTime - pTime)
- pTime = cTime
- cv2.putText(img, str(int(fps)), (50, 100), cv2.FONT_HERSHEY_PLAIN, 5,(255, 0, 0), 5)
- cv2.imshow("Image", img)
- cv2.waitKey(1)
【PoseModule.py】
上面程序用到的“PoseModule.py”文件中,在”poseDetector“类中增加了“midpoint”函数,用于求两点的中点坐标。- import math
- import mediapipe as mp
- import cv2
- class poseDetector():
-
- def __init__(self, mode=False, upBody=False, smooth=True,
- detectionCon=0.5, trackCon=0.5):
-
- self.mode = mode
- self.upBody = upBody
- self.smooth = smooth
- self.detectionCon = detectionCon
- self.trackCon = trackCon
-
- self.mpDraw = mp.solutions.drawing_utils
- self.mpPose = mp.solutions.pose
- self.pose = self.mpPose.Pose(self.mode, self.upBody, self.smooth,
- self.detectionCon, self.trackCon)
-
- def findPose(self, img, draw=True):
- imgRGB = cv2.cvtColor(img, cv2.COLOR_BGR2RGB)
- self.results = self.pose.process(imgRGB)
- if self.results.pose_landmarks:
- if draw:
- self.mpDraw.draw_landmarks(img, self.results.pose_landmarks,
- self.mpPose.POSE_CONNECTIONS)
- return img
-
- def findPosition(self, img, draw=True):
- self.lmList = []
- if self.results.pose_landmarks:
- for id, lm in enumerate(self.results.pose_landmarks.landmark):
- h, w, c = img.shape
- # print(id, lm)
- cx, cy = int(lm.x * w), int(lm.y * h)
- self.lmList.append([id, cx, cy])
- if draw:
- cv2.circle(img, (cx, cy), 5, (255, 0, 0), cv2.FILLED)
- return self.lmList
- def midpoint(self,img,p1,p2,draw=True):
- x1, y1 = self.lmList[p1][1:]
- x2, y2 = self.lmList[p2][1:]
- x3=int((x1+x2)/2)
- y3=int((y1+y2)/2)
- if draw:
- cv2.circle(img, (x3, y3), 10, (0, 0, 255), cv2.FILLED)
- cv2.circle(img, (x3, y3), 15, (0, 0, 255), 2)
- point={"x":x3,"y":y3}
- return point
- def findAngle(self, img, p1, p2, p3, draw=True):
-
- # Get the landmarks
- x1, y1 = self.lmList[p1][1:]
- x2, y2 = self.lmList[p2][1:]
- x3, y3 = self.lmList[p3][1:]
-
- # Calculate the Angle
- angle = math.degrees(math.atan2(y3 - y2, x3 - x2) -
- math.atan2(y1 - y2, x1 - x2))
- if angle < 0:
- angle += 360
-
- # print(angle)
-
- # Draw
- if draw:
- cv2.line(img, (x1, y1), (x2, y2), (255, 255, 255), 3)
- cv2.line(img, (x3, y3), (x2, y2), (255, 255, 255), 3)
- cv2.circle(img, (x1, y1), 10, (0, 0, 255), cv2.FILLED)
- cv2.circle(img, (x1, y1), 15, (0, 0, 255), 2)
- cv2.circle(img, (x2, y2), 10, (0, 0, 255), cv2.FILLED)
- cv2.circle(img, (x2, y2), 15, (0, 0, 255), 2)
- cv2.circle(img, (x3, y3), 10, (0, 0, 255), cv2.FILLED)
- cv2.circle(img, (x3, y3), 15, (0, 0, 255), 2)
- cv2.putText(img, str(int(angle)), (x2 - 50, y2 + 50),
- cv2.FONT_HERSHEY_PLAIN, 2, (0, 0, 255), 2)
- return angle
-
-
【测试网络视频】
【存在的问题】
测试结果令人比较满意,但这里存在这样两个问题:1、标准点point_sd这个坐标是以视频开始第一帧画面是站在原地未起跳为前提。
2、标准点纵坐标的判定区间(point_sd["y"]+5与 point_sd["y"]+15)是根据运行后的数据人为分析出来的,只对这一段视频有效,不具有通用性。
【解决问题思路】
1、在正式跳绳计数前,先试跳,通过数据分析出标准点、判定区间(防止数据在判定点抖动,出现错误计数)。在上个程序中判定点为:point_sd["y"]+10。
2、以手势控制屏幕上的虚拟按钮来分析初始化数据,并启动跳绳计数及终止计数。
【解决问题步骤】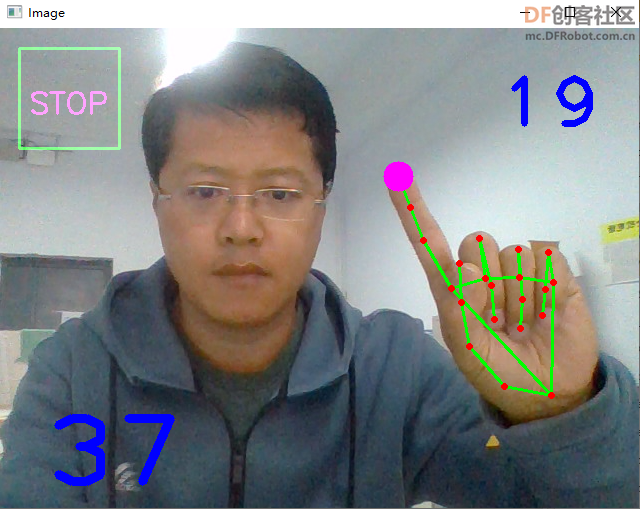
第一步:实现手势控制屏幕按钮。
程序中使用了计时器,以防止连续触发问题。
-
- import cv2
- import numpy as np
- import time
- import os
- import HandTrackingModule as htm
- #######################
- brushThickness = 25
- eraserThickness = 100
- ########################
- drawColor = (255, 0, 255)
-
- cap = cv2.VideoCapture(0)
- cap.set(3, 640)
- cap.set(4, 480)
-
- detector = htm.handDetector(detectionCon=0.65,maxHands=1)
-
- imgCanvas = np.zeros((480, 640, 3), np.uint8)
- rect=[(20, 20), (120, 120)]
- font = cv2.FONT_HERSHEY_SIMPLEX
- cv2.rectangle(imgCanvas, rect[0], rect[1],(0, 255, 0), 2)
- cv2.putText(imgCanvas, "SET", (45,85), font, 1, drawColor, 2)
- bs=0
- bs2=0
- while True:
-
- # 1. Import image
- success, img = cap.read()
- if success:
- img = cv2.flip(img, 1)
-
- # 2. Find Hand Landmarks
- img = detector.findHands(img)
- lmList = detector.findPosition(img, draw=False)
-
- if len(lmList) !=0:
-
-
-
- # tip of index and middle fingers
- x1, y1 = lmList[8][1:]
- x2, y2 = lmList[12][1:]
-
- # 3. Check which fingers are up
- fingers = detector.fingersUp()
- # print(fingers)
-
-
-
- # 5. Index finger is up
- if fingers[1] and fingers[2] == False:
- cv2.circle(img, (x1, y1), 15, drawColor, cv2.FILLED)
- if bs2==1:
- if time.time()-time_start>3:
- bs2=0
- else:
- if x1>rect[0][0] and x1<rect[1][0] and y1>rect[0][1] and y1<rect[1][1]:
- if bs==0:
- print("OK")
- imgCanvas = np.zeros((480, 640, 3), np.uint8)
- cv2.rectangle(imgCanvas, rect[0], rect[1],(0, 255, 0), 2)
- cv2.putText(imgCanvas, "STOP", (30,85), font, 1, drawColor, 2)
- bs=1
- bs2=1
- time_start=time.time()
- else:
- imgCanvas = np.zeros((480, 640, 3), np.uint8)
-
-
-
- imgGray = cv2.cvtColor(imgCanvas, cv2.COLOR_BGR2GRAY)
-
- img = cv2.bitwise_or(img,imgCanvas)
- # img = cv2.addWeighted(img,0.5,imgCanvas,0.5,0)
- cv2.imshow("Image", img)
-
- cv2.waitKey(1)
上面程序引用的“HandTrackingModule.py”文件。
-
- import cv2
- import mediapipe as mp
- import time
- import math
- import numpy as np
-
- class handDetector():
- def __init__(self, mode=False, maxHands=2, detectionCon=0.8, trackCon=0.5):
- self.mode = mode
- self.maxHands = maxHands
- self.detectionCon = detectionCon
- self.trackCon = trackCon
-
- self.mpHands = mp.solutions.hands
- self.hands = self.mpHands.Hands(self.mode, self.maxHands,
- self.detectionCon, self.trackCon)
- self.mpDraw = mp.solutions.drawing_utils
- self.tipIds = [4, 8, 12, 16, 20]
-
- def findHands(self, img, draw=True):
- imgRGB = cv2.cvtColor(img, cv2.COLOR_BGR2RGB)
- self.results = self.hands.process(imgRGB)
- # print(results.multi_hand_landmarks)
-
- if self.results.multi_hand_landmarks:
- for handLms in self.results.multi_hand_landmarks:
- if draw:
- self.mpDraw.draw_landmarks(img, handLms,
- self.mpHands.HAND_CONNECTIONS)
-
- return img
-
- def findPosition(self, img, handNo=0, draw=True):
- xList = []
- yList = []
- bbox = []
- self.lmList = []
- if self.results.multi_hand_landmarks:
- myHand = self.results.multi_hand_landmarks[handNo]
- for id, lm in enumerate(myHand.landmark):
- # print(id, lm)
- h, w, c = img.shape
- cx, cy = int(lm.x * w), int(lm.y * h)
- xList.append(cx)
- yList.append(cy)
- # print(id, cx, cy)
- self.lmList.append([id, cx, cy])
- if draw:
- cv2.circle(img, (cx, cy), 5, (255, 0, 255), cv2.FILLED)
-
- xmin, xmax = min(xList), max(xList)
- ymin, ymax = min(yList), max(yList)
- bbox = xmin, ymin, xmax, ymax
-
- if draw:
- cv2.rectangle(img, (xmin - 20, ymin - 20), (xmax + 20, ymax + 20),
- (0, 255, 0), 2)
-
- return self.lmList
-
- def fingersUp(self):
- fingers = []
- # Thumb
- if self.lmList[self.tipIds[0]][1] > self.lmList[self.tipIds[0] - 1][1]:
- fingers.append(1)
- else:
- fingers.append(0)
-
- # Fingers
- for id in range(1, 5):
- if self.lmList[self.tipIds[id]][2] < self.lmList[self.tipIds[id] - 2][2]:
- fingers.append(1)
- else:
- fingers.append(0)
-
- # totalFingers = fingers.count(1)
-
- return fingers
-
- def findDistance(self, p1, p2, img, draw=True,r=15, t=3):
- x1, y1 = self.lmList[p1][1:]
- x2, y2 = self.lmList[p2][1:]
- cx, cy = (x1 + x2) // 2, (y1 + y2) // 2
-
- if draw:
- cv2.line(img, (x1, y1), (x2, y2), (255, 0, 255), t)
- cv2.circle(img, (x1, y1), r, (255, 0, 255), cv2.FILLED)
- cv2.circle(img, (x2, y2), r, (255, 0, 255), cv2.FILLED)
- cv2.circle(img, (cx, cy), r, (0, 0, 255), cv2.FILLED)
- length = math.hypot(x2 - x1, y2 - y1)
-
- return length, img, [x1, y1, x2, y2, cx, cy]
-
第二步,分析数据,得到判定点纵坐标。思路是,坐标数据是上下波动,将数据中的波峰和波谷分别提取出来计算均值,然后取中值,和差值。中值为判定点,差值用来确定判定区域。波峰和波谷的判定采用的是两边数据与当前数据做差值看差值方向,如果方向相反,即为峰值。但这里就存在,Mediapipe识别准确度的问题,可能在上升或下降的过程中数据不平滑,出现数据波动。可能在分析时,出现误判,采集到错误的峰值。后期可采用滤波算法处理此问题。现在看效果,还不错。
-
- import numpy as np
- import time
- import cv2
- import PoseModule as pm
- import math
- def max_min(a):
- h = []
- l = []
-
- for i in range(1, len(a)-1):
- if(a[i-1] < a[i] and a[i+1] < a[i]):
- h.append(a[i])
- elif(a[i-1] > a[i] and a[i+1] > a[i]):
- l.append(a[i])
- if(len(h) == 0):
- h.append(max(a))
- if(len(l) == 0):
- l.append(min(a[a.index(max(a)):]))
- mid=(np.mean(h)+np.mean(l))/2
- print(int(mid),int(np.mean(h)-np.mean(l)))
- return(int(mid),int(np.mean(h)-np.mean(l)))
- cap = cv2.VideoCapture("tiaosheng.mp4")
- detector = pm.poseDetector()
- count = 0
- dir = 0
- pTime = 0
- success=True
- point=[]
- while success:
- success, img = cap.read()
- if success:
- img = cv2.resize(img, (640, 480))
-
- img = detector.findPose(img, False)
- lmList = detector.findPosition(img, False)
-
- if len(lmList) != 0:
- point_tem=detector.midpoint(img, 24, 23)
- point.append(point_tem['y'])
-
- cv2.putText(img, str(point_tem['y']), (45, 460), cv2.FONT_HERSHEY_PLAIN, 7,(255, 0, 0), 8)
- cTime = time.time()
- fps = 1 / (cTime - pTime)
- pTime = cTime
- cv2.putText(img, str(int(fps)), (50, 100), cv2.FONT_HERSHEY_PLAIN, 5,(255, 0, 0), 5)
- cv2.imshow("Image", img)
- cv2.waitKey(1)
- max_min(point)
- cap.release()
- cv2.destroyAllWindows()
最终得到“304 26”为“中值 差值”
【完整程序】
将以上分段程序进行整合,得到完整程序,并进行实地测试。(纯手工敲码)
-
-
- import cv2
- import numpy as np
- import time
- import os
- import HandTrackingModule as htm
- import PoseModule as pm
- #计算判定点
- def max_min(a):
- h = []
- l = []
-
- for i in range(1, len(a)-1):
- if(a[i-1] < a[i] and a[i+1] < a[i]):
- h.append(a[i])
- elif(a[i-1] > a[i] and a[i+1] > a[i]):
- l.append(a[i])
- if(len(h) == 0):
- h.append(max(a))
- if(len(l) == 0):
- l.append(min(a[a.index(max(a)):]))
- mid=(np.mean(h)+np.mean(l))/2
- print(int(mid),int(np.mean(h)-np.mean(l)))
- return(int(mid),int(np.mean(h)-np.mean(l)))
- #######################
- brushThickness = 25
- eraserThickness = 100
- ########################
- drawColor = (255, 0, 255)
-
- cap = cv2.VideoCapture(0)
- cap.set(3, 640)
- cap.set(4, 480)
-
- detector_hand = htm.handDetector(detectionCon=0.65,maxHands=1)
- detector_pose = pm.poseDetector()
- imgCanvas = np.zeros((480, 640, 3), np.uint8)
- rect=[(20, 20), (120, 120)]
- font = cv2.FONT_HERSHEY_SIMPLEX
- cv2.rectangle(imgCanvas, rect[0], rect[1],(0, 255, 0), 2)
- cv2.putText(imgCanvas, "SET", (45,85), font, 1, drawColor, 2)
- bs=0
- bs2=0
- bs3=0
- point=[]
- count=0
- pTime = 0
- dire=0
- while True:
- success, img = cap.read()
- if success:
- img = cv2.flip(img, 1)
- if bs==1 and bs2==0:
- if bs3==1:
- if time.time()-time_start<4:
- cv2.putText(img, str(3-int(time.time()-time_start)), (300, 240), cv2.FONT_HERSHEY_PLAIN, 10,(255, 255, 0), 5)
- else:
- bs3=0
- time_start=time.time()
- else:
- if time.time()-time_start<11:
- img = detector_pose.findPose(img, False)
- lmList = detector_pose.findPosition(img, False)
-
- if len(lmList) != 0:
- point_tem=detector_pose.midpoint(img, 24, 23)
- point.append(point_tem['y'])
- cv2.putText(img, str(point_tem['y']), (45, 460), cv2.FONT_HERSHEY_PLAIN, 7,(255, 0, 0), 8)
- cv2.putText(img, str(10-int(time.time()-time_start)), (500, 460), cv2.FONT_HERSHEY_PLAIN, 10,(255, 255, 0), 5)
- else:
- point_sd,l=max_min(point)
- bs=2
- cv2.rectangle(imgCanvas, rect[0], rect[1],(0, 255, 0), 2)
- cv2.putText(imgCanvas, "START", (30,85), font, 1, drawColor, 2)
-
- if bs==3 and bs2==0:
- if bs3==1:
- if time.time()-time_start<4:
- cv2.putText(img, str(3-int(time.time()-time_start)), (300, 240), cv2.FONT_HERSHEY_PLAIN, 10,(255, 255, 0), 5)
- else:
- bs3=0
- time_start=time.time()
- else:
- img = detector_pose.findPose(img, False)
- lmList = detector_pose.findPosition(img, False)
-
- if len(lmList) != 0:
- point = detector_pose.midpoint(img, 24, 23)
- if point["y"]> point_sd+l/4:
-
- if dire == 0:
- count += 0.5
- dire = 1
- if point["y"]<point_sd-l/4:
-
- if dire == 1:
- count += 0.5
- dire = 0
-
- cv2.putText(img, str(int(count)), (45, 460), cv2.FONT_HERSHEY_PLAIN, 7,(255, 0, 0), 8)
-
-
-
- if bs2==1:#等待三秒
- if time.time()-time_start>4:
- bs2=0
- time_start=time.time()
-
- else:
- #手势操作
- img = detector_hand.findHands(img)
- lmList = detector_hand.findPosition(img, draw=False)
- if len(lmList) !=0:
- x1, y1 = lmList[8][1:]
- x2, y2 = lmList[12][1:]
- fingers = detector_hand.fingersUp()
- #出示食指
- if fingers[1] and fingers[2] == False:
- cv2.circle(img, (x1, y1), 15, drawColor, cv2.FILLED)
- if x1>rect[0][0] and x1<rect[1][0] and y1>rect[0][1] and y1<rect[1][1]:#食指进入按钮区域
- if bs==0:
- print("OK")
- imgCanvas = np.zeros((480, 640, 3), np.uint8)
-
- bs=1
- bs2=1
- bs3=1
- time_start=time.time()
- elif bs==1:
- imgCanvas = np.zeros((480, 640, 3), np.uint8)
- bs2=1
- bs3=1
- time_start=time.time()
- elif bs==2:
- imgCanvas = np.zeros((480, 640, 3), np.uint8)
- cv2.rectangle(imgCanvas, rect[0], rect[1],(0, 255, 0), 2)
- cv2.putText(imgCanvas, "STOP", (30,85), font, 1, drawColor, 2)
- bs=3
- bs2=1
- bs3=1
- time_start=time.time()
- elif bs==3:
- imgCanvas = np.zeros((480, 640, 3), np.uint8)
- cv2.rectangle(imgCanvas, rect[0], rect[1],(0, 255, 0), 2)
- cv2.putText(imgCanvas, "START", (30,85), font, 1, drawColor, 2)
- bs=2
- bs2=1
- bs3=1
- time_start=time.time()
-
- cTime = time.time()
- fps = 1 / (cTime - pTime)
- pTime = cTime
- cv2.putText(img, str(int(fps)), (500, 100), cv2.FONT_HERSHEY_PLAIN, 5,(255, 0, 0), 5)
- imgGray = cv2.cvtColor(imgCanvas, cv2.COLOR_BGR2GRAY)
- img = cv2.bitwise_or(img,imgCanvas)
-
- cv2.imshow("Image", img)
- cv2.waitKey(1)
【计数炫灯】
使用Pinpong库,连接micro:bit,控制LED灯随跳绳次数增加亮灯数。
|


 沪公网安备31011502402448
 置顶卡
置顶卡 变色卡
变色卡 千斤顶
千斤顶


 活跃会员
活跃会员
 宣传大使
宣传大使
 牛X认证
牛X认证
 创客造
创客造
 编辑选择奖
编辑选择奖
 志“童”道合
 编辑选择奖
编辑选择奖
 编辑选择奖
编辑选择奖
 编辑选择奖
编辑选择奖
 编辑选择奖
编辑选择奖


