|
本例实现将Firebeetle CAM 接入到HomeAssistant中,并通过舵机控制摄像头角度,定时或按需求获取摄像头画面,并将照片保存在SD卡中。
1.HA简介 HomeAssistant简称HA,是用于家庭自动化的免费开源软件,旨在成为智能家居设备的中央控制系统,是控制物联网由模块化集成组件支持的连接技术设备、软件、应用程序和服务,包括用于蓝牙、Zigbee和Z-Wave等无线通信协议的本机集成组件,通关专用API或MQTT等方式提供公共访问,以便通过局域网或互联网进行第三方集成,互联互通各家智能设备,如小米,涂鸦,YeeLight等,更是支持DIY智能硬件接入,联动整个智能生态。
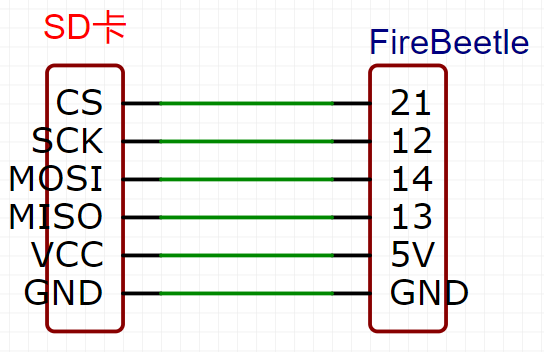
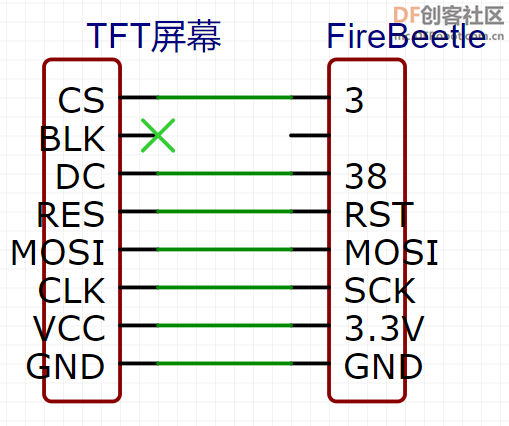
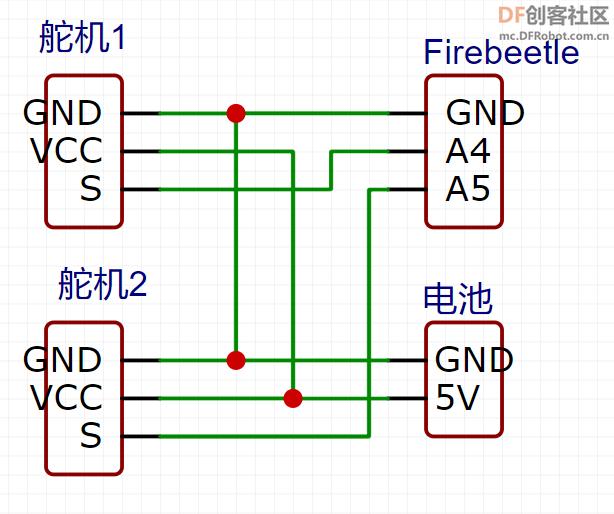
2.硬件连接 SD卡:注意SD卡模块供电是5V TFT屏幕: 舵机:注意舵机需要单独供电
3.本例用到 ArduinoHA库,TFT_eSPI显示库,JPEGDecoder解码库,ESPServo舵机库
4.代码部分
- #include <Arduino.h>
- #include <Wire.h>
- #include <SPI.h>
- #include <WiFi.h>
- #include <ArduinoHA.h>
- #include <PubSubClient.h>
- #include <pins_arduino.h>
- #include <FFat.h>
- #include <LittleFS.h>
- #include <SPIFFS.h>
- #include <SD.h>
- #include <EEPROM.h>
- #include "esp_camera.h"
- #include "DFRobot_AXP313A.h"
- #include <ESP32Servo.h>
- #include <pins_arduino.h>
- #include <JPEGDecoder.h>
- #include <TFT_eSPI.h>
- #define FIREBEETLE_S3_PSRAM
- #include "camera_pins.h"
-
- // mtqq 服务器地址
- #define BROKER_ADDR IPAddress(192, 168, 123, 209)
- // 推送和保存的时间间隔
- #define INTERVAL 20000
-
- DFRobot_AXP313A axp;
- WiFiClient client;
- HADevice device;
- HAMqtt mqtt(client, device);
- HACamera haCamera("myCamera");
- HAButton button("button");
- HANumber number1("NumberX", HANumber::PrecisionP0);
- HANumber number2("NumberY", HANumber::PrecisionP0);
-
- SPIClass sdspi;
- TFT_eSPI tft = TFT_eSPI();
-
- unsigned long lastPublishAt = 0;
- uint32_t pic_cnt;
- volatile bool takepic = false;
-
- const int servoXPin = A4, servoYPin = A5;
-
- Servo servoX;
- Servo servoY;
-
- void startCameraServer();
- void setupCamera();
- void setupWiFi(const char *ssid, const char *password);
- void publishCameraImage();
- void setupHA();
- void callback(const char *topic, const uint8_t *payload, uint16_t length);
- void writeFile(fs::FS &fs, const char *path, uint8_t *data, size_t len);
- void showTime(uint32_t msTime);
- void jpegInfo();
- void jpegRender(int xpos, int ypos);
- void drawSdJpeg(camera_fb_t *fb, int xpos, int ypos);
- void showTime(uint32_t msTime);
- void setupSD();
- void setupServo();
- void onNumberCommand(HANumeric number, HANumber *sender);
- void onButtonCommand(HAButton *sender);
-
- void setup()
- {
- Serial.begin(115200);
- while (!Serial)
- ;
- Serial.setDebugOutput(true);
- // 初始化tft屏幕
- tft.init();
- tft.setRotation(3);
- while (axp.begin() != 0)
- {
- Serial.println("init error");
- delay(1000);
- }
- // 设置摄像头供电
- axp.enableCameraPower(axp.eOV2640);
- // 初始化 Camera
- setupCamera();
- // 连接到wifi
- setupWiFi("ShuangYY", "334452000");
- // 配置HA
- setupHA();
- setupSD();
- EEPROM.begin(4);
- pic_cnt = EEPROM.readUInt(0);
- }
- void loop()
- {
- mqtt.loop();
- // 返回摄像头照片
- camera_fb_t *fb = esp_camera_fb_get();
- // 读取失败
- if (!fb)
- {
- return;
- }
- if (millis() - lastPublishAt > INTERVAL || takepic)
- {
- if (takepic == true)
- takepic = false;
- lastPublishAt = millis();
- publishCameraImage_and_take_photo(pic_cnt, fb);
- pic_cnt++;
- EEPROM.writeUInt(0, pic_cnt);
- }
- // 解码 JEGP 图片
- drawSdJpeg(fb, 0, 0);
- // 释放缓存
- esp_camera_fb_return(fb);
- }
- // 配置 摄像头
- void setupCamera()
- {
- camera_config_t config;
- config.ledc_channel = LEDC_CHANNEL_0;
- config.ledc_timer = LEDC_TIMER_0;
- config.pin_d0 = Y2_GPIO_NUM;
- config.pin_d1 = Y3_GPIO_NUM;
- config.pin_d2 = Y4_GPIO_NUM;
- config.pin_d3 = Y5_GPIO_NUM;
- config.pin_d4 = Y6_GPIO_NUM;
- config.pin_d5 = Y7_GPIO_NUM;
- config.pin_d6 = Y8_GPIO_NUM;
- config.pin_d7 = Y9_GPIO_NUM;
- config.pin_xclk = XCLK_GPIO_NUM;
- config.pin_pclk = PCLK_GPIO_NUM;
- config.pin_vsync = VSYNC_GPIO_NUM;
- config.pin_href = HREF_GPIO_NUM;
- config.pin_sccb_sda = SIOD_GPIO_NUM;
- config.pin_sccb_scl = SIOC_GPIO_NUM;
- config.pin_pwdn = PWDN_GPIO_NUM;
- config.pin_reset = RESET_GPIO_NUM;
- config.xclk_freq_hz = 20000000;
- config.frame_size = FRAMESIZE_HVGA;
- config.pixel_format = PIXFORMAT_JPEG; // for streaming
- // config.pixel_format = PIXFORMAT_RGB565; // for face detection/recognition
- config.grab_mode = CAMERA_GRAB_WHEN_EMPTY;
- config.fb_location = CAMERA_FB_IN_PSRAM;
- config.jpeg_quality = 12;
- config.fb_count = 1;
-
- if (psramFound())
- {
- config.jpeg_quality = 10;
- config.fb_count = 2;
- config.grab_mode = CAMERA_GRAB_LATEST;
- Serial.println("PSRAM 启用成功");
- }
- else
- {
- // Limit the frame size when PSRAM is not available
- config.frame_size = FRAMESIZE_SVGA;
- config.fb_location = CAMERA_FB_IN_DRAM;
- Serial.println("PSRAM 启用失败");
- }
- // camera init
- esp_err_t err = esp_camera_init(&config);
- if (err != ESP_OK)
- {
- Serial.printf("Camera init failed with error 0x%x", err);
- return;
- }
- }
- // 接入WiFi
- void setupWiFi(const char *ssid = "ShuangYY", const char *password = "334452000")
- {
- WiFi.begin(ssid, password);
- WiFi.setSleep(false);
- while (WiFi.status() != WL_CONNECTED)
- {
- delay(500);
- Serial.print(".");
- }
- Serial.println("");
- Serial.println("WiFi connected");
-
- startCameraServer();
-
- Serial.print("Camera Ready! Use 'http://");
- Serial.print(WiFi.localIP());
- Serial.println("' to connect");
- }
- // 推送数据到 mqtt 服务器,并保存到 SD 卡
- void publishCameraImage_and_take_photo(int n, camera_fb_t *fb)
- {
- // 将照片推送到HA
- haCamera.publishImage(fb->buf, fb->len);
- char filename[32];
- sprintf(filename, "/image%d.jpg", n);
- // 将照片写入到SD卡
- writeFile(SD, filename, fb->buf, fb->len);
- }
- // 配置HA的参数
- void setupHA()
- {
- byte mac[6];
- WiFi.macAddress(mac);
- device.setUniqueId(mac, sizeof(mac));
- // set device's details (optional)
- device.setName("FireBettle2-CAM");
- device.setSoftwareVersion("1.2.3");
- device.setManufacturer("DIY");
- // 摄像头
- haCamera.setIcon("mdi:cctv");
- haCamera.setName("FireBettle2");
-
- // 滑动条1
- number1.setIcon("mdi:alpha-x");
- number1.setName("X");
- number1.setMin(0); // can be float if precision is set via the constructor
- number1.setMax(180); // can be float if precision is set via the constructor
- number1.setStep(1); // minimum step: 0.001f
- number1.setMode(HANumber::ModeSlider);
- number1.setCurrentState(90);
- number1.onCommand(onNumberCommand);
- // 滑动条2
- number2.setIcon("mdi:alpha-y");
- number2.setName("Y");
- number2.setMin(0); // can be float if precision is set via the constructor
- number2.setMax(180); // can be float if precision is set via the constructor
- number2.setStep(1); // minimum step: 0.001f
- number2.setMode(HANumber::ModeSlider);
- number2.setCurrentState(90);
- number2.onCommand(onNumberCommand);
- // 拍照按钮
- button.setIcon("mdi:camera-iris");
- button.setName("拍照");
- button.onCommand(onButtonCommand);
-
- mqtt.begin(BROKER_ADDR, 1883, "ESP_CAM");
-
- setupServo();
- }
- // 将图像保存到 SD 卡
- void writeFile(fs::FS &fs, const char *path, uint8_t *data, size_t len)
- {
- File file = fs.open(path, FILE_WRITE);
- if (!file)
- {
- return;
- }
- file.write(data, len);
- file.close();
- }
- // 从 fb 绘制图片到 TFT 屏幕
- // xpos, ypos 是左上角位置
- void drawSdJpeg(camera_fb_t *fb, int xpos, int ypos)
- {
- // 使用以下方法初始化解码器
- bool decoded = JpegDec.decodeArray(fb->buf, fb->len);
- // 解码成功
- if (decoded)
- {
- // 将图片渲染到指定位置
- jpegRender(xpos, ypos);
- }
- else
- {
- Serial.println("Jpeg file format not supported!");
- }
- }
- // 在 TFT 上绘制 JPEG 图像,如果图像不适合,图像将在右侧/底部被裁剪
- void jpegRender(int xpos, int ypos)
- {
-
- uint16_t *pImg;
- uint16_t mcu_w = JpegDec.MCUWidth;
- uint16_t mcu_h = JpegDec.MCUHeight;
- uint32_t max_x = JpegDec.width;
- uint32_t max_y = JpegDec.height;
-
- bool swapBytes = tft.getSwapBytes();
- tft.setSwapBytes(true);
-
- // Jpeg 图像被绘制为一组图块,称为最小编码单元,通常是 16x16 像素块
- // 确定右边缘和下边缘图像块的宽度和高度
- uint32_t min_w = jpg_min(mcu_w, max_x % mcu_w);
- uint32_t min_h = jpg_min(mcu_h, max_y % mcu_h);
-
- // 保存当前图像块大小
- uint32_t win_w = mcu_w;
- uint32_t win_h = mcu_h;
-
- uint32_t drawTime = millis();
- // 保存右侧和底部边缘的坐标,以帮助将图像裁剪为屏幕尺寸
- max_x += xpos;
- max_y += ypos;
-
- // 从文件中获取数据,解码并显示
- while (JpegDec.read())
- { // While there is more data in the file
- pImg = JpegDec.pImage; // 解码 MCU(最小编码单元,通常是 8x8 或 16x16 像素块)
-
- // 计算当前MCU左上角坐标
- int mcu_x = JpegDec.MCUx * mcu_w + xpos;
- int mcu_y = JpegDec.MCUy * mcu_h + ypos;
-
- // 检查右边缘是否需要更改图像块大小
- if (mcu_x + mcu_w <= max_x)
- win_w = mcu_w;
- else
- win_w = min_w;
-
- // 检查底部边缘的图像块大小是否需要更改
- if (mcu_y + mcu_h <= max_y)
- win_h = mcu_h;
- else
- win_h = min_h;
-
- // 将像素复制到连续块中
- if (win_w != mcu_w)
- {
- uint16_t *cImg;
- int p = 0;
- cImg = pImg + win_w;
- for (int h = 1; h < win_h; h++)
- {
- p += mcu_w;
- for (int w = 0; w < win_w; w++)
- {
- *cImg = *(pImg + w + p);
- cImg++;
- }
- }
- }
-
- // 计算必须绘制多少个像素
- uint32_t mcu_pixels = win_w * win_h;
- // 仅在适合屏幕的情况下绘制图像 MCU 块
- if ((mcu_x + win_w) <= tft.width() && (mcu_y + win_h) <= tft.height())
- tft.pushImage(mcu_x, mcu_y, win_w, win_h, pImg);
- else if ((mcu_y + win_h) >= tft.height())
- // 图像已超出屏幕底部,因此中止解码
- JpegDec.abort(); //
- }
-
- tft.setSwapBytes(swapBytes);
- // showTime(millis() - drawTime);
- }
- // 打印图片信息
- // 在 JpegDec.decodeFile(...) 或 JpegDec.decodeArray(...) 之后调用
- void jpegInfo()
- {
- // Print information extracted from the JPEG file
- Serial.println("JPEG image info");
- Serial.println("===============");
- Serial.print("Width :");
- Serial.println(JpegDec.width);
- Serial.print("Height :");
- Serial.println(JpegDec.height);
- Serial.print("Components :");
- Serial.println(JpegDec.comps);
- Serial.print("MCU / row :");
- Serial.println(JpegDec.MCUSPerRow);
- Serial.print("MCU / col :");
- Serial.println(JpegDec.MCUSPerCol);
- Serial.print("Scan type :");
- Serial.println(JpegDec.scanType);
- Serial.print("MCU width :");
- Serial.println(JpegDec.MCUWidth);
- Serial.print("MCU height :");
- Serial.println(JpegDec.MCUHeight);
- Serial.println("===============");
- Serial.println("");
- }
- void showTime(uint32_t msTime)
- {
- // tft.setCursor(0, 0);
- // tft.setTextFont(1);
- // tft.setTextSize(2);
- // tft.setTextColor(TFT_WHITE, TFT_BLACK);
- // tft.print(F(" JPEG drawn in "));
- // tft.print(msTime);
- // tft.println(F(" ms "));
- Serial.print(F(" JPEG drawn in "));
- Serial.print(msTime);
- Serial.println(F(" ms "));
- }
- void setupSD()
- {
- // 初始化 SD 卡使用的SPI总线
- sdspi.begin(12, 14, 13, 21);
- // 初始化 SD 卡
- if (!SD.begin(21, sdspi))
- {
- Serial.println("SD 卡初始化失败");
- return;
- }
- Serial.println("SD 卡初始化成功");
- }
- // 设置舵机
- void setupServo()
- {
- ESP32PWM::allocateTimer(0);
- servoX.setPeriodHertz(50);
- servoX.attach(servoXPin, 500, 2400);
- servoY.setPeriodHertz(50);
- servoY.attach(servoYPin, 500, 2400);
- }
- // 滑动条回调,控制舵机转动
- void onNumberCommand(HANumeric number, HANumber *sender)
- {
- if (number.isSet())
- {
- if (sender == &number1)
- {
- char num[10] = {0};
- number.toStr(num);
- servoX.write(atoi(num));
- Serial.print("X:");
- Serial.println(atoi(num));
- }
- else if (sender == &number2)
- {
- char num[10] = {0};
- number.toStr(num);
- servoY.write(180 - atoi(num));
- Serial.print("Y:");
- Serial.println(180 - atoi(num));
- }
- }
-
- sender->setState(number); // report the selected option back to the HA panel
- }
- // 按钮回调
- void onButtonCommand(HAButton *sender)
- {
- if (sender == &button)
- {
- takepic = true;
- }
- }
将ESP32接入HA的方式非常多,比如ESPhome,Tasmota,ESPEasy。本示例采用一个HA专用库文件ArduinoHA;为SD卡单独使用了一个SPI通道,避免与摄像头冲突;使用EERPOM记录图片的数量;添加TFT 屏幕显示,以便观察图像,由于HA需要接受JPEG图像格式,显示时需要对JPEG格式解码,但解码效率不理想,每个480×320的画面解码在800ms左右,画面卡顿严重。
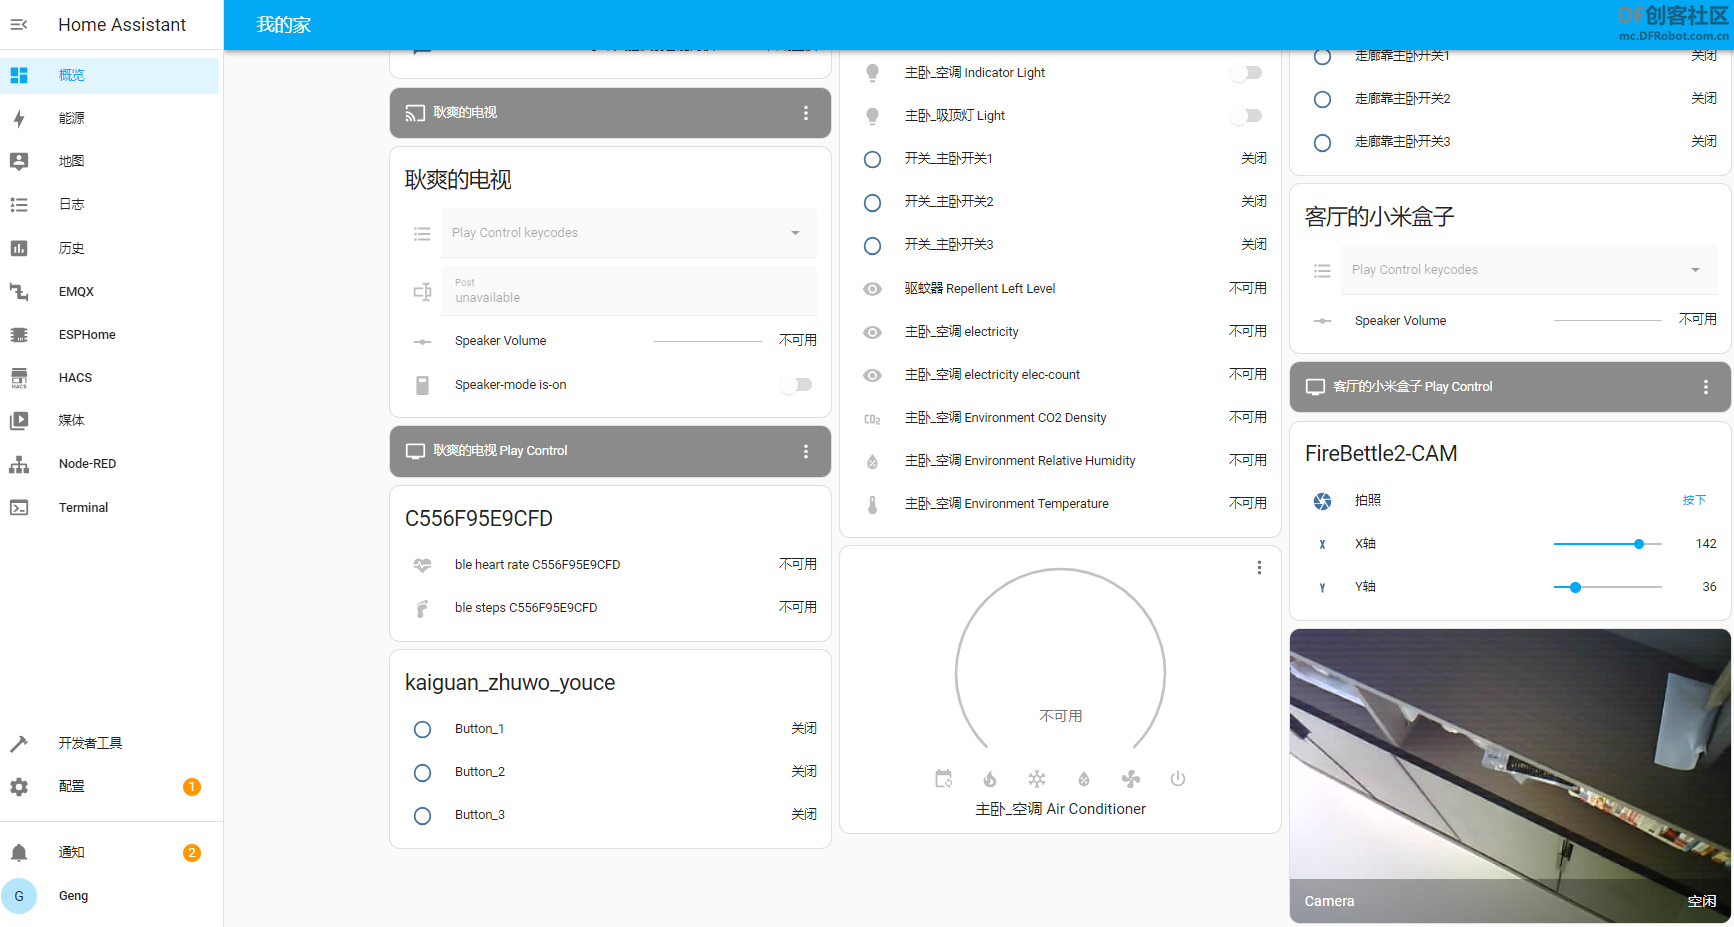
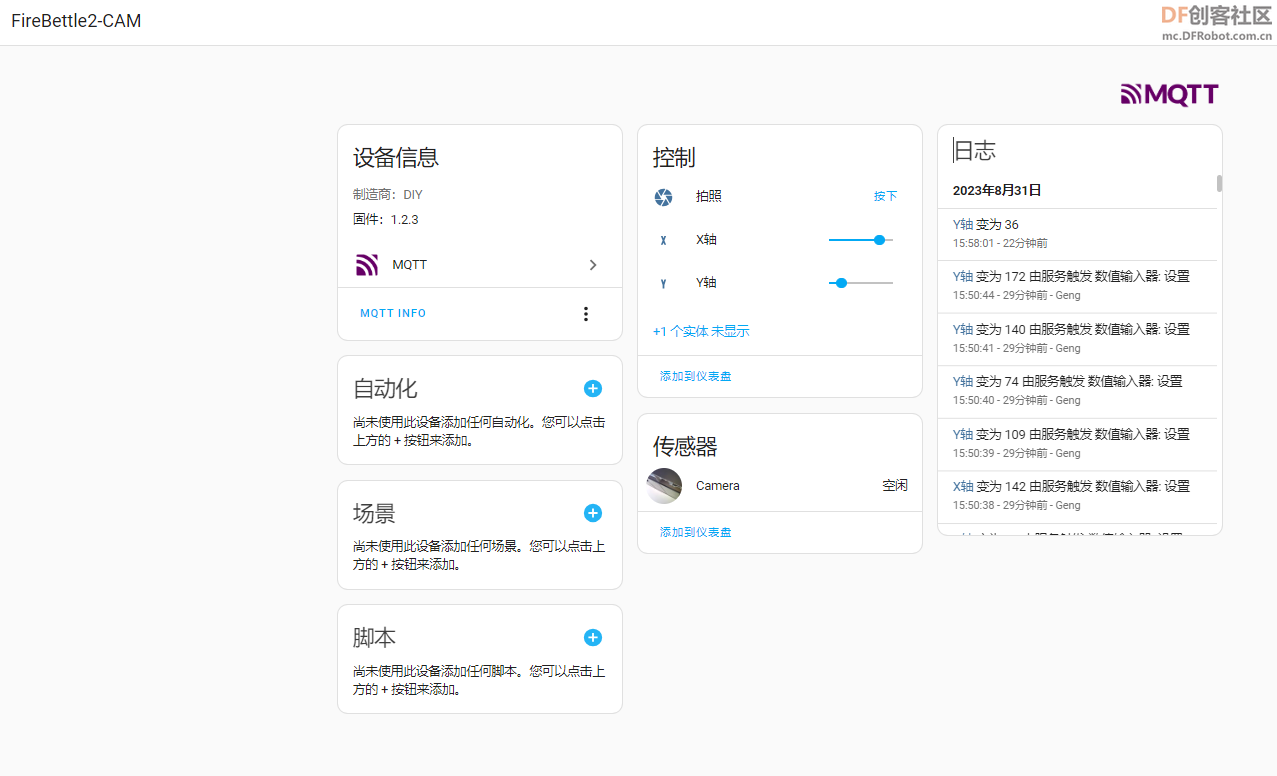
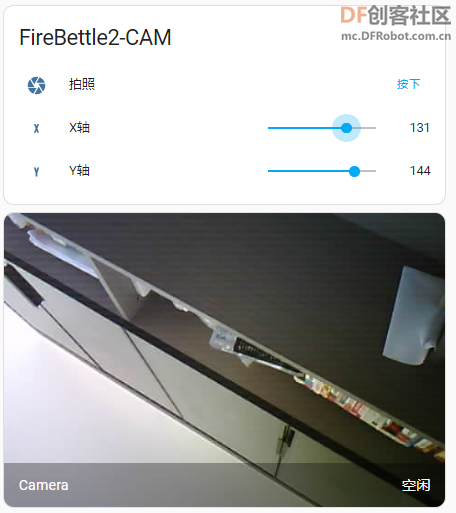
5.HA效果展示 HA支持设备自动发现,程序上传后,概览中可以Firebeetle CAM 设备。 配置界面,可以简单测试 点击拍照可以立刻拍摄一张照片,刷新后显示在窗口,并保存照片在SD卡中;拖动X轴,Y轴滑动条可控制舵机转动,调整摄像头方向。
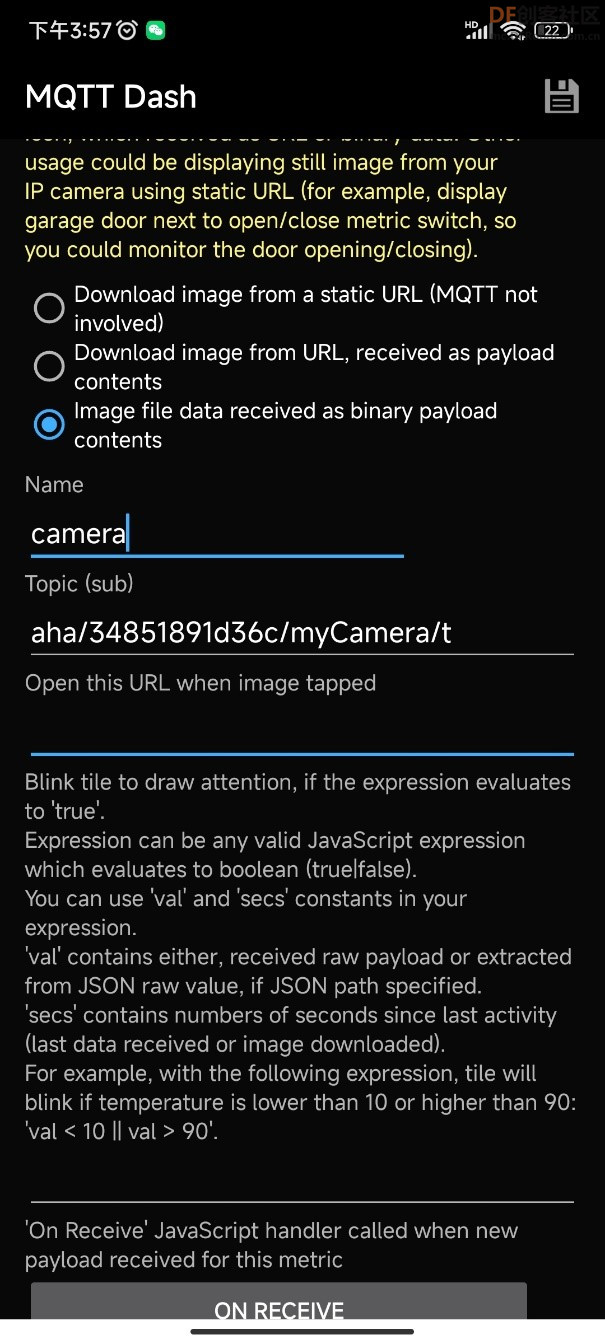
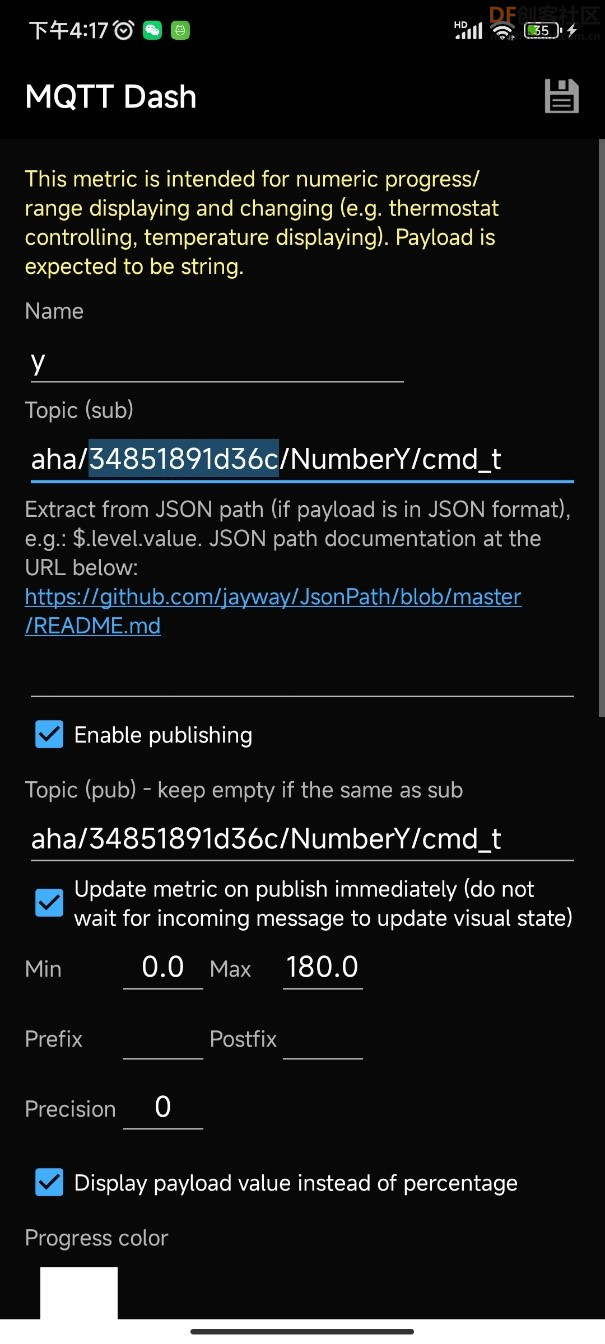
6.无HA的玩法 设备与HA交互的方式是MQTT协议,只需要订阅主题就能脱离HA查看和控制。 - aha/34851891d36c/myCamera/t
Camera主题只需订阅即可 - aha/34851891d36c/NumberY/cmd_t
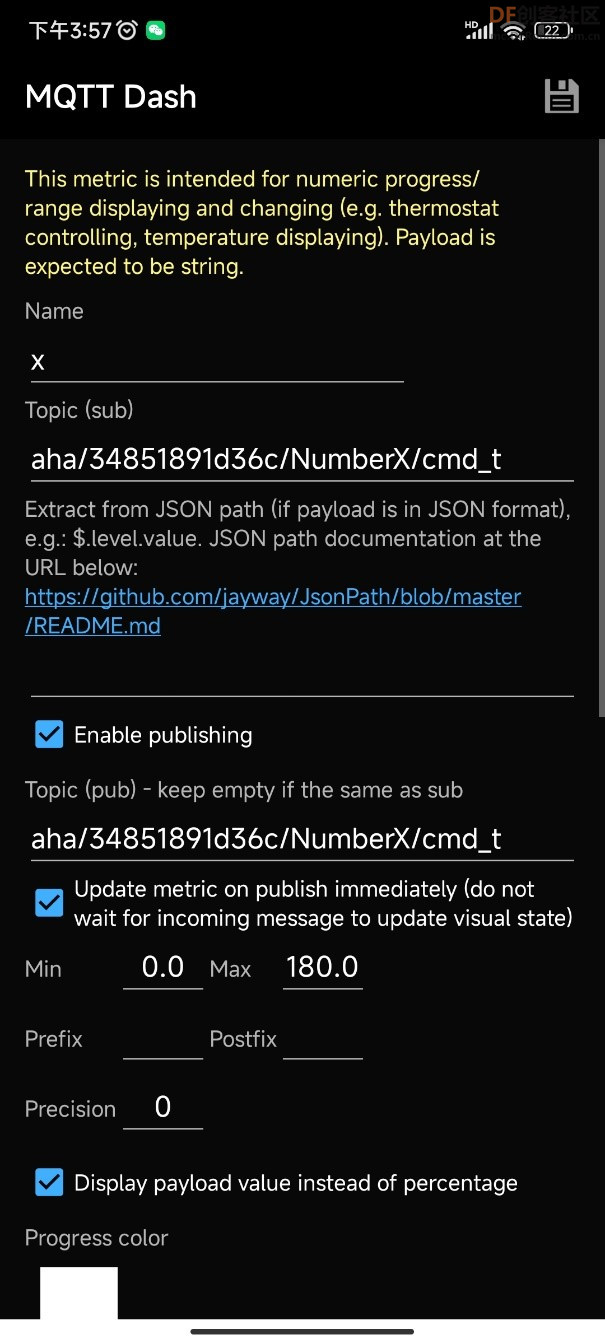
- aha/34851891d36c/NumberX/cmd_t
- aha/34851891d36c/button/cmd_t
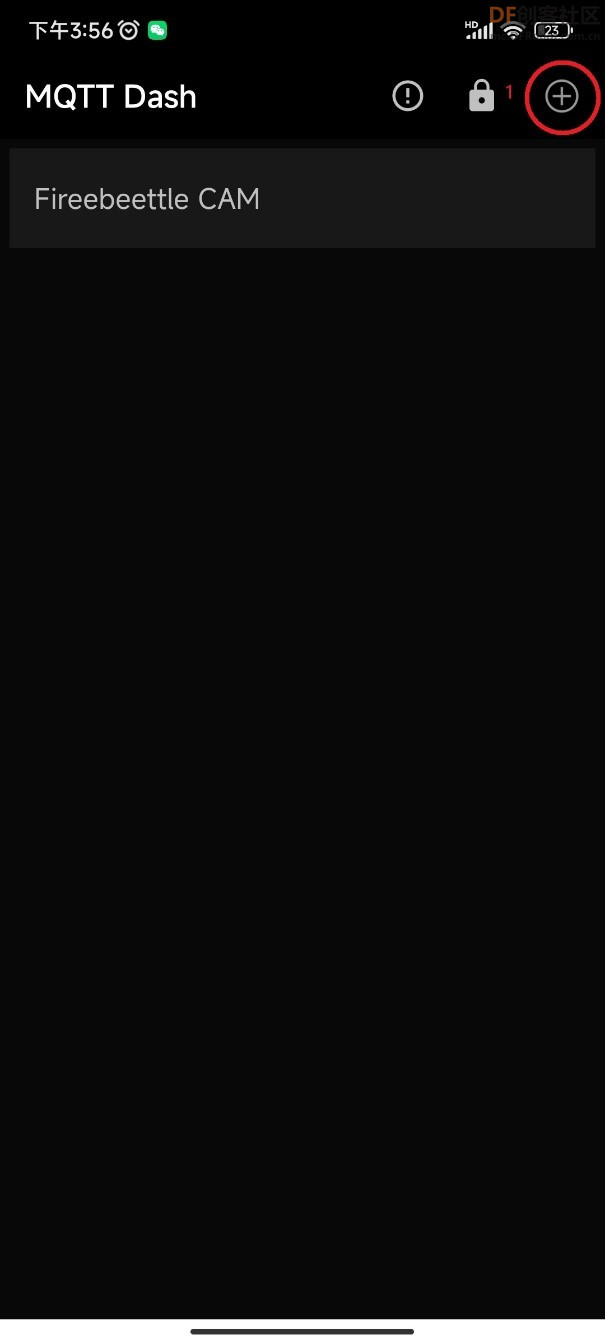
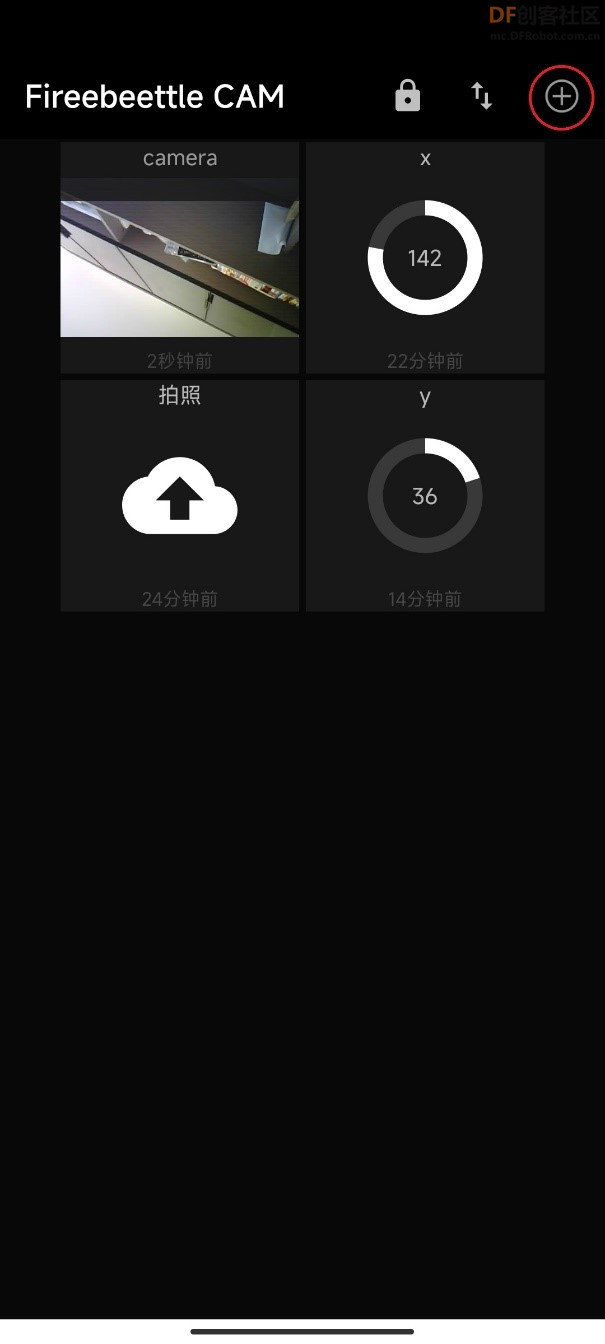
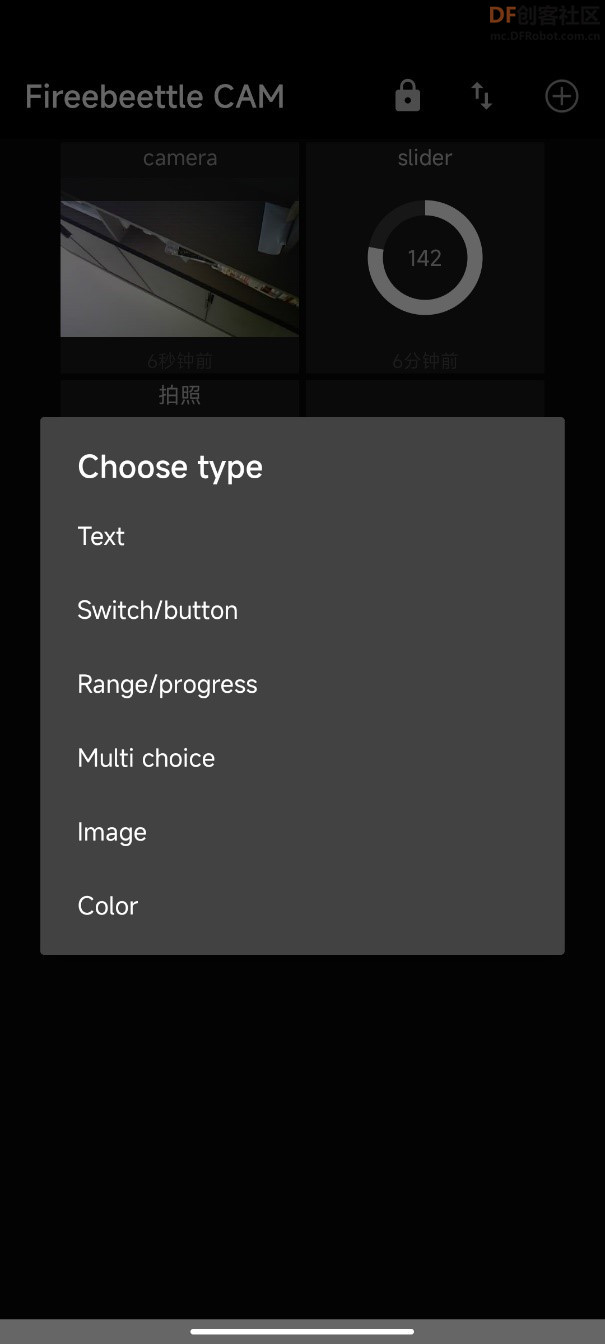
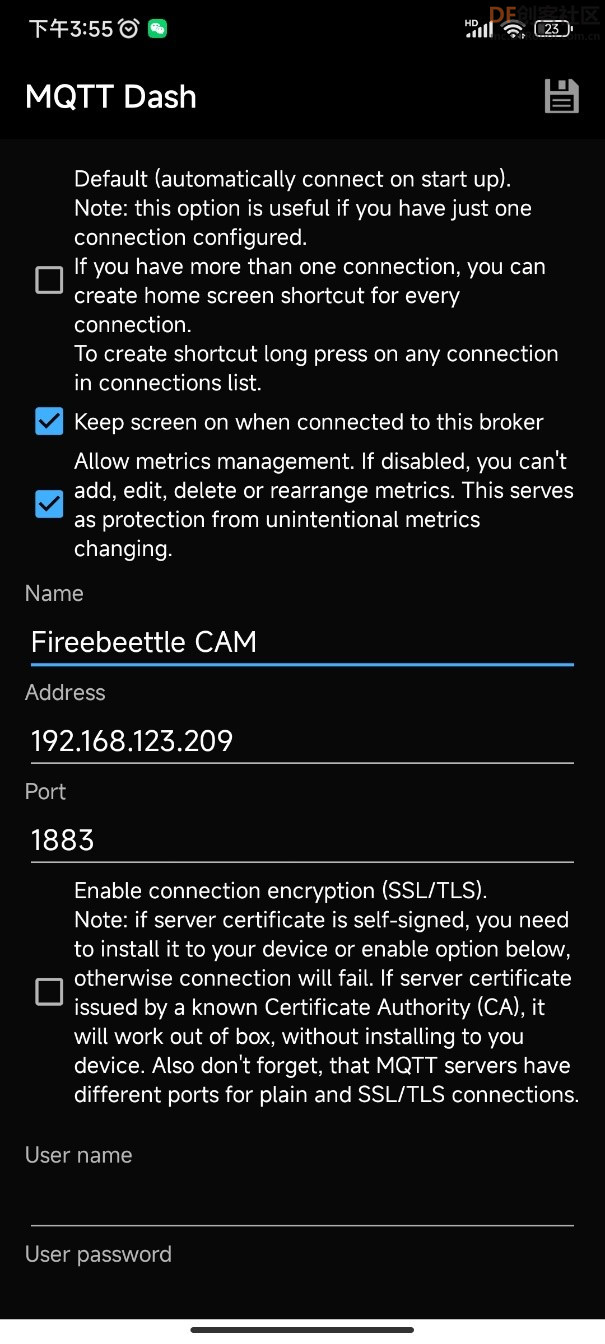
其他主题需要订阅和发布,其中的 34851891d36c 是生成的,每个设备不一样。 安装安卓端mqtt软件MQTT Dash,并作如下配置。 启动软件后,点击右上角加号,添加名称和mqtt服务器地址,保存。 进入创建的Firebeetle条目,点击右上角加号,创建组件,选择Image,订阅topic
保存后退出,如此添加button用于拍照,slider用于控制舵机角度。 添加完成,连接到mqtt服务器即可查看照片和控制舵机。
| 


 沪公网安备31011502402448
 置顶卡
置顶卡 变色卡
变色卡 千斤顶
千斤顶


