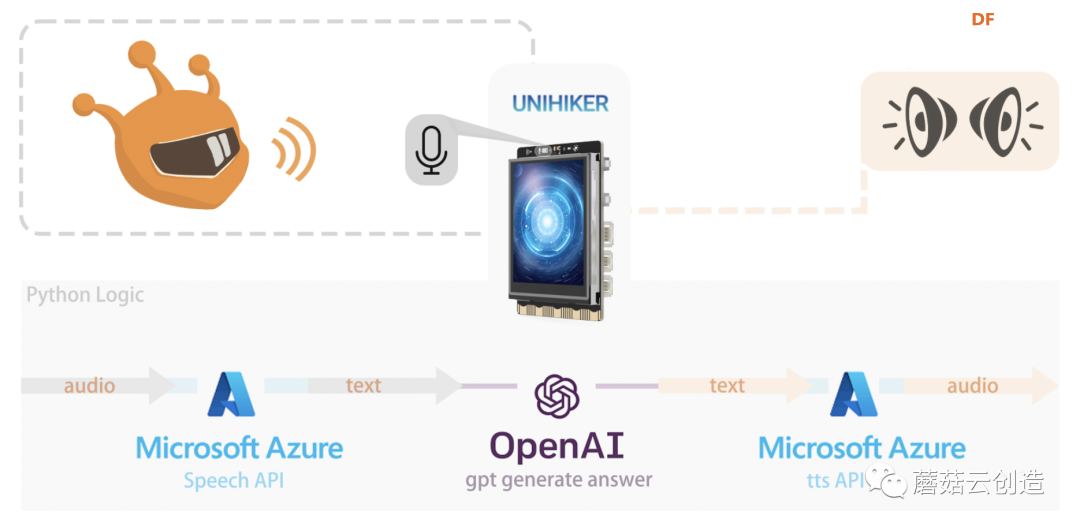
最近做了一个项目,使用 OpenAI 的GPT(生成式预训练变压器)技术和Azure语音API构建AI桌面助手。OpenAI GPT是一种尖端的自然语言处理模型,可以理解并生成类似人类的文本,从而简化与计算机的通信。再加上Azure Speech API的语音识别功能。
该项目的灵感来自于11月8日发生的科技行业标志性事件——OpenAI 开发者大会会议。会议期间,OpenAI展示了跨模态交互,并介绍了GPT商店(GPTs),这是一系列基于GPT技术的应用程序集合,每个应用程序都在各自的领域提供专家级的服务。跨模态交互和GPT商店的引入为我的AI桌面助手项目开辟了一种新方法,使其能够利用自然语言处理和语音交互来执行更复杂的任务。
为了实现这个项目,我选择了 Unihiker 来实现它的硬件。该设备具有内置触摸屏、Wi-Fi、蓝牙以及用于光、运动和陀螺仪测量的传感器。其协处理器非常适合与外部传感器和执行器交互,并且提供的 Python 库显着简化了设备控制。下面我将介绍这款集成了Microsoft Azure和OpenAI GPT的AI桌面助手的开发过程,并分享一种仅使用OpenAI API创建智能语音桌面代理的替代方法。
项目代码文件可以从github下载:https://github.com/zzzqww/DFRobot/tree/main/Unihiker%2BGPT
第一部分:准备硬件
1. 硬件
对于我们的小型化桌面产品的硬件集成,我选择了10cm的电源延长线,以便于充电口的设计更加合理。同时,我们将功放与双声道扬声器相结合,在小尺寸的情况下也能保证高品质的声音播放。
放大器的连接接口需要直接焊接到Unihiker上的焊点上,如下图所示。
硬件清单:
- 行空板 X1
- 3W迷你音频立体声放大器 X1
- 扬声器 X2
- Type-C延长线 X1
2、模型打印
3D 打印文件链接:https://www.thingiverse.com/thing:6307018
在设计上,我的模型将电源端口与品牌IP的形状融为一体,其中“顶部的圆圈”是一个圆形。用作电源按钮。
在安装过程中,为了最大化内部空间,需要特定的组装顺序。将扬声器固定到位后,应将其从顶部提起,以便将 Unihiker 从底部插入。一旦Unihiker固定在屏幕固定位置,即可将声卡推入,完成成功安装。
第二部分:软件编程
第一种方法:GPT&天蓝色
为了实现这个功能,我们需要结合多个库和API来进行语音识别、文本转语音以及与GPT模型的交互。
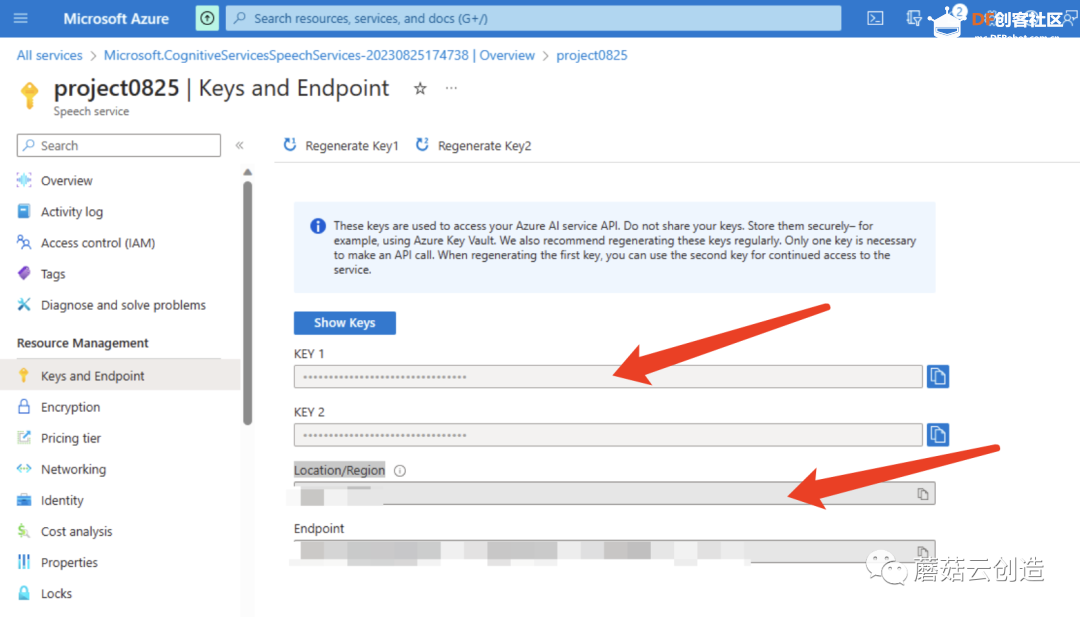
首先我们需要注册 azure 和 openai,以确保“azure.speech_key”和“openai.api_key”可以使用。
如何注册 Azure 并获取 API 密钥,请查看此教程:https://community.dfrobot.com/makelog-313501.html
如何查找openai的api密钥,请查看此链接:< i=3>https://help.openai.com/en/artic ... o-i-find-my-api-key
注册完这两个平台的API后,检查Azure的“speech_key”和“service_region”以及OpenAI的“openai.api_key”。这两个设置稍后会用到。
拿到API后,开始编写python程序。
这些功能都是基于网络接口的,所以Unihiker行空板需要先连接网络。如何连接unihiker进行编程,请查看》:https://www .unihiker.com/wiki/connection
1.导入库和模块
- unihiker.Audio:提供音频相关功能。
- unihiker.GUI:创建图形用户界面 (GUI)。
- openai :用于与 OpenAI 模型交互。
- time:提供时间相关的功能。
- os:提供操作系统相关的功能。
- azure.cognitiveservices.speech.SpeechConfig:提供语音相关功能。
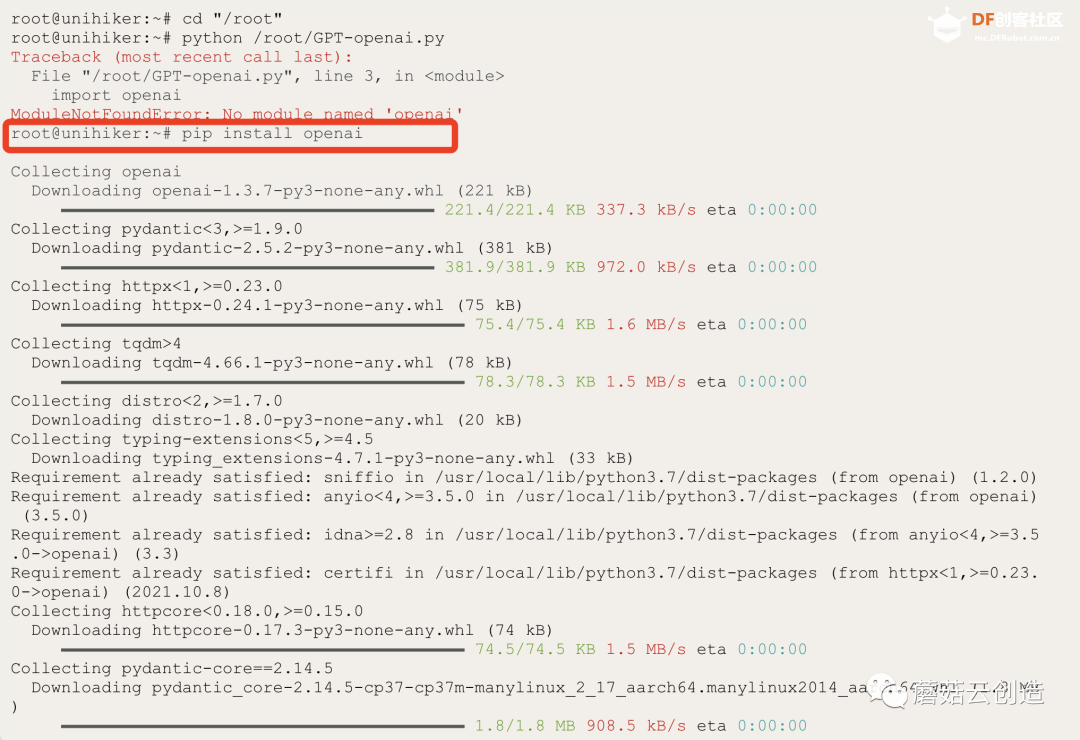
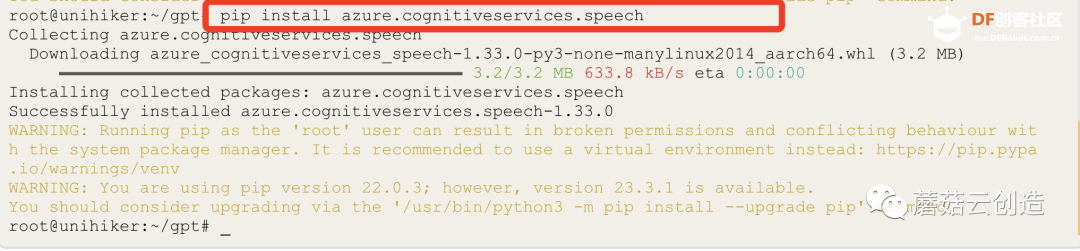
上传代码前,请确保Unihiker上已安装OpenAI库。输入“pip install openai”;和“pip install azure.cognitiveservices.speech”在终端中一一进行,等待安装成功完成,如下图所示。
代码:
- <font face="微软雅黑">
- from unihiker import Audio
- from unihiker import GUI
- import openai
- import time
- import os
- from azure.cognitiveservices.speech import SpeechConfig</font>
2. 设置按键和区域:
使用您的密钥和位置/区域创建实例。
- voice_key:指定 Azure 语音服务的密钥。
- service_region:指定Azure 语音服务的区域/位置。
代码:
- <font face="微软雅黑">
- speech_key = "xxxxx" # Fill key
- service_region = "xxx" # Enter Location/Region</font>
3. 设置 OpenAI API 密钥:
- openai.api_key:设置与 OpenAI GPT 模型交互的 API 密钥。
代码:
- <font face="微软雅黑">
- openai.api_key = "xxxxxxxxxxx" #input OpenAI api key</font>
4.导入Azure语音SDK:
- 代码尝试导入天蓝色。gnitiveservices.speech 模块并在导入失败时打印错误消息。
代码:
- <font face="微软雅黑"> try:
- import azure.cognitiveservices.speech as speechsdk
- except ImportError:
-
- print("""
- Importing the Speech SDK for Python failed.
- Refer to
- https://docs.microsoft.com/azure/cognitive-services/speech-service/quickstart-python for
- installation instructions.
- """)
- import sys
- sys.exit(1)</font>
5.功能:识别默认麦克风的语音
· 使用默认麦克风合成语音
· recognize_once_async:
以非阻塞(异步)模式进行识别。这将识别单个话语。单个话语的结束是通过监听末尾的静音或直到处理最多 15 秒的音频来确定的。
代码:- <font face="微软雅黑"># speech to text
- def recognize_from_microphone():
- # This example requires environment variables named "SPEECH_KEY" and "SPEECH_REGION"
- audio_config = speechsdk.audio.AudioConfig(use_default_microphone=True)
- speech_recognizer = speechsdk.SpeechRecognizer(speech_config=speech_config, audio_config=audio_config)
- speech_recognition_result = speech_recognizer.recognize_once_async().get()
-
- # Exception reminder
- if speech_recognition_result.reason == speechsdk.ResultReason.RecognizedSpeech:
- return speech_recognition_result.text
- elif speech_recognition_result.reason == speechsdk.ResultReason.NoMatch:
- print("No speech could be recognized: {}".format(speech_recognition_result.no_match_details))
- elif speech_recognition_result.reason == speechsdk.ResultReason.Canceled:
- cancellation_details = speech_recognition_result.cancellation_details
- print("Speech Recognition canceled: {}".format(cancellation_details.reason))
- if cancellation_details.reason == speechsdk.CancellationReason.Error:
- print("Error details: {}".format(cancellation_details.error_details))
- print("Did you set the speech resource key and region values?")</font>
6. tts(text):使用Azure Speech SDK将文本转换为语音。
· 使用默认扬声器播放语音
代码:
- <font face="微软雅黑"># text to speech
- def tts(text):
- speech_config.set_property(property_id=speechsdk.PropertyId.SpeechServiceResponse_RequestSentenceBoundary, value='true')
- audio_config = speechsdk.audio.AudioOutputConfig(use_default_speaker=True)
- speech_synthesizer = speechsdk.SpeechSynthesizer(speech_config=speech_config, audio_config=audio_config)
- speech_synthesizer.synthesis_word_boundary.connect(speech_synthesizer_word_boundary_cb)
- speech_synthesis_result = speech_synthesizer.speak_text_async(text).get()</font>
7.speech_synthesizer_word_boundary_cb(evt):
处理语音合成过程中单词边界的回调函数。达到单词依次出现的效果。
代码:
- <font face="微软雅黑"> # display text one by one
- def speech_synthesizer_word_boundary_cb(evt: speechsdk.SessionEventArgs):
- global text_display
-
- if not (evt.boundary_type == speechsdk.SpeechSynthesisBoundaryType.Sentence):
- text_result = evt.text
- text_display = text_display + " " + text_result
- trans.config(text = text_display)
-
- if evt.text == ".":
- text_display = ""</font>
8.askOpenAI(question):向OpenAI GPT模型发送问题并返回生成的答案。(可以选择其他版本的gpt型号)
代码:
- <font face="微软雅黑">
- # openai
- def askOpenAI(question):
- completion = openai.ChatCompletion.create(
- model="gpt-3.5-turbo",
- messages = question
- )
- return completion['choices'][0]['message']['content']</font>
9.事件回调函数:
-button_click1():将flag变量设置为1。
-button_click2():将flag变量设置为3。
代码:
- <font face="微软雅黑">
- def button_click1():
- global flag
- flag = 1
-
- def button_click2():
- global flag
- flag = 3</font>
10.语音服务配置:
- voice_config:使用提供的语音键、区域、语言和语音设置配置 Azure 语音 SDK。
- 图形用户界面初始化:
- 语音服务中的文本转语音功能支持 400 多种语音和 140 多种语言及其变体。您可以获取完整列表或在语音库中尝试 (
https://learn.microsoft.com/en-us/azure/ai-services/speech-service/language-support?tabs=tts)。
代码:
- <font face="微软雅黑">
- # speech service configuration
- speech_config = speechsdk.SpeechConfig(subscription=speech_key, region=service_region)
- speech_config.speech_synthesis_language = 'en-US'
- speech_config.speech_synthesis_voice_name = "en-US-JennyNeural"</font>
(语音按优先级顺序确定,如下:
- 如果未设置 SpeechSynthesisVoiceName 或 SpeechSynthesisLanguage,则默认声音为 en-US。
- 如果仅设置了 SpeechSynthesisLanguage,则朗读指定语言环境的默认语音。
- 如果同时设置了 SpeechSynthesisVoiceName 和 SpeechSynthesisLanguage,则 SpeechSynthesisLanguage 会忽略此设置。您将使用 SpeechSynthesisVoiceName 指定的语音进行朗读.
- 如果您使用语音合成标记语言 (SSML) 设置语音元素,则 SpeechSynthesisVoiceName 和 SpeechSynthesisLanguage 设置将被忽略。)
11.初始化 GUI 和音频对象:
- u_gui:从 unihiker 库创建 GUI 类的实例。
- u_audio:从 unihiker 库创建 Audio 类的实例unihiker 库。
- 创建和配置各种 GUI 元素,例如图像、按钮和文本。
- 屏幕分辨率为 240x320,因此 unihiker 库分辨率为也是 240x320。坐标原点为屏幕左上角,x轴正方向向右,y轴正方向向下。坐标原点为屏幕左上角,x轴正方向向右,y轴正方向向下。一个>
代码:
- <font face="微软雅黑">u_gui=GUI()
- u_audio = Audio()
-
- # GUI initialization
- img1=u_gui.draw_image(image="background.jpg",x=0,y=0,w=240)
- button=u_gui.draw_image(image="mic.jpg",x=13,y=240,h=60,onclick=button_click1)
- refresh=u_gui.draw_image(image="refresh.jpg",x=157,y=240,h=60,onclick=button_click2)
- init=u_gui.draw_text(text="Tap to speak",x=27,y=50,font_size=15, color="#00CCCC")
- trans=u_gui.draw_text(text="",x=2,y=0,font_size=12, color="#000000")
- trans.config(w=230)
- result = ""
- flag = 0
- text_display = ""
-
- message = [{"role": "system", "content": "You are a helpful assistant."}]
- user = {"role": "user", "content": ""}
- assistant = {"role": "assistant", "content": ""}</font>
12.主循环:代码进入无限循环,不断检查flag变量的值,并根据其值执行相应的操作。
当flag为0时,GUI按钮启用。当flag为3时,消息列表被清空,并添加系统消息。当flag为2时,代码通过发送消息列表并生成响应来与OpenAI模型交互。然后将响应合成为语音。
当标志为 1 时,代码侦听来自麦克风的语音输入,将用户的消息添加到消息列表,并使用识别的文本更新 GUI。
代码:
- <font face="微软雅黑">
- while True:
- if (flag == 0):
- button.config(image="mic.jpg",state="normal")
- refresh.config(image="refresh.jpg",state="normal")
-
-
- if (flag == 3):
- message.clear()
- message = [{"role": "system", "content": "You are a helpful assistant."}]
-
- if (flag == 2):
- azure_synthesis_result = askOpenAI(message)
- assistant["content"] = azure_synthesis_result
- message.append(assistant.copy())
-
- tts(azure_synthesis_result)
- time.sleep(1)
-
-
- flag = 0
- trans.config(text=" ")
- button.config(image="",state="normal")
- refresh.config(image="",state="normal")
- init.config(x=15)
-
- if (flag == 1):
- init.config(x=600)
- trans .config(text="Listening。。。")
- button.config(image="",state="disable")
- refresh.config(image="",state="disable")
- result = recognize_from_microphone()
- user["content"] = result
- message.append(user.copy())
- trans .config(text=result)
- time.sleep(2)
- trans .config(text="Thinking。。。")
- flag = 2</font>
第一种方法中的完整代码:GPT &天蓝色
代码:
- <font face="微软雅黑"> from unihiker import Audio
- from unihiker import GUI
- import openai
- import time
- import os
- from azure.cognitiveservices.speech import SpeechConfig
-
- speech_key = "xxxxxxxxx" # Fill key
- service_region = "xxxxx" # Enter Location/Region
-
- openai.api_key = "xxxxxxxxxx" # inputOpenAI api key
-
- try:
- import azure.cognitiveservices.speech as speechsdk
- except ImportError:
-
-
- print("""
- Importing the Speech SDK for Python failed.
- Refer to
- https://docs.microsoft.com/azure/cognitive-services/speech-service/quickstart-python for
- installation instructions.
- """)
- import sys
- sys.exit(1)
-
-
- # Set up the subscription info for the Speech Service:
- # Replace with your own subscription key and service region (e.g., "japaneast").
-
-
- # speech to text
- def recognize_from_microphone():
- # This example requires environment variables named "SPEECH_KEY" and "SPEECH_REGION"
- audio_config = speechsdk.audio.AudioConfig(use_default_microphone=True)
- speech_recognizer = speechsdk.SpeechRecognizer(speech_config=speech_config, audio_config=audio_config)
- speech_recognition_result = speech_recognizer.recognize_once_async().get()
-
- # Exception reminder
- if speech_recognition_result.reason == speechsdk.ResultReason.RecognizedSpeech:
- # print("Recognized: {}".format(speech_recognition_result.text))
- return speech_recognition_result.text
- elif speech_recognition_result.reason == speechsdk.ResultReason.NoMatch:
- print("No speech could be recognized: {}".format(speech_recognition_result.no_match_details))
- elif speech_recognition_result.reason == speechsdk.ResultReason.Canceled:
- cancellation_details = speech_recognition_result.cancellation_details
- print("Speech Recognition canceled: {}".format(cancellation_details.reason))
- if cancellation_details.reason == speechsdk.CancellationReason.Error:
- print("Error details: {}".format(cancellation_details.error_details))
- print("Did you set the speech resource key and region values?")
-
- # text to speech
- def tts(text):
- speech_config.set_property(property_id=speechsdk.PropertyId.SpeechServiceResponse_RequestSentenceBoundary, value='true')
- audio_config = speechsdk.audio.AudioOutputConfig(use_default_speaker=True)
- speech_synthesizer = speechsdk.SpeechSynthesizer(speech_config=speech_config, audio_config=audio_config)
- speech_synthesizer.synthesis_word_boundary.connect(speech_synthesizer_word_boundary_cb)
- speech_synthesis_result = speech_synthesizer.speak_text_async(text).get()
-
-
- # display text one by one
- def speech_synthesizer_word_boundary_cb(evt: speechsdk.SessionEventArgs):
- global text_display
-
- if not (evt.boundary_type == speechsdk.SpeechSynthesisBoundaryType.Sentence):
- text_result = evt.text
- text_display = text_display + " " + text_result
- trans.config(text = text_display)
-
- if evt.text == ".":
- text_display = ""
-
-
-
- # openai
- def askOpenAI(question):
- completion = openai.ChatCompletion.create(
- model="gpt-3.5-turbo",
- messages = question
- )
- return completion['choices'][0]['message']['content']
-
-
-
- # speech service configuration
- def button_click1():
- global flag
- flag = 1
-
-
- def button_click2():
- global flag
- flag = 3
-
-
- u_gui=GUI()
- u_audio = Audio()
-
-
- # speech service configuration
- speech_config = speechsdk.SpeechConfig(subscription=speech_key, region=service_region)
- speech_config.speech_synthesis_language = 'en-US'
- speech_config.speech_synthesis_voice_name = "en-US-JennyNeural"
-
- # GUI initialization
- img1=u_gui.draw_image(image="background.jpg",x=0,y=0,w=240)
- button=u_gui.draw_image(image="mic.jpg",x=13,y=240,h=60,onclick=button_click1)
- refresh=u_gui.draw_image(image="refresh.jpg",x=157,y=240,h=60,onclick=button_click2)
- init=u_gui.draw_text(text="Tap to speak",x=27,y=50,font_size=15, color="#00CCCC")
- trans=u_gui.draw_text(text="",x=2,y=0,font_size=12, color="#000000")
- trans.config(w=230)
- result = ""
- flag = 0
- text_display = ""
-
- message = [{"role": "system", "content": "You are a helpful assistant."}]
- user = {"role": "user", "content": ""}
- assistant = {"role": "assistant", "content": ""}
-
- while True:
- if (flag == 0):
- button.config(image="mic.jpg",state="normal")
- refresh.config(image="refresh.jpg",state="normal")
-
-
- if (flag == 3):
- message.clear()
- message = [{"role": "system", "content": "You are a helpful assistant."}]
-
- if (flag == 2):
- azure_synthesis_result = askOpenAI(message)
- assistant["content"] = azure_synthesis_result
- message.append(assistant.copy())
-
- tts(azure_synthesis_result)
- time.sleep(1)
-
-
- flag = 0
- trans.config(text=" ")
- button.config(image="",state="normal")
- refresh.config(image="",state="normal")
- init.config(x=15)
-
- if (flag == 1):
- init.config(x=600)
- trans .config(text="Listening。。。")
- button.config(image="",state="disable")
- refresh.config(image="",state="disable")
- result = recognize_from_microphone()
- user["content"] = result
- message.append(user.copy())
- trans .config(text=result)
- time.sleep(2)
- trans .config(text="Thinking。。。")
- flag = 2</font>
在上述技术路径的基础上,OpenAI的跨模态能力进一步强化了其生态系统,让开发者能够更快地开发基于OpenAI的应用。就单一模式的表现而言,最近更新的DALL·E 3在视觉效果上并不逊于之前领先的Midjourney和Stable Diffusion。与微软合作,将视觉功能、GPT-4以及文本到语音转换技术TTS和Co-pilot相结合,这种跨模态集成将大大简化通过自然语言通信实现复杂逻辑和任务执行的过程。与此同时,GPT-4也得到了重大更新。新的GPT-4 Turbo版本支持用户上传外部数据库或文件,处理上下文长度可达128k(相当于一本300页的书),知识库已更新至2023年4月,API价格也都大打折扣。
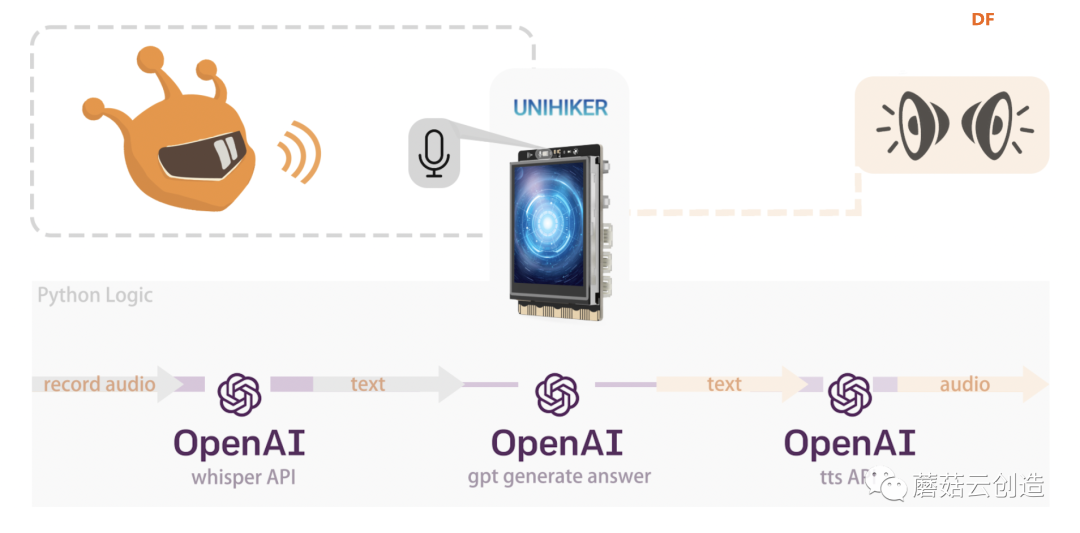
第二种方法:OpenAI全部处理(gpt+whisper+tts)
通过这个接口集成,我们可以尝试使用openai的所有API来实现这个功能。使用openai的“whisper + gpt + tts”也可以实现以上功能。优点是只需注册openai并获取实现功能的密钥,并且可以自动识别语言类别。不过openai的whisper暂时无法支持实时转换,所以在代码编写和程序响应上还存在差异。
- 初始化并录制音频
- 使用耳语模型录制语音并将其转换为文本:转录 API 将您要转录的音频文件和所需的输出文件作为输入音频转录的格式。我们目前支持多种输入和输出文件格式。文件上传目前限制为 25 MB,并且支持以下输入文件类型:mp3、mp4、mpeg、mpga、m4a、wav 和 webm。
- 使用 gpt-3.5-turbo 模型生成答案。
- 使用 tts-1 模型将文本转换为语音并输出音频文件。
- 播放音频文件
代码:
- <font face="微软雅黑">import openai
- import pyaudio
- import wave
- import time
- import os
- openai.api_key="xxxxxxxx" # input your openai key
-
-
- def record_and_convert():
-
- # Define recording parameters
- CHUNK = 1024 # Number of frames per buffer
- FORMAT = pyaudio.paInt16 #Data format
- CHANNELS = 1 # Number of channels
- RATE = 44100 # sampling rate
- RECORD_SECONDS = 10 # Recording time
- WAVE_OUTPUT_FILENAME = "output.wav" # Output file name
-
- # initialization pyaudio
- p = pyaudio.PyAudio()
-
- # Open recording stream
- stream = p.open(format=FORMAT,
- channels=CHANNELS,
- rate=RATE,
- input=True,
- frames_per_buffer=CHUNK)
-
- print("Start recording, please speak...")
-
- frames = []
-
- # Record audio data
- for i in range(0, int(RATE / CHUNK * RECORD_SECONDS)):
- data = stream.read(CHUNK)
- frames.append(data)
-
- print("Recording ends!")
-
- # Stop recording
- stream.stop_stream()
- stream.close()
- p.terminate()
-
- # Save recording data to file
- wf = wave.open(WAVE_OUTPUT_FILENAME, 'wb')
- wf.setnchannels(CHANNELS)
- wf.setsampwidth(p.get_sample_size(FORMAT))
- wf.setframerate(RATE)
- wf.writeframes(b''.join(frames))
- wf.close()
-
- audio_file= open("output.wav", "rb")
-
- transcript = openai.audio.transcriptions.create(
- model="whisper-1",
- file=audio_file,
- response_format="text"
- )
- print("transform completed")
-
- input_txt = transcript
-
- response_text = openai.chat.completions.create(
- model="gpt-3.5-turbo",
- messages=[
- {"role": "user",
- "content": input_txt}
- ]
- )
- #print(response_text.choices[0].message)
- input_tts = response_text.choices[0].message.content
-
- #Convert to speech
- print("Start converting speech")
- response = openai.audio.speech.create(
- model="tts-1",
- voice="shimmer",
- input=input_tts,
- )
-
- response.stream_to_file("output2.mp3")
- #Play the speech
- os.system("play output2.mp3")
-
- if __name__ == "__main__":
- while True:
- record_and_convert()
- time.sleep(1)</font>
通过以上两种方法,我们实现了gpt语音座席助手功能。Azure Speech API 与 OpenAI GPT 的集成为开发智能桌面助手开辟了新领域。自然语言处理和语音识别技术的进步使我们与计算机的交互更加自然和高效。通过利用这些技术的力量,我们可以构建能够执行复杂任务并在各自领域提供专家级服务的应用程序。在接下来的文章中,我将继续分享这个智能助手的开发过程,并探索这种集成可以带来的更多可能性。
GPT和丰富的API使我们能够轻松开发和实现个性化智能代理。智能代理可以理解为与外部环境交互时能够模拟人类智能行为的程序。例如,自动驾驶汽车的控制系统就是一个智能代理。在开发者大会上,OpenAI员工展示了一个例子:一秒上传一份航班信息的PDF,智能代理就能整理出机票信息并显示在网页上。如果结合更多不同的硬件接口,我们可以尝试在没有电脑或手机接口的情况下定制更多自己的gpt应用。就像这款智能桌面助手的应用案例一样,未来还可以扩展更多物理层面的智能控制,实现更自然的“智能代理”。
我们曾经设想的人工智能代理的未来现已成为现实。
| 


 沪公网安备31011502402448

 置顶卡
置顶卡 变色卡
变色卡 千斤顶
千斤顶
 萌萌哒新人
萌萌哒新人
 活跃会员
活跃会员
 宣传大使
宣传大使
 志“童”道合
 编辑选择奖
编辑选择奖


