|
22950| 4
|
[讨论] 【评测】基于UNO开发板的DGUS串口屏使用与评测 |
|
大家好,我是萌萌哒的新人Bill。今天很高兴得为大家带来基于DFRobot的uno开发板的DUGS串口屏的评测。之前搜了一下,DFRobot貌似还没有关于触控屏方面的测试,这次的操作有点复杂,不过总体的难度其实不高,而且最后的效果还是不错的,大家有机会可以尝试一下。PS:如果这次大家觉得这篇评测前后的行文风格不一致,大家可以尽情去投诉Angelo,写惯了技术文档,要写一篇思路广、欢乐多的评测还真是难啊,大家多多包涵下。 废话不多说,先上一段完成后的效果视频吧。 这里我一共写了两个页面,第一个页面显示温度,第二页面显示湿度,可以点击通过右下角的小图标来相互切换。温度页面有个曲线显示的功能,能够不断刷新当前的温度;湿度页面有个类似仪表盘的百分比显示功能。理论上效果还能做的更酷炫点,不过楼主不仅眼残、而且手残,在做一下午的美工,画了无数弯弯的直线后终于放弃了。嗯。。。反正我们数据符合比例就行了。。。 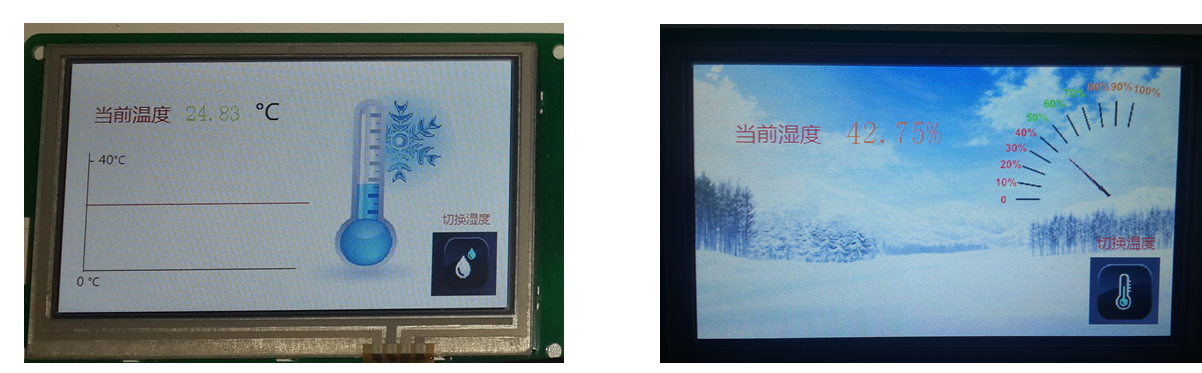 简单的介绍完了后,我们该展示怎么搭建这个项目吧,首先你需要如下的部件和工具 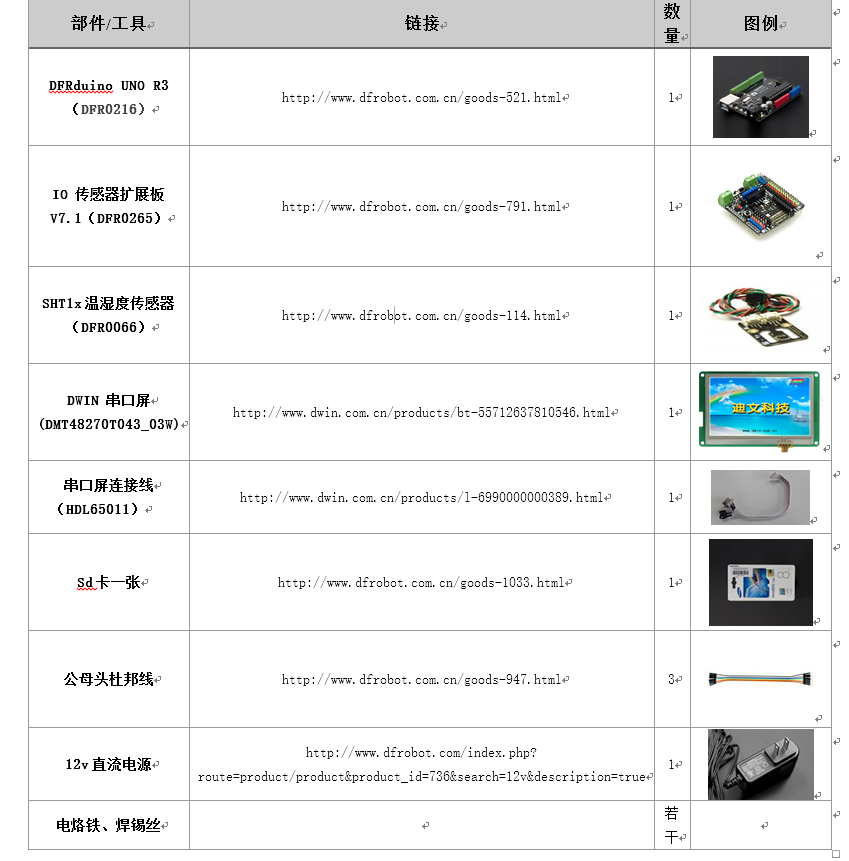 然后连接图如下配置 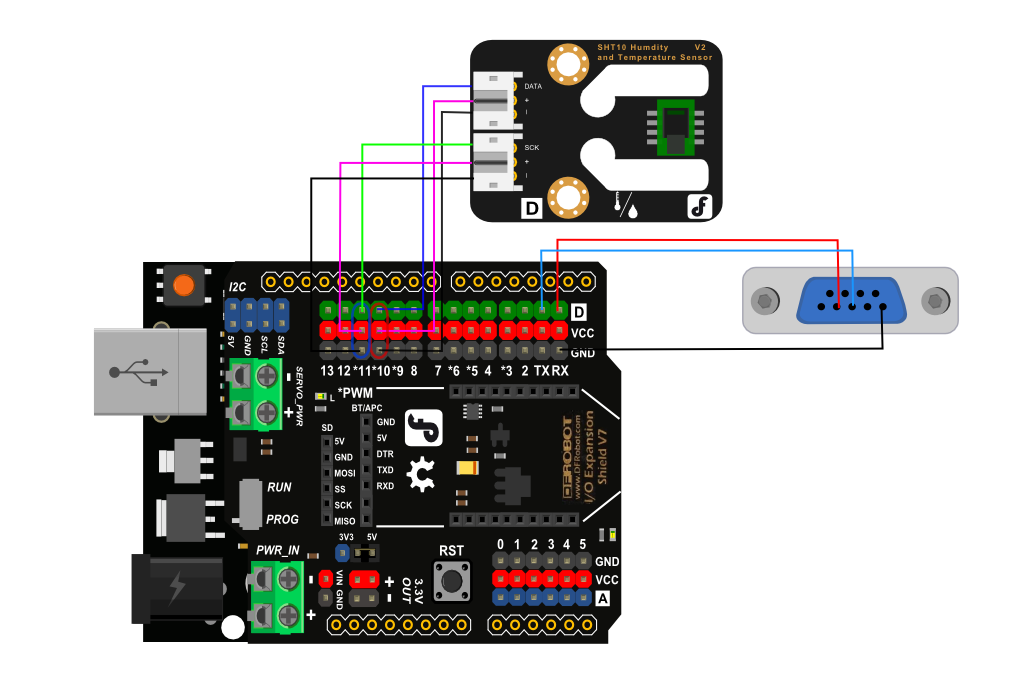 然后因为DGUS屏默认的串口通讯方式为RS232,而Arduino的为TTL,所以你需要把下图中红色框中的引脚焊上才能正常通讯。 系统完成后的示意图如下(偷偷告诉大家一个小技巧,我搭建的时候连了BT/APC上的串口端口,这样TX、RX端还可以再连一个USB转串口来监听双方的通讯,来进行debug) 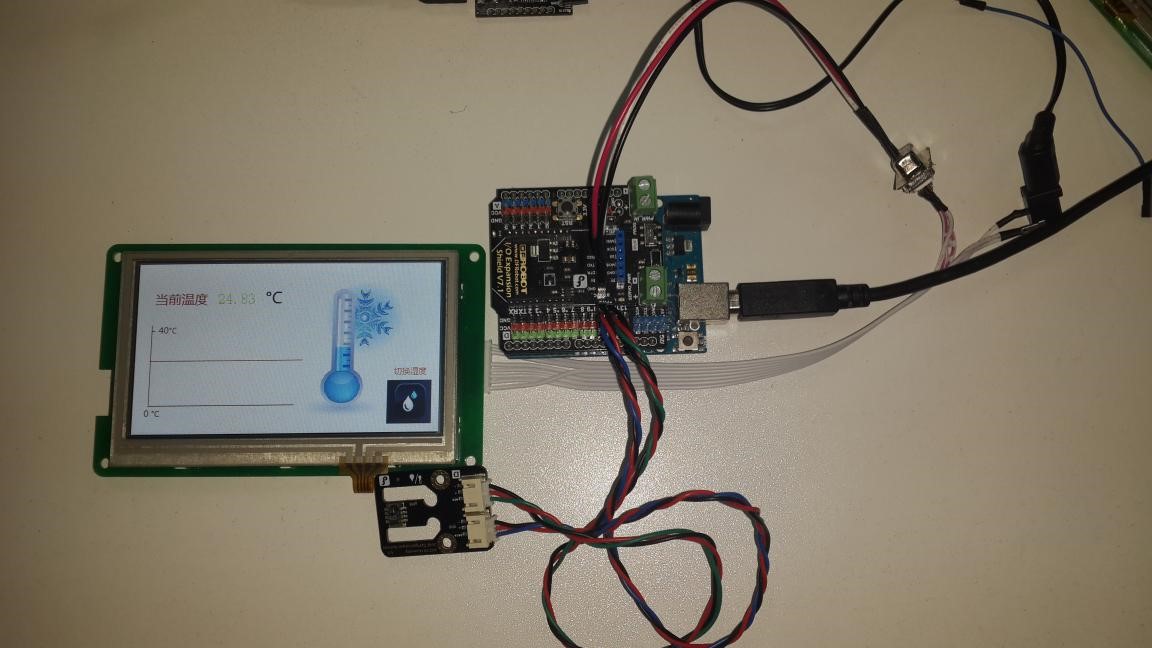 系统搭建完成后,我们首先配置DGUS上的程序。下面的网盘里有DGUS基本操作和软件,其中的DGUS配置软件视频教程大家可以重点看下1_新建工程及打开工程.wmv,2_图标库生成.wmv,3_基本触控.wmv,4_数据显示及录入修改.wmv,9_曲线显示.wmv,12_仪表盘.wmv,17_串口通信.wmv 1.DGUS开发资料: 云盘链接: http://pan.baidu.com/s/1dD1mMel 2.DGUS开发配套软件: 云盘链接 http://pan.baidu.com/s/1dD5pNLf 3.视频教程: 云盘链接 http://pan.baidu.com/s/1kTwWhnh 这里我只是介绍下,如果配置我们这工程。首先你需要做好页面,这次做的比较简单的。我是网上随便搜点图图标,然后用windows自带的画图工具随便摆下大致就好了。然后第一张图的坐标和第二张的刻度表之所以看起来比较挫,是因为网上没有找到合适的。。。 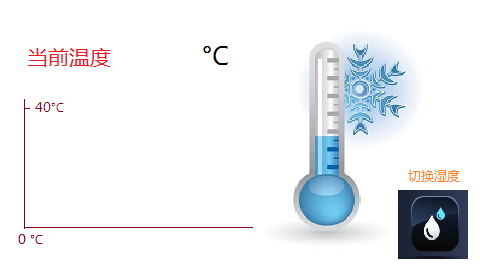  画好图后,我们打开  。选择共管理中的新建工程 。选择共管理中的新建工程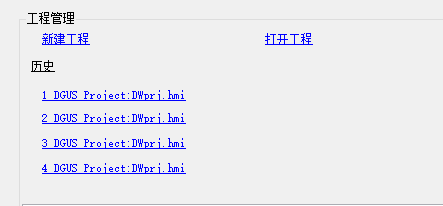 屏幕属性设置 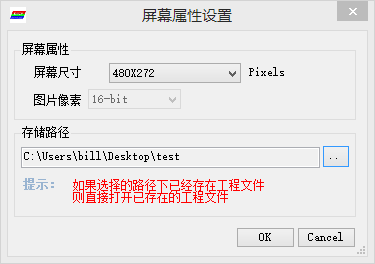 根据型号来定,这里的尺寸是480X272。然后我们点击 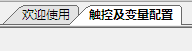 欢迎使用回到初始界面,点击DGUS配置工具中的图片转换,选择 欢迎使用回到初始界面,点击DGUS配置工具中的图片转换,选择 Add来添加之前做好的页面图片, Add来添加之前做好的页面图片,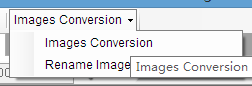 Images Conversion来转换图片,注意左上的Size内的分辨率应为480x272。然后把生成的图片文件重命名,第一页为0.bmp,第二页为1.bmp以此类推。图片转换完毕后点击加入图片。点击上方 Images Conversion来转换图片,注意左上的Size内的分辨率应为480x272。然后把生成的图片文件重命名,第一页为0.bmp,第二页为1.bmp以此类推。图片转换完毕后点击加入图片。点击上方 按钮设置好 按钮设置好 。如果采用不同波特率或者串口帧R3或者RA,代码的相对应部分也要进行修改 。如果采用不同波特率或者串口帧R3或者RA,代码的相对应部分也要进行修改根据DWIN的教学视频配置好6个控件。其中有难点的1、2、3、4号控件的配置图如下 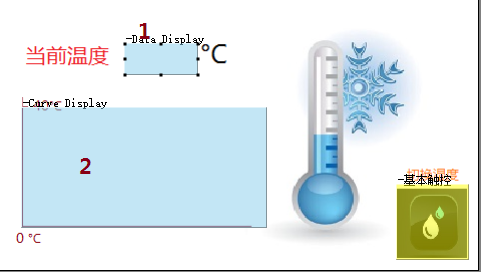 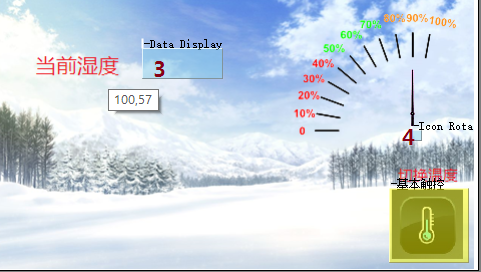 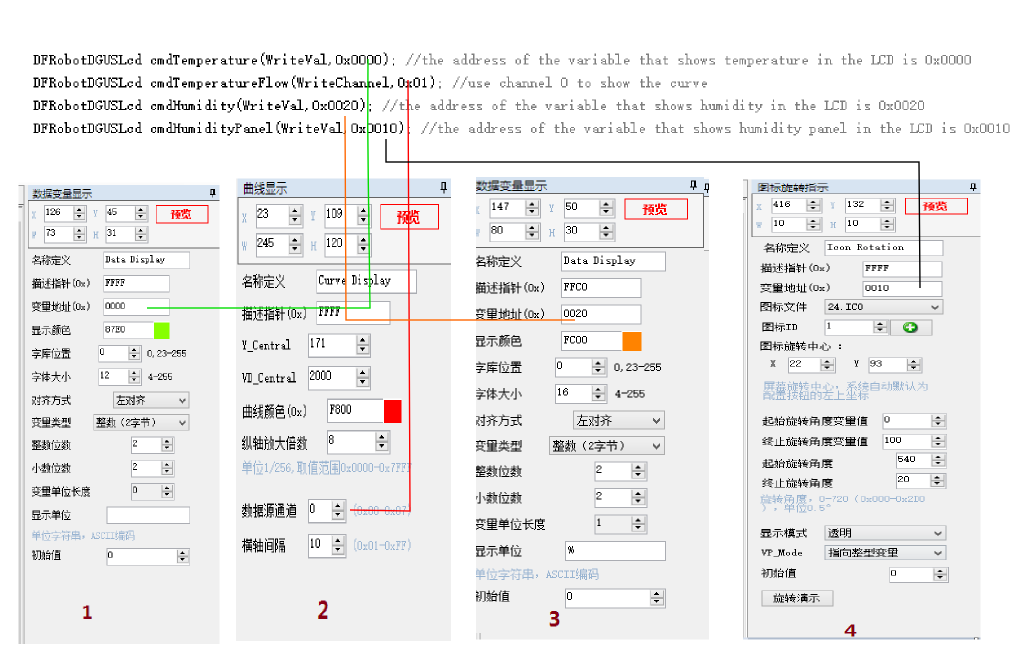 最后,大家喜闻乐见的配置好的DGUS文件  test.rar test.rar把test文件夹下内容复制到一张空microsd卡,然后插到DGUS屏上的sd卡槽上即可。 接下来arduino上的代码。 t-sensor.rar[mw_shl_code=applescript,true]#include <DFRobotDGUSLcd.h> #include <SHT1x.h> // Specify data and clock connections and instantiate SHT1x object #define dataPin 10 #define clockPin 11 SHT1x sht1x(dataPin, clockPin); DFRobotDGUSLcd cmdTemperature(WriteVal,0x0000); //the address of the variable that shows temperature in the LCD is 0x0000 DFRobotDGUSLcd cmdTemperatureFlow(WriteChannel,0x01); //use channel 0 to show the curve DFRobotDGUSLcd cmdHumidity(WriteVal,0x0020); //the address of the variable that shows humidity in the LCD is 0x0020 DFRobotDGUSLcd cmdHumidityPanel(WriteVal,0x0010); //the address of the variable that shows humidity panel in the LCD is 0x0010 void setup() { pinMode(13, OUTPUT); Serial.begin(115200); cmdTemperature.begin(Serial); } void loop() { float temp_c; float temp_f; float humidity; // Read values from the sensor temp_c = sht1x.readTemperatureC(); temp_f = sht1x.readTemperatureF(); humidity = sht1x.readHumidity(); //write the serial stream cmdTemperature.write(sht1x.readTemperatureC() *100); cmdTemperatureFlow.write(0,temp_c *100); cmdHumidity.write(humidity*100); cmdHumidityPanel.write(humidity); delay(500); // Print the values to the serial port Serial.print("Temperature: "); Serial.print(temp_c, DEC); Serial.print("C / "); Serial.print(temp_f, DEC); Serial.print("F. Humidity: "); Serial.print(humidity); Serial.println("%"); }[/mw_shl_code] 以及我写的库文件DFRobotDGUSLcd.h和DFRobotDGUSLcd.cpp的代码,基本DGUS的串口5条指令都基本实现了,但更复杂的则有待于完善 DFRobotDGUSLcd.h [mw_shl_code=applescript,true]#ifndef _SERIAL_LCD__ #define _SERIAL_LCD__ #if ARDUINO >= 100 #include "Arduino.h" #else #include "WProgram.h" #endif #define WriteReg 0x80 #define ReadReg 0x81 #define WriteVal 0x82 #define ReadVal 0x83 #define WriteChannel 0x84 class DFRobotDGUSLcd { private: uint8_t R3; //frame head1 uint8_t RA; //frame head2 uint8_t cmdLength; //command length uint8_t cmdType; //command Type 0x80-0x84 Write Control Register;Read Control Register;Write Variable;Read Variable&Write Channel uint8_t address; //the address of the value to write or read for command 0x80-0x81 //the control byte for command 0x84--write channel // each bit of address determines whether the corresponding channel is on or off // eg.0x00 means all channel is off;0x11 means channel 0 and channel 1 is on uint16_t data; // data for command 0x80-0x83 to send uint8_t cmdCRC; // not used uint16_t channel[8]; // vector to store the data of 8 channels Stream* _serial; public: DFRobotDGUSLcd():R3(0xFF),RA(0x00){} //default head is 0xFF 0x00 DFRobotDGUSLcd(unsigned int cmdType, unsigned int address):R3(0xFF),RA(0x00),cmdType(cmdType),address(address), _serial(&Serial){} DFRobotDGUSLcd(uint8_t R3,uint8_t RA,uint8_t cmdType, uint8_t address, uint16_t data); void begin(Stream &theSerial); void write(unsigned int data); void write(unsigned int channelNum, unsigned int data); void sendCmd(void); void sendCmd(unsigned int cmdType,unsigned address, unsigned data); void setHead(unsigned int R3,unsigned int RA); void setType(unsigned int cmdType); void setData(unsigned int data); void setAddress(unsigned int address); void setChannelData(unsigned int channelNum, unsigned int data); }; #endif[/mw_shl_code] DFRobotDGUSLcd.cpp [mw_shl_code=applescript,true]#include "DFRobotDGUSLcd.h" /********************************************************************* Constructor *********************************************************************/ DFRobotDGUSLcd::DFRobotDGUSLcd(uint8_t R3,uint8_t RA,uint8_t cmdType, uint8_t address, uint16_t data) { this->R3 = R3; this->RA = RA; this->cmdType = cmdType; this->address = address; this->data = data; switch(cmdType) { case WriteReg: case ReadReg: case WriteChannel: cmdLength = 4; break; case WriteVal: case ReadVal: cmdLength = 5; break; } } /********************************************************************* Set the serial port, default port is _serial *********************************************************************/ void DFRobotDGUSLcd::begin(Stream &theSerial) { _serial=&theSerial; } /********************************************************************* Set the type of the command #define WriteReg 0x80 #define ReadReg 0x81 #define WriteVal 0x82 #define ReadVal 0x83 #define WriteChannel 0x84 *********************************************************************/ void DFRobotDGUSLcd::setType(unsigned int cmdType) { this->cmdType = cmdType; } /********************************************************************* Set the data to send for command #define WriteReg 0x80 #define ReadReg 0x81 #define WriteVal 0x82 #define ReadVal 0x83 *********************************************************************/ void DFRobotDGUSLcd::setData(unsigned int data) { this->data = data &0xFFFF; } /********************************************************************* Set the frame head of command the value should be the same of the value in the LCD Config file *********************************************************************/ void DFRobotDGUSLcd::setHead(unsigned int RA, unsigned int R3) { this->RA = RA; this->R3 = R3; } /********************************************************************* Set the address of the value to write or read for command 0x80-0x81 the control byte for command 0x84--write channel each bit of address determines whether the corresponding channel is on or off eg.0x00 means all channel is off;0x11 means channel 0 and channel 1 is on *********************************************************************/ void DFRobotDGUSLcd::setAddress(unsigned int address) { this->address = address &0xFFFF; } /********************************************************************* Set the data of the channels *********************************************************************/ void DFRobotDGUSLcd::setChannelData(unsigned int channelNum, unsigned int data) { channel[channelNum] = data; } /********************************************************************* Write and send the data *********************************************************************/ void DFRobotDGUSLcd::write(unsigned int data) { setData(data); sendCmd(); } /********************************************************************* Set the data of the corresponding Channel and send the serial flow *********************************************************************/ void DFRobotDGUSLcd::write(unsigned int channelNum, unsigned int data) { setChannelData(0, data); sendCmd(); } /********************************************************************* Set command through serial port1 *********************************************************************/ void DFRobotDGUSLcd::sendCmd(void) { uint8_t addressHigh; uint8_t addressLow; uint8_t dataHigh; uint8_t dataLow; unsigned int temp = address; unsigned int channelNum = 0; _serial->write(R3); _serial->write(RA); switch(cmdType) { case WriteReg: case ReadReg: cmdLength = 4; break; case WriteChannel: cmdLength = 3; while(temp != 0) { if(temp & 0x01 == 1) cmdLength++; temp = temp>>1; } if (cmdLength == 3) cmdLength++; break; case WriteVal: case ReadVal: cmdLength = 5; break; } _serial->write(cmdLength); _serial->write(cmdType); switch(cmdType) { case WriteReg: case ReadReg: _serial->write(address&0xFF); addressHigh = address / 0x100; addressLow = address % 0x100; _serial->write(dataHigh); _serial->write(dataLow); break; case WriteVal: case ReadVal: addressHigh = address / 0x100; addressLow = address % 0x100; dataHigh = data / 0x100; dataLow = data % 0x100; _serial->write(addressHigh); _serial->write(addressLow); _serial->write(dataHigh); _serial->write(dataLow); break; case WriteChannel: _serial->write(address); temp = address; if( temp == 0) { _serial->write(channel[0]); _serial->write(channel[0]); } while(temp != 0) { if(temp & 0x01 == 1) { dataHigh = channel[channelNum] / 0x100; dataLow = channel[channelNum] % 0x100; _serial->write(dataHigh); _serial->write(dataLow); } temp = temp>>1; channelNum++; } break; } } /********************************************************************* Set command through serial port2 *********************************************************************/ void DFRobotDGUSLcd::sendCmd(unsigned int cmdType,unsigned address, unsigned data) { this->cmdType = cmdType; this->address = address; this->data = data; sendCmd(); }[/mw_shl_code] 最后,我们还需要使用温度传感器的库文件 希望大家搭建顺利,有什么问题可以联系我。 最后,这里我其实只用了像串口屏发送指令的功能,实际上大家还可以来读取串口屏的反馈信息来进行交互,例如用串口屏来模拟手柄、控制其他传感器等等功能。大家有什么好想法也来讨论,886 |


 沪公网安备31011502402448
© 2013-2026 Comsenz Inc. Powered by Discuz! X3.4 Licensed

 置顶卡
置顶卡 变色卡
变色卡 千斤顶
千斤顶


