|
5493| 9
|
[ 虚谷号入门] 虚谷号百科相机 |
虚谷号百科相机上一篇教程中已经介绍了虚谷号结合厚物扩展板和pinpong库的基本使用方法,这篇教程来带大家做一个简单的项目,来感受一下虚谷号结合了厚物扩展板和pinpong库后的强大功能。 一、功能演示注:按键A为切换/返回键,按键B为确定键。(记住这个有利于下面的理解) 二、准备工作1.需要的器件:虚谷号创客版套件 1 (主要包含主板、天线、数据线、适配器,也可以选择教育版套件,性能更佳) 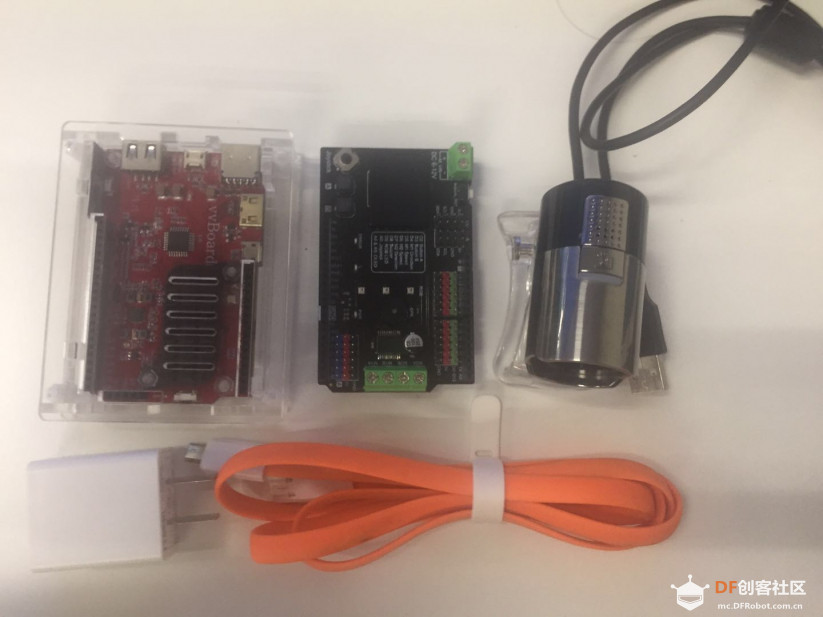 2.创建百度云图像识别应用本次项目的实现我们借助了百度云的图像识别功能,要使用百度云的图像识别功能需要在百度云创建一个图像识别的应用,这一节就来介绍如何在百度云创建一个图像识别的应用: (1)浏览器打开百度云图像识别:链接https://cloud.baidu.com/product/imagerecognition (2)注册或登录百度云帐号,登录后点击立即使用。(我们使用的功能都是免费的,请放心使用)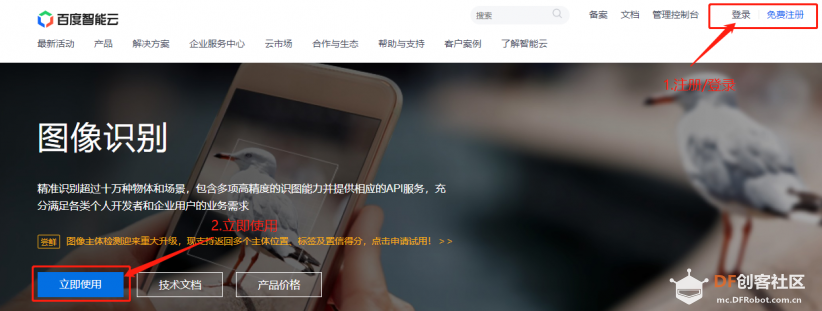 (3)点击创建应用。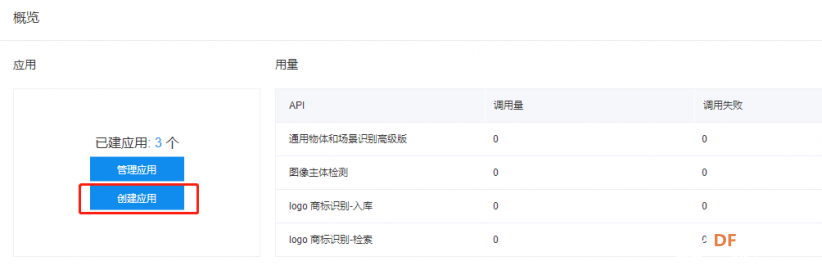 (4)点开图像识别前面的加号可以看到图像识别的接口默认已经全部勾选。 (5)填写好名称和描述,操作完成后点击立即创建。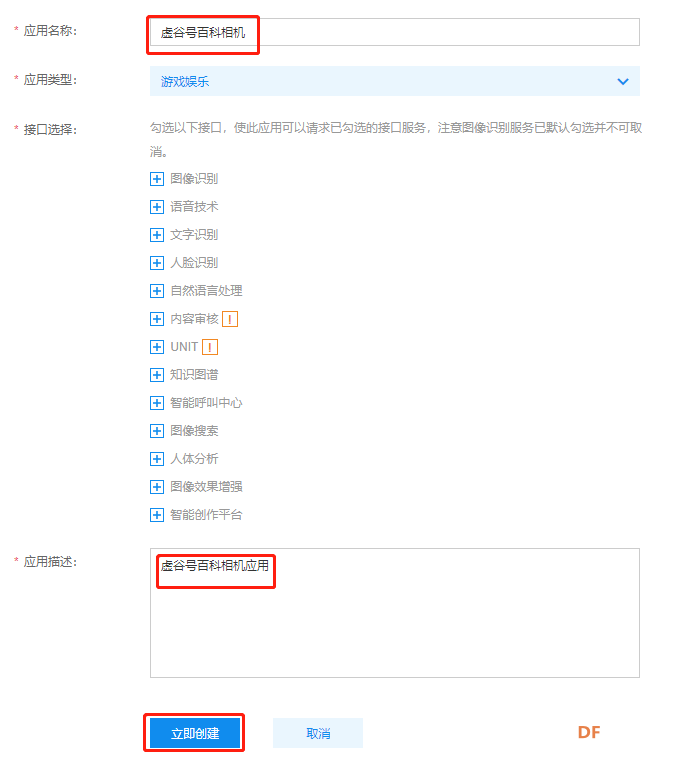 (6)创建完成后点击查看应用详情。 (7)记录下AppID、APIKey、SecretKey三个参数,最后程序设计中会用到,到这里我们的图像识别应用就创建成功了。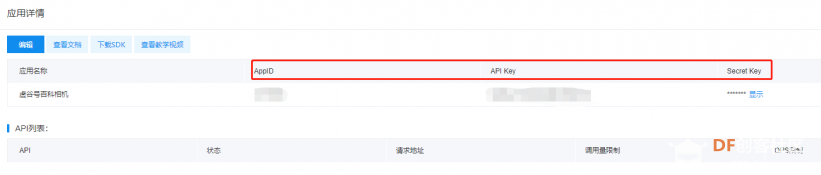 3.组装接线 按照上图将线接好后再将数据线的另一端接到电脑上,接好后板子上的指示灯会被点亮。 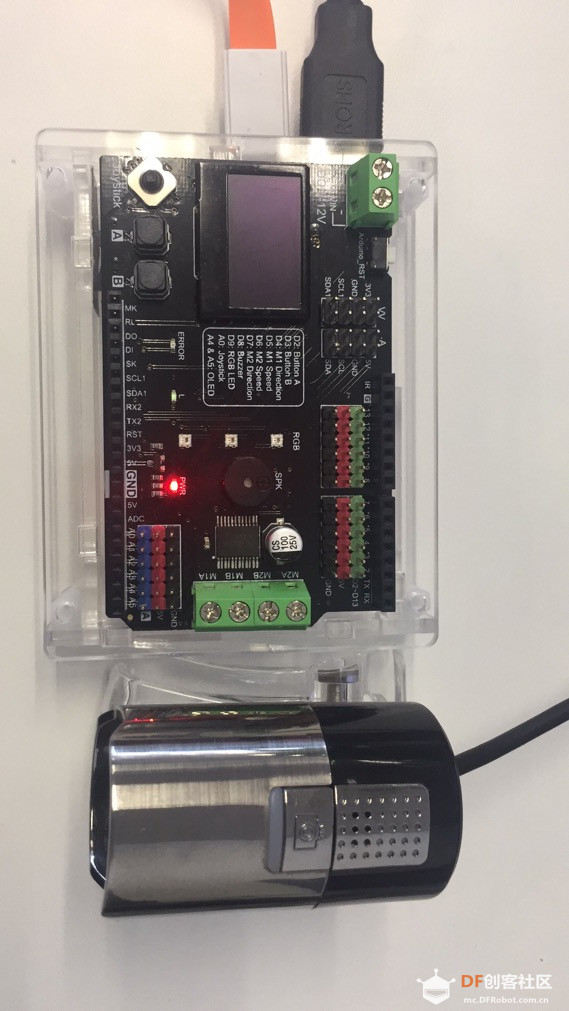 4.按照上一篇教程中准备工作中的方法,打开jupyter编辑器,新建python3文件(如果没有做过上一篇教程,需要先将上一篇教程中的准备工作做一次) 二、程序设计通过开始的演示视频,大家应该已经对本项目的功能有了了解,我们将功能拆分成几个部分来分别实现,分别是:屏幕和按键实现菜单切换、拍照功能实现、明星识别功能实现、功能组合实现。
1.屏幕和按键实现菜单切换(1)流程图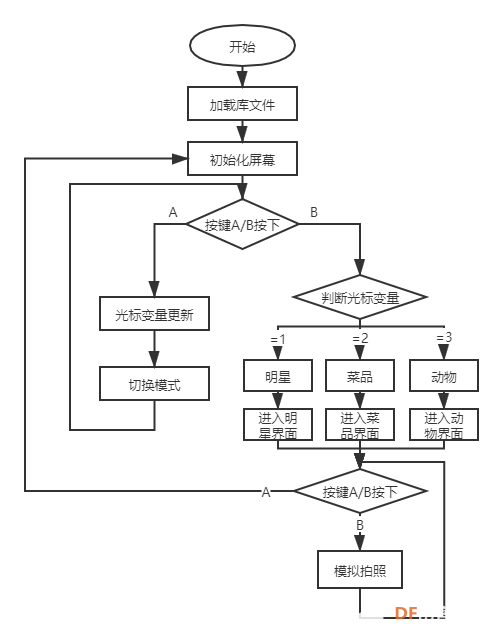 (2)程序代码根据流程图设计程序,代码中具体说明已经做了标注 [mw_shl_code=python,false] from pinpong.board import Board,Pin from pinpong.libs.dfrobot_ssd1306 import SSD1306_I2C #导入ssd1306库 import time Board("xugu").begin() #初始化,选择板型和端口号,不输入则留空进行自动识别 A = Pin(Pin.D2, Pin.IN) #定义按键A为D2,即厚物板A按键 B = Pin(Pin.D3, Pin.IN) #定义按键B为D3,即厚物板B按键 oled=SSD1306_I2C(128, 64) #初始化屏幕,传入屏幕像素点数 #光标移动函数 def cursor_move(line_f): if line_f ==1: oled.text("-",80,5) #指定位置显示文字 oled.text(" ",80,25) #指定位置显示文字 oled.text(" ",80,45) #指定位置显示文字 if line_f ==2: oled.text(" ",80,5) #指定位置显示文字 oled.text("-",80,25) #指定位置显示文字 oled.text(" ",80,45) #指定位置显示文字 if line_f ==3: oled.text(" ",80,5) #指定位置显示文字 oled.text(" ",80,25) #指定位置显示文字 oled.text("-",80,45) #指定位置显示文字 oled.show() #显示生效 #屏幕初始化函数 def oled_init_page(): oled.fill(0) #全部填充熄灭,清屏 oled.text("Star ",5,5) #指定位置显示文字 oled.text("Food ",5,25) #指定位置显示文字 oled.text("Animal ",5,45) #指定位置显示文字 oled.show() #显示生效 #模式1,明星识别 def mode1_star(): #循环执行 while True: oled.fill(0) #全部填充熄灭,清屏 oled.text("Star Mode",20,0) #指定位置显示文字 oled.text("press button B",5,25) #指定位置显示文字 oled.show() #显示生效 if B.value(): oled.fill(0) #全部填充熄灭,清屏 oled.text("Taking ...",5,25) #指定位置显示文字 oled.show() #显示生效 time.sleep(1) if A.value(): oled_init_page() #初始化屏幕 cursor_move(1) #光标保持在第一行 break #跳出while循环 #模式2,菜品模式 def mode2_food(): #循环执行 while True: oled.fill(0) #全部填充熄灭,清屏 oled.text("Food Mode",20,0) #指定位置显示文字 oled.text("press button B",5,25) #指定位置显示文字 oled.show() #显示生效 if B.value(): oled.fill(0) #全部填充熄灭,清屏 oled.text("Taking ...",5,25) #指定位置显示文字 oled.show() #显示生效 time.sleep(1) if A.value(): oled_init_page() #初始化屏幕 cursor_move(2) #光标保持在第二行 break #跳出while循环 #模式3,动物模式 def mode3_animal(): #循环执行 while True: oled.fill(0) #全部填充熄灭,清屏 oled.text("Animal Mode",20,0) #指定位置显示文字 oled.text("press button B",5,25) #指定位置显示文字 oled.show() #显示生效 if B.value(): oled.fill(0) #全部填充熄灭,清屏 oled.text("Taking ...",5,25) #指定位置显示文字 oled.show() #显示生效 time.sleep(1) if A.value(): oled_init_page() #初始化屏幕 cursor_move(3) #光标保持在第三行 break #跳出while循环 if __name__ == "__main__": oled_init_page() #初始化屏幕显示 line = 1 #定义一个行号的变量 line_num = 3 #行数 cursor_move(line) #默认光标在第一行 #开始循环执行 while True: # 如果按键A被按下就切换光标位置 if A.value(): if line+1 > line_num: line= 1 else: line = line + 1 cursor_move(line) # 如果按键B被按下就判断模式 if B.value(): if line == 1: mode1_star() if line == 2: mode2_food() if line == 3: mode3_animal() [/mw_shl_code] (3)运行效果 2.拍照功能实现(1)程序代码[mw_shl_code=applescript,false] import cv2 #实现拍照功能 from IPython import display #显示图片 from matplotlib import pyplot as plt #显示图片 import time %matplotlib inline #拍照并保存 def getcampic(fname): cap = cv2.VideoCapture(0) # 打开摄像头 ret, frame = cap.read() # 读摄像头 display.clear_output(wait=True) # 设置只在一个画面中刷新 cv2.imwrite(fname,frame) #保存照片 print('保存图片') plt.imshow(frame[:,:,::-1]) #显示照片 plt.axis('off') #不显示坐标 plt.show() #显示照片 cap.release() #释放摄像头 cv2.destroyAllWindows() #释放摄像头 if __name__ == "__main__": getcampic('1.jpg') [/mw_shl_code] (2)运行效果程序运行后就可以在编辑器页面上显示出摄像头拍到的照片 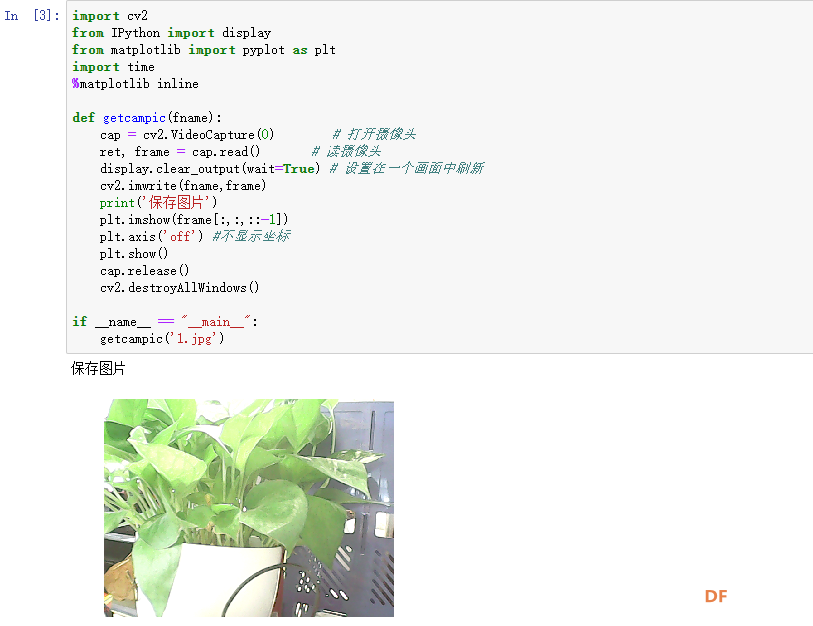 3.明星识别功能实现明星识别的方法与流程与菜品识别和动物识别基本相同,只是调用百度云SDK的接口不同,因此我们这里以明星识别为例,介绍一下怎样设计。 注意:这里的AppID_Censor、APIKey_Censor、SecretKey_Censor三个参数不要修改,明星识别的这个接口在百度云官方文档中没有找到,因此使用的是虚谷号教程中的一个开放接口。 (1)流程图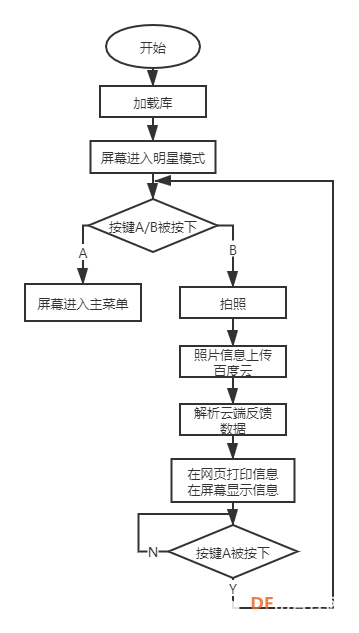 (2)程序代码[mw_shl_code=python,false] from pinpong.board import Board,Pin from pinpong.libs.dfrobot_ssd1306 import SSD1306_I2C #导入ssd1306库 from aip import AipImageCensor,AipImageClassify #导入百度云图像库 import json #数据解析 import pypinyin #汉字转拼音 import cv2 #拍照 from IPython import display #显示照片 from matplotlib import pyplot as plt #显示照片 import time %matplotlib inline Board("xugu").begin() #初始化,选择板型和端口号,不输入则留空进行自动识别 A = Pin(Pin.D2, Pin.IN) B = Pin(Pin.D3, Pin.IN) oled=SSD1306_I2C(128, 64) #初始化屏幕,传入屏幕像素点数 APP_ID_Censor = '17520265' #不要修改 API_KEY_Censor = 'iLnN9HOesAee23glcRQ2QhgU' #不要修改 SECRET_KEY_Censor = 'YfMt6s5QIvDi9Cz7WwFdLk65onuNpy3t' #不要修改 client_star = AipImageCensor(APP_ID_Censor, API_KEY_Censor, SECRET_KEY_Censor) def getcampic(fname): cap = cv2.VideoCapture(0) # 打开摄像头 ret, frame = cap.read() # 读摄像头 display.clear_output(wait=True) # 设置在一个画面中刷新 cv2.imwrite(fname,frame) print('保存图片') plt.imshow(frame[:,:,::-1]) plt.axis('off') #不显示坐标 plt.show() cap.release() cv2.destroyAllWindows() #读取图片信息,准备上传百度云 def get_file_content(filePath): with open(filePath, 'rb') as fp: return fp.read() #汉字转拼音 def pinyin(word): s = '' for i in pypinyin.pinyin(word, style=pypinyin.NORMAL): s += ''.join(i) return s #屏幕初始化函数 def oled_init_page(): oled.fill(0) #全部填充熄灭,清屏 oled.text("Star ",5,5) #指定位置显示文字 oled.text("Food ",5,25) #指定位置显示文字 oled.text("Animal ",5,45) #指定位置显示文字 oled.show() #显示生效 #模式1 def mode1_star(): while True: oled.fill(0) #全部填充熄灭,清屏 oled.text("Star Mode",20,0) #指定位置显示文字 oled.text("press button B",5,25) #指定位置显示文字 oled.show() #显示生效 if B.value(): try: oled.text("taking...",5,45) #指定位置显示文字 oled.show() #显示生效 getcampic("mode_1.jpg") oled.text("waiting...",5,45) #指定位置显示文字 oled.show() #显示生效 #数据上传百度云并获取反馈数据 result_star = client_star.imageCensorComb(get_file_content('mode_1.jpg'),['public']) #解析数据 json_star = json.dumps(result_star,ensure_ascii=False) print(json_star) name_star = result_star['result']['public']['result'][0]['stars'][0]['name'] probability_star = result_star['result']['public']['result'][0]['stars'][0]['probability'] print('====================================================') print('您的撞脸明星是:{name_star},可信度为:{probability_star}'.format(name_star=name_star,probability_star=probability_star)) oled.fill(0) #全部填充熄灭,清屏 oled.text("you like:",5,5) #指定位置显示文字 oled.text(pinyin(name_star),5,25) #指定位置显示文字 #oled.text('similarity',5,45) #指定位置显示文字 oled.text(str(probability_star),5,45) #指定位置显示文字 oled.show() #显示生效 #等待返回键(A)按下 while True: if A.value(): time.sleep(0.3) print('please press button B') break except: oled.text("try again",5,25) #指定位置显示文字 oled.show() #显示生效 print('try again') if A.value(): oled_init_page() cursor_move(1) break if __name__ == "__main__": oled.fill(0) #全部填充熄灭,清屏 mode1_star() [/mw_shl_code] (3)运行效果动图比较模糊,功能就是按下B键拍照并显示姓名和相似度,按下A键后返回。  4.组合功能实现上面的三部分代码已经将三部分主要功能分步实现了,下面我们将功能进行整合,除了菜品识别模式和动物识别模式增加了新的函数,其他没有新的函数增加,只需要注意代码逻辑即可。 (1) 流程图 (2)程序代码[mw_shl_code=python,false] from pinpong.board import Board,Pin from pinpong.libs.dfrobot_ssd1306 import SSD1306_I2C #导入ssd1306库 from aip import AipImageCensor,AipImageClassify # import json import pypinyin import cv2 import time from IPython import display #脱机工作时需要注释这句话 from matplotlib import pyplot as plt #脱机工作时需要注释这句话 #脱机工作时需要注释这句话 %matplotlib inline Board("xugu").begin() #初始化,选择板型和端口号,不输入则留空进行自动识别 APP_ID = 'XXXXXXXXX' API_KEY = 'XXXXXXXXX' SECRET_KEY = 'XXXXXXXXX' client_food = AipImageClassify(APP_ID, API_KEY, SECRET_KEY) client_animal = AipImageClassify(APP_ID, API_KEY, SECRET_KEY) APP_ID_Censor = '17520265' API_KEY_Censor = 'iLnN9HOesAee23glcRQ2QhgU' SECRET_KEY_Censor = 'YfMt6s5QIvDi9Cz7WwFdLk65onuNpy3t' client_star = AipImageCensor(APP_ID_Censor, API_KEY_Censor, SECRET_KEY_Censor) A = Pin(Pin.D2, Pin.IN) B = Pin(Pin.D3, Pin.IN) oled=SSD1306_I2C(128, 64) #初始化屏幕,传入屏幕像素点数 def getcampic(fname): cap = cv2.VideoCapture(0) # 打开摄像头 ret, frame = cap.read() # 读摄像头 display.clear_output(wait=True) #脱机工作时需要注释这句话,设置在一个画面中刷新 cv2.imwrite(fname,frame) print('保存图片') plt.imshow(frame[:,:,::-1]) #脱机工作时需要注释这句话 plt.axis('off') #脱机工作时需要注释这句话,不显示坐标 plt.show() #脱机工作时需要注释这句话 cap.release() cv2.destroyAllWindows() def get_file_content(filePath): with open(filePath, 'rb') as fp: return fp.read() def pinyin(word): s = '' for i in pypinyin.pinyin(word, style=pypinyin.NORMAL): s += ''.join(i) return s def mode1_star(): print('please press button B') while True: oled.fill(0) #全部填充熄灭,清屏 oled.text("Star Mode",20,0) #指定位置显示文字 oled.text("press button B",5,25) #指定位置显示文字 oled.show() #显示生效 if B.value(): try: oled.text("taking...",5,45) #指定位置显示文字 oled.show() #显示生效 getcampic("mode_1.jpg") oled.text("waiting...",5,45) #指定位置显示文字 oled.show() #显示生效 #数据上传百度云并获取反馈数据 result_star = client_star.imageCensorComb(get_file_content('mode_1.jpg'),['public']) #解析数据 json_star = json.dumps(result_star,ensure_ascii=False) print(json_star) name_star = result_star['result']['public']['result'][0]['stars'][0]['name'] probability_star = result_star['result']['public']['result'][0]['stars'][0]['probability'] print('====================================================') print('您的撞脸明星是:{name_star},可信度为:{probability_star}'.format(name_star=name_star,probability_star=probability_star)) oled.fill(0) #全部填充熄灭,清屏 oled.text("you like:",5,5) #指定位置显示文字 oled.text(pinyin(name_star),5,25) #指定位置显示文字 #oled.text('similarity',5,45) #指定位置显示文字 oled.text(str(probability_star),5,45) #指定位置显示文字 oled.show() #显示生效 #等待返回键(A)按下 while True: if A.value(): time.sleep(0.3) print('please press button B') break except: oled.text("try again",5,25) #指定位置显示文字 oled.show() #显示生效 print('try again') if A.value(): oled_init_page() cursor_move(1) break #模式2 def mode2_food(): print('please press button B') while True: oled.fill(0) #全部填充熄灭,清屏 oled.text("Food Mode",20,0) #指定位置显示文字 oled.text("press button B",5,25) #指定位置显示文字 oled.show() #显示生效 if B.value(): try: oled.text("taking...",5,45) #指定位置显示文字 oled.show() #显示生效 getcampic("mode_2.jpg") oled.text("waiting...",5,45) #指定位置显示文字 oled.show() #显示生效 options_food = {} options_food["top_num"] = 1 options_food["filter_threshold"] = "0.7" options_food["baike_num"] = 5 #数据上传百度云并获取反馈数据 result_food = client_food.dishDetect(get_file_content("mode_2.jpg"), options_food) #解析数据 json_food = json.dumps(result_food,ensure_ascii=False) print(json_food) name_food = result_food['result'][0]['name'] if name_food != '非菜': calorie_food = result_food['result'][0]['calorie'] else: calorie_food = 0 oled.fill(0) #全部填充熄灭,清屏 oled.text("This food is:",5,5) #指定位置显示文字 oled.text(pinyin(name_food),5,25) #指定位置显示文字 oled.text('calorie:',5,45) #指定位置显示文字 oled.text(str(calorie_food),70,45) #指定位置显示文字 oled.show() #显示生效 #等待返回键(A)按下 while True: if A.value(): time.sleep(0.3) print('please press button B') break except: oled.text("try again",5,25) #指定位置显示文字 oled.show() #显示生效 print('try again') if A.value(): oled_init_page() cursor_move(2) break def mode3_animal(): print('please press button B') while True: oled.fill(0) #全部填充熄灭,清屏 oled.text("Animal Mode",20,0) #指定位置显示文字 oled.text("press button B",5,25) #指定位置显示文字 oled.show() #显示生效 if B.value(): try: oled.text("taking...",5,45) #指定位置显示文字 oled.show() #显示生效 getcampic("mode_3.jpg") oled.text("waiting...",5,45) #指定位置显示文字 oled.show() #显示生效 options_animal = {} options_animal["top_num"] = 1 options_animal["filter_threshold"] = "0.7" options_animal["baike_num"] = 5 #数据上传百度云并获取反馈数据 result_animal = client_animal.animalDetect(get_file_content("mode_3.jpg"), options_animal) #解析数据 json_animal = json.dumps(result_animal,ensure_ascii=False) print(json_animal) name_animal = result_animal['result'][0]['name'] oled.fill(0) #全部填充熄灭,清屏 oled.text("This animal is:",5,5) #指定位置显示文字 oled.text(pinyin(name_animal),5,25) #指定位置显示文字 oled.show() #显示生效 #等待返回键(A)按下 while True: if A.value(): time.sleep(0.3) print('please press button B') break except: oled.text("try again",5,25) #指定位置显示文字 oled.show() #显示生效 print('try again') if A.value(): oled_init_page() cursor_move(3) break #光标移动函数 def cursor_move(line_f): if line_f ==1: oled.text("-",80,5) #指定位置显示文字 oled.text(" ",80,25) #指定位置显示文字 oled.text(" ",80,45) #指定位置显示文字 if line_f ==2: oled.text(" ",80,5) #指定位置显示文字 oled.text("-",80,25) #指定位置显示文字 oled.text(" ",80,45) #指定位置显示文字 if line_f ==3: oled.text(" ",80,5) #指定位置显示文字 oled.text(" ",80,25) #指定位置显示文字 oled.text("-",80,45) #指定位置显示文字 oled.show() #显示生效 #屏幕初始化函数 def oled_init_page(): oled.fill(0) #全部填充熄灭,清屏 oled.text("Star ",5,5) #指定位置显示文字 oled.text("Food ",5,25) #指定位置显示文字 oled.text("Animal ",5,45) #指定位置显示文字 oled.show() #显示生效 print("start") oled_init_page() line=1 #行号 line_num = 3 #行数 cursor_move(1) while True: A_value = A.value() B_value = B.value() if A.value(): if line+1 > line_num: line = 1 cursor_move(line) else: line = line + 1 cursor_move(line) if B.value(): if line == 1: mode1_star() if line == 2: mode2_food() if line == 3: mode3_animal() [/mw_shl_code] 将最后这个程序复制到jupyter中运行,就可以实现最开始视频演示的功能了。记住不要忘了替换AppID、APIKey、SecretKey三个参数。 三、脱机工作上面我们所讲的方法都是通过USB线连接电脑的,如果想脱离电脑拿在手里跟小伙伴玩耍要怎么做呢,其实虚谷号是有这种工作模式的,下面我们来讲一下怎样不通过电脑连接就能工作。 1.注释最后代码当中的一些代码。将代码中的有标注的代码注释掉(在前面加一个#),这些是用于在网页编辑器中显示图片,当我们脱离电脑工作时就不需要在电脑上显示图片了,因此需要注释掉。   2.跟之前一样用USB连接电脑,然后打开弹出的U盘,进入Python文件夹,打开python_config.ini文件,修改文件内容。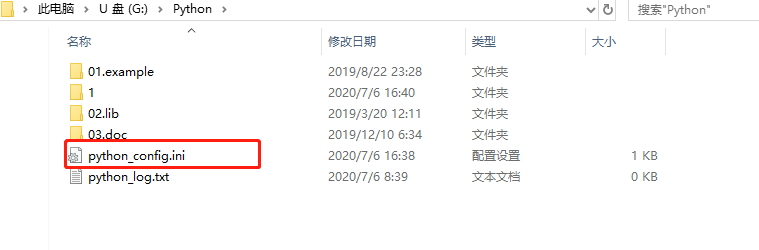 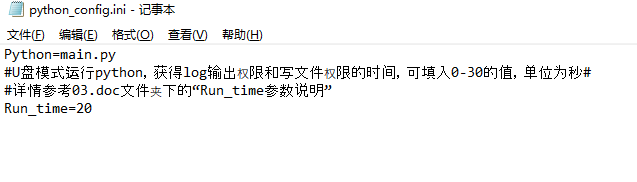 3.在Python文件夹下,右键新建文本文件,重命名为main.py,然后用记事本打开main.py并将最后完成的代码复制进去,保存后关闭。 4.断开板子跟电脑的连接,将USB线一端插入板子上方的供电口(不是侧面的),另一端接适配器,适配器接到电源插座,或者另一端直接连充电宝也可以,按下复位键后等待20S左右即可看到屏幕正常显示,表示程序正常运行。 5.如果屏幕没有反应,就重新连接电脑打开U盘->Python文件夹,察看python_log.txt文件,里面会有错误信息提示,按照提示修改代码即可。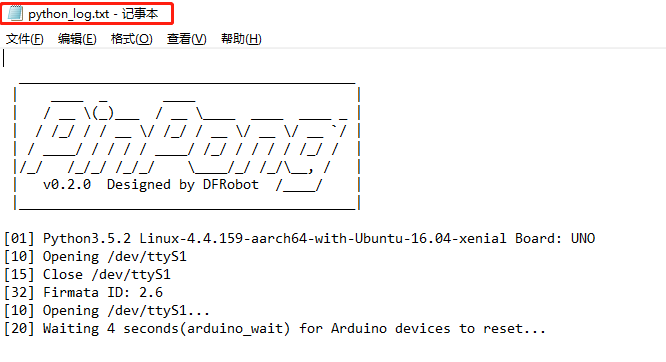 百度云图像识别还有车辆识别、车辆检测、商标识别、植物识别、地标识别、花卉识别等功能,可以通过察看官方文档来使用:https://ai.baidu.com/ai-doc/IMAGERECOGNITION/vk3bcxiu2 |
|
pip install pypinyin提示如下 The following command must be run outside of the IPython shell: $ pip install pypinyin The Python package manager (pip) can only be used from outside of IPython. Please reissue the `pip` command in a separate terminal or command prompt. See the Python documentation for more information on how to install packages: https://docs.python.org/3/installing/ 怎么解决 ? |


 沪公网安备31011502402448
© 2013-2026 Comsenz Inc. Powered by Discuz! X3.4 Licensed

 置顶卡
置顶卡 变色卡
变色卡 千斤顶
千斤顶