|
嗨!大家好,我是【502实验室 | 502LAB www.502lab.com】的掌柜:创客强。
为什么要试用“TinkerNode NB-IoT物联网开发板”?
首先,我被”TinkerNode NB-IoT物联网开发板”所吸引的最直接原因是:它使用了ESP32作为主控模块。而我的物联网启蒙模块就是它的同源版本ESP8266,价格便宜,性能优良,我把ESP8266系列之一的ESP01-s模块通过MicroPython编程成功实现了MQTT物联网通信,顺利将一台手柄遥控的小挖机改造成了手机扫一扫即可遥控。(视频链接:https://www.bilibili.com/video/BV1ga4y1s7Cp/ )所以,我对乐鑫旗下的这类产品具有潜意识的好感!
另外,它是由DFROBOT出品!在我的印象里,DFROBOT就是创客界的高端品牌。匠心般的设计,优质的做工,丰富的品类,不断激发创客们勇于创造的激、情!
开箱初印象
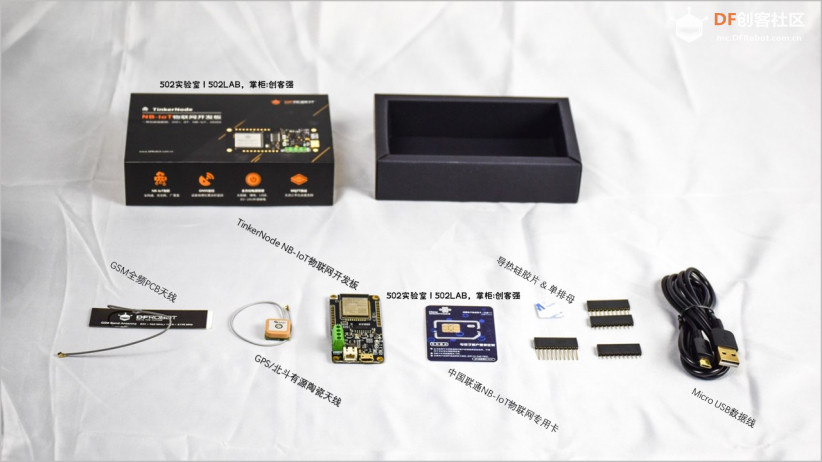
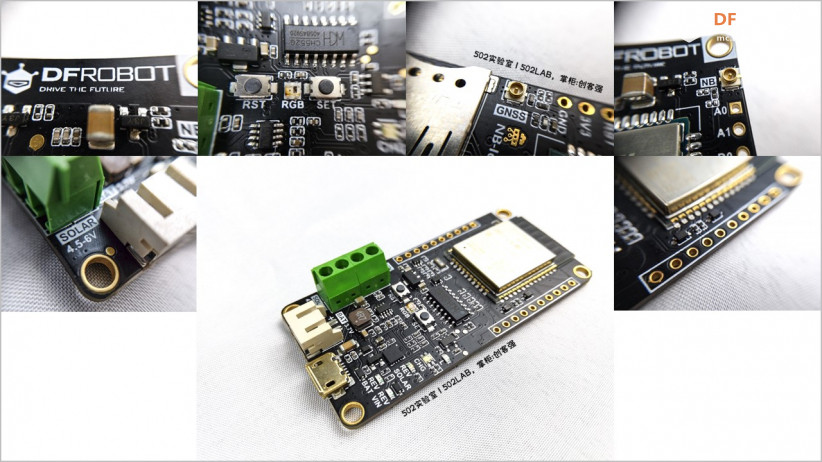
物品清单:开发板、NB-IoT外接PCB天线、GPS/BeiDou外接有源陶瓷天线、MicroUSB数据线、联通NB-IoT物联网专用卡、导热硅胶片、4个排母
(在新标签打开图片看实际大图)
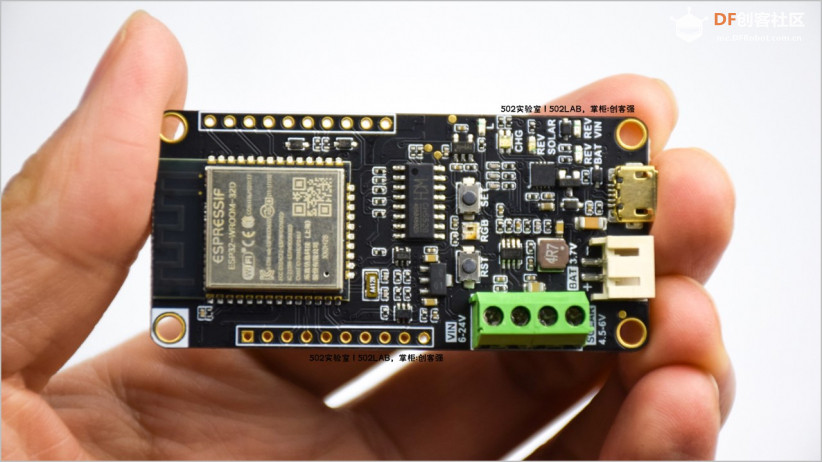
外观:第一眼,觉得好看。
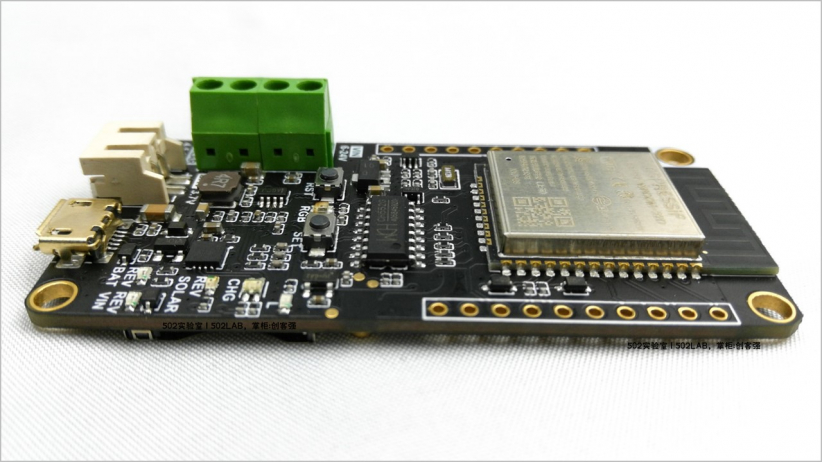
材质细腻、做工精良。拿在手上,很有质感!线路板上黑金颜色搭配,彰显豪华气质。
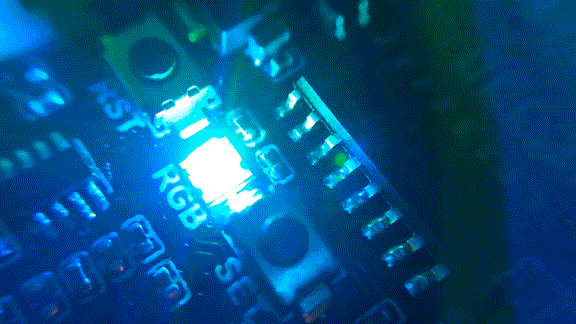
只要一通电,主板中间的RGB灯就会交替闪烁,在黑夜里显得十分炫酷。
核心功能
1、GPS/BeiDou双星精确定位功能(可用于实现实时定位,轨迹跟踪,电子围栏等功能)
2、NB-IoT广域低功耗通信,全网通(移动、电信、联通,谁的信号好,就办谁的物联网SIM卡,实时传输数据)
3、4合一电源充电管理,太阳能、锂电池、USB、6-24V电源(电池供电,太阳能充电,USB充电编程调试一体)
4、WiFi+蓝牙4.0二合一EPS32主控(此模块功能强大)
5、8M微型U盘(数据本地存储,可以定期连电脑拷贝,在没信号的地方采集数据非常实用)
6、多IO接口(包含:数字I/O、模拟输入、SPI、I2C、UART)
上手实践
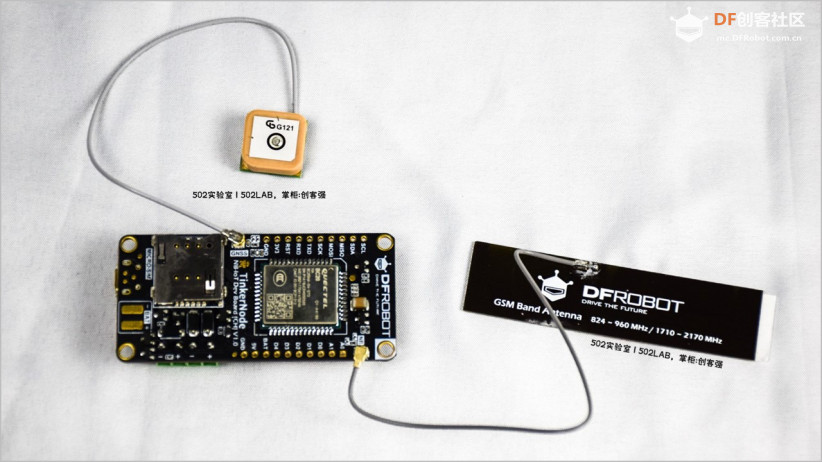
1、装好天线,USB连接电脑安装驱动(安装很简单,不过默认固件是不带U盘功能的,产品维库后半部分专门有一个知识小节叫“9.5 微型U盘与Flash”,里面有说明。但如果你和我一样,只单纯看“8.2 安装开发板驱动”,它就指导你要看到有U盘弹出,结果会发现从办公室到家里连换三台电脑都无法弹出U盘盘符,还以为是电脑系统不兼容。这么重要的信息,在驱动安装教程中没有提前交待清楚!!!要扣小编的面包哦!)
2、Arduino IDE板卡驱动包安装(分几个操作步骤,在线下载安装速度很快)
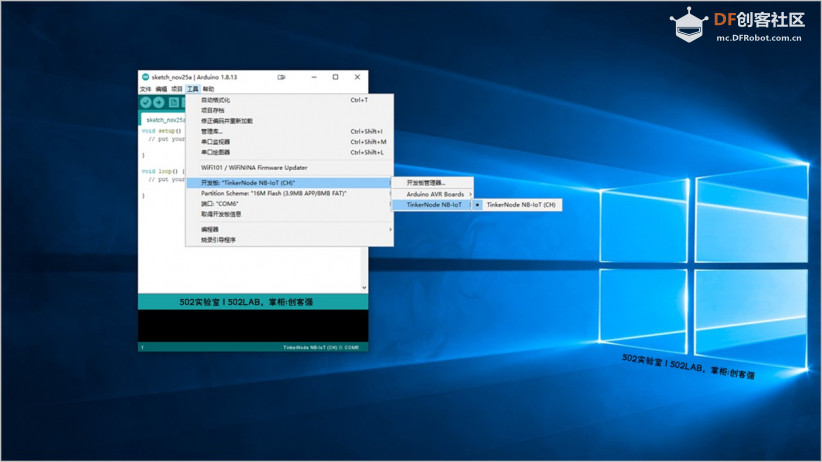
(在新标签打开图片看实际大图)
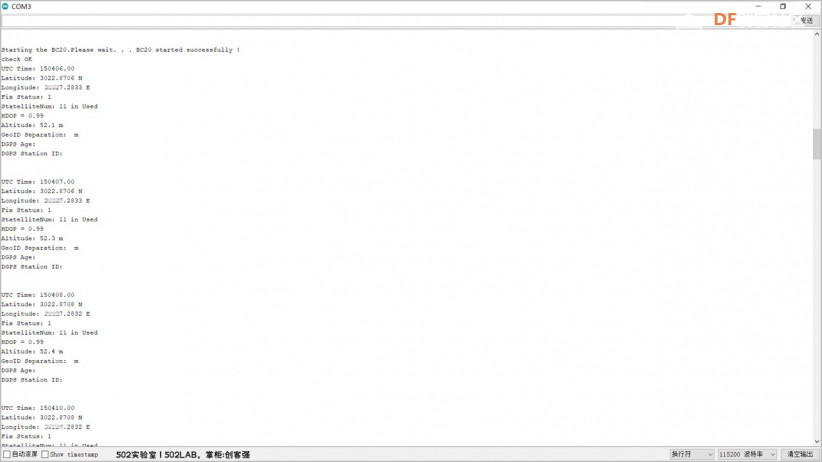
3、GPS定位示例运行(示例:getGGA。在串口监视器可以看到卫星数量、GPS经纬度等)
(在新标签打开图片看实际大图)
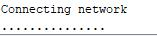
4、NB-IoT广域网连接(一直连不上,开始不知道是设备问题还是本地联通没有NB信号覆盖,在网上也无法查到NB覆盖城市或区域,而且换不同的地方尝试了好几次,都不行。后来找到本地移动公司的政企服务电话,打过去咨询才得知移动有本地NB信号覆盖,而联通没有。最后,去到移动公司整整等了一个多小时,才办好一张物联网卡。客服办理业务的系统很难用,拍照都拍了3回,就是不成功。)
5、购买了移动NB-IoT物联网卡后再次测试NB-IoT广域网信号情况(这次成功!高兴坏了!)
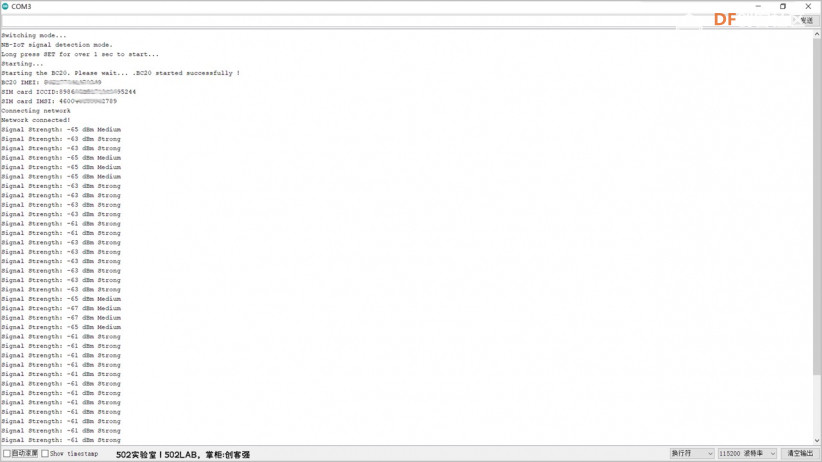
(在新标签打开图片看实际大图)
6、通过wifi连接MQTT服务器推送主题消息(通过官方提供的示例,自己作了一些修改,能连接到我自建的MQTT服务器,并发布主题消息,通过手机客户端订阅成功收到消息!不用官方推荐的几个物联网平台,第一是考虑金钱成本,第二是考虑编程开发的自由度,我不是为了简单,而是开发起来不受平台条条框框的诸多限制。有了这个基础尝试,接下来就可以加装一些传感器,来开发有意思的项目了!) 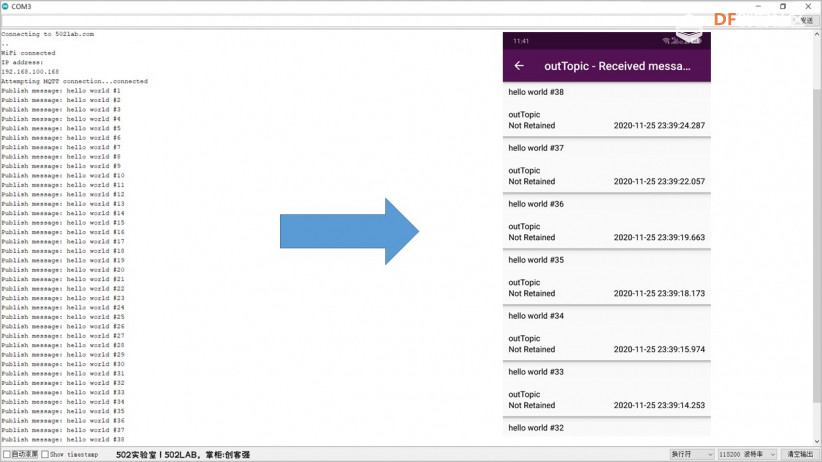
(在新标签打开图片看实际大图)
总结
由DFROBOT出品的”TinkerNode NB-IoT物联网开发板”,可谓是既有颜值,又有实力。可以说是各类电子模块中高级艺术品,也是探索物联网技术应用的一把神器!值得入手,更值得专研!
不过,想玩物联网,总是会受到外部局部环境或关联系统的阻碍。使用过程中遇到第一个小不顺利,是官方维库给的驱动安装教程是针对U盘版固件的,有U盘显示才算成功,而默认出厂是没有的,它永远都不会显示U盘。非得把维库教程,从前往后,从后往前,逐字逐句看清楚,才搞明白是怎么回事。第二个大不顺利是本地联通没有NB信号覆盖,连不上网,但是查了很多资料,都只罗列了造成这种问题的原因。只能靠推测先假定是因为没有信号而不是因为设备问题,很可惜没有很直接的查信号覆盖的方法,哪怕是咨询客服,也是转了几道联系最终才弄清楚。当然,这是物联网还没有真正普及的原因造成的!或许,这就需要创客们的努力创造,发掘出更有潜力的物联网应用场景,来推动这项技术的普及!
当然,还有一个小期望,就是希望官方能提供MicroPython编程固件,已经学了一阵子Python了,而且在ESP8266上也跑得很顺溜了。这次试用,我竟然是第一次下载使用Arduino IDE!
写在最后,本次评测,只是初步试用,待后续结合项目开发,放在实际应用环境中跑一跑,才会有更深刻领悟!到时候肯定有图文,也有视频,先在心里自我期待一下!谢谢大家阅览!
附上改写自示例程序的代码,能连接自建的MQTT服务器,发送主题消息:
- /@@*
- Basic ESP8266 MQTT example
- This sketch demonstrates the capabilities of the pubsub library in combination
- with the ESP8266 board/library.
- It connects to an MQTT server then:
- - publishes "hello world" to the topic "outTopic" every two seconds
- - subscribes to the topic "inTopic", printing out any messages
- it receives. NB - it assumes the received payloads are strings not binary
- - If the first character of the topic "inTopic" is an 1, switch ON the ESP Led,
- else switch it off
- It will reconnect to the server if the connection is lost using a blocking
- reconnect function. See the 'mqtt_reconnect_nonblocking' example for how to
- achieve the same result without blocking the main loop.
- To install the ESP8266 board, (using Arduino 1.6.4+):
- - Add the following 3rd party board manager under "File -> Preferences -> Additional Boards Manager URLs":
- <a href="http://arduino.esp8266.com/stable/package_esp8266com_index.json" target="_blank">http://arduino.esp8266.com/stable/package_esp8266com_index.json</a>
- - Open the "Tools -> Board -> Board Manager" and click install for the ESP8266"
- - Select your ESP8266 in "Tools -> Board"
- */
- #include <WiFi.h>
- #include <PubSubClient.h>
- // Up<ickey>date these with values suitable for your network.
- const char* ssid = "502lab.com";
- const char* password = "";
- const char* mqtt_server = "";
- const char* user_name = "";
- const char* user_password = "";
- WiFiClient espClient;
- PubSubClient client(espClient);
- long lastMsg = 0;
- char msg[50];
- int value = 0;
- void setup_wifi() {
- delay(10);
- // We start by connecting to a WiFi network
- Serial.println();
- Serial.print("Connecting to ");
- Serial.println(ssid);
- WiFi.begin(ssid, password);
- while (WiFi.status() != WL_CONNECTED) {
- delay(500);
- Serial.print(".");
- }
- randomSeed(micros());
- Serial.println("");
- Serial.println("WiFi connected");
- Serial.println("IP address: ");
- Serial.println(WiFi.localIP());
- }
- void callback(char* topic, byte* payload, unsigned int length) {
- Serial.print("Message arrived [");
- Serial.print(topic);
- Serial.print("] ");
- for (int i = 0; i < length; i++) {
- Serial.print((char)payload<i>);
- }
- Serial.println();
- // Switch on the LED if an 1 was received as first character
- if ((char)payload[0] == '1') {
- digitalWrite(BUILTIN_LED, LOW); // Turn the LED on (Note that LOW is the voltage level
- // but actually the LED is on; this is because
- // it is active low on the ESP-01)
- } else {
- digitalWrite(BUILTIN_LED, HIGH); // Turn the LED off by making the voltage HIGH
- }
- }
- void reconnect() {
- // Loop until we're reconnected
- while (!client.connected()) {
- Serial.print("Attempting MQTT connection...");
- // Create a random client ID
- String clientId = "ESP8266Client-";
- clientId += String(random(0xffff), HEX);
- // Attempt to connect
- if (client.connect(clientId.c_str(),user_name,user_password)) {
- Serial.println("connected");
- // Once connected, publish an announcement...
- client.publish("outTopic", "hello world");
- // ... and resubscribe
- client.subscribe("inTopic");
- } else {
- Serial.print("failed, rc=");
- Serial.print(client.state());
- Serial.println(" try again in 5 seconds");
- // Wait 5 seconds before retrying
- delay(5000);
- }
- }
- }
- void setup() {
- pinMode(BUILTIN_LED, OUTPUT); // Initialize the BUILTIN_LED pin as an output
- Serial.begin(115200);
- setup_wifi();
- client.setServer(mqtt_server, 1883);
- client.setCallback(callback);
- }
- void loop() {
- if (!client.connected()) {
- reconnect();
- }
- client.loop();
- long now = millis();
- if (now - lastMsg > 2000) {
- lastMsg = now;
- ++value;
- snprintf (msg, 50, "hello world #%ld", value);
- Serial.print("Publish message: ");
- Serial.println(msg);
- client.publish("outTopic", msg);
- }
- }</i>
| 


 沪公网安备31011502402448
 置顶卡
置顶卡 变色卡
变色卡 千斤顶
千斤顶


