本帖最后由 囧大大王 于 2023-6-2 13:06 编辑
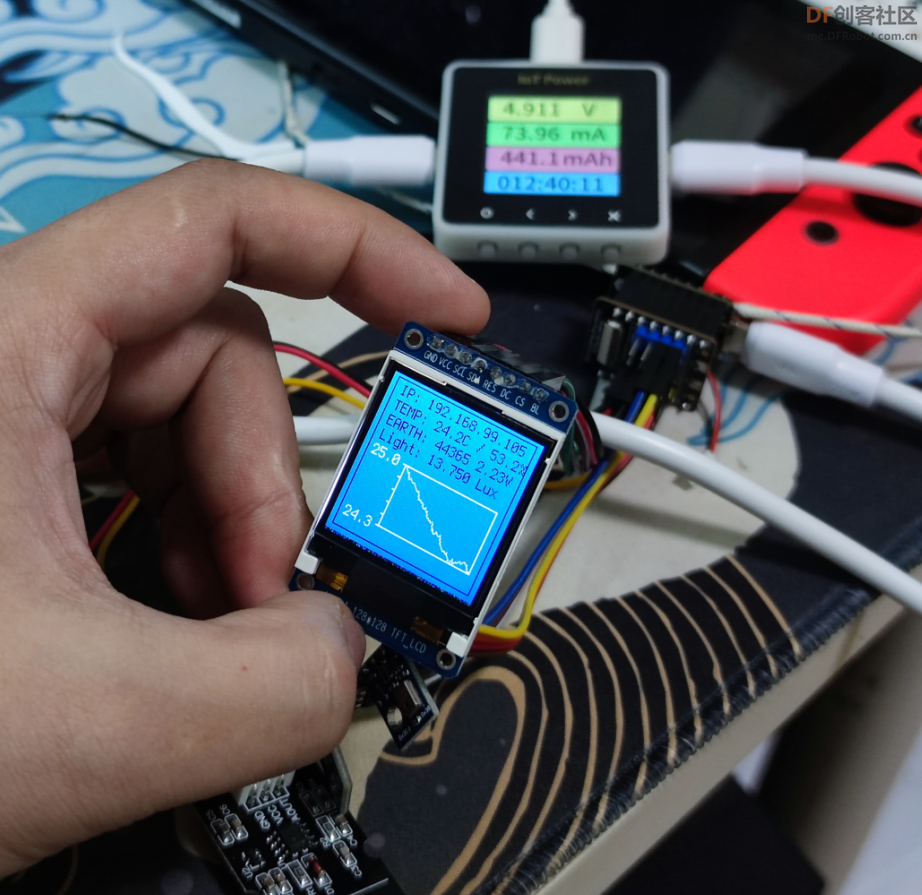
最近老婆在布置花园,作为一个技术男我就想着能不能用技术给她帮帮忙,正好这边DFROBOT发起了【DIY】Beetle ESP32-C3免费试用活动,在之前选型的时候ESP32就已经进入了我的备选列表里了,这次正好进行一下尝试。
基于这个小beetle,我做了一个用于进行环境监测的小终端,用于采集环境温度、湿度、光照等信息,后续会再增加土壤湿度的采集。采集到的数据会通过一块小屏幕显示出来,也会通过mqtt发送到我自己的服务器上,后续基于这些数据就可以再继续做一些智能灌溉之类的功能了。
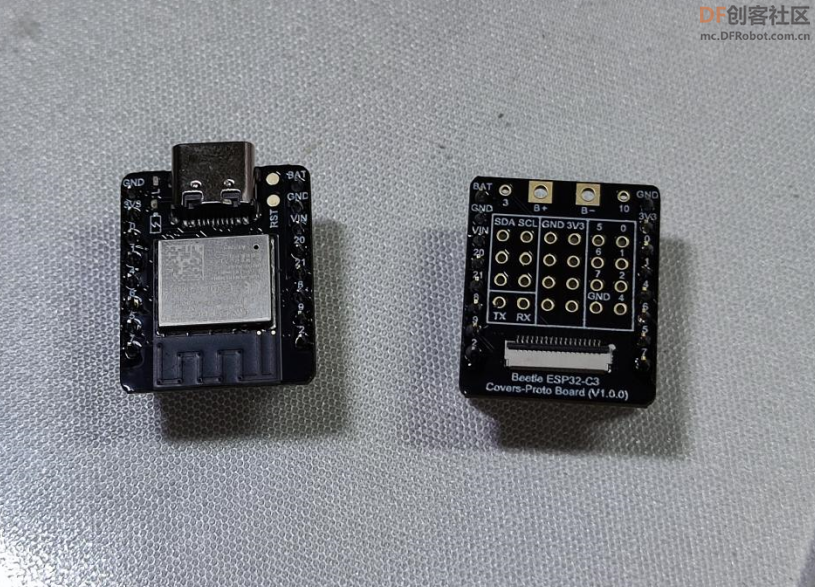
这次用的Beetle ESP32-C3设计非常小巧,到手后拿到的是两个部分,核心板和一块扩展板。
扩展板上引出了3组i2c接口、一组串口和9个io口。这么小的体积这么多的接口,对于开发来说真的是非常方便了,尤其是上面还集成了锂电池充电管理芯片,可以直接用锂电池供电,完美覆盖我的项目需求。
设备清单
- Beetle ESP32-C3 *1
- AHT10 温湿度传感器模块 *1
- GY-302 光照传感器模块 *1
- 电容式土壤湿度传感器模块 *1
- ST7735 显示屏 *1
- 3.7v锂电池 *1
制作过程
一、焊接、组装
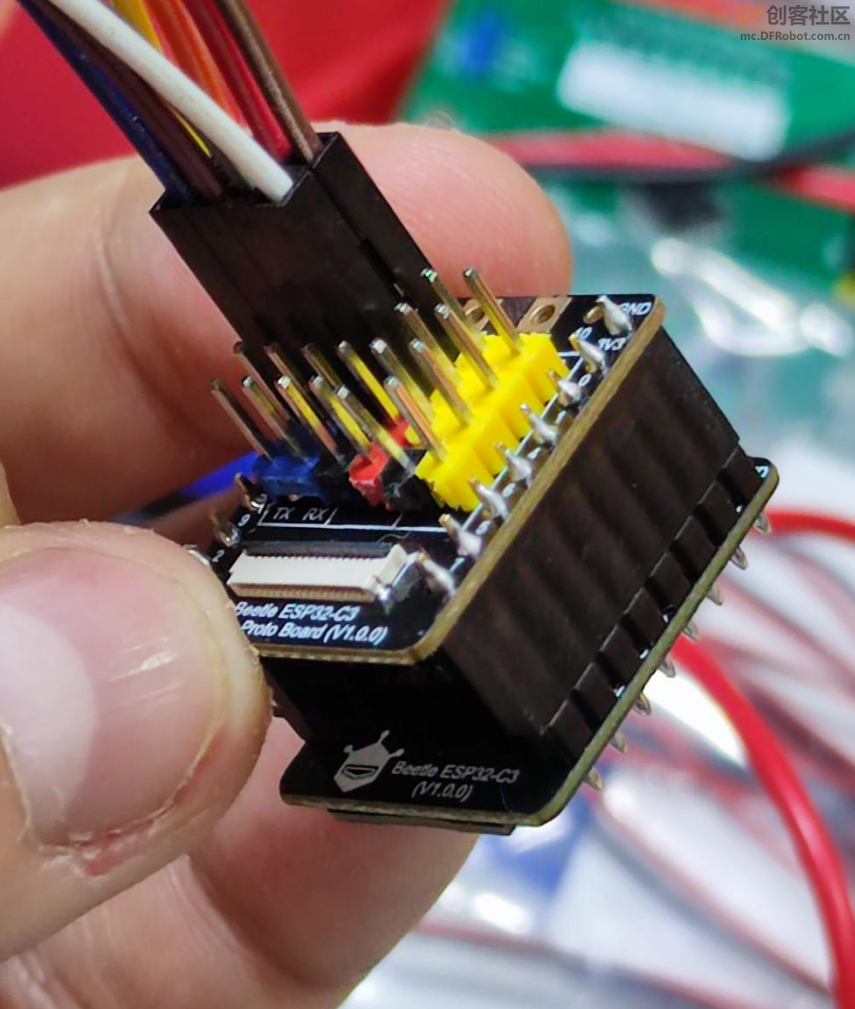
这里我选择用排母焊在扩展板上,方便随时调整,使用起来更方便。
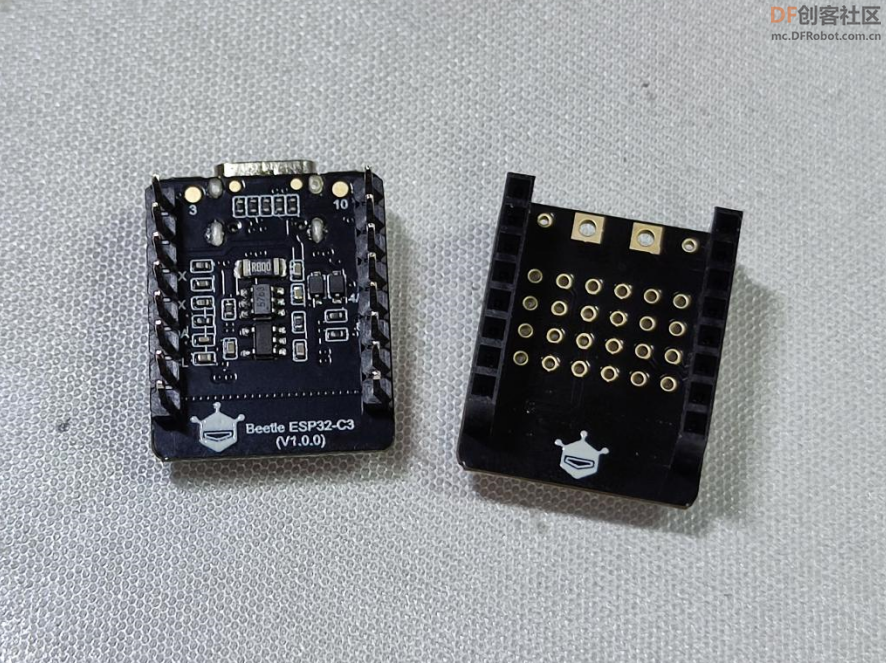
扩展板上的io口3、10两个没有用到,位置比较特别也就干脆没焊接了。
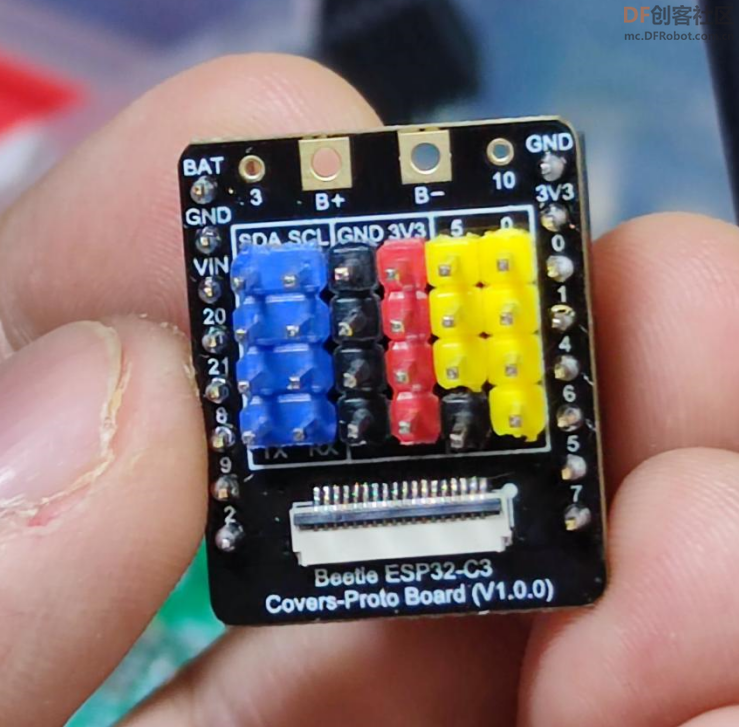
实际组装效果
二、程序编写这个的项目的程序部分使用了CircuitPython进行进行开发,首先是像顺便学一点python,另外群里有大佬一直在推,据说是比较简单。
下面介绍一下程序部分的编写过程。
1、烧写CircuitPython固件;
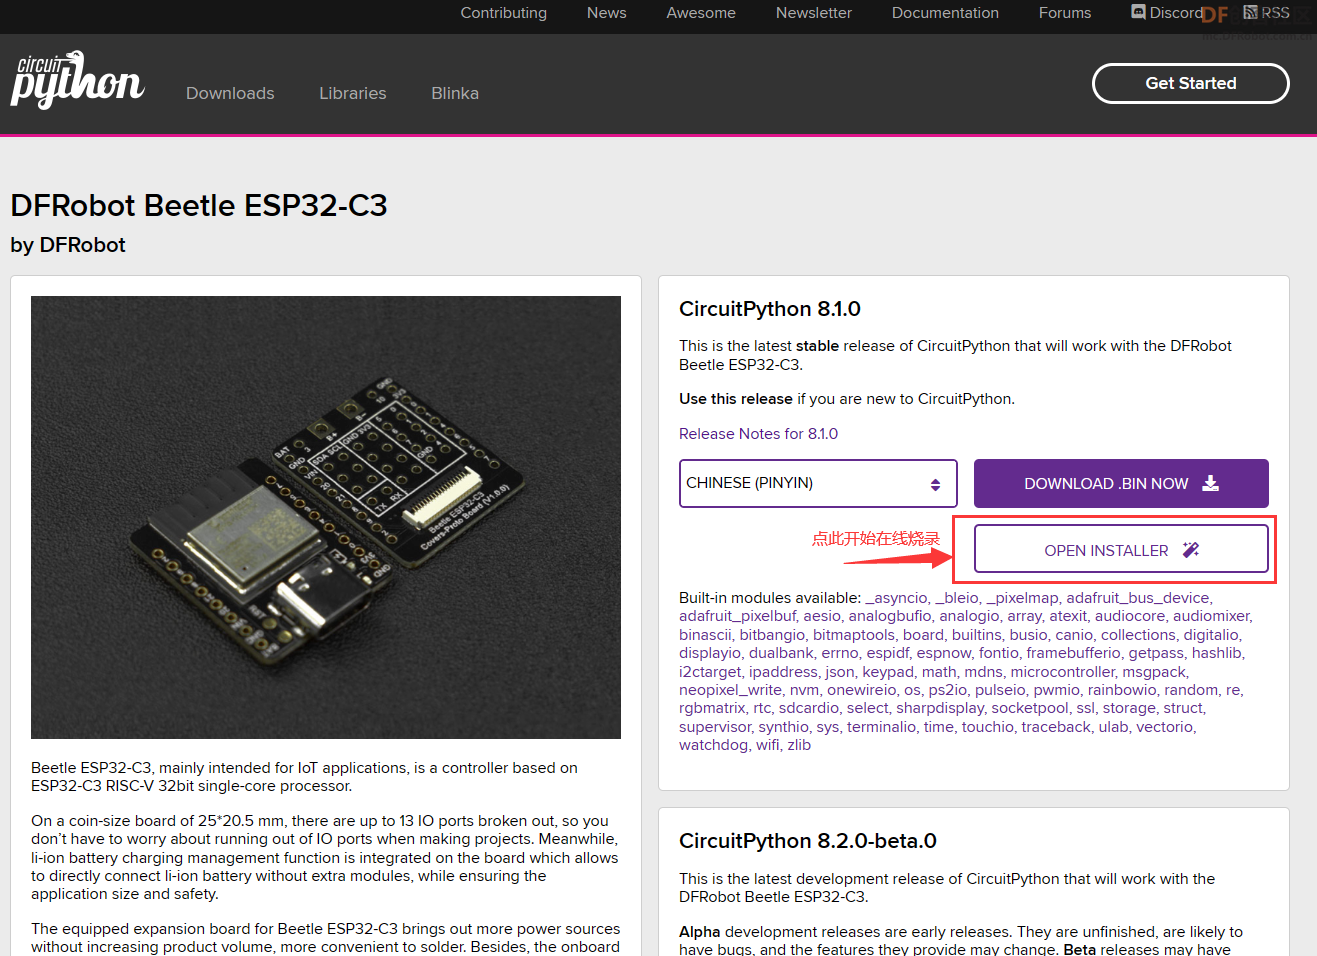
CircuitPython确实简单,开发环境都不用准备,官方对Beetle ESP32-C3也已经做了适配,烧录固件和代码编写都是通过浏览器就可以完成。
固件下载与烧录地址 DFRobot Beetle ESP32-C3 Download (circuitpython.org)
注意:烧录前需要先将IO9拉低,然后短接RST使esp32进入下载模式。
2、编写代码;
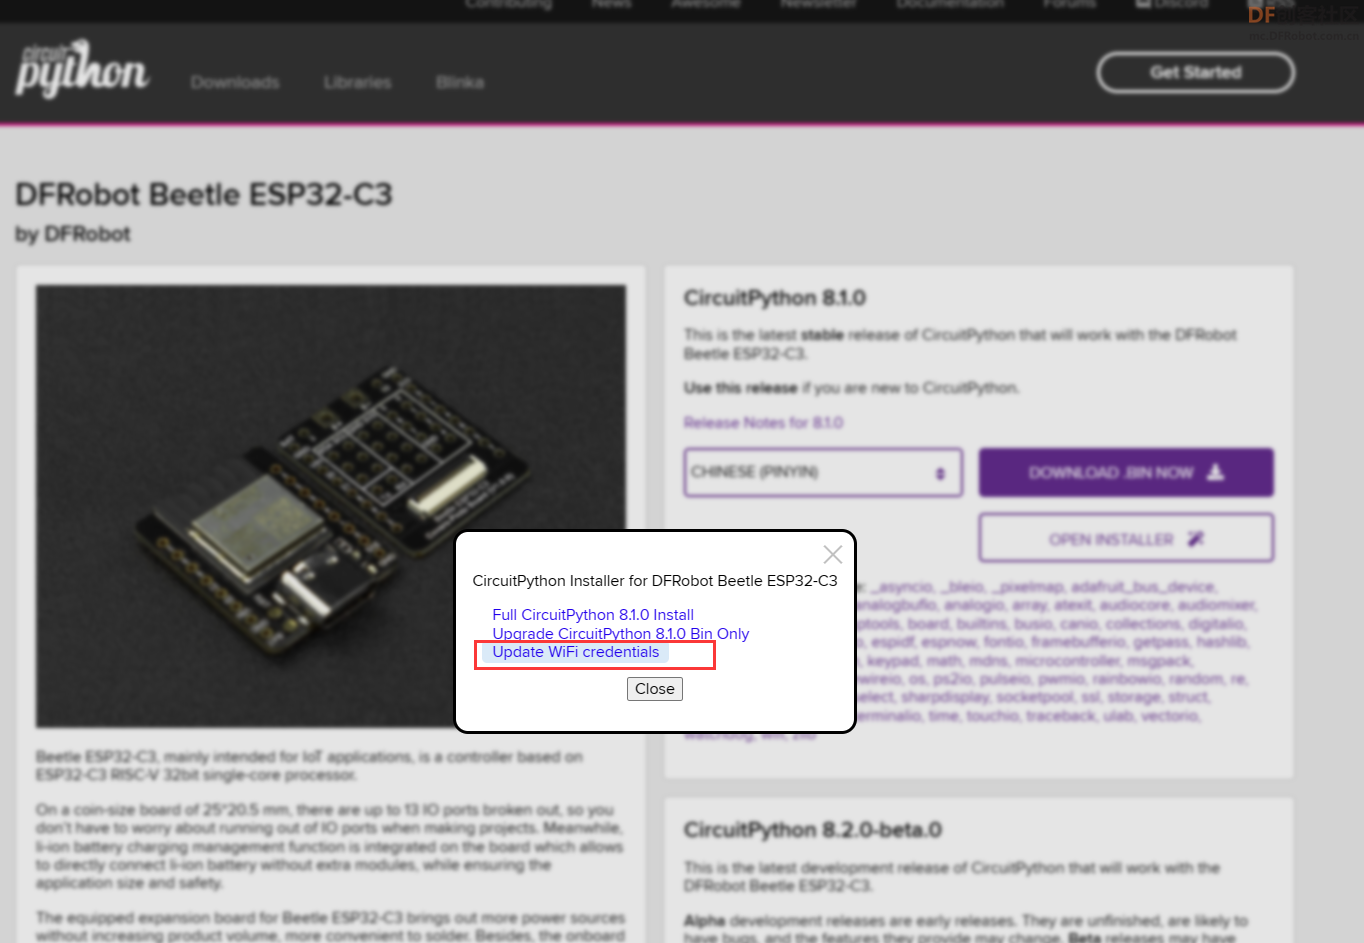
一般来说CircuitPython推荐的开发板都是有提供USB功能的,烧录固件后可以直接将代码放到CircuitPython生成的U盘里面来完成代码上传,但是咱们这个Beetle用的ESP32-C3是没有USB功能的,那这里代码和文件上传就需要通过web进行了。
烧录固件后还是通过上面的网页,要通过CircuitPython的在线Installer修改Wifi连接信息(下图)。
修改完WiFi连接信息后应该会自动重启,保险起见呢也可以手动再短接RST重启一下。
重启后CircuitPython会连接到咱们设置的WiFi接入点并启动web服务,这里我们需要到路由器去看一下分配的IP地址。
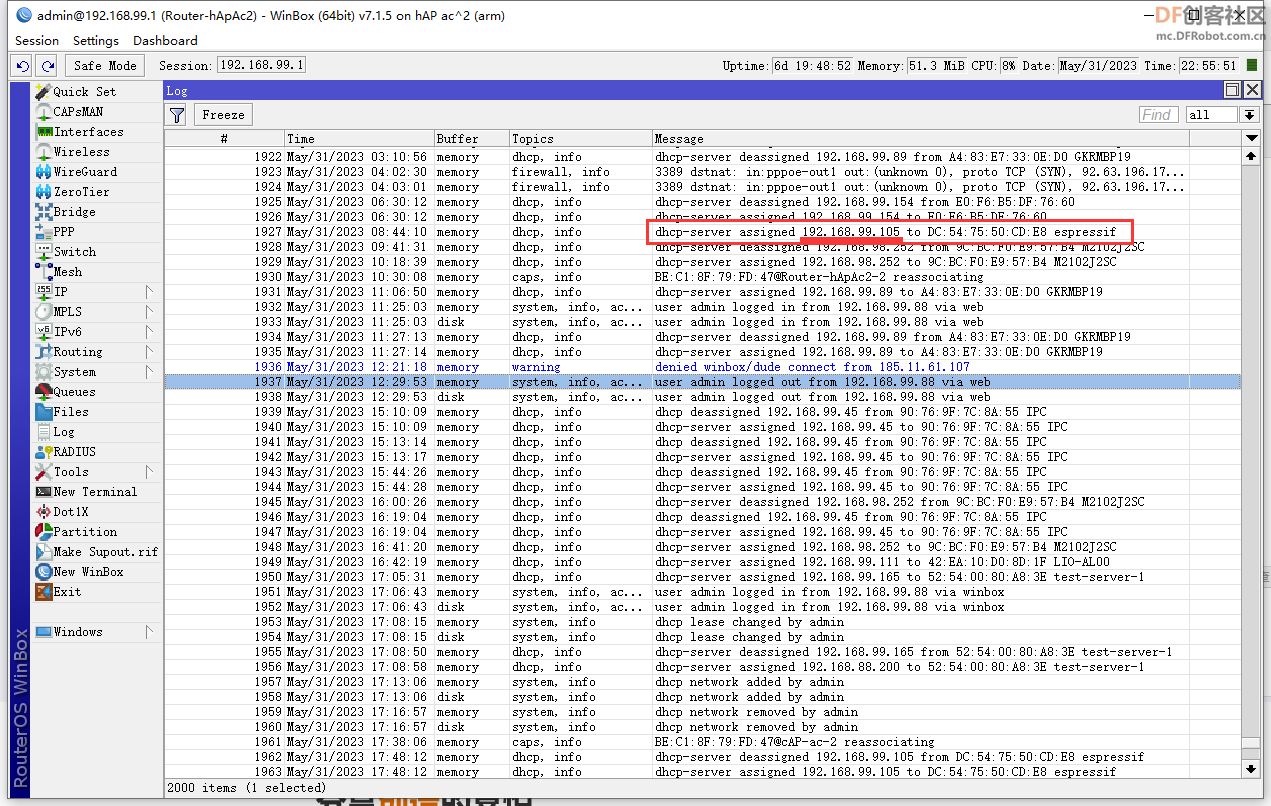
通过这个IP地址我们就可以访问到CircuitPython的web服务了,通过这个web服务我们上传代码或直接在线编辑代码、运行和调试。
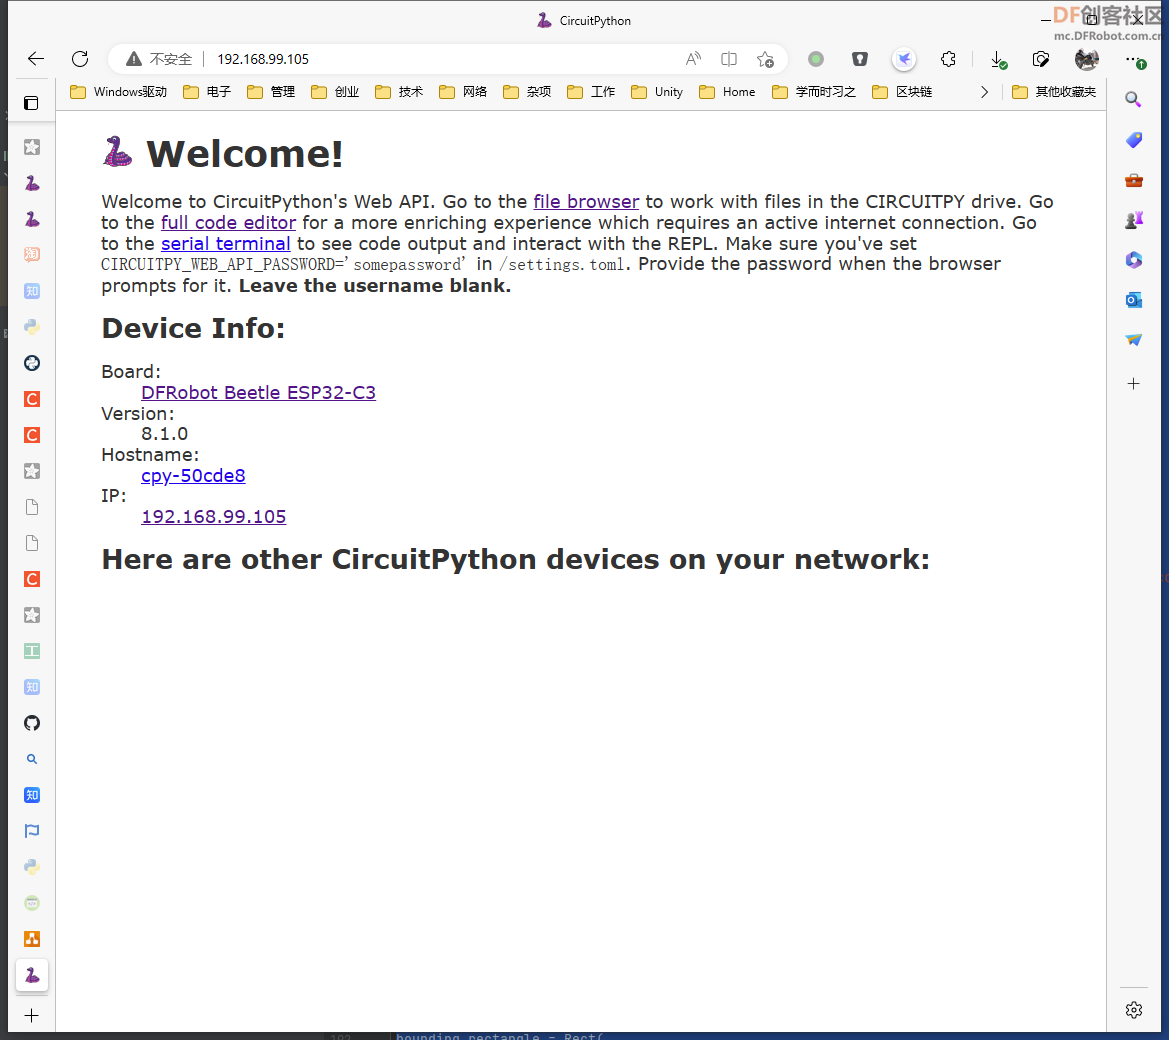
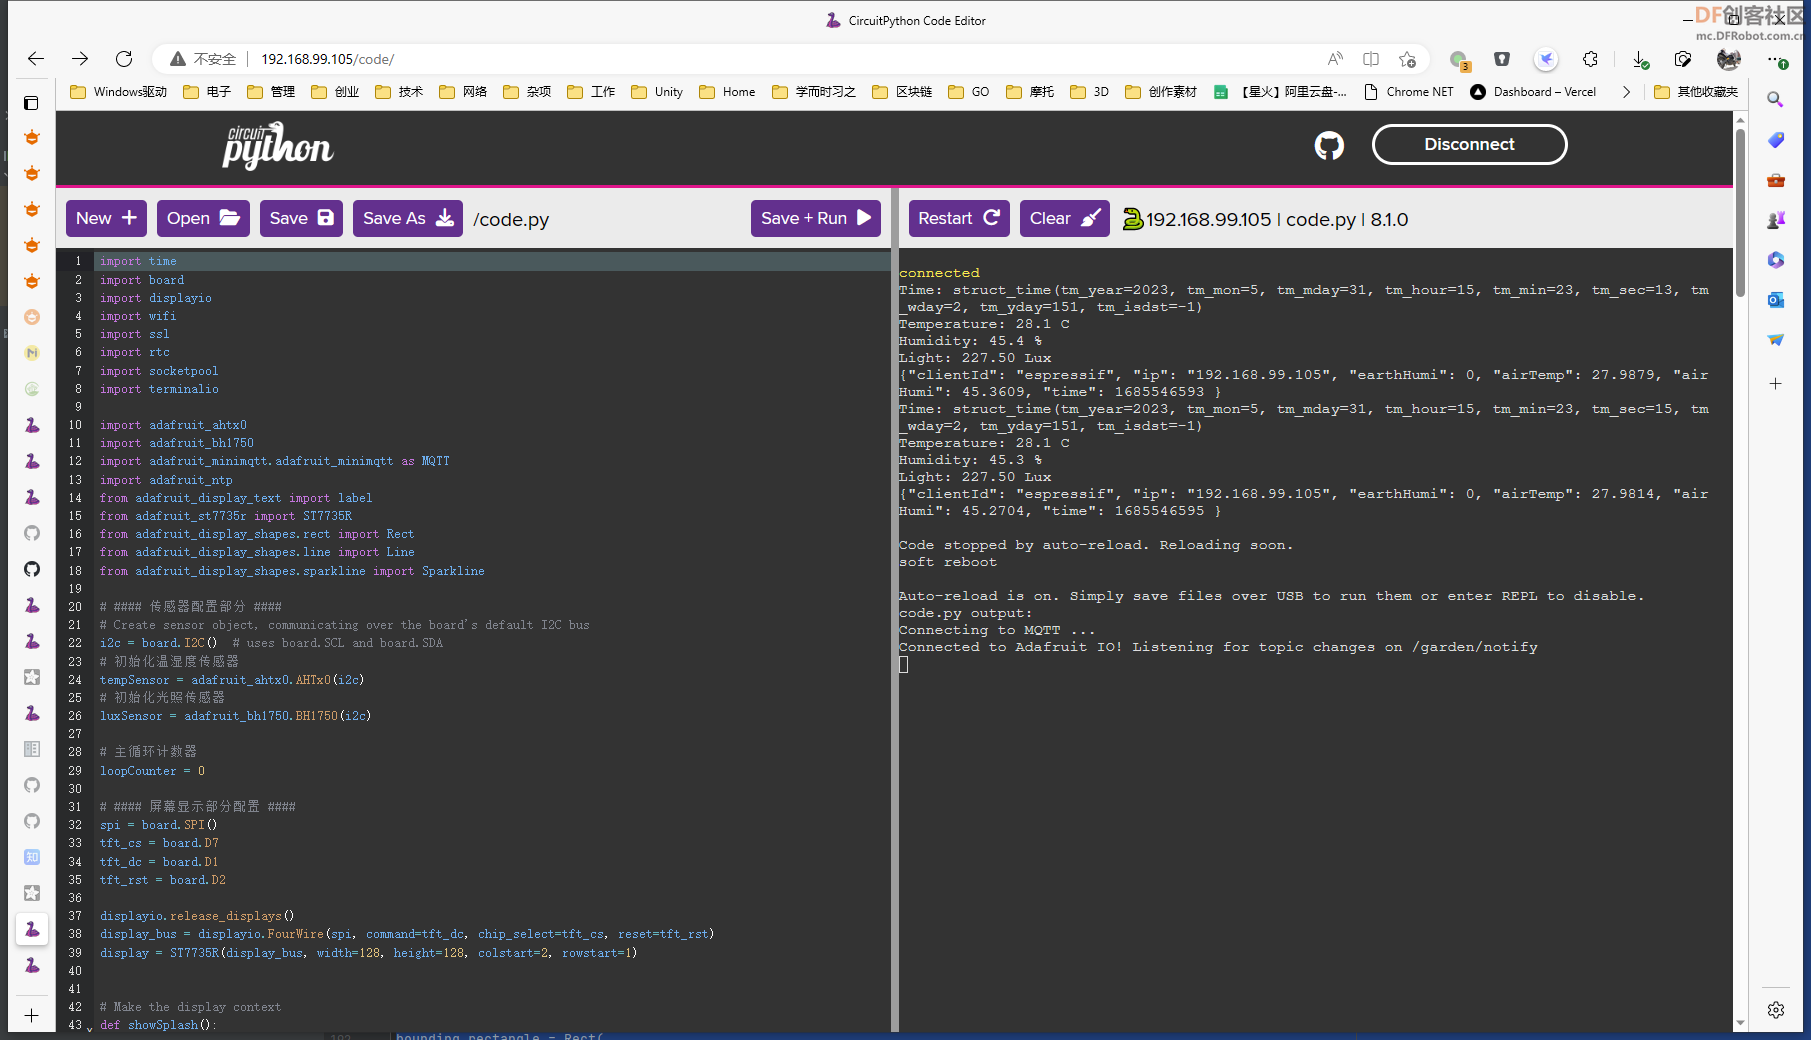
下面开始编码部分
- ########################################
- # 基于Beetle ESP32-C3的环境监测终端
- #
- # @Author: 囧大大王<mail@hessian.cn>
- # @Date: 2023/5/31
- ########################################
-
-
- # === 内置库 ===
- import time
- import board
- import displayio
- import wifi
- import ssl
- import rtc
- import socketpool
- import terminalio
- import analogio
-
- # === 外部库 ====
- import adafruit_ahtx0
- import adafruit_bh1750
- import adafruit_minimqtt.adafruit_minimqtt as MQTT
- import adafruit_ntp
- from adafruit_display_text import label
- from adafruit_st7735r import ST7735R
- from adafruit_display_shapes.rect import Rect
- from adafruit_display_shapes.line import Line
- from adafruit_display_shapes.sparkline import Sparkline
-
- # #### 传感器配置部分 ####
- # Create sensor object, communicating over the board's default I2C bus
- i2c = board.I2C() # uses board.SCL and board.SDA
- # 初始化温湿度传感器
- tempSensor = adafruit_ahtx0.AHTx0(i2c)
- # 初始化光照传感器
- luxSensor = adafruit_bh1750.BH1750(i2c)
-
- # 主循环计数器
- loopCounter = 0
-
- # #### 屏幕显示部分配置 ####
- spi = board.SPI()
- tft_cs = board.D7
- tft_dc = board.D1
- tft_rst = board.D2
-
- displayio.release_displays()
- display_bus = displayio.FourWire(spi, command=tft_dc, chip_select=tft_cs, reset=tft_rst)
- display = ST7735R(display_bus, width=128, height=128, colstart=2, rowstart=1)
-
-
- # Make the display context
- def showSplash():
- splash = displayio.Group()
- display.show(splash)
-
- color_bitmap = displayio.Bitmap(128, 128, 1)
- color_palette = displayio.Palette(1)
- color_palette[0] = 0xFF0000
-
- bg_sprite = displayio.TileGrid(color_bitmap, pixel_shader=color_palette, x=0, y=0)
- splash.append(bg_sprite)
-
- # Draw a smaller inner rectangle
- inner_bitmap = displayio.Bitmap(108, 108, 1)
- inner_palette = displayio.Palette(1)
- inner_palette[0] = 0xAA0088 # Purple
- inner_sprite = displayio.TileGrid(inner_bitmap, pixel_shader=inner_palette, x=10, y=10)
- splash.append(inner_sprite)
-
- # Draw a label
- text = "Hello DFRobot!"
- text_area = label.Label(terminalio.FONT, text=text, color=0xFFFF00, x=20, y=64)
- splash.append(text_area)
-
-
- # Make the display context
- def initMainUI():
- view = displayio.Group()
- display.show(view)
-
- # BG
- color_bitmap = displayio.Bitmap(128, 128, 1)
- color_palette = displayio.Palette(1)
- color_palette[0] = 0x7ecef4
- bg_sprite = displayio.TileGrid(color_bitmap, pixel_shader=color_palette, x=0, y=0)
- view.append(bg_sprite)
-
- rect = Rect(4, 4, 120, 120, outline=0x666666)
- view.append(rect)
-
- return view
-
-
- # 显示欢迎界面
- showSplash()
- # 等待1秒
- time.sleep(1)
-
- # #### MQTT配置 ####
- MQTT_HOST = "192.168.99.7"
- MQTT_PORT = 1883
- MQTT_USER = "gardener"
- MQTT_PASSWORD = "53bffe07f84e0c5909ff569bb2a848e7"
- MQTT_SUB_TOPIC = "/garden/notify"
- MQTT_PUB_TOPIC = "/garden/notify"
-
-
- # Define callback methods which are called when events occur
- # pylint: disable=unused-argument, redefined-outer-name
- def connected(client, userdata, flags, rc):
- # This function will be called when the client is connected
- # successfully to the broker.
- print("Connected to Adafruit IO! Listening for topic changes on %s" % MQTT_SUB_TOPIC)
- # Subscribe to all changes on the onoff_feed.
- client.subscribe(MQTT_SUB_TOPIC)
-
-
- def disconnected(client, userdata, rc):
- # This method is called when the client is disconnected
- print("Disconnected from Adafruit IO!")
-
-
- def message(client, topic, message):
- # This method is called when a topic the client is subscribed to
- # has a new message.
- print("New message on topic {0}: {1}".format(topic, message))
-
-
- # Create a socket pool
- pool = socketpool.SocketPool(wifi.radio)
- ssl_context = ssl.create_default_context()
-
- # Set up a MiniMQTT Client
- mqtt_client = MQTT.MQTT(
- broker=MQTT_HOST,
- port=MQTT_PORT,
- username=MQTT_USER,
- password=MQTT_PASSWORD,
- socket_pool=pool,
- ssl_context=ssl_context,
- )
-
- # Setup the callback methods above
- mqtt_client.on_connect = connected
- mqtt_client.on_disconnect = disconnected
- mqtt_client.on_message = message
-
- # Connect the client to the MQTT broker.
- print("Connecting to MQTT ...")
- mqtt_client.connect()
-
-
- # #### NTP时间同步配置 ####
- ntp = adafruit_ntp.NTP(pool, tz_offset=0, server="ntp1.aliyun.com", socket_timeout=5)
-
- def updateTimeByNTP():
- r = rtc.RTC()
- try:
- r.datetime = ntp.datetime
- except Exception as e:
- print(f"NTP fetch time failed: {e}")
-
-
- # #### 主界面配置 ####
- mainUi = initMainUI()
-
- # 字体配置,使用内置字体
- font = terminalio.FONT
-
- # ===上半屏信息文本===
- # IP地址
- labelIp = label.Label(font, text="255.255.255.255", color=0x333333, x=10, y=12)
- # 空气温湿度信息
- labelTemp = label.Label(font, text="TEMP: 00.0C 100%", color=0x333333, x=10, y=24)
- # 土壤湿度信息
- labelEarthHumi = label.Label(font, text="EARTH: 00000 3.3V", color=0x333333, x=10, y=36)
- # 光照
- labelLight = label.Label(font, text="Light: 9999.99lux", color=0x333333, x=10, y=48)
-
- # 温度曲线图表
- line_color = 0xffffff
- chart_width = 80
- chart_height = 50
- spkline = Sparkline(width=chart_width, height=chart_height, max_items=chart_width, x=38, y=60, color=line_color)
-
- text_xoffset = -5
- text_label1a = label.Label(
- font=font, text=str(spkline.y_top), color=line_color
- ) # yTop label
- text_label1a.anchor_point = (1, 0.5) # set the anchorpoint at right-center
- text_label1a.anchored_position = (
- spkline.x + text_xoffset,
- spkline.y,
- ) # set the text anchored position to the upper right of the graph
-
- text_label1b = label.Label(
- font=font, text=str(spkline.y_bottom), color=line_color
- ) # yTop label
- text_label1b.anchor_point = (1, 0.5) # set the anchorpoint at right-center
- text_label1b.anchored_position = (
- spkline.x + text_xoffset,
- spkline.y + chart_height,
- ) # set the text anchored position to the upper right of the graph
-
- bounding_rectangle = Rect(
- spkline.x, spkline.y, chart_width, chart_height, outline=line_color
- )
-
- mainUi.append(labelIp)
- mainUi.append(labelTemp)
- mainUi.append(labelEarthHumi)
- mainUi.append(labelLight)
- mainUi.append(spkline)
- mainUi.append(text_label1a)
- mainUi.append(text_label1b)
- mainUi.append(bounding_rectangle)
-
- total_ticks = 5
-
- for i in range(total_ticks + 1):
- x_start = spkline.x - 2
- x_end = spkline.x
- y_both = int(round(spkline.y + (i * (chart_height) / (total_ticks))))
- if y_both > spkline.y + chart_height - 1:
- y_both = spkline.y + chart_height - 1
- mainUi.append(Line(x_start, y_both, x_end, y_both, color=line_color))
-
- display.show(mainUi)
-
- # ADC输入初始化(土壤湿度)
- adcPin = analogio.AnalogIn(board.A0)
-
- while True:
- # 轮询MQTT消息
- mqtt_client.loop()
-
- if loopCounter > 86400:
- loopCounter = 1
-
- # 每两分钟重新获取一次网络时间
- if loopCounter % 120 == 0:
- updateTimeByNTP()
-
- clientId = wifi.radio.hostname
- ip = wifi.radio.ipv4_address
- now = time.time()
- json = f'{{"clientId": "{clientId}", "ip": "{ip}", "earthHumi": {adcPin.value}, "airTemp": {tempSensor.temperature}, "airHumi": {tempSensor.relative_humidity}, "time": {now} }}'
-
-
- # 打印调试信息
- print(f"Time: {time.localtime()}")
- print("Temperature: %0.1f C" % tempSensor.temperature)
- print("Humidity: %0.1f %%" % tempSensor.relative_humidity)
- print("Light: %.2f Lux" % luxSensor.lux)
- print(f"ADC A0 vlaue: {adcPin.value} {adcPin.reference_voltage}V")
- print(json)
-
- # 更新图表
- spkline.add_value(tempSensor.temperature)
- text_label1a.text = "%.1f" % max(spkline.values())
- text_label1b.text = "%.1f" % min(spkline.values())
-
- # 更新上半屏信息
- labelIp.text = f'IP: {ip}'
- labelTemp.text = "TEMP: %.1fC / %.1f%%" % (tempSensor.temperature, tempSensor.relative_humidity)
- labelEarthHumi.text = "EARTH: %d %.2fV" % (adcPin.value, adcPin.value / 65535 * adcPin.reference_voltage)
- labelLight.text = "Light: %.3f Lux" % luxSensor.lux
-
- # 每分钟一次,发送到MQTT
- if loopCounter % 60 == 0:
- mqtt_client.publish(MQTT_PUB_TOPIC, json)
-
- loopCounter += 1
-
- time.sleep(1)
完整项目代码: beetle-env-monitor.zip beetle-env-monitor.zip
项目演示
查看数据趋势的web界面
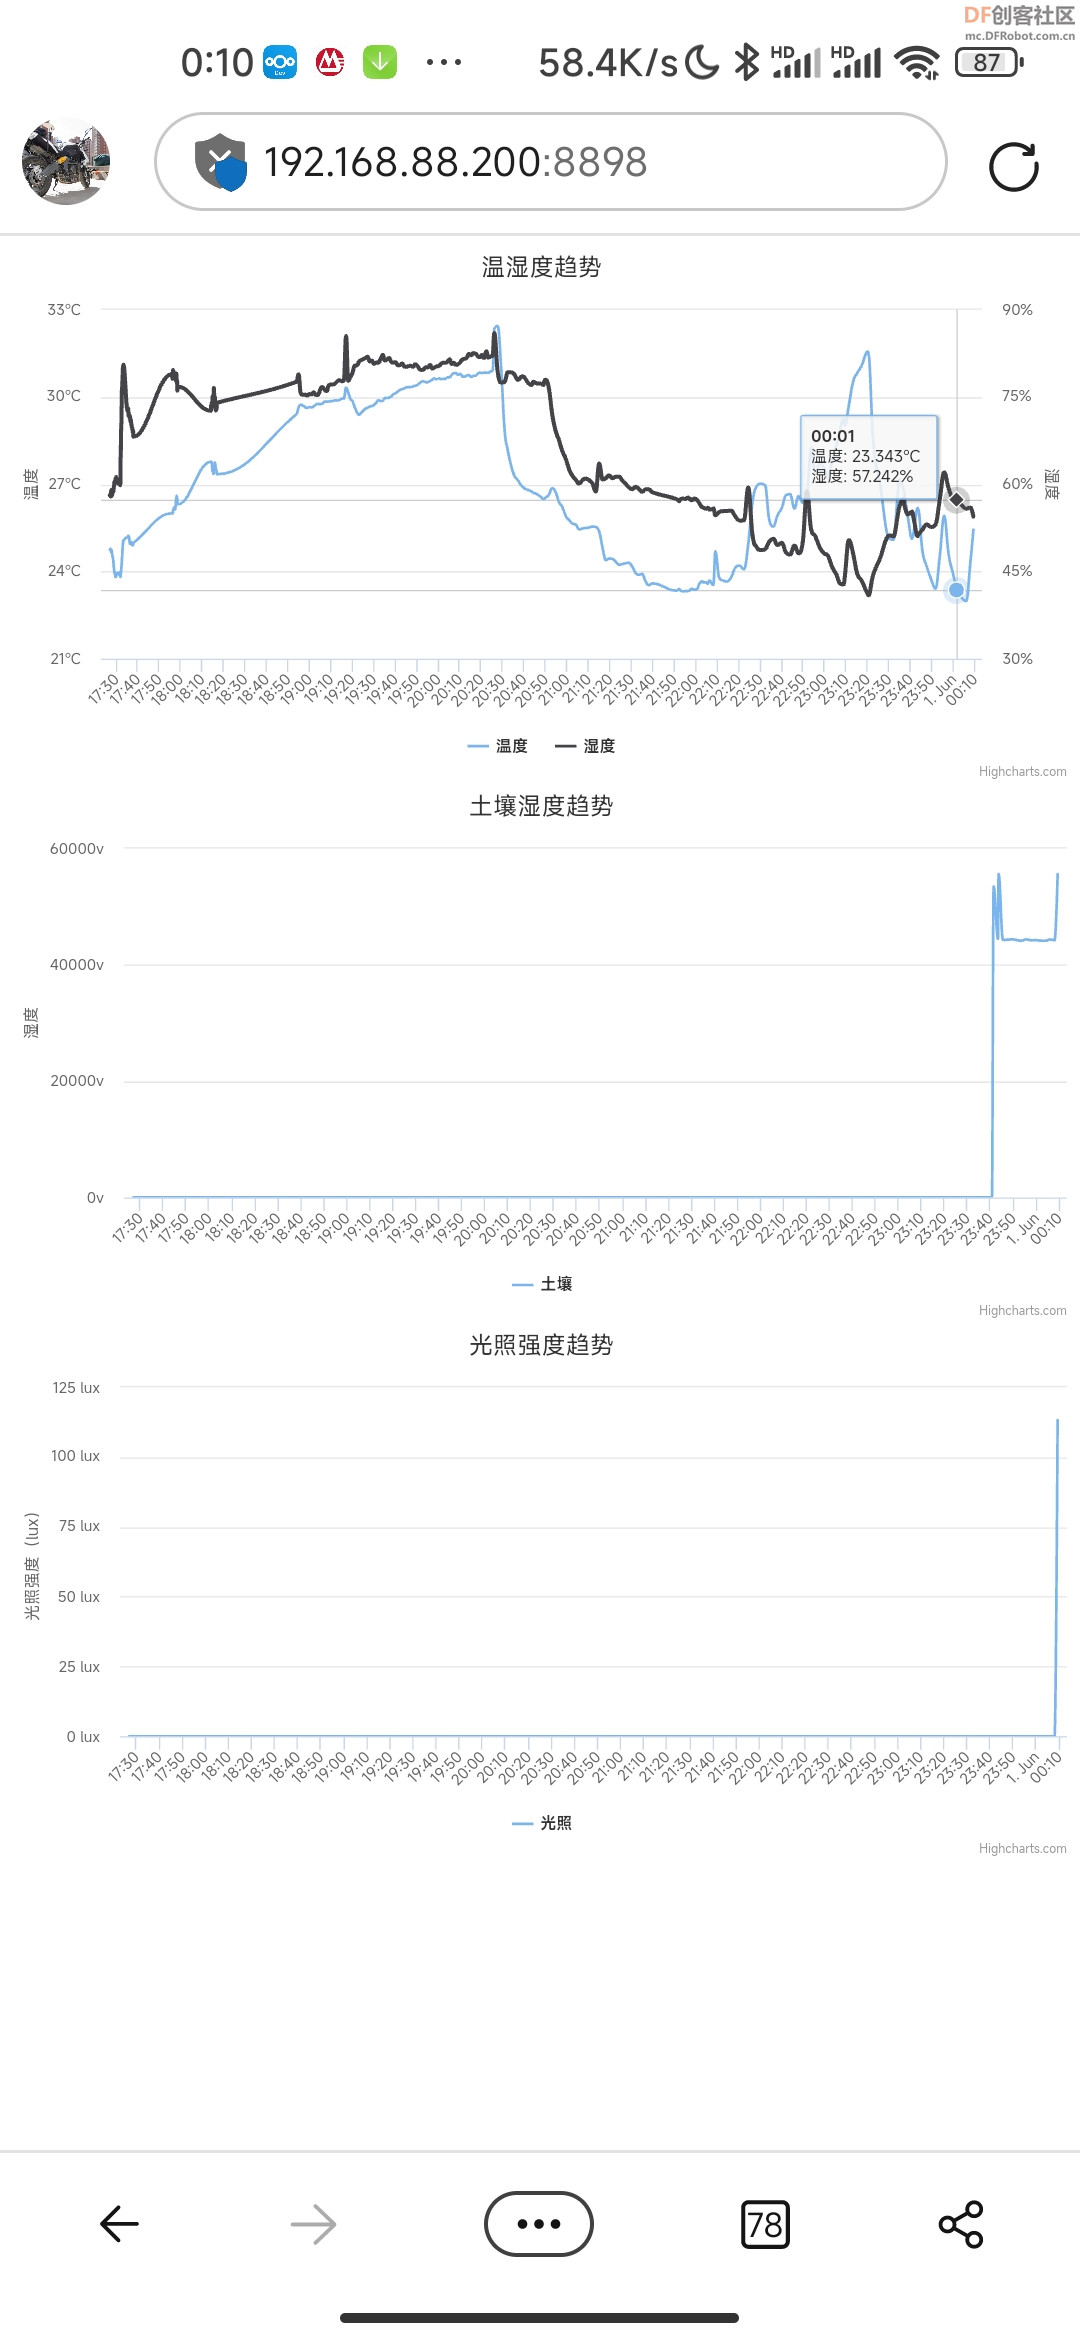
功耗情况
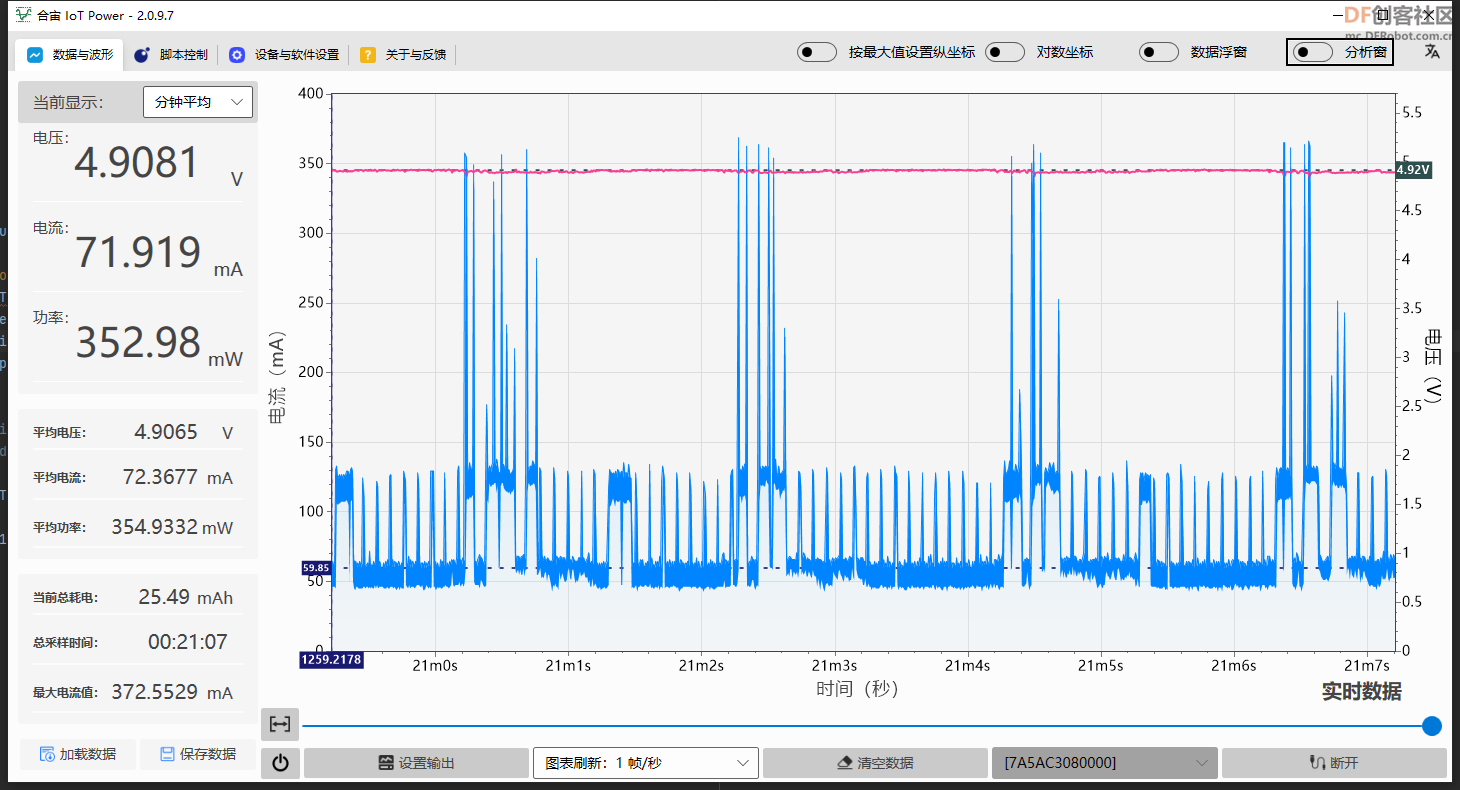
|


 beetle-env-monitor.zip

 沪公网安备31011502402448