|
一种面向智慧无人超市 基于深度学习构建人脸真伪性检测识别的安防预警系统
作品来源:第四届全国青少年人工智能挑战赛-单片机创意智造专项赛优秀作品
参赛学生:浙江省诸暨市海亮高级中学 林肯
指导老师:张渊
步骤1:作品主旨
(一)主题
智慧无人超市
(二)其他主题
安防预警、人脸真伪性检测识别、深度学习、计算机视觉
步骤2:创意来源
人工智能正在以前所未有的速度改变着我们的生活和思维,我们深知人工智能将改变未来,但未来不是我们要去的地方,而是我们正在创造的地方。人工智能给我们的生活带来便利的同时,也存在弊端,因此,需要我们去改变人工智能。现如今,应用人脸识别等人工智能技术的智慧无人超市无处不在,人脸识别系统在智慧无人超市环境中正变得比以往任何时候都更加普遍且更有需要,然而,人脸识别系统很容易被“欺骗”,被“非真实”的人脸所愚弄。例如:只需将一个人的照片(无论是打印的,还是在手机上等)放在人脸识别摄像头前面,就可以绕过人脸识别系统。为了使智慧无人超市环境中的人脸识别系统更安全,针对传统人脸真伪性检测方法的特征提取单一、检测精度低以及存在网络耗时长等问题,我们需要基于深度学习及计算机视觉技术构建人脸真伪性检测识别安防预警系统,以此来检测非真实人脸,为智慧无人超市的安全性等问题助力,为构建安全和谐的社会环境贡献自己力所能及的智慧和力量。
步骤3:作品概述
人脸识别系统必须拥有较高的安全性以及高效准确检测识别的能力,能够积极预防非真实人脸的欺骗与攻击。本项目创作了一种面向智慧无人超市基于深度学习构建人脸真伪性检测识别的安防预警系统。该系统包括两部分,分别是人脸真伪性检测识别系统和安防预警装置,人脸真伪性检测识别系统将SSD算法与轻量型的模型MobileNet结合起来,将会高效且快速地进行人脸检测,接着使用FaceNet模型提取深度学习人脸嵌入特征,最后构建CNN卷积神经网络,训练人脸真伪性检测识别模型,在实时视频流中应用该模型实现动态检测,完****脸的真伪性鉴别。该系统提高了人脸真伪性识别精度,使人脸真伪性检测精度达到99%以上,且拥有计算的复杂度低、识别精度高以及具有更高的效率的优点。当人脸真伪性检测识别系统检测到正常真实人脸时,通过pinpong库控制安防预警装置的绿灯将闪烁,当检测识别到虚假人脸时,红灯闪烁且蜂鸣器发出提示声音。
步骤4:功能简介
(一)总体概述
该系统的功能主要包括两部分,①基于卷积神经网络和OpenCV计算机视觉技术实现人脸真伪性检测功能,②通过pinpong库控制安防预警装置的硬件设备,如果检测到正常真实人脸,则安防预警装置的绿灯将闪烁,当检测识别到虚假人脸时,红灯闪烁且蜂鸣器发出提示声音。
(二)基于CNN卷积神经网络的人脸真伪性检测核心算法简介
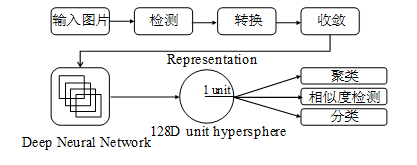
本作品创作的一种基于深度学习构建人脸真伪性检测识别安防预警系统主要通过二分类问题解决真伪人脸识别问题,该系统第一步制作与分类用于真伪人脸检测的数据集,在此过程中,首先基于Caffe深度学习框架训练SSD检测模型以检测人脸,然后通过FaceNet卷积神经网络提取人脸深度嵌入特征,然后使用SVM分类算法,在提取到的深度人脸嵌入特征上训练分类器模型,同时训练生成一种用于人脸识别的模型,最后在实时视频流中应用训练得到的人脸识别模型进行动态的人脸检测与识别,同时使用OpenCV将脸部单独提取出来,流程框图如图1所示;第二步是建立一个CNN卷积神经网络并训练人脸真伪性检测模型;第三步读取实时视频流,应用真伪性检测模型进行人脸真伪性检测识别,正确区分真实人脸和伪造人脸,从而完****脸的真伪性鉴别。
图1 人脸检测流程框图
1、制作真实人脸与伪造人脸视频
制作真实性人脸视频时,自己用手机的前置摄像头拍一段20秒左右的视频便可以使用,制作伪造人脸视频时,通过翻拍真实人脸视频来完成。为了提高算法的各种性能,更好地提取真实人脸和伪造人脸嵌入特征,在收集数据的时候应该使用不同的人脸,甚至不同肤色的人脸,而且通过旋转、翻转等各种操作增加图片数量,同时使真实人脸与伪造人脸的图片数量保持平衡。
2、人脸检测
在构建人脸检测网络时,通常使用现有的网络体系结构,例如:VGG或ResNet,然后在人脸检测内部使用它,然而这些网络体系结构比较大,在资源受限的设备上将不适合使用,本项目将MobileNets和SSD框架结合起来,MobileNets网络作为前端,SSD算法作为后端,可以快速且高效的实现基于深度学习的人脸检测。
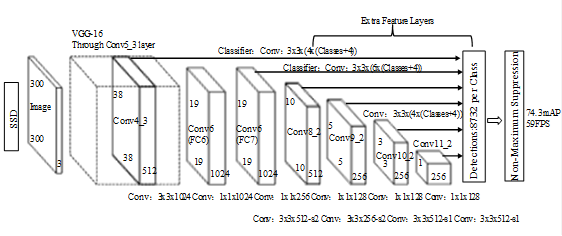
SSD综合了Faster R-CNN和yolo的优点,对于300*300的图像经过SSD模型之后,通过voc2007数据集进行测试,速度将会达到每秒59帧,map将是72.3%,SSD网络结构图如图2所示,该网络的基础模型采用vgg16,将vgg16的全连接层FC6转换成3x3的Dilation Rate=6的卷积层Conv6,把FC7转换成1x1的卷积层Conv7,将Fc8层和Dropout层进行移除操作,为了预测Confidence和Offset,需要通过增加卷积层来得到更多的特征图。该算法的输入是300x300x3,使用Conv4_3、Conv7、Conv8_2、Conv9_2、Conv10_2以及Conv11_2的输出共提取了六个特征图以预测位置和置信度,一共可以预测到8732个边界。
图2 SSD网络结构
MobileNets是谷歌公司提出的一个轻量型的神经网络,现在已经成为一种基础性的网络结构,和googlenet以及resnet比较类似,MobileNets的核心是把常规的卷积通过分解,生成1x1的逐点卷积以及深度可分离卷积,MobileNets的这种卷积操作在减小计算量以及降低模型的大小方面具有积极的作用,同时会把提取的特征进行融合操作,MobileNets的网络结构如表1所示,首先是一个3*3的标准卷积,接着是一些Depthwise Seperable Convolution,并且通过Strides=2将一些Depthwise Convolution进行采样操作,然后使用Average Pooling将特征更改为1x1,根据预测类别的大小添加整个全连接层,完了添加Softmax层。
表1 MobileNets的网络结构
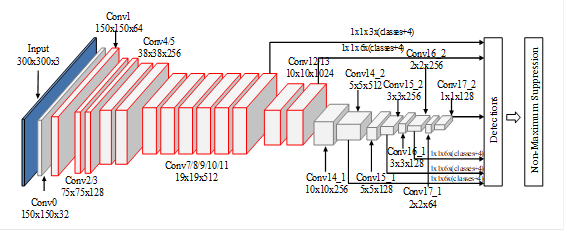
MobileNet-SSD网络是由MobileNets模型和SSD算法结合得到的,如图3所示,对应层的输出特征图是由图中的每个立方体来表示的,在基础网络部分,MobileNet-SSD神经网络与MobileNet神经网络在Conv0到Conv13的配置是完全相同的,MobileNet-SSD网络只不过没有softmax层以及全连接层等;在SSD部分,MobileNet-SSD处理Detections方面主要通过六个不同尺度的特征图上进行特征提取,从特征图到Detections的过程中,MobileNet-SSD将使用1x1的卷积核。
图3 MobileNet-SSD网络结构
3、提取人脸嵌入特征
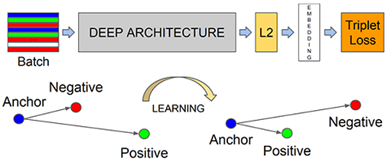
本项目在深度学习人脸嵌入特征提取方面将使用FaceNet神经网络进行处理,如图4所示,前面是一个传统的CNN网络,归一化过程需要在L2范数之前进行处理,然后建立嵌入空间,最后将是损失函数。人脸照片通过FaceNet神经网络,转化成一个128维的向量(Embedding)。这个Embedding具备一个特性,它能使同一个人的图片对应的Embedding之间的欧几里得距离很小,而不同人的图片对应的Embedding之间的欧几里得距离很大。因此,算法的目标——对样本集里构造的任意三元组 ,使得类内距离尽可能小,类间距离尽可能拉大。即机器学习里这样的一个损失函数,如式(1)所示:
这里,α是个阈值,当α类内距离与类间距离大于阈值时,才产生loss和梯度。对三元组分别求偏导,则有式(2)~式(4):
由此可以得知,通常使用正向传播的变量来求梯度,因此,为了直接计算反向传播的梯度,可在在计算的时候只需要把正向传播的结果暂时保存起来。FaceNet采用谷歌的Inception和Zeiler&Fergus架构两种深度卷积网络,FaceNet的整体框架和其它比较常见的深度学习框架是一致的。在特征提取方面同样使用了基于CNN的方式,在损失函数的选择上使用了Triplet_Loss,还包括使用随机梯度下降法来进行反向传播,此方法比较突出的一点是该模型连接了残差部分,为训练时收敛速度的提高做了良好的基础。
图4 FaceNet模型提取深度学习人脸嵌入特征
4、CNN卷积神经网络
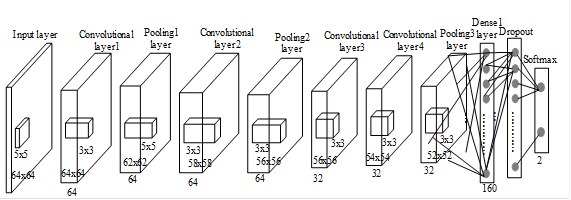
本系统构建了一个用于人脸真伪性检测的CNN卷积神经网络,如图5所示,让网络保持在最浅、参数最少的状态,这样做有两个原因:一是为避免模型在小数据集上发生过拟合,二是为保证模型快到可以实时运行,就算在树莓派上也能运行。卷积层,激活层,池化层和全连接层等组成了CNN的基本结构,随着网络层数越来越深,结构越来越复杂,一方面通过增加深度来提取更多有效的特征,另一方面也提出了很多优化的方法来提升网络的效率和精度。四个卷积层、两个池化层以及一个全连接层组成了该模型。
图5 CNN模型 (1)卷积层
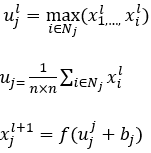
卷积层主要用于平滑卷积,它是由具有可调参数的卷积核和上一层的卷积之后获得的特征图计算得出的,然后通过加上偏置项获得输出,接着最终的卷积输出将通过激活该功能获得新的特征图,并将其输出以用于整个图片的卷积计算,如式(5)~式(6)所示:
(2)抽样层
输入图像之后,CNN将会提取图像所包含的特征,因为这些特征通常含有大量的信息,在这里,CNN卷积神经网络提取到的特征主要用于分类问题。一般情况下,当使用经过CNN卷积神经网络提取到的特征进行分类器训练时,将会产生大量且复杂的计算量,因此,经过卷积之后,要进行降维操作,主要采用的方法是最大合并方法,将提取到的特征区域划分成n*n的小区域,同时将n*n的小区域的max值用于卷积特征来处理,这些特征经过降维处理之后分类操作将会更容易进行。最大值法、输出函数和均值法如式(7)~式(9)所示:
(3)全连接层
全连接层:使用softmax完全连接,经过CNN提取图像的一系列特征之后,将会进一步获得激活函数值。在使用的过程中比较常用的分类方法如式(10)所示:
步骤6:软件平台及模式
Mind+ V1.7.1 RC1.0 ,Python模式。
步骤7:硬件清单
1x Arduino UNO主控板
1x Arduino UNO I/O扩展板
1x 红色LED灯
1x 绿色LED灯
1x 蜂鸣器
1x USB数据线
3x 3pin线
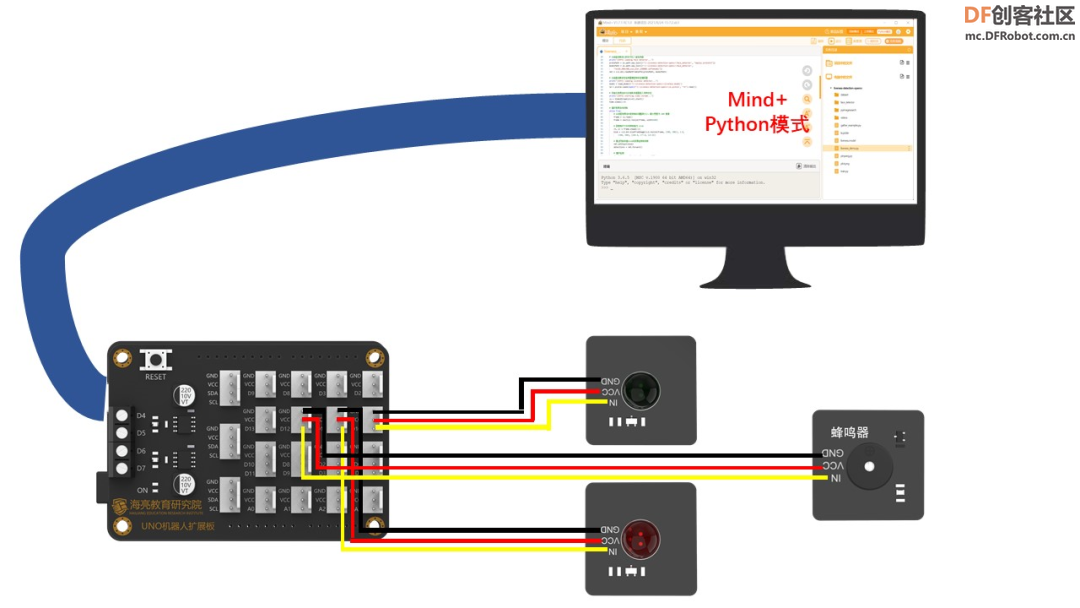
步骤8:硬件接线图
步骤9:制作过程
(一)结构设计
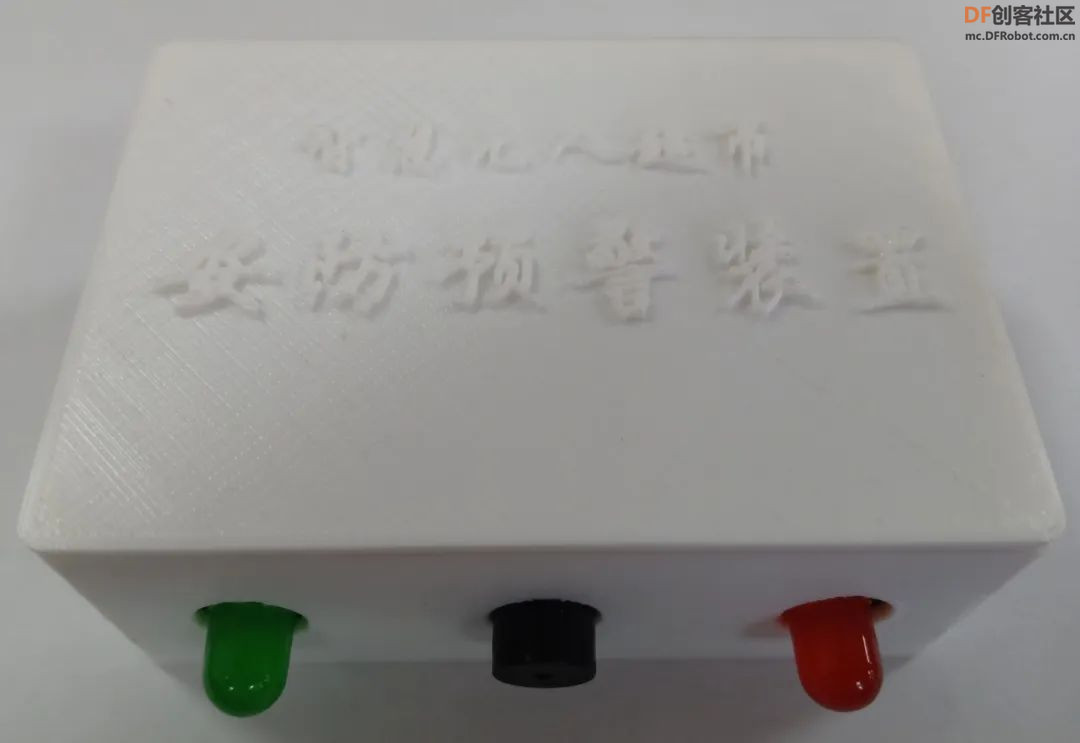
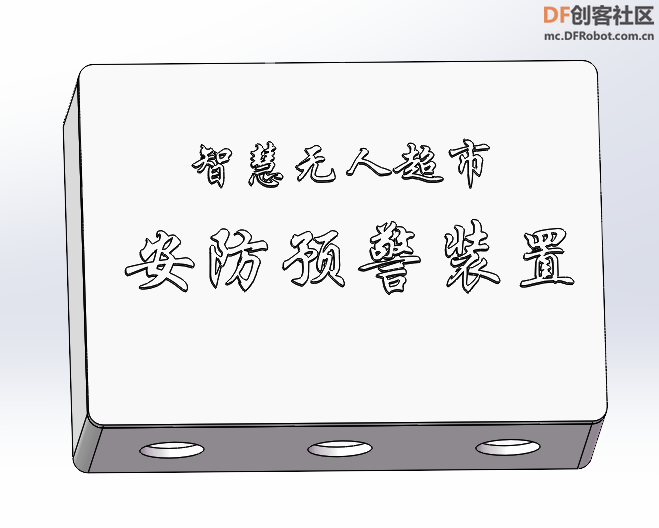
安防预警装置外观形状是盒子类型的,采用PLA材料3D打印而成,并且在相对应的传感器和连线处留了一定大小的孔位,盖子与盒子主体部分的衔接处采用卡扣的方式拼接而成。如图6所示为solidworks建模文件,如图7所示为3D打印的实物图。
图6 solidworks建模图
图7 3D打印的实物图
(二)算法开发调试
(说明:该过程中的算法全部在Mind+环境中,Python模式下进行开发调试)
在Mind+软件中,Python模式下,进入库管理界面,安装需要用到的软件包:pinpong、scikit-learn、Theano、Keras、numpy、scipy、matplotlib、Pillow、opencv-Python、TensorFlow、imutils。
1、创建自定义人脸识别数据集
创建一个 Python 脚本,命名为build_face_dataset.py,使用 OpenCV 和摄像头来检测视频流中的人脸并将人脸图像/帧保存到磁盘。这个 Python 脚本将:访问摄像头,检测人脸,将包含人脸的帧写入磁盘。
(1)导入需要用到的软件包。
代码
- # 导入必要的软件包
- from imutils.video import VideoStream
- import argparse
- import imutils
- import time
- import cv2
- import os
(2)从磁盘加载 OpenCV 的 Haar 级联进行人脸检测并初始化视频流。
代码
-
- # 从磁盘加载 OpenCV 的 Haar 级联进行人脸检测
- detector = cv2.CascadeClassifier(r'C:\build-face-dataset\haarcascade_frontalface_default.xml')
- # 初始化视频流,让相机传感器预热,并初始化到目前为止写入磁盘的示例总数
- print("[INFO] starting video stream...")
- vs = VideoStream(src=0).start()
- time.sleep(2.0)
- total = 0
(3)循环视频流中的帧。
代码
-
- # 循环视频流中的帧
- while True:
- # 从线程视频流中抓取帧,克隆它,然后调整框架的大小
- frame = vs.read()
- orig = frame.copy()
- frame = imutils.resize(frame, width=400)
-
- # 检测灰度帧中的人脸
- rects = detector.detectMultiScale(
- cv2.cvtColor(frame, cv2.COLOR_BGR2GRAY), scaleFactor=1.1,
- minNeighbors=5, minSize=(30, 30))
-
- # 循环面部检测并将它们绘制在框架上
- for (x, y, w, h) in rects:
- cv2.rectangle(frame, (x, y), (x + w, y + h), (0, 255, 0), 2)
-
(4)在屏幕上显示人脸框架,同时 处理按键,保存人脸或者退出。
代码
-
- # 显示输出帧
- cv2.imshow("Frame", frame)
- key = cv2.waitKey(1) & 0xFF
-
- # 如果`k`键被按下,将*原始*帧写入磁盘,以便我们稍后处理它并将其用于人脸识别
- if key == ord("k"):
- p = os.path.sep.join([r'C:\build-face-dataset\dataset\hl', "{}.png".format(
- str(total).zfill(5))])
- cv2.imwrite(p, orig)
- total += 1
-
- # 如果按下 `q` 键,则中断循环
- elif key == ord("q"):
- break
(5)打印存储在电脑中的图像数量并执行清理工作。
代码
-
- # 打印保存的总数并做一些清理工作
- print("[INFO] {} face images stored".format(total))
- print("[INFO] cleaning up...")
- cv2.destroyAllWindows()
- vs.stop()
(6)完整代码
代码
-
- # 导入必要的软件包
- from imutils.video import VideoStream
- import argparse
- import imutils
- import time
- import cv2
- import os
-
- # 从磁盘加载 OpenCV 的 Haar 级联进行人脸检测
- detector = cv2.CascadeClassifier(r'C:\build-face-dataset\haarcascade_frontalface_default.xml')
- # 初始化视频流,让相机传感器预热,并初始化到目前为止写入磁盘的示例总数
- print("[INFO] starting video stream...")
- vs = VideoStream(src=0).start()
- time.sleep(2.0)
- total = 0
-
- # 循环视频流中的帧
- while True:
- # 从线程视频流中抓取帧,克隆它,然后调整框架的大小
- frame = vs.read()
- orig = frame.copy()
- frame = imutils.resize(frame, width=400)
-
- # 检测灰度帧中的人脸
- rects = detector.detectMultiScale(
- cv2.cvtColor(frame, cv2.COLOR_BGR2GRAY), scaleFactor=1.1,
- minNeighbors=5, minSize=(30, 30))
-
- # 循环面部检测并将它们绘制在框架上
- for (x, y, w, h) in rects:
- cv2.rectangle(frame, (x, y), (x + w, y + h), (0, 255, 0), 2)
-
- # 显示输出帧
- cv2.imshow("Frame", frame)
- key = cv2.waitKey(1) & 0xFF
-
- # 如果`k`键被按下,将*原始*帧写入磁盘,以便我们稍后处理它并将其用于人脸识别
- if key == ord("k"):
- p = os.path.sep.join([r'C:\build-face-dataset\dataset\hl', "{}.png".format(
- str(total).zfill(5))])
- cv2.imwrite(p, orig)
- total += 1
-
- # 如果按下 `q` 键,则中断循环
- elif key == ord("q"):
- break
-
- # 打印保存的总数并做一些清理工作
- print("[INFO] {} face images stored".format(total))
- print("[INFO] cleaning up...")
- cv2.destroyAllWindows()
- vs.stop()
(7)创建的自定义人脸识别数据集如图8所示。
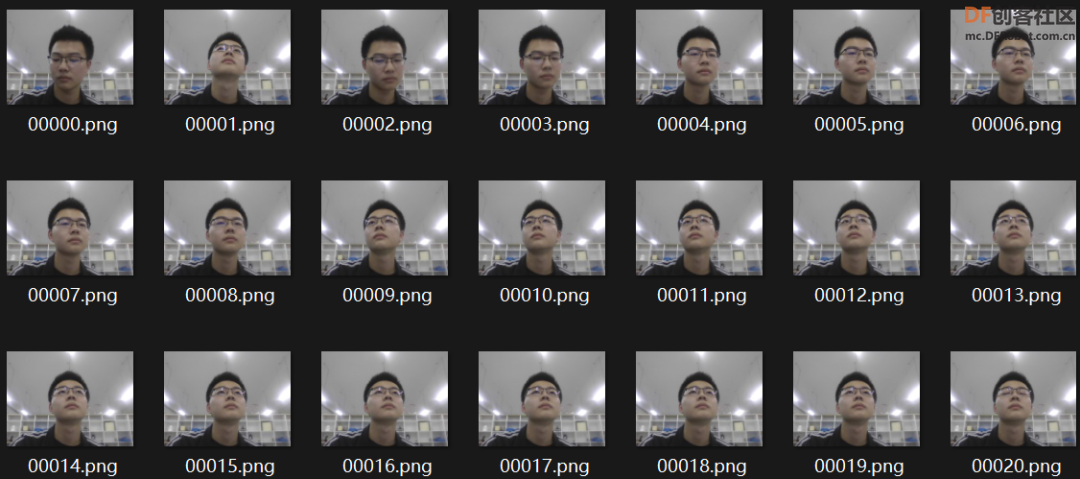
图8 人脸识别数据集
2、人脸检测识别
为了构建人脸真伪性检测识别系统,首先需要执行人脸检测,使用深度学习计算128维人脸嵌入以量化人脸,从每个人脸中提取人脸嵌入,在嵌入上训练支持向量机 (SVM)人脸识别模型,然后使用 OpenCV 识别视频流中的人脸。
(1)从人脸数据集中提取嵌入特征
新建Python脚本,命名为extract_embeddings.py。
①导入所需的包,构造参数解析器并解析参数。
代码
-
- # 导入必要的软件包
- from imutils import paths
- import numpy as np
- import argparse
- import imutils
- import pickle
- import cv2
- import os
-
- # 构造参数解析器并解析参数
- ap = argparse.ArgumentParser()
- ap.add_argument("-c", "--confidence", type=float, default=0.5,
- help="minimum probability to filter weak detections")
- args = vars(ap.parse_args())
②从磁盘加载人脸检测器和嵌入器,使用基于 Caffe 的 DL 人脸检测器来定位图像中的人脸,使用基于 Torch负责通过深度学习特征提取来提取面部嵌入。
代码
-
- # 从磁盘加载我们的序列化人脸检测器
- print("[INFO] loading face detector...")
- protoPath = os.path.sep.join([r'C:\opencv-face-recognition\face_detection_model', "deploy.prototxt"])
- modelPath = os.path.sep.join([r'C:\opencv-face-recognition\face_detection_model',
- "res10_300x300_ssd_iter_140000.caffemodel"])
- detector = cv2.dnn.readNetFromCaffe(protoPath, modelPath)
-
- # 从磁盘加载我们序列化的人脸嵌入模型
- print("[INFO] loading face recognizer...")
- embedder = cv2.dnn.readNetFromTorch(r'C:\opencv-face-recognition\openface_nn4.small2.v1.t7')
③获取图像路径并执行初始化。
代码
-
- # 获取数据集中输入图像的路径
- print("[INFO] quantifying faces...")
- imagePaths = list(paths.list_images(r'C:\opencv-face-recognition\dataset'))
-
- # 初始化我们提取的面部嵌入列表和对应的人名
- knownEmbeddings = []
- knownNames = []
-
- # 初始化处理的人脸总数
- total = 0
④开始遍历图像路径,这个循环将负责从每个图像中找到的人脸中提取嵌入特征。
代码
-
- # 遍历图像路径
- for (i, imagePath) in enumerate(imagePaths):
- # 从图片路径中提取人名
- print("[INFO] processing image {}/{}".format(i + 1,
- len(imagePaths)))
- name = imagePath.split(os.path.sep)[-2]
-
- # 加载图像,将其调整为 600 像素的宽度,然后抓取图像尺寸
- image = cv2.imread(imagePath)
- image = imutils.resize(image, width=600)
- (h, w) = image.shape[:2]
⑤检测和定位人脸。
代码
-
- # 从图像构建一个 blob
- imageBlob = cv2.dnn.blobFromImage(
- cv2.resize(image, (300, 300)), 1.0, (300, 300),
- (104.0, 177.0, 123.0), swapRB=False, crop=False)
-
- # 应用 OpenCV 的基于深度学习的人脸检测器来定位输入图像中的人脸
- detector.setInput(imageBlob)
- detections = detector.forward()
-
⑥处理检测,定位图像中人脸的概率和坐标。
代码
- # 确保至少找到一张脸
- if len(detections) > 0:
- # 我们假设每个图像只有一个人脸,所以找到概率最大的边界框
- i = np.argmax(detections[0, 0, :, 2])
- confidence = detections[0, 0, i, 2]
-
- # 确保最大概率的检测也是表示我们的最小概率测试
- if confidence > args["confidence"]:
- # 计算人脸边界框的 (x, y) 坐标
- box = detections[0, 0, i, 3:7] * np.array([w, h, w, h])
- (startX, startY, endX, endY) = box.astype("int")
-
- #提取人脸ROI并抓取ROI尺寸
- face = image[startY:endY, startX:endX]
- (fH, fW) = face.shape[:2]
-
- # 确保人脸宽度和高度足够大
- if fW < 20 or fH < 20:
- continue
-
⑦利用嵌入器CNN 并提取人脸嵌入特征。
代码
-
- # 为人脸 ROI 构造一个 blob,然后传递 blob,通过人脸嵌入模型得到128-d人脸量化
- faceBlob = cv2.dnn.blobFromImage(face, 1.0 / 255,
- (96, 96), (0, 0, 0), swapRB=True, crop=False)
- embedder.setInput(faceBlob)
- vec = embedder.forward()
-
- # 添加人名+对应人脸,嵌入到各自的列表
- knownNames.append(name)
- knownEmbeddings.append(vec.flatten())
- total += 1
⑧将数据存储到磁盘。
代码
-
- # 将面部嵌入+名称保存到磁盘
- print("[INFO] serializing {} encodings...".format(total))
- data = {"embeddings": knownEmbeddings, "names": knownNames}
- f = open(r'C:\opencv-face-recognition\output\embeddings.pickle', "wb")
- f.write(pickle.dumps(data))
- f.close()
⑨完整代码。
代码-
- # 导入必要的软件包
- from imutils import paths
- import numpy as np
- import argparse
- import imutils
- import pickle
- import cv2
- import os
-
- # 构造参数解析器并解析参数
- ap = argparse.ArgumentParser()
- ap.add_argument("-c", "--confidence", type=float, default=0.5,
- help="minimum probability to filter weak detections")
- args = vars(ap.parse_args())
-
- # 从磁盘加载我们的序列化人脸检测器
- print("[INFO] loading face detector...")
- protoPath = os.path.sep.join([r'C:\opencv-face-recognition\face_detection_model', "deploy.prototxt"])
- modelPath = os.path.sep.join([r'C:\opencv-face-recognition\face_detection_model',
- "res10_300x300_ssd_iter_140000.caffemodel"])
- detector = cv2.dnn.readNetFromCaffe(protoPath, modelPath)
-
- # 从磁盘加载我们序列化的人脸嵌入模型
- print("[INFO] loading face recognizer...")
- embedder = cv2.dnn.readNetFromTorch(r'C:\opencv-face-recognition\openface_nn4.small2.v1.t7')
-
- # 获取数据集中输入图像的路径
- print("[INFO] quantifying faces...")
- imagePaths = list(paths.list_images(r'C:\opencv-face-recognition\dataset'))
-
- # 初始化我们提取的面部嵌入列表和对应的人名
- knownEmbeddings = []
- knownNames = []
-
- # 初始化处理的人脸总数
- total = 0
-
- # 遍历图像路径
- for (i, imagePath) in enumerate(imagePaths):
- # 从图片路径中提取人名
- print("[INFO] processing image {}/{}".format(i + 1,
- len(imagePaths)))
- name = imagePath.split(os.path.sep)[-2]
-
- # 加载图像,将其调整为 600 像素的宽度,然后抓取图像尺寸
- image = cv2.imread(imagePath)
- image = imutils.resize(image, width=600)
- (h, w) = image.shape[:2]
-
- # 从图像构建一个 blob
- imageBlob = cv2.dnn.blobFromImage(
- cv2.resize(image, (300, 300)), 1.0, (300, 300),
- (104.0, 177.0, 123.0), swapRB=False, crop=False)
-
- # 应用 OpenCV 的基于深度学习的人脸检测器来定位输入图像中的人脸
- detector.setInput(imageBlob)
- detections = detector.forward()
-
- # 确保至少找到一张脸
- if len(detections) > 0:
- # 我们假设每个图像只有一个人脸,所以找到概率最大的边界框
- i = np.argmax(detections[0, 0, :, 2])
- confidence = detections[0, 0, i, 2]
-
- # 确保最大概率的检测也是表示我们的最小概率测试
- if confidence > args["confidence"]:
- # 计算人脸边界框的 (x, y) 坐标
- box = detections[0, 0, i, 3:7] * np.array([w, h, w, h])
- (startX, startY, endX, endY) = box.astype("int")
-
- #提取人脸ROI并抓取ROI尺寸
- face = image[startY:endY, startX:endX]
- (fH, fW) = face.shape[:2]
-
- # 确保人脸宽度和高度足够大
- if fW < 20 or fH < 20:
- continue
-
- # 为人脸 ROI 构造一个 blob,然后传递 blob,通过人脸嵌入模型得到128-d人脸量化
- faceBlob = cv2.dnn.blobFromImage(face, 1.0 / 255,
- (96, 96), (0, 0, 0), swapRB=True, crop=False)
- embedder.setInput(faceBlob)
- vec = embedder.forward()
-
- # 添加人名+对应人脸,嵌入到各自的列表
- knownNames.append(name)
- knownEmbeddings.append(vec.flatten())
- total += 1
-
- # 将面部嵌入+名称保存到磁盘
- print("[INFO] serializing {} encodings...".format(total))
- data = {"embeddings": knownEmbeddings, "names": knownNames}
- f = open(r'C:\opencv-face-recognition\output\embeddings.pickle', "wb")
- f.write(pickle.dumps(data))
- f.close()
⑩执行脚本以使用 OpenCV 计算人脸嵌入,如图9所示。

图9 计算提取人脸嵌入特征
(2)训练人脸识别模型
已经为每张脸提取了 128 维嵌入特征,接着需要在嵌入之上训练一个“标准”机器学习模型。新建train_model.py脚本。
①导入必要的软件包。
代码
-
- # 导入必要的软件包
- from sklearn.preprocessing import LabelEncoder
- from sklearn.svm import SVC
- import argparse
- import pickle
②加载面部嵌入并对标签进行编码。
代码
-
- # 加载人脸嵌入
- print("[INFO] loading face embeddings...")
- data = pickle.loads(open(r'C:\opencv-face-recognition\output\embeddings.pickle', "rb").read())
-
- # 编码标签
- print("[INFO] encoding labels...")
- le = LabelEncoder()
- labels = le.fit_transform(data["names"])
③训练SVM 模型来识别人脸。
代码
-
- # 训练用于接受人脸和产生实际的人脸识别的128维嵌入的模型
- print("[INFO] training model...")
- recognizer = SVC(C=1.0, kernel="linear", probability=True)
- recognizer.fit(data["embeddings"], labels)
④训练模型后,将模型和标签编码器保存到磁盘。
代码
-
- # 训练用于接受人脸和产生实际的人脸识别的128维嵌入的模型
- print("[INFO] training model...")
- recognizer = SVC(C=1.0, kernel="linear", probability=True)
- recognizer.fit(data["embeddings"], labels)
⑤完整代码
代码
-
- # 导入必要的软件包
- from sklearn.preprocessing import LabelEncoder
- from sklearn.svm import SVC
- import argparse
- import pickle
-
- # 加载人脸嵌入
- print("[INFO] loading face embeddings...")
- data = pickle.loads(open(r'C:\opencv-face-recognition\output\embeddings.pickle', "rb").read())
-
- # 编码标签
- print("[INFO] encoding labels...")
- le = LabelEncoder()
- labels = le.fit_transform(data["names"])
-
- # 训练用于接受人脸和产生实际的人脸识别的128维嵌入的模型
- print("[INFO] training model...")
- recognizer = SVC(C=1.0, kernel="linear", probability=True)
- recognizer.fit(data["embeddings"], labels)
-
- # 将实际人脸识别模型写入磁盘
- f = open(r'C:\opencv-face-recognition\output\recognizer.pickle', "wb")
- f.write(pickle.dumps(recognizer))
- f.close()
-
- # 将标签编码器写入磁盘
- f = open(r'C:\opencv-face-recognition\output\le.pickle', "wb")
- f.write(pickle.dumps(le))
- f.close()
⑥模型训练结果,如图10所示。
图10 模型训练结果
(3)使用OpenCV识别视频流中的人脸
新建recognize.py脚本。
①导入必要的软件包,构造参数解析器并解析参数。
代码
-
- # 导入必要的软件包
- from imutils.video import VideoStream
- from imutils.video import FPS
- import numpy as np
- import argparse
- import imutils
- import pickle
- import time
- import cv2
- import os
-
- # 构造参数解析器并解析参数
- ap = argparse.ArgumentParser()
- ap.add_argument("-c", "--confidence", type=float, default=0.5,
- help="minimum probability to filter weak detections")
- args = vars(ap.parse_args())
②将三个模型从磁盘加载到内存中。
代码
-
- # 从磁盘加载我们的序列化人脸检测器
- print("[INFO] loading face detector...")
- protoPath = os.path.sep.join([r'C:\opencv-face-recognition\face_detection_model', "deploy.prototxt"])
- modelPath = os.path.sep.join([r'C:\opencv-face-recognition\face_detection_model',
- "res10_300x300_ssd_iter_140000.caffemodel"])
- detector = cv2.dnn.readNetFromCaffe(protoPath, modelPath)
-
- # 从磁盘加载我们序列化的人脸嵌入模型
- print("[INFO] loading face recognizer...")
- embedder = cv2.dnn.readNetFromTorch(r'C:\opencv-face-recognition\openface_nn4.small2.v1.t7')
-
- # 加载实际人脸识别模型和标签编码器
- recognizer = pickle.loads(open(r'C:\opencv-face-recognition\output\recognizer.pickle', "rb").read())
- le = pickle.loads(open(r'C:\opencv-face-recognition\output\le.pickle', "rb").read())
③初始化视频流并处理帧。
代码
-
- # 初始化视频流,然后让相机传感器预热
- print("[INFO] starting video stream...")
- vs = VideoStream(src=0).start()
- time.sleep(2.0)
-
- # 启动 FPS 吞吐量估算器
- fps = FPS().start()
-
- # 循环视频文件流中的帧
- while True:
- # 从线程视频流中抓取帧
- frame = vs.read()
-
- # 将框架尺寸调整为 600 像素的宽度,然后抓取图像
- frame = imutils.resize(frame, width=600)
- (h, w) = frame.shape[:2]
-
- # 从图像构建一个 blob
- imageBlob = cv2.dnn.blobFromImage(
- cv2.resize(frame, (300, 300)), 1.0, (300, 300),
- (104.0, 177.0, 123.0), swapRB=False, crop=False)
-
- # 应用 OpenCV 的基于深度学习的人脸检测器来定位输入图像中的人脸
- # faces in the input image
- detector.setInput(imageBlob)
- detections = detector.forward()
④开始处理检测。
代码
- # 循环检测
- for i in range(0, detections.shape[2]):
- # 提取与预测相关的置信度
- confidence = detections[0, 0, i, 2]
-
- # 过滤掉弱检测
- if confidence > args["confidence"]:
- # 计算人脸边界框的 (x, y) 坐标
- box = detections[0, 0, i, 3:7] * np.array([w, h, w, h])
- (startX, startY, endX, endY) = box.astype("int")
-
- # 提取人脸ROI
- face = frame[startY:endY, startX:endX]
- (fH, fW) = face.shape[:2]
-
- # 确保人脸宽度和高度足够大
- if fW < 20 or fH < 20:
- continue
⑤执行 OpenCV 人脸识别。
代码
-
- # 为人脸 ROI 构造一个 blob,然后传递 blob,通过我们的人脸嵌入模型得到128-d人脸量化
- faceBlob = cv2.dnn.blobFromImage(face, 1.0 / 255,
- (96, 96), (0, 0, 0), swapRB=True, crop=False)
- embedder.setInput(faceBlob)
- vec = embedder.forward()
-
- # 进行分类识别人脸
- preds = recognizer.predict_proba(vec)[0]
- j = np.argmax(preds)
- proba = preds[j]
- name = le.classes_[j]
-
- # 绘制人脸的边界框以及关联的概率
- text = "{}: {:.2f}%".format(name, proba * 100)
- y = startY - 10 if startY - 10 > 10 else startY + 10
- cv2.rectangle(frame, (startX, startY), (endX, endY),
- (0, 0, 255), 2)
- cv2.putText(frame, text, (startX, y),
- cv2.FONT_HERSHEY_SIMPLEX, 0.45, (0, 0, 255), 2)
-
- # 更新 FPS 计数器
- fps.update()
⑥显示 OpenCV 人脸识别结果并做清理工作。
代码
-
- # 显示输出帧
- cv2.imshow("Frame", frame)
- key = cv2.waitKey(1) & 0xFF
-
- # 如果按下 `q` 键,则中断循环
- if key == ord("q"):
- break
-
- # 停止计时器并显示 FPS 信息
- fps.stop()
- print("[INFO] elasped time: {:.2f}".format(fps.elapsed()))
- print("[INFO] approx. FPS: {:.2f}".format(fps.fps()))
-
- # 做一些清理工作
- cv2.destroyAllWindows()
- vs.stop()
⑦完整代码。
代码
-
- # 导入必要的软件包
- from imutils.video import VideoStream
- from imutils.video import FPS
- import numpy as np
- import argparse
- import imutils
- import pickle
- import time
- import cv2
- import os
-
- # 构造参数解析器并解析参数
- ap = argparse.ArgumentParser()
- ap.add_argument("-c", "--confidence", type=float, default=0.5,
- help="minimum probability to filter weak detections")
- args = vars(ap.parse_args())
-
- # 从磁盘加载我们的序列化人脸检测器
- print("[INFO] loading face detector...")
- protoPath = os.path.sep.join([r'C:\opencv-face-recognition\face_detection_model', "deploy.prototxt"])
- modelPath = os.path.sep.join([r'C:\opencv-face-recognition\face_detection_model',
- "res10_300x300_ssd_iter_140000.caffemodel"])
- detector = cv2.dnn.readNetFromCaffe(protoPath, modelPath)
-
- # 从磁盘加载我们序列化的人脸嵌入模型
- print("[INFO] loading face recognizer...")
- embedder = cv2.dnn.readNetFromTorch(r'C:\opencv-face-recognition\openface_nn4.small2.v1.t7')
-
- # 加载实际人脸识别模型和标签编码器
- recognizer = pickle.loads(open(r'C:\opencv-face-recognition\output\recognizer.pickle', "rb").read())
- le = pickle.loads(open(r'C:\opencv-face-recognition\output\le.pickle', "rb").read())
-
- # 初始化视频流,然后让相机传感器预热
- print("[INFO] starting video stream...")
- vs = VideoStream(src=0).start()
- time.sleep(2.0)
-
- # 启动 FPS 吞吐量估算器
- fps = FPS().start()
-
- # 循环视频文件流中的帧
- while True:
- # 从线程视频流中抓取帧
- frame = vs.read()
-
- # 将框架尺寸调整为 600 像素的宽度,然后抓取图像
- frame = imutils.resize(frame, width=600)
- (h, w) = frame.shape[:2]
-
- # 从图像构建一个 blob
- imageBlob = cv2.dnn.blobFromImage(
- cv2.resize(frame, (300, 300)), 1.0, (300, 300),
- (104.0, 177.0, 123.0), swapRB=False, crop=False)
-
- # 应用 OpenCV 的基于深度学习的人脸检测器来定位输入图像中的人脸
- # faces in the input image
- detector.setInput(imageBlob)
- detections = detector.forward()
-
- # 循环检测
- for i in range(0, detections.shape[2]):
- # 提取与预测相关的置信度
- confidence = detections[0, 0, i, 2]
-
- # 过滤掉弱检测
- if confidence > args["confidence"]:
- # 计算人脸边界框的 (x, y) 坐标
- box = detections[0, 0, i, 3:7] * np.array([w, h, w, h])
- (startX, startY, endX, endY) = box.astype("int")
-
- # 提取人脸ROI
- face = frame[startY:endY, startX:endX]
- (fH, fW) = face.shape[:2]
-
- # 确保人脸宽度和高度足够大
- if fW < 20 or fH < 20:
- continue
-
- # 为人脸 ROI 构造一个 blob,然后传递 blob,通过我们的人脸嵌入模型得到128-d人脸量化
- faceBlob = cv2.dnn.blobFromImage(face, 1.0 / 255,
- (96, 96), (0, 0, 0), swapRB=True, crop=False)
- embedder.setInput(faceBlob)
- vec = embedder.forward()
-
- # 进行分类识别人脸
- preds = recognizer.predict_proba(vec)[0]
- j = np.argmax(preds)
- proba = preds[j]
- name = le.classes_[j]
-
- # 绘制人脸的边界框以及关联的概率
- text = "{}: {:.2f}%".format(name, proba * 100)
- y = startY - 10 if startY - 10 > 10 else startY + 10
- cv2.rectangle(frame, (startX, startY), (endX, endY),
- (0, 0, 255), 2)
- cv2.putText(frame, text, (startX, y),
- cv2.FONT_HERSHEY_SIMPLEX, 0.45, (0, 0, 255), 2)
-
- # 更新 FPS 计数器
- fps.update()
-
- # 显示输出帧
- cv2.imshow("Frame", frame)
- key = cv2.waitKey(1) & 0xFF
-
- # 如果按下 `q` 键,则中断循环
- if key == ord("q"):
- break
-
- # 停止计时器并显示 FPS 信息
- fps.stop()
- print("[INFO] elasped time: {:.2f}".format(fps.elapsed()))
- print("[INFO] approx. FPS: {:.2f}".format(fps.fps()))
-
- # 做一些清理工作
- cv2.destroyAllWindows()
- vs.stop()
⑧人脸识别效果图,如图11所示。
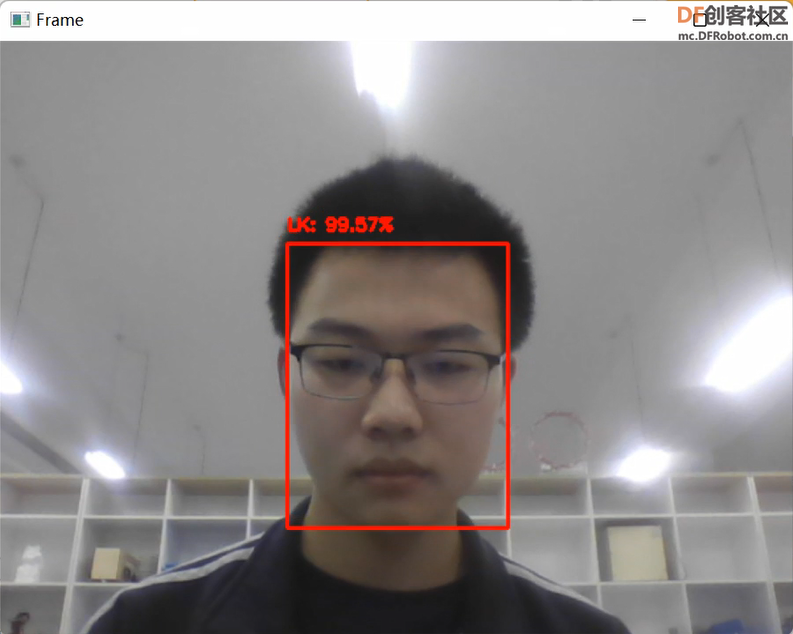
图11 实时视频流中的人脸识别效果
3、人脸真伪性检测识别
首选构建图像数据集本身,接着实现一个能够执行人脸真伪性检测器的 CNN卷积神经网络,训练活体检测器网络。最后创建一个 Python脚本,该脚本能够采用我们经过训练的人脸真伪性检测器模型并将其应用于实时视频人脸检测识别。
(1)从输入视频中提取真实和虚假的人脸图像。
新建gather_examples.py脚本。
①导入必要的软件包,构造参数 parse ,并解析参数。
代码
-
- # 导入必要的软件包
- import numpy as np
- import argparse
- import cv2
- import os
-
- # 构造参数 parse ,并解析参数
- ap = argparse.ArgumentParser()
- ap.add_argument("-c", "--confidence", type=float, default=0.5,
- help="minimum probability to filter weak detections")
- ap.add_argument("-s", "--skip", type=int, default=16,
- help="# of frames to skip before applying face detection")
- args = vars(ap.parse_args())
②加载人脸检测器并初始化视频流。
代码
-
- # 从磁盘加载我们的序列化人脸检测器
- print("[INFO] loading face detector...")
- protoPath = os.path.sep.join([r'C:\liveness-detection-opencv\face_detector', "deploy.prototxt"])
- modelPath = os.path.sep.join([r'C:\liveness-detection-opencv\face_detector',
- "res10_300x300_ssd_iter_140000.caffemodel"])
- net = cv2.dnn.readNetFromCaffe(protoPath, modelPath)
-
- # 打开一个指向视频文件流的指针并初始化
- vs = cv2.VideoCapture(r"C:\liveness-detection-opencv\videos\real.mov")
- vs = cv2.VideoCapture(r"C:\liveness-detection-opencv\videos\fake.mp4")
- read = 0
- saved = 0
③创建一个循环来处理帧。
代码
-
- # 循环视频文件流中的帧
- while True:
- # 从文件中抓取框架
- (grabbed, frame) = vs.read()
-
- # 如果框架没有被抓取,那么已经到了视频文件流的结尾
- if not grabbed:
- break
-
- # 增加到目前为止读取的总帧数
- read += 1
-
- # 检查我们是否应该处理这个框架
- if read % args["skip"] != 0:
- continue
④继续检测人脸。
代码
-
- # 获取框架尺寸并从框架中构造一个 blob
- (h, w) = frame.shape[:2]
- blob = cv2.dnn.blobFromImage(cv2.resize(frame, (300, 300)), 1.0,
- (300, 300), (104.0, 177.0, 123.0))
-
- # 通过网络传递blob并获得检测和预测
- net.setInput(blob)
- detections = net.forward()
-
- # 确保至少找到一张脸
- if len(detections) > 0:
- # 我们假设每个图像只有一个人脸,所以找到概率最大的边界框
- i = np.argmax(detections[0, 0, :, 2])
- confidence = detections[0, 0, i, 2]
⑤过滤弱检测并将人脸 ROI 写入磁盘。
代码
-
- # 确保最大概率的检测也是表示我们的最小概率测试,从而过滤掉弱检测
- if confidence > args["confidence"]:
- # 计算人脸边界框的 (x, y) 坐标,并提取人脸ROI
- box = detections[0, 0, i, 3:7] * np.array([w, h, w, h])
- (startX, startY, endX, endY) = box.astype("int")
- face = frame[startY:endY, startX:endX]
-
- # 将帧写入磁盘
- p = os.path.sep.join([r'C:\liveness-detection-opencv\dataset\real',
- "{}.png".format(saved)])
- p = os.path.sep.join([r'C:\liveness-detection-opencv\dataset\fake',
- "{}.png".format(saved)])
- cv2.imwrite(p, face)
- saved += 1
- print("[INFO] saved {} to disk".format(p))
-
- # 做一些清理工作
- vs.release()
- cv2.destroyAllWindows()
⑥完整代码。
代码
-
- # 导入必要的软件包
- import numpy as np
- import argparse
- import cv2
- import os
-
- # 构造参数 parse ,并解析参数
- ap = argparse.ArgumentParser()
- ap.add_argument("-c", "--confidence", type=float, default=0.5,
- help="minimum probability to filter weak detections")
- ap.add_argument("-s", "--skip", type=int, default=16,
- help="# of frames to skip before applying face detection")
- args = vars(ap.parse_args())
-
- # 从磁盘加载我们的序列化人脸检测器
- print("[INFO] loading face detector...")
- protoPath = os.path.sep.join([r'C:\liveness-detection-opencv\face_detector', "deploy.prototxt"])
- modelPath = os.path.sep.join([r'C:\liveness-detection-opencv\face_detector',
- "res10_300x300_ssd_iter_140000.caffemodel"])
- net = cv2.dnn.readNetFromCaffe(protoPath, modelPath)
-
- # 打开一个指向视频文件流的指针并初始化
- vs = cv2.VideoCapture(r"C:\liveness-detection-opencv\videos\real.mov")
- vs = cv2.VideoCapture(r"C:\liveness-detection-opencv\videos\fake.mp4")
- read = 0
- saved = 0
-
- # 循环视频文件流中的帧
- while True:
- # 从文件中抓取框架
- (grabbed, frame) = vs.read()
-
- # 如果框架没有被抓取,那么已经到了视频文件流的结尾
- if not grabbed:
- break
-
- # 增加到目前为止读取的总帧数
- read += 1
-
- # 检查我们是否应该处理这个框架
- if read % args["skip"] != 0:
- continue
-
- # 获取框架尺寸并从框架中构造一个 blob
- (h, w) = frame.shape[:2]
- blob = cv2.dnn.blobFromImage(cv2.resize(frame, (300, 300)), 1.0,
- (300, 300), (104.0, 177.0, 123.0))
-
- # 通过网络传递blob并获得检测和预测
- net.setInput(blob)
- detections = net.forward()
-
- # 确保至少找到一张脸
- if len(detections) > 0:
- # 我们假设每个图像只有一个人脸,所以找到概率最大的边界框
- i = np.argmax(detections[0, 0, :, 2])
- confidence = detections[0, 0, i, 2]
-
- # 确保最大概率的检测也是表示我们的最小概率测试,从而过滤掉弱检测
- if confidence > args["confidence"]:
- # 计算人脸边界框的 (x, y) 坐标,并提取人脸ROI
- box = detections[0, 0, i, 3:7] * np.array([w, h, w, h])
- (startX, startY, endX, endY) = box.astype("int")
- face = frame[startY:endY, startX:endX]
-
- # 将帧写入磁盘
- p = os.path.sep.join([r'C:\liveness-detection-opencv\dataset\real',
- "{}.png".format(saved)])
- p = os.path.sep.join([r'C:\liveness-detection-opencv\dataset\fake',
- "{}.png".format(saved)])
- cv2.imwrite(p, face)
- saved += 1
- print("[INFO] saved {} to disk".format(p))
-
- # 做一些清理工作
- vs.release()
- cv2.destroyAllWindows()
⑦构建的真伪性检测图像数据集,如图12所示。

图12 真伪性检测数据集
(2)构建深度学习真伪性检测器。
保持这个网络的浅层和尽可能少的参数,减少在小数据集上过度拟合的机会,确保真伪性检测器快速,能够实时运行,新建livenessnet.py脚本。
①导入必要的软件包。
代码
-
- # 导入必要的软件包
- from tensorflow.keras.models import Sequential
- from tensorflow.keras.layers import BatchNormalization
- from tensorflow.keras.layers import Conv2D
- from tensorflow.keras.layers import MaxPooling2D
- from tensorflow.keras.layers import Activation
- from tensorflow.keras.layers import Flatten
- from tensorflow.keras.layers import Dropout
- from tensorflow.keras.layers import Dense
- from tensorflow.keras import backend as K
-
- class LivenessNet:
- @staticmethod
- def build(width, height, depth, classes):
- # 将模型和输入形状一起初始化为"channels last" 和通道维度本身
- model = Sequential()
- inputShape = (height, width, depth)
- chanDim = -1
-
- # 如果我们使用“通道优先”和通道维度,更新输入形状
- if K.image_data_format() == "channels_first":
- inputShape = (depth, height, width)
- chanDim = 1
②向CNN添加层。
代码
-
- # 第一个 CONV => RELU => CONV => RELU => POOL 层
- model.add(Conv2D(16, (3, 3), padding="same",
- input_shape=inputShape))
- model.add(Activation("relu"))
- model.add(BatchNormalization(axis=chanDim))
- model.add(Conv2D(16, (3, 3), padding="same"))
- model.add(Activation("relu"))
- model.add(BatchNormalization(axis=chanDim))
- model.add(MaxPooling2D(pool_size=(2, 2)))
- model.add(Dropout(0.25))
-
- # 第二个 CONV => RELU => CONV => RELU => POOL 层
- model.add(Conv2D(32, (3, 3), padding="same"))
- model.add(Activation("relu"))
- model.add(BatchNormalization(axis=chanDim))
- model.add(Conv2D(32, (3, 3), padding="same"))
- model.add(Activation("relu"))
- model.add(BatchNormalization(axis=chanDim))
- model.add(MaxPooling2D(pool_size=(2, 2)))
- model.add(Dropout(0.25))
③添加FC = > RELU层。
代码
-
- # 第一组(也是唯一的)FC => RELU 层
- model.add(Flatten())
- model.add(Dense(64))
- model.add(Activation("relu"))
- model.add(BatchNormalization())
- model.add(Dropout(0.5))
-
- # softmax 分类器
- model.add(Dense(classes))
- model.add(Activation("softmax"))
-
- # 返回构建的网络架构
- return model
④完整代码。
代码
-
- # 导入必要的软件包
- from tensorflow.keras.models import Sequential
- from tensorflow.keras.layers import BatchNormalization
- from tensorflow.keras.layers import Conv2D
- from tensorflow.keras.layers import MaxPooling2D
- from tensorflow.keras.layers import Activation
- from tensorflow.keras.layers import Flatten
- from tensorflow.keras.layers import Dropout
- from tensorflow.keras.layers import Dense
- from tensorflow.keras import backend as K
-
- class LivenessNet:
- @staticmethod
- def build(width, height, depth, classes):
- # 将模型和输入形状一起初始化为"channels last" 和通道维度本身
- model = Sequential()
- inputShape = (height, width, depth)
- chanDim = -1
-
- # 如果我们使用“通道优先”和通道维度,更新输入形状
- if K.image_data_format() == "channels_first":
- inputShape = (depth, height, width)
- chanDim = 1
-
- # 第一个 CONV => RELU => CONV => RELU => POOL 层
- model.add(Conv2D(16, (3, 3), padding="same",
- input_shape=inputShape))
- model.add(Activation("relu"))
- model.add(BatchNormalization(axis=chanDim))
- model.add(Conv2D(16, (3, 3), padding="same"))
- model.add(Activation("relu"))
- model.add(BatchNormalization(axis=chanDim))
- model.add(MaxPooling2D(pool_size=(2, 2)))
- model.add(Dropout(0.25))
-
- # 第二个 CONV => RELU => CONV => RELU => POOL 层
- model.add(Conv2D(32, (3, 3), padding="same"))
- model.add(Activation("relu"))
- model.add(BatchNormalization(axis=chanDim))
- model.add(Conv2D(32, (3, 3), padding="same"))
- model.add(Activation("relu"))
- model.add(BatchNormalization(axis=chanDim))
- model.add(MaxPooling2D(pool_size=(2, 2)))
- model.add(Dropout(0.25))
-
- # 第一组(也是唯一的)FC => RELU 层
- model.add(Flatten())
- model.add(Dense(64))
- model.add(Activation("relu"))
- model.add(BatchNormalization())
- model.add(Dropout(0.5))
-
- # softmax 分类器
- model.add(Dense(classes))
- model.add(Activation("softmax"))
-
- # 返回构建的网络架构
- return model
⑤深度学习架构如图13所示。
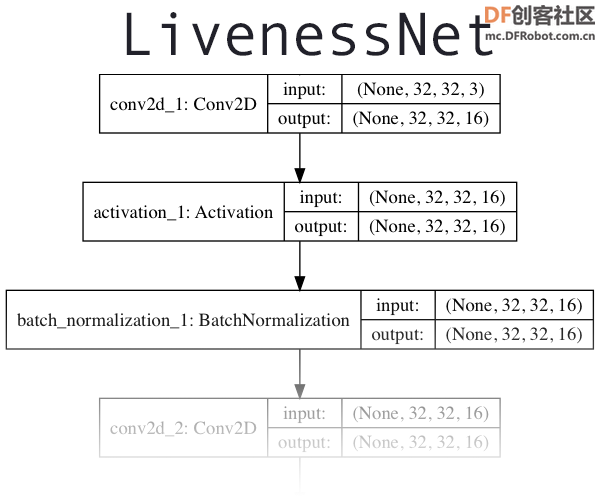
图13深度学习架构图
(3)训练网络。
新建train.py脚本文件。
①设置 matplotlib 后端,以便可以将图形保存在背景中,导入必要的软件包,构造参数解析器并解析参数。
代码
-
- # 设置 matplotlib 后端,以便可以将图形保存在背景中
- import matplotlib
- matplotlib.use("Agg")
-
- # 导入必要的软件包
- from hl.livenessnet import LivenessNet
- from sklearn.preprocessing import LabelEncoder
- from sklearn.model_selection import train_test_split
- from sklearn.metrics import classification_report
- from tensorflow.keras.preprocessing.image import ImageDataGenerator
- from tensorflow.keras.optimizers import Adam
- from tensorflow.keras.utils import to_categorical
- from imutils import paths
- import matplotlib.pyplot as plt
- import numpy as np
- import argparse
- import pickle
- import cv2
- import os
-
- # 构造参数解析器并解析参数
- ap = argparse.ArgumentParser()
- ap.add_argument("-p", "--plot", type=str, default="plot.png",
- help="path to output loss/accuracy plot")
- args = vars(ap.parse_args())
②执行一些初始化并构建据。
代码
-
- # 初始化初始学习率、批量大小和epochs 训练
- INIT_LR = 1e-4
- BS = 8
- EPOCHS = 50
-
- # 获取数据集目录中的图像列表数据列表(即图像)和类图像,然后初始化
- print("[INFO] loading images...")
- imagePaths = list(paths.list_images(r'C:\liveness-detection-opencv\dataset'))
- data = []
- labels = []
-
- # 遍历所有图像路径
- for imagePath in imagePaths:
- # 从文件名中提取类标签,加载图像,将其调整为固定的 32x32 像素,忽略纵横比
- label = imagePath.split(os.path.sep)[-2]
- image = cv2.imread(imagePath)
- image = cv2.resize(image, (32, 32))
-
- # 分别更新数据和标签列表
- data.append(image)
- labels.append(label)
-
- # 将数据转换为 NumPy 数组,然后通过范围内的所有像素强度 [0, 1]缩放对其进行预处理
- data = np.array(data, dtype="float") / 255.0
③对标签进行编码并对数据进行分区。
代码
-
- # 将标签(当前是字符串)编码为整数,然后ne-hot 编码
- le = LabelEncoder()
- labels = le.fit_transform(labels)
- labels = to_categorical(labels, 2)
-
- # 将数据划分为训练和测试,75% 数据为训练,剩余的 25% 用于测试
- (trainX, testX, trainY, testY) = train_test_split(data, labels,
- test_size=0.25, random_state=42)
④初始化数据增强对象并编译、训练模型
代码
-
- # 为数据增强构建训练图像生成器
- aug = ImageDataGenerator(rotation_range=20, zoom_range=0.15,
- width_shift_range=0.2, height_shift_range=0.2, shear_range=0.15,
- horizontal_flip=True, fill_mode="nearest")
-
- # 初始化优化器和模型
- print("[INFO] compiling model...")
- opt = Adam(lr=INIT_LR, decay=INIT_LR / EPOCHS)
- model = LivenessNet.build(width=32, height=32, depth=3,
- classes=len(le.classes_))
- model.compile(loss="binary_crossentropy", optimizer=opt,
- metrics=["accuracy"])
-
- # 训练网络
- print("[INFO] training network for {} epochs...".format(EPOCHS))
- H = model.fit(x=aug.flow(trainX, trainY, batch_size=BS),
- validation_data=(testX, testY), steps_per_epoch=len(trainX) // BS,
- epochs=EPOCHS)
⑤评估结果并生成训练图。
代码
-
- # 评估网络
- print("[INFO] evaluating network...")
- predictions = model.predict(x=testX, batch_size=BS)
- print(classification_report(testY.argmax(axis=1),
- predictions.argmax(axis=1), target_names=le.classes_))
-
- # 将网络保存到磁盘
- print("[INFO] serializing network to '{}'...".format(r'C:\liveness-detection-opencv'))
- model.save(r'C:\liveness-detection-opencv\liveness.model', save_format="h5")
-
- # 将标签编码器保存到磁盘
- f = open(r'C:\liveness-detection-opencv\le.pickle', "wb")
- f.write(pickle.dumps(le))
- f.close()
-
- # 绘制训练损失和准确率
- plt.style.use("ggplot")
- plt.figure()
- plt.plot(np.arange(0, EPOCHS), H.history["loss"], label="train_loss")
- plt.plot(np.arange(0, EPOCHS), H.history["val_loss"], label="val_loss")
- plt.plot(np.arange(0, EPOCHS), H.history["accuracy"], label="train_acc")
- plt.plot(np.arange(0, EPOCHS), H.history["val_accuracy"], label="val_acc")
- plt.title("Training Loss and Accuracy on Dataset")
- plt.xlabel("Epoch #")
- plt.ylabel("Loss/Accuracy")
- plt.legend(loc="lower left")
- plt.savefig(args["plot"])
⑥完整代码。
代码
-
- # 设置 matplotlib 后端,以便可以将图形保存在背景中
- import matplotlib
- matplotlib.use("Agg")
-
- # 导入必要的软件包
- from hl.livenessnet import LivenessNet
- from sklearn.preprocessing import LabelEncoder
- from sklearn.model_selection import train_test_split
- from sklearn.metrics import classification_report
- from tensorflow.keras.preprocessing.image import ImageDataGenerator
- from tensorflow.keras.optimizers import Adam
- from tensorflow.keras.utils import to_categorical
- from imutils import paths
- import matplotlib.pyplot as plt
- import numpy as np
- import argparse
- import pickle
- import cv2
- import os
-
- # 构造参数解析器并解析参数
- ap = argparse.ArgumentParser()
- ap.add_argument("-p", "--plot", type=str, default="plot.png",
- help="path to output loss/accuracy plot")
- args = vars(ap.parse_args())
-
- # 初始化初始学习率、批量大小和epochs 训练
- INIT_LR = 1e-4
- BS = 8
- EPOCHS = 50
-
- # 获取数据集目录中的图像列表数据列表(即图像)和类图像,然后初始化
- print("[INFO] loading images...")
- imagePaths = list(paths.list_images(r'C:\liveness-detection-opencv\dataset'))
- data = []
- labels = []
-
- # 遍历所有图像路径
- for imagePath in imagePaths:
- # 从文件名中提取类标签,加载图像,将其调整为固定的 32x32 像素,忽略纵横比
- label = imagePath.split(os.path.sep)[-2]
- image = cv2.imread(imagePath)
- image = cv2.resize(image, (32, 32))
-
- # 分别更新数据和标签列表
- data.append(image)
- labels.append(label)
-
- # 将数据转换为 NumPy 数组,然后通过范围内的所有像素强度 [0, 1]缩放对其进行预处理
- data = np.array(data, dtype="float") / 255.0
-
- # 将标签(当前是字符串)编码为整数,然后ne-hot 编码
- le = LabelEncoder()
- labels = le.fit_transform(labels)
- labels = to_categorical(labels, 2)
-
- # 将数据划分为训练和测试,75% 数据为训练,剩余的 25% 用于测试
- (trainX, testX, trainY, testY) = train_test_split(data, labels,
- test_size=0.25, random_state=42)
-
- # 为数据增强构建训练图像生成器
- aug = ImageDataGenerator(rotation_range=20, zoom_range=0.15,
- width_shift_range=0.2, height_shift_range=0.2, shear_range=0.15,
- horizontal_flip=True, fill_mode="nearest")
-
- # 初始化优化器和模型
- print("[INFO] compiling model...")
- opt = Adam(lr=INIT_LR, decay=INIT_LR / EPOCHS)
- model = LivenessNet.build(width=32, height=32, depth=3,
- classes=len(le.classes_))
- model.compile(loss="binary_crossentropy", optimizer=opt,
- metrics=["accuracy"])
-
- # 训练网络
- print("[INFO] training network for {} epochs...".format(EPOCHS))
- H = model.fit(x=aug.flow(trainX, trainY, batch_size=BS),
- validation_data=(testX, testY), steps_per_epoch=len(trainX) // BS,
- epochs=EPOCHS)
-
- # 评估网络
- print("[INFO] evaluating network...")
- predictions = model.predict(x=testX, batch_size=BS)
- print(classification_report(testY.argmax(axis=1),
- predictions.argmax(axis=1), target_names=le.classes_))
-
- # 将网络保存到磁盘
- print("[INFO] serializing network to '{}'...".format(r'C:\liveness-detection-opencv'))
- model.save(r'C:\liveness-detection-opencv\liveness.model', save_format="h5")
-
- # 将标签编码器保存到磁盘
- f = open(r'C:\liveness-detection-opencv\le.pickle', "wb")
- f.write(pickle.dumps(le))
- f.close()
-
- # 绘制训练损失和准确率
- plt.style.use("ggplot")
- plt.figure()
- plt.plot(np.arange(0, EPOCHS), H.history["loss"], label="train_loss")
- plt.plot(np.arange(0, EPOCHS), H.history["val_loss"], label="val_loss")
- plt.plot(np.arange(0, EPOCHS), H.history["accuracy"], label="train_acc")
- plt.plot(np.arange(0, EPOCHS), H.history["val_accuracy"], label="val_acc")
- plt.title("Training Loss and Accuracy on Dataset")
- plt.xlabel("Epoch #")
- plt.ylabel("Loss/Accuracy")
- plt.legend(loc="lower left")
- plt.savefig(args["plot"])
⑦训练过程如图14所示。
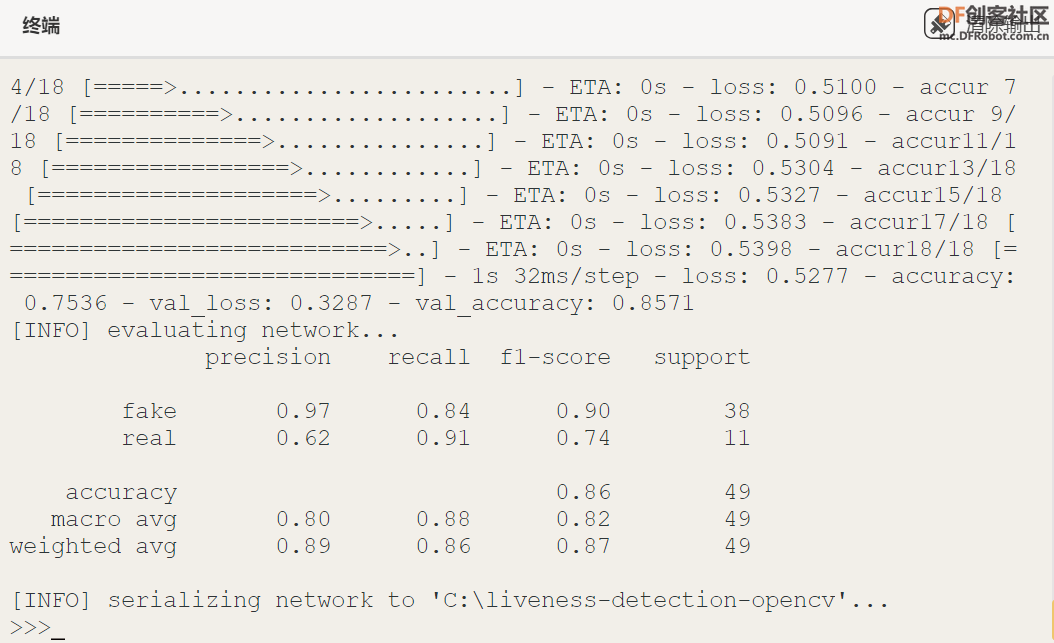
图14 训练过程
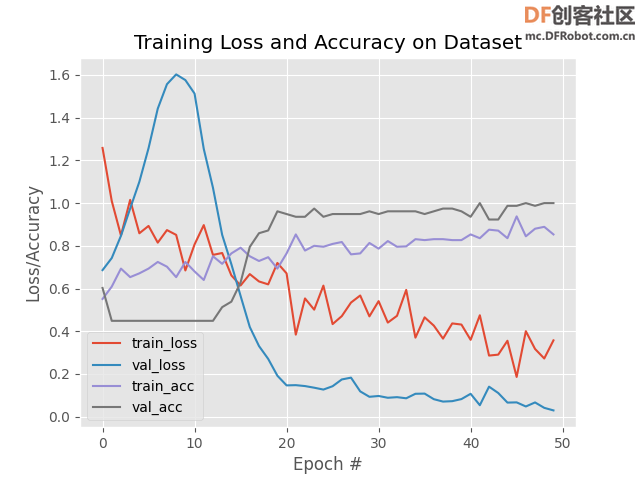
⑧训练面部模型的图,如图15所示。如结果所示,能够在有限的过度拟合的情况下在验证集上获得 100% 的真伪性检测准确度。
图15 训练面部模型的图
(4)访问摄像头/视频流,对每一帧应用人脸检测,对于检测到的每个人脸,应用人脸真伪性检测器模型。
新建liveness_demo.py脚本文件。
①导入必要的软件包,构造参数解析器并解析参数,初始化Arduino引脚。
代码
-
- # 导入必要的软件包
- from imutils.video import VideoStream
- from tensorflow.keras.preprocessing.image import img_to_array
- from tensorflow.keras.models import load_model
- import numpy as np
- import argparse
- import imutils
- import pickle
- import time
- import cv2
- import os
- import time
- from pinpong.board import Board,Pin
-
- #初始化,选择板型(uno、microbit、RPi、handpy)和端口号,不输入端口号则进行自动识别
- Board("uno").begin()
- #引脚初始化为电平输出
- led = Pin(Pin.D2, Pin.OUT)
- #引脚初始化为电平输出
- led = Pin(Pin.D3, Pin.OUT)
-
- # 构造参数解析器并解析参数
- ap = argparse.ArgumentParser()
- ap.add_argument("-c", "--confidence", type=float, default=0.5,
- help="minimum probability to filter weak detections")
- args = vars(ap.parse_args())
②初始化人脸检测器、真伪性检测模型 、 标签编码器和视频流。
代码
-
- # 从磁盘加载我们的序列化人脸检测器
- print("[INFO] loading face detector...")
- protoPath = os.path.sep.join([r'C:\liveness-detection-opencv\face_detector', "deploy.prototxt"])
- modelPath = os.path.sep.join([r'C:\liveness-detection-opencv\face_detector',
- "res10_300x300_ssd_iter_140000.caffemodel"])
- net = cv2.dnn.readNetFromCaffe(protoPath, modelPath)
-
- # 从磁盘加载活性检测器模型和标签编码器
- print("[INFO] loading liveness detector...")
- model = load_model(r'C:\liveness-detection-opencv\liveness.model')
- le = pickle.loads(open(r'C:\liveness-detection-opencv\le.pickle', "rb").read())
-
- # 初始化视频流并允许相机传感器进入预热状态
- print("[INFO] starting video stream...")
- vs = VideoStream(src=0).start()
- time.sleep(2.0)
③开始遍历帧来检测真人脸与假人脸/欺骗人脸。
代码
- # 循环视频流中的帧
- while True:
- # 从线程视频流中抓取帧并调整其大小,最大宽度为 600 像素
- frame = vs.read()
- frame = imutils.resize(frame, width=600)
-
- # 获取帧尺寸并将其转换为 blob
- (h, w) = frame.shape[:2]
- blob = cv2.dnn.blobFromImage(cv2.resize(frame, (300, 300)), 1.0,
- (300, 300), (104.0, 177.0, 123.0))
-
- # 通过网络传递blob并获得检测和预测
- net.setInput(blob)
- detections = net.forward()
④使用 OpenCV 和深度学习进行活体检测。
代码
-
- # 循环检测
- for i in range(0, detections.shape[2]):
- # 提取与预测相关的置信度(即概率)
- confidence = detections[0, 0, i, 2]
-
- # 过滤掉弱检测
- if confidence > args["confidence"]:
- # 计算人脸边界框的 (x, y) 坐标并提取人脸ROI
- box = detections[0, 0, i, 3:7] * np.array([w, h, w, h])
- (startX, startY, endX, endY) = box.astype("int")
-
- # 确保检测到的边界框不在框架的尺寸
- startX = max(0, startX)
- startY = max(0, startY)
- endX = min(w, endX)
- endY = min(h, endY)
-
- # 提取人脸 ROI,然后在精确的与我们的训练数据相同的方式中对其进行预处理
- face = frame[startY:endY, startX:endX]
- face = cv2.resize(face, (32, 32))
- face = face.astype("float") / 255.0
- face = img_to_array(face)
- face = np.expand_dims(face, axis=0)
-
- # 将人脸 ROI 经过确定人脸是“真”还是“假”的模型训练的活体检测器
- preds = model.predict(face)[0]
- j = np.argmax(preds)
- label = le.classes_[j]
-
- # 在框架上绘制标签和边界框
- label = "{}: {:.4f}".format(label, preds[j])
- cv2.putText(frame, label, (startX, startY - 10),
- cv2.FONT_HERSHEY_SIMPLEX, 0.5, (0, 0, 255), 2)
- cv2.rectangle(frame, (startX, startY), (endX, endY),
- (0, 0, 255), 2)
⑤显示结果并清理。
代码
-
- # 显示输出帧并等待按键
- cv2.imshow("Frame", frame)
- key = cv2.waitKey(1) & 0xFF
-
- # 如果按下 `q` 键,则中断循环
- if key == ord("q"):
- break
-
- # 做一些清理工作
- cv2.destroyAllWindows()
- vs.stop()
⑥完整代码。
代码
-
- # 导入必要的软件包
- from imutils.video import VideoStream
- from tensorflow.keras.preprocessing.image import img_to_array
- from tensorflow.keras.models import load_model
- import numpy as np
- import argparse
- import imutils
- import pickle
- import time
- import cv2
- import os
- import time
- from pinpong.board import Board,Pin
-
- #初始化,选择板型(uno、microbit、RPi、handpy)和端口号,不输入端口号则进行自动识别
- Board("uno").begin()
- #引脚初始化为电平输出
- led = Pin(Pin.D2, Pin.OUT)
- #引脚初始化为电平输出
- led = Pin(Pin.D3, Pin.OUT)
-
- # 构造参数解析器并解析参数
- ap = argparse.ArgumentParser()
- ap.add_argument("-c", "--confidence", type=float, default=0.5,
- help="minimum probability to filter weak detections")
- args = vars(ap.parse_args())
-
- # 从磁盘加载我们的序列化人脸检测器
- print("[INFO] loading face detector...")
- protoPath = os.path.sep.join([r'C:\liveness-detection-opencv\face_detector', "deploy.prototxt"])
- modelPath = os.path.sep.join([r'C:\liveness-detection-opencv\face_detector',
- "res10_300x300_ssd_iter_140000.caffemodel"])
- net = cv2.dnn.readNetFromCaffe(protoPath, modelPath)
-
- # 从磁盘加载活性检测器模型和标签编码器
- print("[INFO] loading liveness detector...")
- model = load_model(r'C:\liveness-detection-opencv\liveness.model')
- le = pickle.loads(open(r'C:\liveness-detection-opencv\le.pickle', "rb").read())
-
- # 初始化视频流并允许相机传感器进入预热状态
- print("[INFO] starting video stream...")
- vs = VideoStream(src=0).start()
- time.sleep(2.0)
-
- # 循环视频流中的帧
- while True:
- # 从线程视频流中抓取帧并调整其大小,最大宽度为 600 像素
- frame = vs.read()
- frame = imutils.resize(frame, width=600)
-
- # 获取帧尺寸并将其转换为 blob
- (h, w) = frame.shape[:2]
- blob = cv2.dnn.blobFromImage(cv2.resize(frame, (300, 300)), 1.0,
- (300, 300), (104.0, 177.0, 123.0))
-
- # 通过网络传递blob并获得检测和预测
- net.setInput(blob)
- detections = net.forward()
-
- # 循环检测
- for i in range(0, detections.shape[2]):
- # 提取与预测相关的置信度(即概率)
- confidence = detections[0, 0, i, 2]
-
- # 过滤掉弱检测
- if confidence > args["confidence"]:
- # 计算人脸边界框的 (x, y) 坐标并提取人脸ROI
- box = detections[0, 0, i, 3:7] * np.array([w, h, w, h])
- (startX, startY, endX, endY) = box.astype("int")
-
- # 确保检测到的边界框不在框架的尺寸
- startX = max(0, startX)
- startY = max(0, startY)
- endX = min(w, endX)
- endY = min(h, endY)
-
- # 提取人脸 ROI,然后在精确的与我们的训练数据相同的方式中对其进行预处理
- face = frame[startY:endY, startX:endX]
- face = cv2.resize(face, (32, 32))
- face = face.astype("float") / 255.0
- face = img_to_array(face)
- face = np.expand_dims(face, axis=0)
-
- # 将人脸 ROI 经过确定人脸是“真”还是“假”的模型训练的活体检测器
- preds = model.predict(face)[0]
- j = np.argmax(preds)
- label = le.classes_[j]
-
- # 在框架上绘制标签和边界框
- label = "{}: {:.4f}".format(label, preds[j])
- cv2.putText(frame, label, (startX, startY - 10),
- cv2.FONT_HERSHEY_SIMPLEX, 0.5, (0, 0, 255), 2)
- cv2.rectangle(frame, (startX, startY), (endX, endY),
- (0, 0, 255), 2)
-
- # 显示输出帧并等待按键
- cv2.imshow("Frame", frame)
- key = cv2.waitKey(1) & 0xFF
-
- # 如果按下 `q` 键,则中断循环
- if key == ord("q"):
- break
-
- # 做一些清理工作
- cv2.destroyAllWindows()
- vs.stop()
⑦在实时视频中应用人脸真伪性检测器,效果图如图16所示。

图16 人脸真伪性检测效果图
(三)作品组装
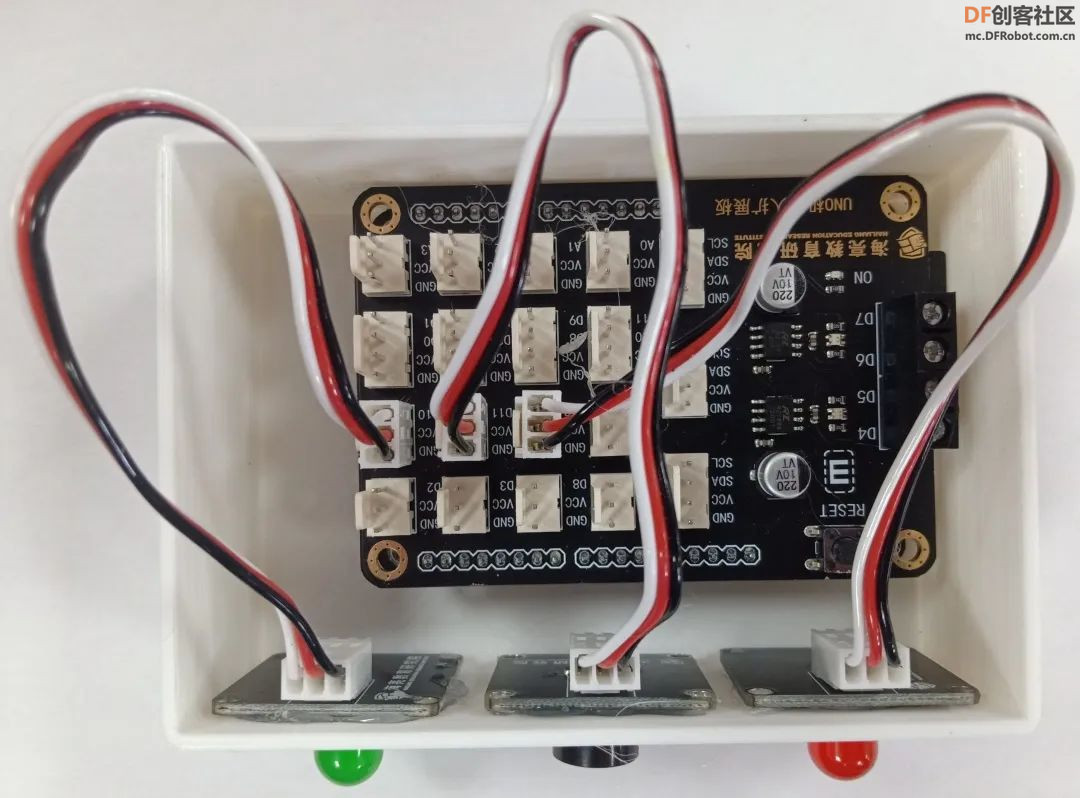
1、安装Arduino uno主控板、UNO扩展板、LED灯和蜂鸣器,通过螺丝或者热熔胶固定,如图17所示。
图17 安装主控板传感器
2、通过卡扣方式安装盖子,如图18所示。
图18 安装盖子
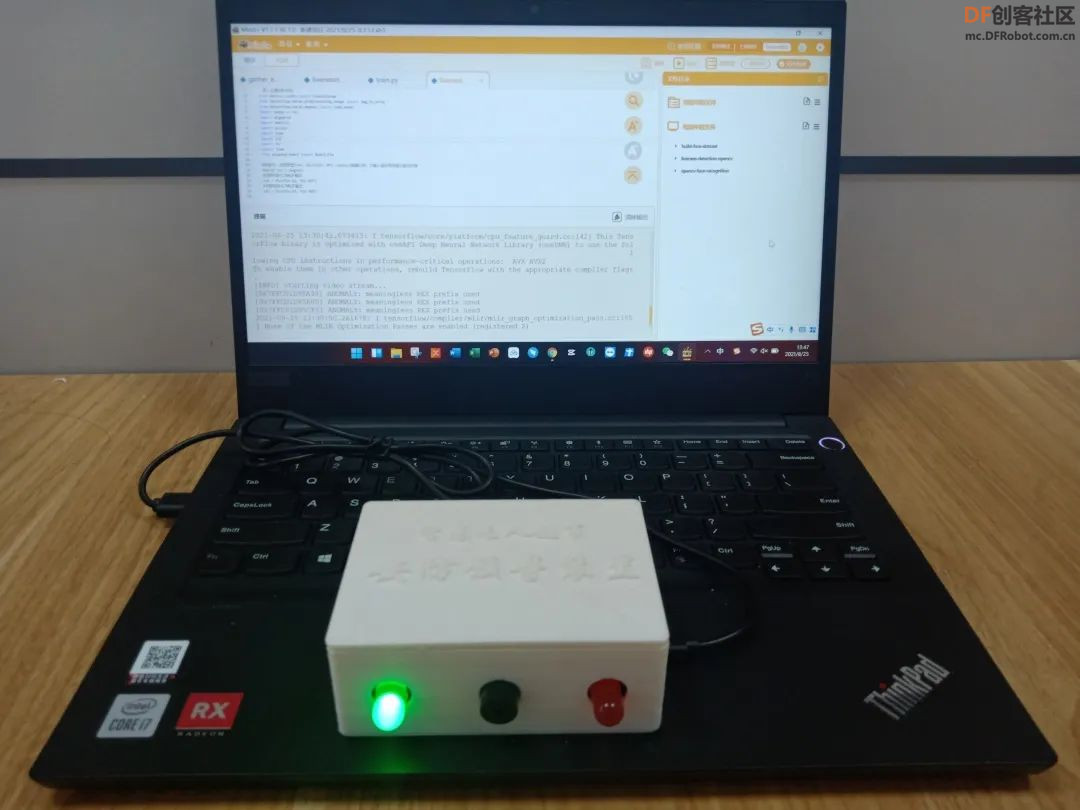
3、整体作品效果图如图19所示。
图19 整体效果图
步骤10:项目总结
一种面向智慧无人超市基于深度学习构建人脸真伪性检测识别安防预警系统,采用基于卷积神经网络的人脸真伪性检测方法,该方法首先将SSD算法与轻量型的模型MobileNet神经网络结合起来高效且快速地进行人脸检测,接着使用FaceNet模型提取了深度学习人脸嵌入特征,最后搭建简单的CNN卷积神经网络,训练人脸真伪性检测模型,应用于图片或实时视频中,实现动态检测,完****脸真伪性鉴别,提高了识别的准确性。从识别效果图可以得知:CNN卷积神经网络应用于人脸真伪性检测时,可以正确地区分真实人脸和伪造人脸,并且检测准确率高,精度将达到99%以上。该系统将极大的提升智慧无人超市人脸识别系统的安全性,保障社会公共系统安全,对于促进社会和谐健康发展具有积极作用。
步骤11:未来展望
该作品及人工智能技术应用到智慧无人超市等环境中,将极大的提升智慧无人超市人脸识别系统的安全性,对整个行业都会有所帮助,对于整个社会的安全、健康、和谐及可持续发展起到积极的作用。未来,我将不断优化该作品,将核心算法部署到嵌入式AI系统中,使该作品实现产品化,为智慧无人超市的安全问题贡献我的创意思路,希望这项创意作品能够应用到其他应用了人脸识别的一些行业。
2. 音箱音量:语音合成模块的音量较小,在较为吵杂的景区内,游客可能听不清楚播报的语言,后续我们可以增加音频输出加装外接音箱也可以让游客选择蓝牙连接自己的耳机。
附件下载
 一种面向智慧无人超市基于深度学习构建人脸真伪性检测识别的安防预警系统.zip.zip 一种面向智慧无人超市基于深度学习构建人脸真伪性检测识别的安防预警系统.zip.zip
|









 一种面向智慧无人超市基于深度学习构建人脸真伪性检测识别的安防预警系统.zip.zip
 沪公网安备31011502402448