tensorman
前言
原创文章,转载引用请务必注明链接,水平有限,如有疏漏,欢迎指正。
拯救深陷 TensorFlow GPU 开发环境配置泥潭中的人。
最近参加了 DFRobot 和 Intel 共同举办的『行业AI开发者大赛』,由于基础薄弱,摸索过程中踩坑很多,当然收获也很多。迁移学习使用 TensorFlow 1.14 GPU + Object Detection API,后来偶然了解到 TensorMan (以下简称 tm)这个工具,可以简化开发环境配置。使用 Linux 的好处是开发更方便,而且设置系统环境变量较 Windows 要方便。本文软硬件环境:
- Pop! OS/ Ubuntu MATE/Lubuntu 20.04
- TenserFlow 1.14 (虽然有 tf 1.15,但 1.14 是 tf 2.x 之前最稳定的版本)
- Python 3.6
- PC [AMD R5 2600 + Nvidia GTX1660](for TF GPU)
- LattePanda Delta / v1 (for TF CPU)
1、安装 TensoFlow 与 Object Detection API 的常规方法
由于需要进行迁移学习,我们使用 Nvidia GPU ,借助 CUDA 的力量加速。参考官方的安装指南,我们总结了三种方式。
AMD 也有一个项目叫做 ROCm,全称Radeon Open Compute platform, 目标是建立可替代 CUDA 的生态。不过应用还不够广泛。具体可以查看 相关介绍。
要使用 TensorFlow GPU 必须在系统中安装以下 NVIDIA® 软件:
1.1 本机安装
指需要自行下载安装上述软件包,相比于商业维护软件,开源软件并不是版本越新越好。例如 Nvidia 近期发布了 cuda 11,最新的显卡驱动已经支持,不过 cuda 工具包我们还是要使用 cuda 10.x,并要搭配对应版本的 cuDNN SDK。
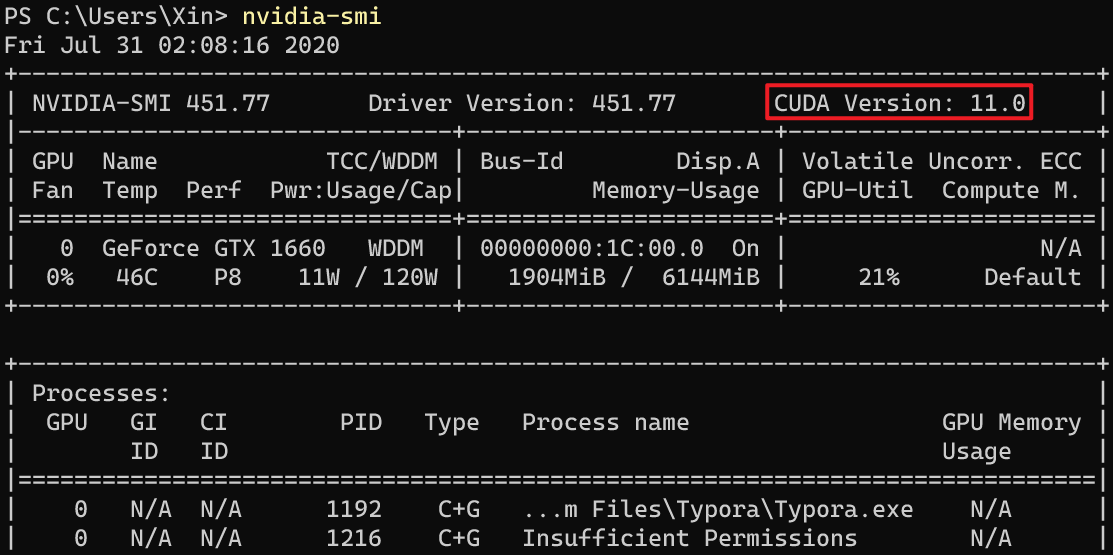
[系统驱动支持的cuda版本]使用 nvidia-smi 工具可以还可以查看显卡负载、温度、内存用量等信息。
1.2 Anaconda 套件
Anaconda 是一个用于科学计算的 Python 发行版,支持 Linux, Mac, Windows, 包含了众多流行的科学计算、数据分析的 Python 包。通过 conda 工具安装 tensorflow,仅需要系统安装 GPU 驱动即可,其他的都可以一键自动安装,无需过多担心依赖问题。然而由于和系统联系较深,实际使用过程中仍然有很多问题,比如报错 cuDNN not initalized 之类。建议在 Windows 下使用该方法
1.3 Docker 容器
因为各种依赖问题折腾得头痛,让人不禁想到了可以解决复杂的环境依赖问题的方案——Docker,它将各种软件包打包好,开箱即用。官方提供的 TensorFlow Docker 映像 ,已经过配置,可运行 TensorFlow。Docker 容器可在虚拟环境中运行,是设置 GPU 支持的最简单方法。
2、Pop!_OS 与 TensorMan

Pop!_OS 基于 Ubuntu 的衍生版,由 System76 公司维护,最新版本是 20.04。System76 是一家专注于制造运行 Linux 的设备的美国企业。
可以看到 POS 可以很方便地安装运行各种生产力工具,其中有一个工具叫做 TensorMan。可以方便地管理 tf 工具链,简化了安装使用官方镜像的 docker 命令。详情可参考 项目主页 和 介绍文档 。
2.1 粮草先行
首先我们设置一些软件的镜像源,加速下载。
0x01 加速 apt 软件仓库
建议使用 Lemonitor 的 测速工具,找到当前网络环境下最快的软件源地址。这里以阿里云为例,根据自己情况修改:
sudo sed -i 's/archive.ubuntu.com/mirrors.aliyun.com/g' /etc/apt/sources.list
sudo sed -i 's/security.ubuntu.com/mirrors.aliyun.com/g' /etc/apt/sources.list
参考:mirrors.ustc.edu.cn
0x02 加速 pip 下载 Python 库
修改完毕后,使用 tensorman 创建的镜像继承该设置。
# 创建目录和配置文件
mkdir ~/.pip && touch ~/.pip/pip.conf
# 修改配置文件
cat << _EOF_ >> ~/.pip/pip.conf
[global]
index-url = https://mirrors.aliyun.com/pypi/simple/

[install]
trusted-host=mirrors.aliyun.com
_EOF_
参考:developer.aliyun.com
0x03 加速 docker hub 镜像仓库
修改或者创建 /etc/docker/daemon.json 文件,加入以下内容,注意配置文件格式和逗号:
{
    "runtimes": {
        "nvidia": {
            "path": "nvidia-container-runtime",
            "runtimeArgs": []
        }
    },
    "registry-mirrors": [
        "https://2h3po24q.mirror.aliyuncs.com"
    ]
}
【二选一】 如果安装CPU版,则为:
{
  "registry-mirrors": ["https://docker.mirrors.ustc.edu.cn/"]
}
我这里 aliyun 速度较快,也可以使用 ustc 的,但是有时候不稳定。
# 重启 dockerd
sudo systemctl restart docker
参考:
0x04 加速 Ubuntu PPA
PPA 表示个人软件包存档(Personal Package Archive),通过添加 PPA 源,可以让 Ubuntu 安装新版本的软件,但由于是个人维护的,软件质量参差不齐。详细的介绍可以移步 Ubuntu PPA 使用指南 。由于 PPA 软件源比较零散,所以很少有直接建立镜像的,不过有一种反向代理的方法可以变相加速。当然也可以自己建立代理加速,比如配合 tsocks。
sudo su
# 查找 sources.list.d 目录下的所以软件仓库地址,并修改为 ustc 反代地址。
find /etc/apt/sources.list.d/ -type f -name "*.list" -exec  sed  -i.bak -r  's#deb(-src)?\s*http(s)?://ppa.launchpad.net#deb\1 https://launchpad.proxy.ustclug.org#ig' {} \;
参考:能否镜像 ppa 仓库里的软件 及 反向代理使用帮助
注意 http 被污染了,强制使用 https,建议所有源都使用 https,虽然性能速度会有所损失。
0x05 加速 Anaconda (Optional)
nano ~/.condarc
# 添加以下内容
channels:
  - defaults
show_channel_urls: true
channel_alias: https://mirrors.tuna.tsinghua.edu.cn/anaconda
default_channels:
  - https://mirrors.tuna.tsinghua.edu.cn/anaconda/pkgs/main
  - https://mirrors.tuna.tsinghua.edu.cn/anaconda/pkgs/free
  - https://mirrors.tuna.tsinghua.edu.cn/anaconda/pkgs/r
  - https://mirrors.tuna.tsinghua.edu.cn/anaconda/pkgs/pro
  - https://mirrors.tuna.tsinghua.edu.cn/anaconda/pkgs/msys2
custom_channels:
  conda-forge: https://mirrors.tuna.tsinghua.edu.cn/anaconda/cloud
  msys2: https://mirrors.tuna.tsinghua.edu.cn/anaconda/cloud
  bioconda: https://mirrors.tuna.tsinghua.edu.cn/anaconda/cloud
  menpo: https://mirrors.tuna.tsinghua.edu.cn/anaconda/cloud
  pytorch: https://mirrors.tuna.tsinghua.edu.cn/anaconda/cloud
  simpleitk: https://mirrors.tuna.tsinghua.edu.cn/anaconda/cloud
  intel: https://mirrors.tuna.tsinghua.edu.cn/anaconda/cloud
# 清除索引缓存,保证用的是镜像站提供的索引。
conda clean -i
# 测试安装 numpy 和 intel channel (需要通过 -c 指定)的 openvino
# conda install numpy
# conda install openvino -c intel
参考:mirrors.tuna.tsinghua.edu.cn
2.1 在 Pop! OS 上使用 TensorMan
现在万事俱备,小试一把牛刀:
# 非 Pop!OS 无法直接安装,如想使用请参考后文
sudo apt install tensorman
# $USER 可以是 root,也可以是当前用户名
sudo usermod -aG docker $USER
# 需要 root 权限执行,使用官方镜像创建一个容器,分别是 1.14 版本、暴露容器的 8888 端口,使用 Python3,
# 安装 Jupyter Notebook,容器名称为 pc-gpu,我这里在 PC 主机上安装
sudo tensorman +1.14.0 run -p 8888:8888 --root --python3 --jupyter --gpu --name tf-gpu bash
# 【二选一】如果没有 Nvidia GPU,我们也可以创建 TensorFlow CPU 版:去掉 --gpu 参数
# 我这里在 LattePanda v1 和 LattePanda Delta 上安装
sudo tensorman +1.14.0 run -p 8888:8888 --root --python3 --jupyter --name lp-cpu bash
创建容器的时候会拉取镜像,如果没有设置加速直接从 docker hub 上获取,会非常耗费时间,而且经常失败。安装完毕后会自动进入如下界面。
通过 sources.list 能看到镜像是 ubuntu 18.04(Bonic),在 容器里非宿主机内 执行以下命令进行更新:
sed -i 's/archive.ubuntu.com/mirrors.aliyun.com/g' /etc/apt/sources.list
sed -i 's/security.ubuntu.com/mirrors.aliyun.com/g' /etc/apt/sources.list
apt-get update && apt upgrade -y
pip install --upgrade pip setuptools
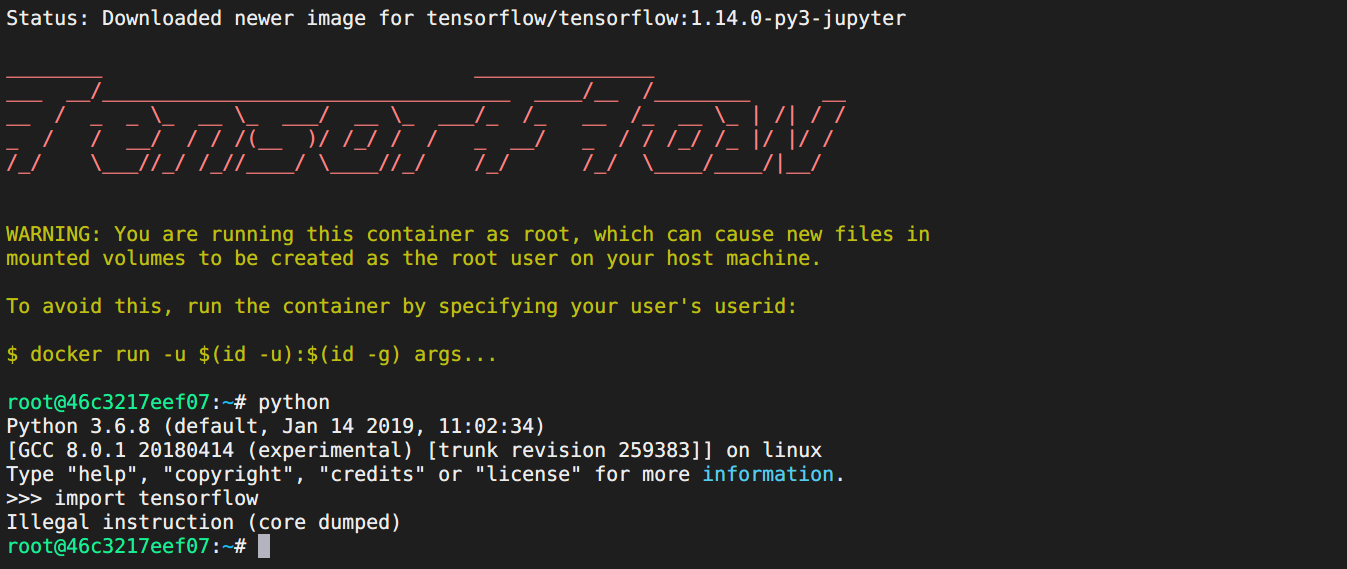
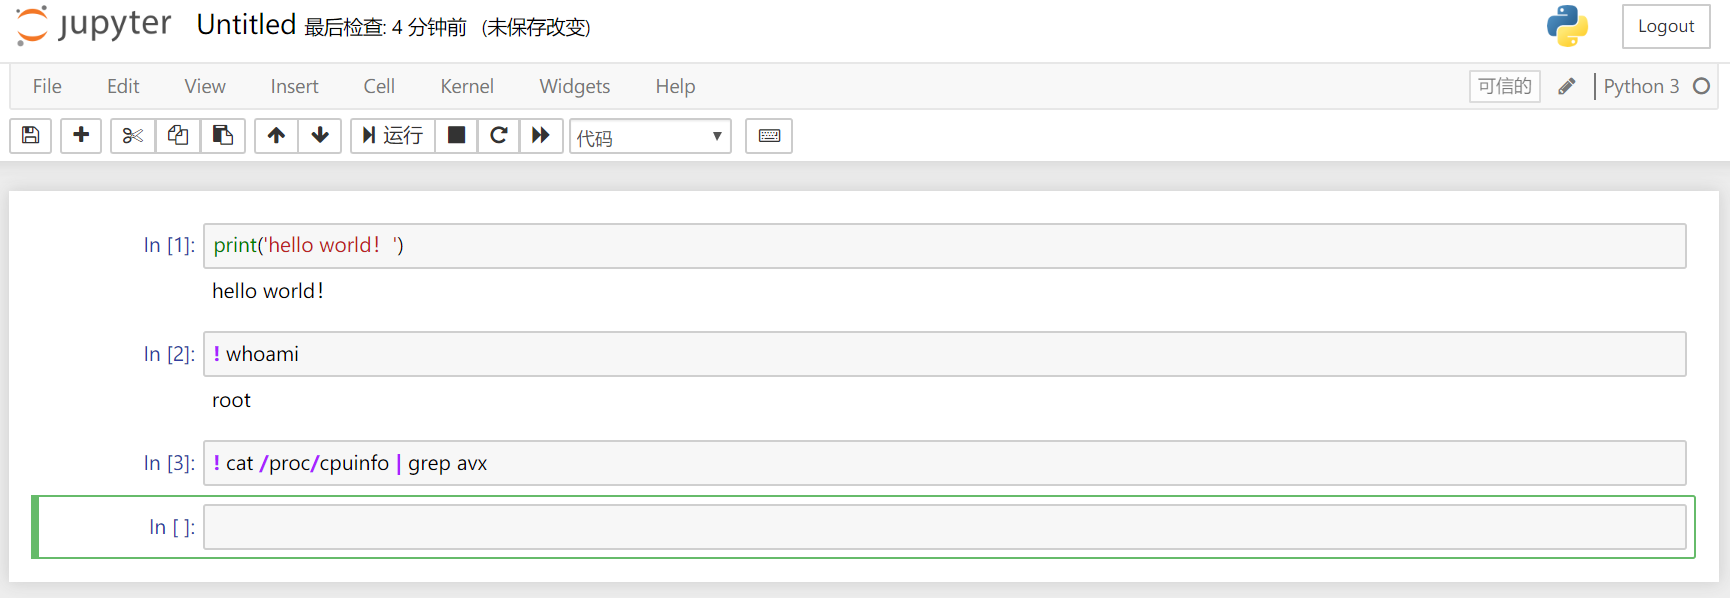
在不支持 avx/avx2 指令集的 CPU 上使用TensorFlow CPU
如果是 GPU 版,即可以正常使用了,在 Python 中可以正常 import tensorflow 不报错,<u>可以跳过此段</u>。而在 LP1 和 LPD 上则会如上图所示,报错:Illegal instruction (core dumped) 。原因在于,TensorFlow 1.6 之后,官方编译的版本需要 CPU 支持 avx 指令集,而我们的 Intel Celeron N4100/ Atom X5 z8350 都不支持该指令集,所以报错。
如何知道自己的 CPU 是否支持 avx 指令集?有三种方式。
- 访问 Intel 产品规范高级搜索页面,筛选条件选择
指令集扩展 ——> Intel AVX,第二筛选条件选择 家族 ,即可以看到 Atom/Celeron/Core 系列处理器对 avx 指令集的支持情况,可见目前 Atom 和 Celeron 系列消费级处理器全都不支持 avx 指令集。

- 可以搜索关键词:
cpuz + N4100 查看处理器规格截图。
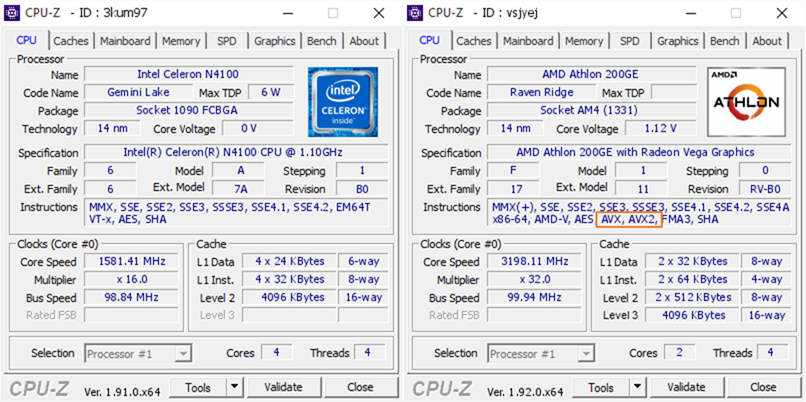
【CPU-Z Snapshot】
我们可以看到 N4100 并不支持 AVX 指令集,而散片价格不到 200元的 AMD 低端处理器 Athlon 200GE 很良心。牙膏厂果然名不虚传。 Via:a/b
- 使用 Linux 系统的话,可以使用
cat /proc/cpuinfo | grep avx 查看是否支持
解决方法
自行编译或者使用第三方不需要 avx 指令集的 tensorFlow 包。前者请自行搜索,例如 docker-tensorflow-builder ,我们来介绍第二种方法。
有一个名为 tensorflow-community-wheels 的项目,在 Issues 里可以找到大家分享的编译好的 tensorflow 软件包,我们找到对应 Python 版本的 noavx 包,例如这个:Tensorflow 1.14.1, Python 3.6, libc-2.27, linux_x86_64, whl (B970 noAVX, noCUDA, CPU-only)。下载获得 whl文件。
# 卸载旧版 tf
pip uninstall tensorflow
# /Projects 即为宿主机的 home 目录,安装下载的 whl 第三方预编译包
pip install tensorflow-1.14.1-cp36-cp36m-linux_x86_64.whl
# 升级以解决安装 grpcio 时,长时间卡在编译的问题,直接安装预编译包
pip install --upgrade pip setuptools
- 也有 网友说,通过
conda install -c conda-forge tensorflow 命令安装 tf 来解决问题,我没测试。
- 在 OpenVINO 安装模型优化器依赖时,默认安装的 TF CPU 版本也需要 avx 指令集,同样可以通过上述方法解决。
测试安装
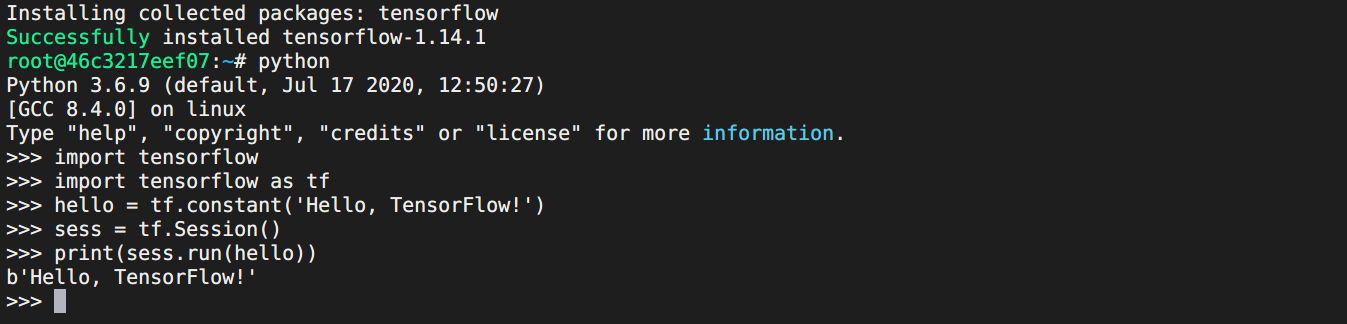
【测试 TF】
可以看到正常导入并成功使用 tf
jupyter notebook --ip=0.0.0.0 --no-browser --allow-root
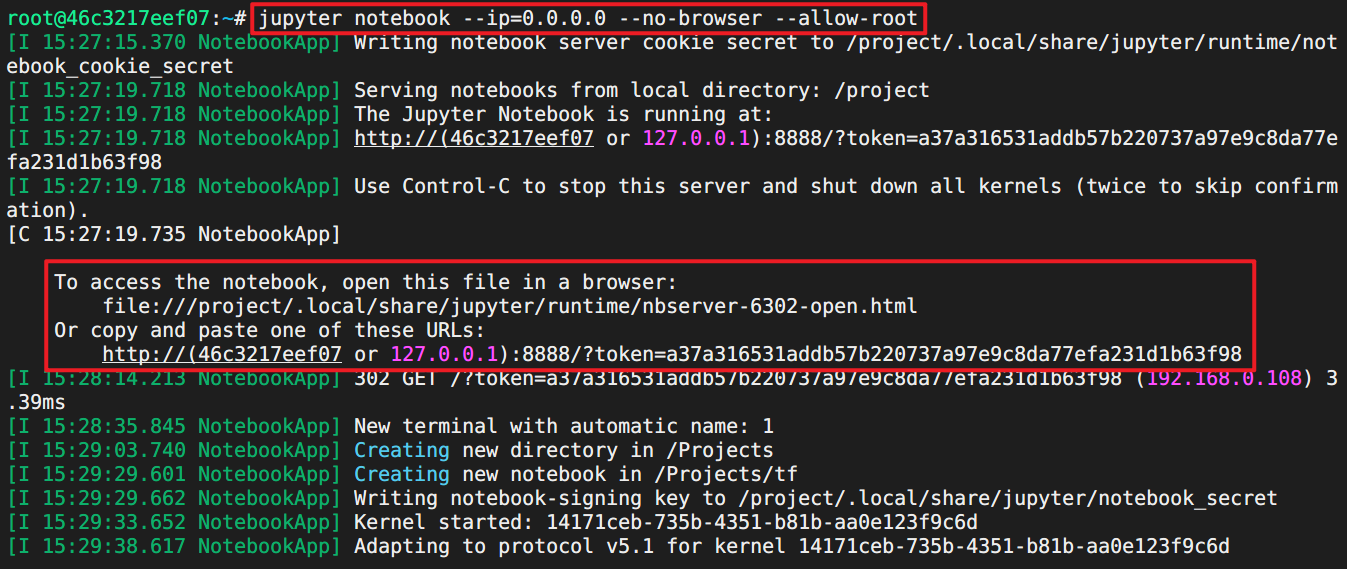
【测试 Jupyter Notebook 一】
【测试 Jupyter Notebook 二】
打开浏览器,可以看到 Jupyter 已经正确监听运行
我们可以安装 tmux 来使 Jupyter 在后台运行。
创建自定义镜像
以上方法不会每次运行之后即时销毁,下次每次都会从官方镜像重新创建容器不会保存改动,我们这里尝试创建镜像保存改动。
# 因为我们要使用 tensorflow object detection api,安装以下包
apt-get install -y libsm6 libxext6 libxrender-dev tmux
pip install opencv-python cython lxml pillow
pip install --upgrade protobuf
# 在宿主机的终端里执行下面的命令保存自定义镜像,名为 lp-cpu
tensorman save lp-cpu lp-cpu
# 在宿主机的终端里执行以下命令查看镜像和容器
sudo docker images
tensorman show
sudo tensorman list
docker ps
# 下次执行以下命令即可启动自定义镜像
sudo tensorman '=lp-cpu' run -p 8888:8888 --root --name lp-cpu2 bash
# 在容器里执行以下命令启动 jupyter
jupyter notebook --allow-root --ip=0.0.0.0 --no-browser
注意:
- 保存的镜像名称可以自定义,我这里使用的是
lp-cpu
- 建议每次启动容器时都指定名称,方便定制
- 更多使用方法请参考 介绍文档
测试 Object Detection API
安装可以参考 这个非官方教程,由于前期工作已经搞定,从 Downloading the TensorFlow Models 部分开始查看即可。主要注意:
- COCO API 需要安装
- 添加以下内容来设置 GPU 用量,否则报错
config = tf.ConfigProto()
config.gpu_options.allow_growth = True
session = tf.Session(config=config)
或者
config = tf.compat.v1.ConfigProto(allow_soft_placement=True)
config.gpu_options.per_process_gpu_memory_fraction = 0.3
tf.compat.v1.keras.backend.set_session(tf.compat.v1.Session(config=config))
如是就应该正确执行经典 demo,输出成功图了。

最近新版 Object Detection API 已经支持 TensorFlow 2.x 了,大家可以参考 更新文档。
2.2 在其他 Ubuntu 19.10+ 及其衍生发行版上使用
TensorMan 是 Pop! OS 专有的,通过修改我们尝试在 Ubuntu 发行版上使用。考虑是软件源有所不同。
找到这个 PPA源:
https://launchpad.net/~system76/+archive/ubuntu/pop
还有 apt.pop-os.org 软件仓库。
sudo add-apt-repository ppa:system76/pop
sudo su
# 查找 sources.list.d 目录下的所以软件仓库地址,并修改为 ustc 反代地址。
find /etc/apt/sources.list.d/ -type f -name "*.list" -exec  sed  -i.bak -r  's#deb(-src)?\s*http(s)?://ppa.launchpad.net#deb\1 https://launchpad.proxy.ustclug.org#ig' {} \;
# 增加 apt.pop-os.org 软件仓库,根据情况修改 focal:20.04 为对应版本代号。例如 eoan:19.10
cat << _EOF_ >> /etc/apt/sources.list.d/pop-os.list
deb http://apt.pop-os.org/proprietary focal main
_EOF_
apt-get update
然后就可以正常使用 TensorMan 了。该 PPA 源针对 Pop! OS,在其他 Ubuntu 发行版上使用可能会导致未知问题,不过我用着还好。
2.3 在 Ubuntu 18.04 上使用 TensorMan
主要原因是 18.04 自带的 Docker 版本过于老旧,不支持 GPU 相关功能,不过可以通过添加 PPA 源更新 dokcer 的方法来使用。具体参考以下链接:When is it coming to 18.04 LTS?

 萌萌哒新人
萌萌哒新人
 活跃会员
活跃会员
 宣传大使
宣传大使
 版主限定
版主限定
 牛X认证
牛X认证
 老版主限定
老版主限定
 创作达人
创作达人
 小蘑菇
小蘑菇
 编辑选择奖
编辑选择奖
 ARD DAY
 编辑选择奖
编辑选择奖
 摸鱼团员
摸鱼团员
 编辑选择奖
编辑选择奖
 志“童”道合
 编辑选择奖
编辑选择奖
 编辑选择奖
编辑选择奖
 编辑选择奖
编辑选择奖


 沪公网安备31011502402448
 置顶卡
置顶卡 变色卡
变色卡 千斤顶
千斤顶


