|
11757| 1
|
[项目] 使用SPRESENSE电路板的POV显示器 |
|
我使用SPRESENSE和DotStar LED编带制作了全彩POV显示器。 此项目用到的工具材料 硬件组件
软件应用程序和在线服务 故事 我使用SPRESENSE、无线充电模块和DotStar LED编带制作了全彩POV(视觉暂留)显示器。 搭建过程 LED胶带、SPRESENSE和反射传感器安装在旋转组件上,并且LED编带采用DotStar。使用无线充电模块执行对旋转部件的无线供电过程。 一节AA电池用于电机供电,三节AA电池用于向旋转部件提供无线电源。 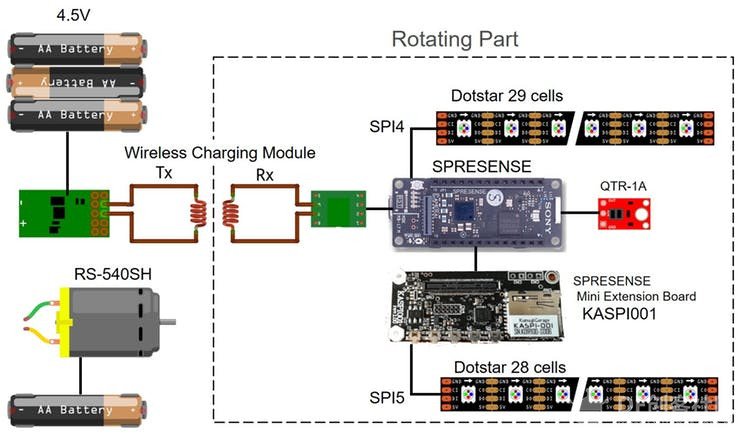 POV显示设备 电机采用金属配件固定,手柄采用黑色木材制成,电池插座和电源开/关滑动开关固定。  旋转组件完全独立,如下所示。 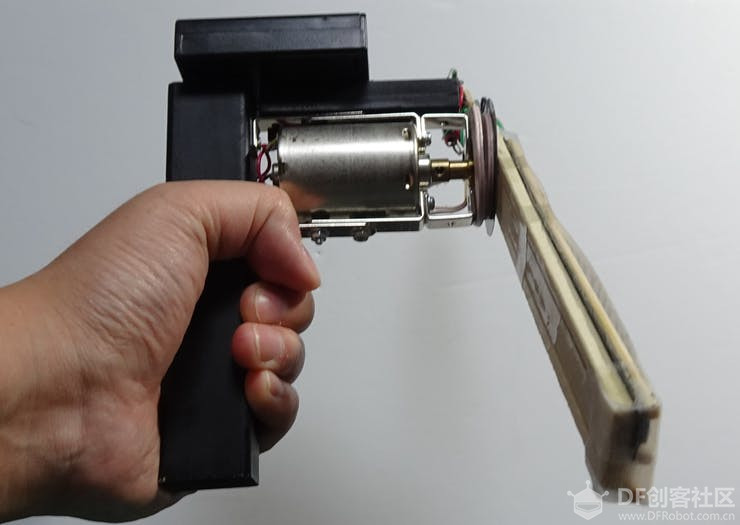 我使用了两个Dotstar LED编带。29芯LED灯带经由SPI4进行控制。28芯LED编导由SPI5进行控制。 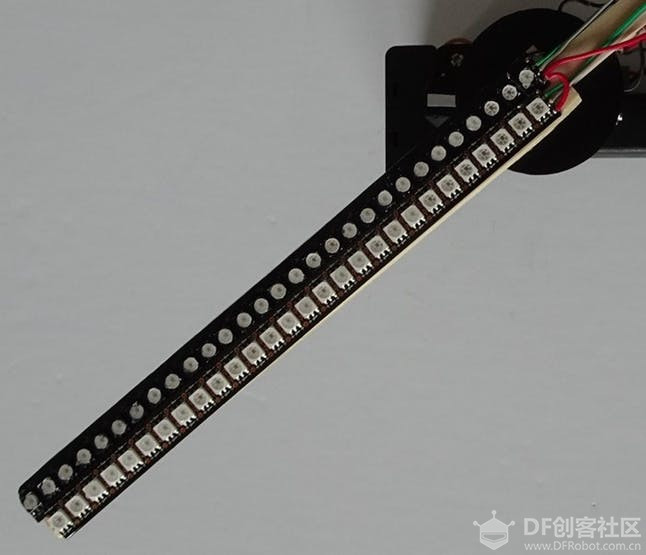 我敷设了一层乳白色的薄膜,用于光的传播。 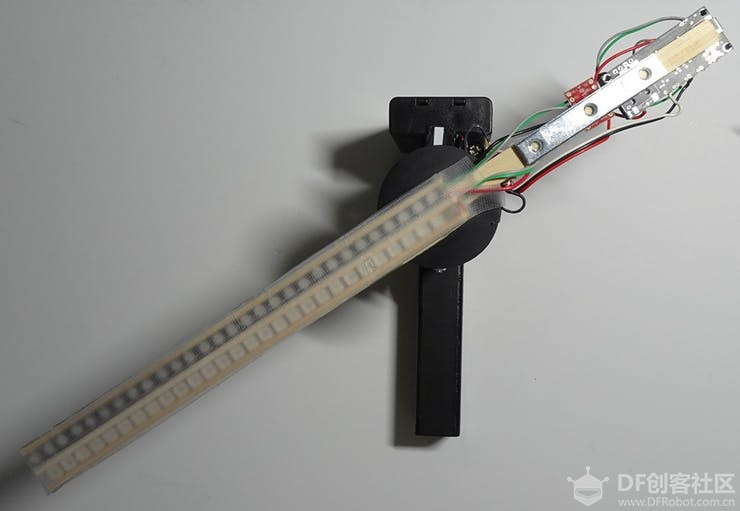 电压电平转换器TXB0104用于将SPRESENSE的逻辑电平从1.8V转换为5V。  我使用无线充电模块为LED旋转组件供电。它只是将传动线圈面向电动机旋转轴,而几乎不需要执行任何操作。 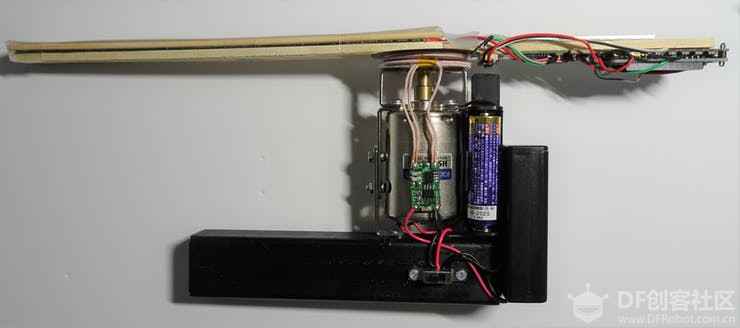 Arduino IDE代码 以下库用于Dotstar.https://github.com/adafruit/Adafruit_DotStar Adafruit_DotStar_SPI5.h是对Adafruit_DotStar.h的修改,以便能够使用SPI5。 当反射传感器检测到标记信号时,它会减小输出,因此它会在附加中断中检测到标记信号,并测量中断处理一圈所需的时间。 它通过将一圈的时间除以150使得LED闪烁切换。LED显示模式以阵列形式存储在graphics.h中。 [mw_shl_code=applescript,true]#include <SPI.h> #include "Adafruit_DotStar_SPI5.h" #include <Adafruit_DotStar.h> #include "graphics.h" #define NUMPIXELS2 29 // Number of LEDs in strip #define NUMPIXELS 57 // Number of LEDs in 2 strips #define Frame 16 #define Div 150 #define Fclk 26000000 #define itrPin 19 int numRot = 0; int numDiv = 0, numDiv2 = 0; int stateDiv = 0; unsigned long rotTime, timeOld, timeNow; Adafruit_DotStar_SPI5 strip5 = Adafruit_DotStar_SPI5(NUMPIXELS2, DOTSTAR_BGR); Adafruit_DotStar strip4 = Adafruit_DotStar(NUMPIXELS2, DOTSTAR_BGR); void setup() { Serial.begin(115200); strip5.begin(); SPI5.beginTransaction(SPISettings(Fclk, MSBFIRST, SPI_MODE0)); strip4.begin(); SPI.beginTransaction(SPISettings(Fclk, MSBFIRST, SPI_MODE0)); strip5.clear(); strip4.clear(); strip5.show(); strip4.show(); delay(500); attachInterrupt(digitalPinToInterrupt(itrPin), RotCount, FALLING ); } void loop() { if(stateDiv == 1 && micros() - timeOld > rotTime / Div * (numDiv)){ stateDiv = 0; } if(stateDiv == 0 && micros() - timeOld < rotTime / Div * (numDiv + 1)){ stateDiv = 1; strip5.clear(); strip4.clear(); for(int i=0;i<NUMPIXELS2; i++){ numDiv2 = numDiv+2; if(numDiv2 >= Div) numDiv2 -= Div; strip5.setPixelColor(i, pic[numRot][numDiv2][i*2]); strip4.setPixelColor(i, pic[numRot][numDiv][i*2+1]); } strip5.show(); strip4.show(); numDiv++; if(numDiv >= Div ) numDiv = 0; } } void RotCount() { timeNow = micros(); rotTime = timeNow - timeOld; timeOld = timeNow; numRot++; if(numRot >= Frame) numRot = 0; } [/mw_shl_code] 显示图形数据创建方法(Python) 在Python代码中创建POV显示数据“graphics.h”。可以通过GIF或静止图像创建显示数据。 [mw_shl_code=applescript,true]# -*- coding: utf-8 -*- import cv2 import os import math from PIL import Image #Array setting NUMPIXELS = 57 #Number of LEDs Div = 150 #Number of divisions per lap Bright = 30 #LED Brightness Led0Bright = 3 #Brightness of center LED [%] #File creation file = open('graphics.h', 'w') file.write('#define NUMPIXELS ' + str(NUMPIXELS) + '\n') file.write('#define Div ' + str(Div) + '\n' + '\n') #file.write('#define Frame ' + str(Frame) + '\n' + '\n') file.write('const uint32_t pic [Frame][Div][NUMPIXELS] = {' + '\n') # Read GIF file gif_file_name = "xxx.gif" gif = cv2.VideoCapture(gif_file_name) #Image conversion function def polarConv(pic, i): imgOrgin = cv2.imread(pic) #Read image data h, w, _ = imgOrgin.shape #Get image size #Image reduction imgRedu = cv2.resize(imgOrgin,(math.floor((NUMPIXELS * 2 -1)/h *w), NUMPIXELS * 2 -1)) #cv2.imwrite(str(i) + '-resize.jpg',imgRedu) #Reduced image center coordinates h2, w2, _ = imgRedu.shape wC = math.floor(w2 / 2) hC = math.floor(h2 / 2) #Polar coordinate conversion image preparation imgPolar = Image.new('RGB', (NUMPIXELS, Div)) #Polar transformation file.write('\t{\n') for j in range(0, Div): file.write('\t\t{') for i in range(0, hC+1): #Get coordinate color rP = int(imgRedu[hC + math.ceil(i * math.cos(2*math.pi/Div*j)), wC - math.ceil(i * math.sin(2*math.pi/Div*j)), 2] * ((100 - Led0Bright) / NUMPIXELS * i + Led0Bright) / 100 * Bright /100) gP = int(imgRedu[hC + math.ceil(i * math.cos(2*math.pi/Div*j)), wC - math.ceil(i * math.sin(2*math.pi/Div*j)), 1] * ((100 - Led0Bright) / NUMPIXELS * i + Led0Bright) / 100 * Bright /100) bP = int(imgRedu[hC + math.ceil(i * math.cos(2*math.pi/Div*j)), wC - math.ceil(i * math.sin(2*math.pi/Div*j)), 0] * ((100 - Led0Bright) / NUMPIXELS * i + Led0Bright) / 100 * Bright /100) file.write('0x%02X%02X%02X' % (rP,gP,bP)) if i == hC: file.write('},\n') else: file.write(', ') imgPolar.putpixel((i,j), (rP, gP, bP)) file.write('\t},\n\n') #Generate directory to save screen capture dir_name = "screen_caps" if not os.path.exists(dir_name): os.mkdir(dir_name) i = 0 while True: is_success, frame = gif.read() # Exit when the file can not be read if not is_success: break # Write out to an image file img_name = str(i) + ".jpg" img_path = os.path.join(dir_name, img_name) cv2.imwrite(img_path, frame) #conversion polarConv(img_path, i) i += 1 file.write('};' + '\n' + '\n') file.close() #Inserting the number of frames at the beginning of the file with open('graphics.h') as f: l = f.readlines() l.insert(0, '#define Frame ' + str(i) + '\n') with open('graphics.h', mode='w') as f: f.writelines(l)[/mw_shl_code] 测试GIF文件 我使用了以下GIF文件。帧数是16。 |
 活跃会员
活跃会员
 牛X认证
牛X认证


 沪公网安备31011502402448
© 2013-2026 Comsenz Inc. Powered by Discuz! X3.4 Licensed

 置顶卡
置顶卡 变色卡
变色卡 千斤顶
千斤顶


