|
5091| 1
|
土壤传感器测试---IOT篇 |
|
本帖最后由 gada888 于 2020-9-25 21:27 编辑 引言: 土壤传感器大家都用过,可是在实际应用中普遍发现老版的传感防水差,易氧化等问题,这次终于期盼到了新版防水土壤传感。感谢DF团队提供的这个测试机会。这一次因为要用到IOT功能,因此主控选择了流行的ESP32.这次的项目利用了RGB灯来反应植物的情绪,例如缺水和湿润,达到互动效果,并且通过ESP32的WIFI功能把传感获得的数值每隔两秒发布到adafruit物联网平台。这样你就可以远程观察土壤模块的采样数值变化。 相关视频展示如下: 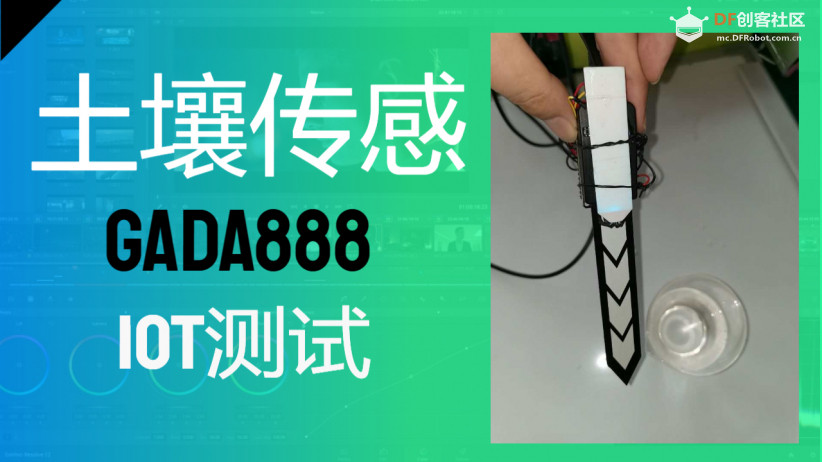 第一步:展示内容 将传感放入水中后,传感相连的RGB灯则变色,变成黄色。出水则变蓝色。 第二步:代码要点 先用串口的代码来找到传感在空气和水中的值,然后把这个值做一个简单的运算。得到精确的临界值。例如你要展示的是一个0-100数值的图表。用这个图表来表示水分含量。那么从ESP32模拟口取值,就是代表5V电压的0-1023值转换为0-100的数值。然后用一个简单的数学公式来算出来,由于这个土壤模块放入水中的位置不同取值也不同。因此你首先得到你把传感放入水中的大致位置先想好。然后用传感wiki也给出的案例算出大致的值。例如我是吧传感放入水中三分之一的位置。那我取值是600空气,水分350.因此会采用这个参考值修改公式的数值。得出相对精确的理想值。 第三步:硬件搭建 所需器材:(1)ESP32控制器(2);DF的防水土壤传感器(3);一些连接电线(4);5v 锂电池;(5);USB数据线;(6);DF的RGB灯板 第四步:了解一下关键硬件的参数 根据测试,土壤传感的灵敏度很好,没有延迟,防水很好。 第五步: 发一些硬件的图片。让人有个直观的认识 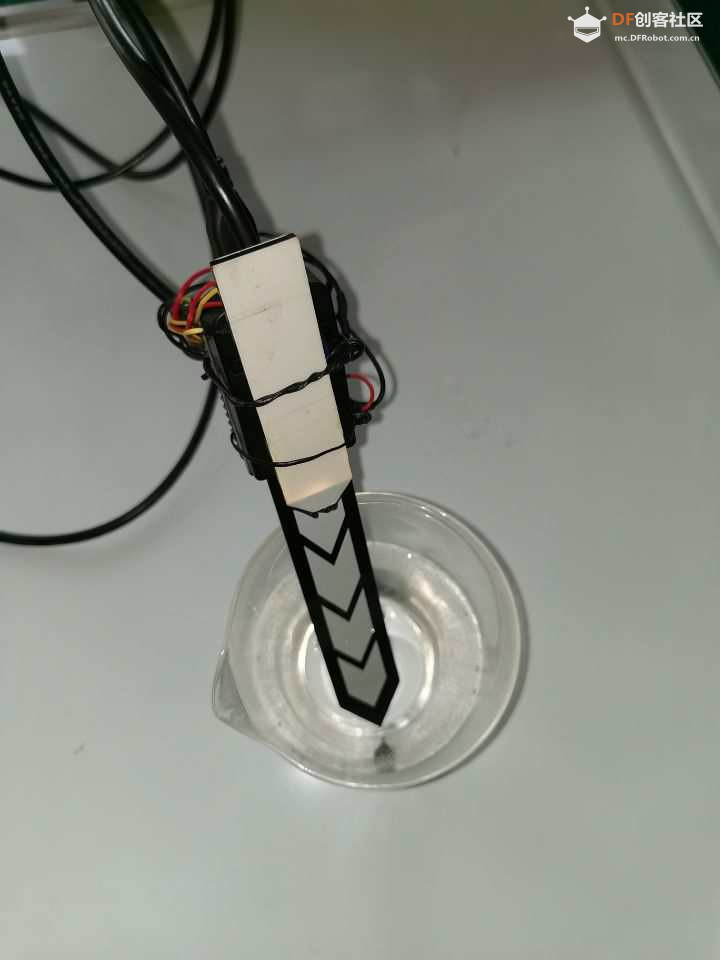 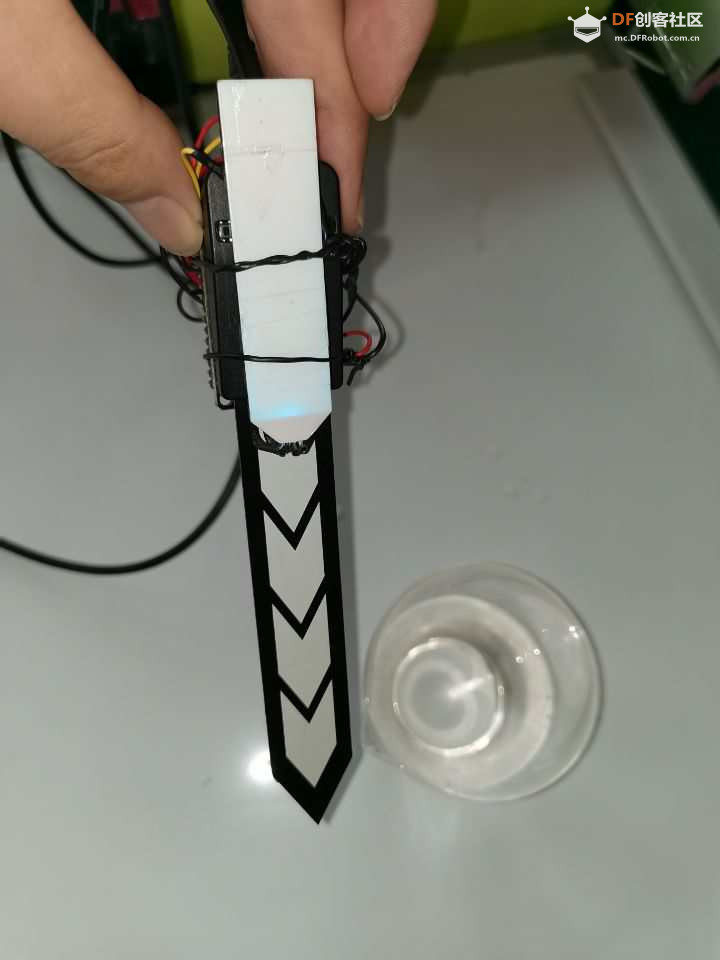 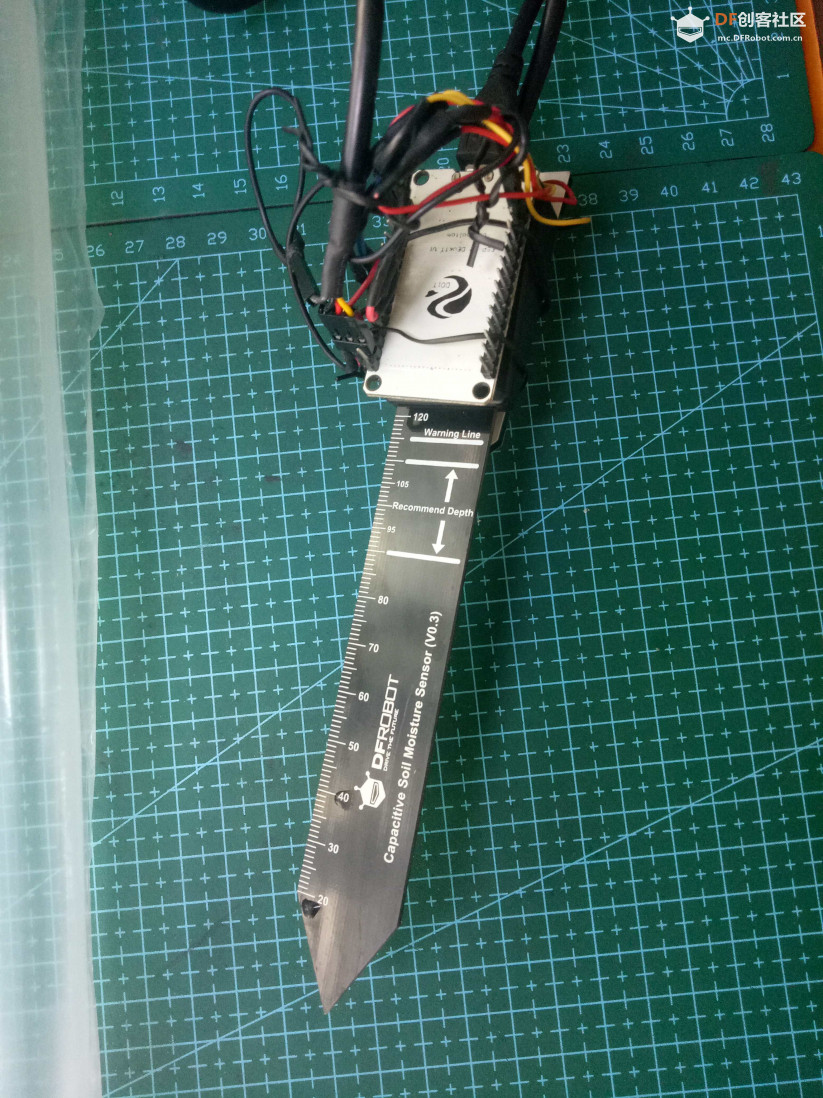 第六步:总体概括 项目用RGB灯来反应出土壤传感的回传值。这个值和你插入土中的传感的深度相关。这里我插入的是传感的三分之一,那么我是从这个点取值,即350.展现的结果是传感遇水则RGB灯发出黄色,缺水RGB灯颜色变蓝。具体参见视频。 第七部:连线图 连线图如下: 土壤传感的data线-ESP32的A0 RGB LED针脚连线如下 uint8_t LedR = A4; // GPIO32 uint8_t LedG = A5; // GPIO33 uint8_t LedB = A18; // GPIO25 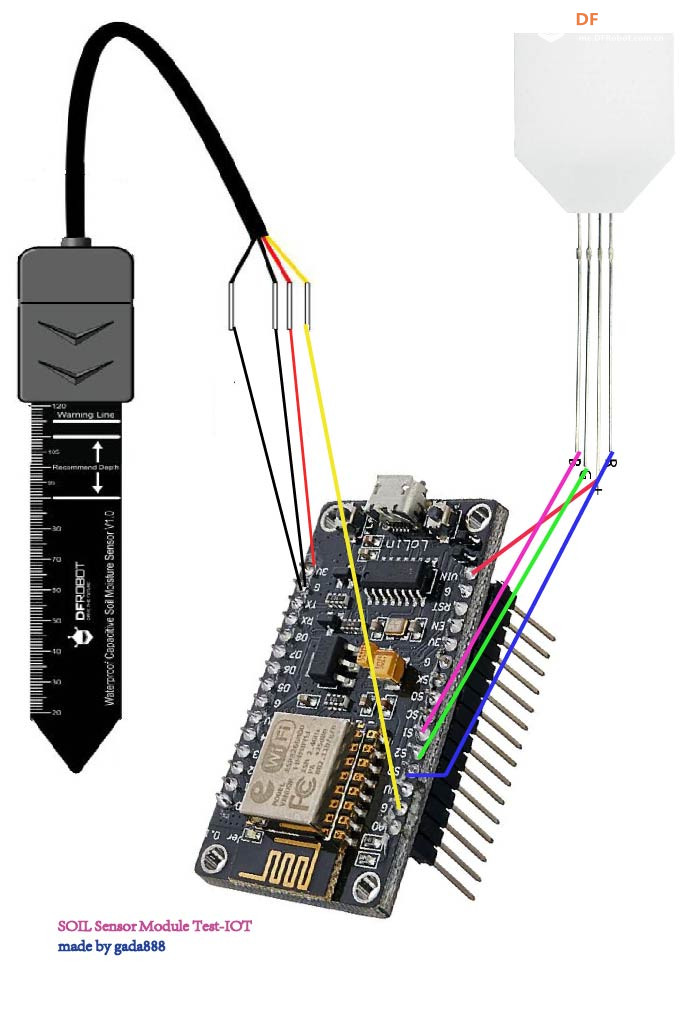 连线图连线时一定要参阅你的ESP32的官方引脚图。因为ESP32出了很多版本。有的引脚放置位置和其他的不一样。我用的是ESP32 DEVKIT VI版。 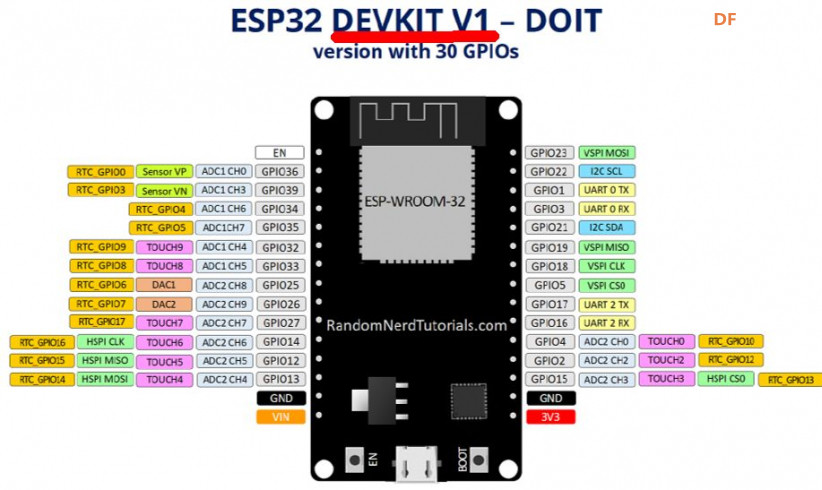 第八部:代码部分的设计 [AppleScript] [color=rgb(51, 102, 153) !important]纯文本查看 [color=rgb(51, 102, 153) !important]复制代码 [backcolor=rgb(27, 36, 38) !important][color=white !important] [color=white !important]?
先用上面的代码测出你的传感的干湿范围。 我取的是600空气值和400水湿度.你可以参考一下产品WIKI的描述 ============= 记录传感器放置在空气中时读到的模拟值,代表干燥时的读数。由于空气中的湿度不同,该 数值区间一般在520-640之间。 将传感器插入水中一定深度,深度推荐在"Recommend Depth"之间,不要超过板子上 的"Warning Line"。待传感器反馈数值为0时,代表100%湿度的读数,此时根据传感器上的刻 度,记录读到的深度值,在土壤中使用时,也推荐插入至该深度值。 =============== [mw_shl_code=applescript,false]#include <WiFi.h> #include "Adafruit_MQTT.h" #include "Adafruit_MQTT_Client.h" const char *ssid = "00000000"; // 填你的Enter your WiFi Name const char *pass = "0000000"; // 填你的Enter your WiFi Password const int AirValue = 600; //可以忽视you need to change this value that you had recorded in t const int WaterValue = 350; //可以忽视you need to change this value that you had recorded in th int intervals = (AirValue - WaterValue)/3;//可以忽视 uint8_t LedR = A4; // GPIO32 uint8_t LedG = A5; // GPIO33 uint8_t LedB = A18; // GPIO25 WiFiClient client; #define MQTT_SERV "io.adafruit.com" #define MQTT_PORT 1883 #define MQTT_NAME "0000" //填你的注册名 Your Adafruit IO Username #define MQTT_PASS "aio_F00000000" // 填你的key Adafruit IO AIO key const int moisturePin = A0; // moisteure sensor pin int mValue; //moisture reading //Set up the feed you're publishing to Adafruit_MQTT_Client mqtt(&client, MQTT_SERV, MQTT_PORT, MQTT_NAME, MQTT_PASS); // mData is the feed name where you will publish your data Adafruit_MQTT_Publish mData = Adafruit_MQTT_Publish(&mqtt,MQTT_NAME "/f/mData"); void setup() { Serial.begin(115200); delay(10); pinMode(LedR, OUTPUT); pinMode(LedG, OUTPUT); pinMode(LedB, OUTPUT); Serial.println("Connecting to "); Serial.println(ssid); WiFi.begin(ssid, pass); while (WiFi.status() != WL_CONNECTED) { delay(500); Serial.print("."); // print ... till not connected } Serial.println(""); Serial.println("WiFi connected"); } void loop() { MQTT_connect(); mValue = (355 - ((analogRead(moisturePin) / 1023.00) * 100)); Serial.print("Soil Moisture is = "); Serial.print(mValue); Serial.println("%"); if(mValue > 90) { Serial.println("Very Wet"); digitalWrite(LedR, LOW); digitalWrite(LedB, LOW); digitalWrite(LedG, HIGH); //Green LED } else if((mValue < 20)) { Serial.println("Dry"); digitalWrite(LedR, HIGH); digitalWrite(LedB, LOW); digitalWrite(LedG, LOW); //Green LED } String data1 = String(mValue); //This condition is used to publish the Variable (mValue) on adafruit IO. Change thevariable according to yours. if (! mData.publish(mValue)) { delay(2000); } delay(3000); } void MQTT_connect() { int8_t ret; // Stop if already connected. if (mqtt.connected()) { return; } uint8_t retries = 3; while ((ret = mqtt.connect()) != 0) // connect will return 0 for connected { mqtt.disconnect(); delay(3000); // wait 5 seconds retries--; if (retries == 0) { // basically die and wait for WDT to reset me while (1); } } }[/mw_shl_code] =========== IOT这块,要你io.adafruit.com注册你的免费账号,MQTT配置方面不用管,代码里有写好,因为这块的配置繁琐,因为过程都录在视频里了。视频里有操作步骤。光看图片有点不容易明白。 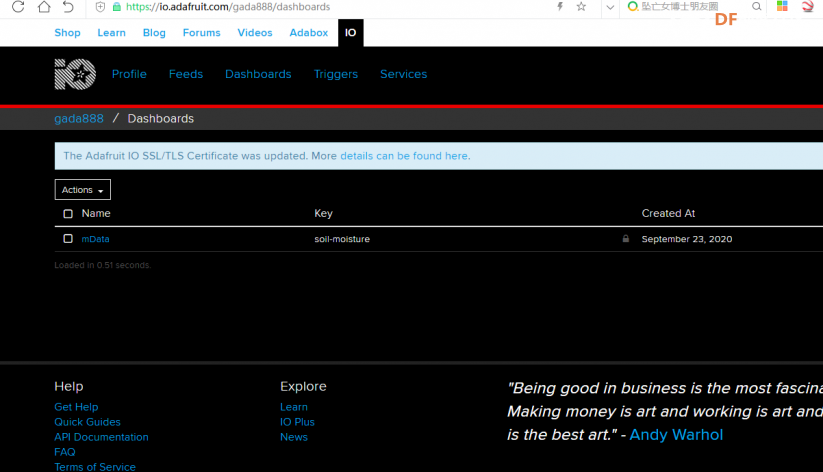 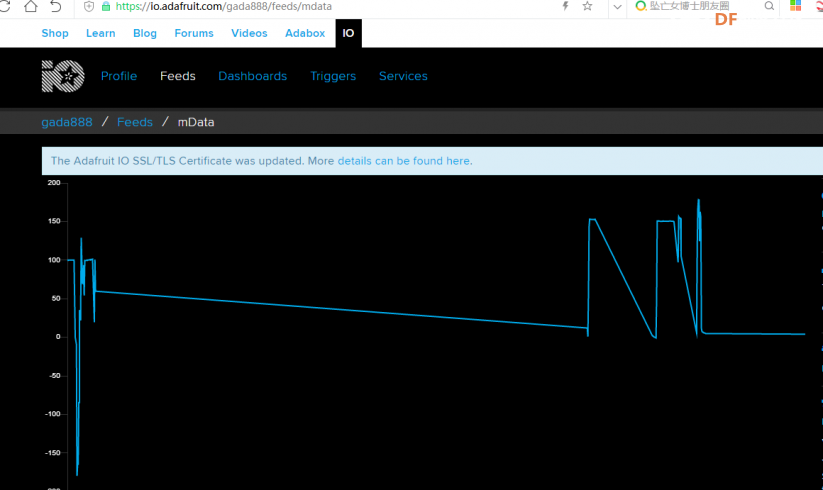  |


 沪公网安备31011502402448
© 2013-2026 Comsenz Inc. Powered by Discuz! X3.4 Licensed


 置顶卡
置顶卡 变色卡
变色卡 千斤顶
千斤顶
 老版主限定
老版主限定
 创作达人
创作达人
 创客造
创客造
 编辑选择奖
编辑选择奖


