本帖最后由 gada888 于 2024-9-23 17:29 编辑
前言:完成这样一个项目的意义在于什么呢,在于你会发现整个项目的核心居然是两个数学计算公式。所以有人说‘’AI的尽头是数学‘’不无道理。当下在AI代码助手的帮助下,学习代码这个工作的意义其实在弱化了。我们更多的关注点应该在创意和数学上。
mediapipe是机器视觉的一个套件。在opencv的框架下,可以利用mediapipe的高互动性来做一些有趣的项目。今天我们用个简化的mediapipe库文件。cvzone来完成一个手势控制灯光的项目。

为了让大家对这个项目的核心内容有个快速的了解。这里发布一个教学视频。视频里有对核心代码部分的解释。因为时间关系,也因为代码注释很完整,视频讲解就不对mediapipe和opencv部分进行解释,因此它不是初学者项目。需要学习者有python,opencv和机器视觉知识的基础储备。
下面是视频链接:
下面是源代码:并且提供了代码注释。
- from cvzone.HandTrackingModule import HandDetector
- import cv2
- #Arduino Declare
- import time
- from pinpong.board import Board,Pin
- Board("uno","COM3").begin()
- pwm0 = Pin(Pin.D7, Pin.PWM)
-
- # Initialize the webcam to capture video
- # The '2' indicates the third camera connected to your computer; '0' would usually refer to the built-in camera
- cap = cv2.VideoCapture(0)
- length = 0
- # Initialize the HandDetector class with the given parameters
- detector = HandDetector(staticMode=False, maxHands=2, modelComplexity=1, detectionCon=0.5, minTrackCon=0.5)
-
- # Continuously get frames from the webcam
- while True:
- # Capture each frame from the webcam
- # 'success' will be True if the frame is successfully captured, 'img' will contain the frame
- success, img = cap.read()
-
- # Find hands in the current frame
- # The 'draw' parameter draws landmarks and hand outlines on the image if set to True
- # The 'flipType' parameter flips the image, making it easier for some detections
- hands, img = detector.findHands(img, draw=True, flipType=True)
-
- # Check if any hands are detected
- if hands:
- # Information for the first hand detected
- hand1 = hands[0] # Get the first hand detected
- lmList1 = hand1["lmList"] # List of 21 landmarks for the first hand
- bbox1 = hand1["bbox"] # Bounding box around the first hand (x,y,w,h coordinates)
- center1 = hand1['center'] # Center coordinates of the first hand
- handType1 = hand1["type"] # Type of the first hand ("Left" or "Right")
-
- # Count the number of fingers up for the first hand
- fingers1 = detector.fingersUp(hand1)
- print(f'H1 = {fingers1.count(1)}', end=" ") # Print the count of fingers that are up
-
- # Calculate distance between specific landmarks on the first hand and draw it on the image
- length, info, img = detector.findDistance(lmList1[4][0:2], lmList1[8][0:2], img, color=(255, 0, 255),
- scale=10)
-
- # Check if a second hand is detected
- if len(hands) == 2:
- # Information for the second hand
- hand2 = hands[1]
- lmList2 = hand2["lmList"]
- bbox2 = hand2["bbox"]
- center2 = hand2['center']
- handType2 = hand2["type"]
-
- # Count the number of fingers up for the second hand
- fingers2 = detector.fingersUp(hand2)
- print(f'H2 = {fingers2.count(1)}', end=" ")
-
- # Calculate distance between the index fingers of both hands and draw it on the image
- length, info, img = detector.findDistance(lmList1[4][0:2], lmList2[8][0:2], img, color=(255, 0, 0),
- scale=10)
- length = int((length // 10) * 10 - 30)
-
- if length < 0: length = 0
- if length > 100: length = 100
- print(length)
- pwm0.write_analog(length)
-
- #lengthConverted = int(np.interp(length, [0, 200], [398, 150]))
-
- print(" ") # New line for better readability of the printed output
-
- # Display the image in a window
- cv2.imshow("Image", img)
-
- # Keep the window open and update it for each frame; wait for 1 millisecond between frames
- cv2.waitKey(1)
这个项目主要用食指和拇指的缩放来进行灯的明暗控制。软件控制硬件是用的DFRobot的pinpong库。感谢pinpong库,让我们能够完成软硬件互动项目。程序通过摄像头来对双手进行辨识。它会提取并且绘制手型框。它能识别左右手,用H1和H2表示。它可以识别手指。最关键是识别缩放。因为缩放是变量值。需要计算和公式才能达到我们的目的。
关于软件部分,我是参考了cvzone的官方手势识别案例,换句话说,人家把框架搭好了。我可以按照自己的意图去实现更个性化的目的。在这个案例里,我调用了pinpong库的pwm0函数功能。那问题来了。我怎么知道它的功能是怎么使用的呢?我是在下列地址找到了pinpong原始档案。https://pypi.org/project/pinpong/#files
找到pwm文件。------------------------------
根据下面两条语句:
from pinpong.board import Board,Pin #导入PWM类实现模拟输出
pwm0.write_analog(i) #设置模拟输出值
----------------------
从而知道了取值范围是0-100和模拟输出的值范围0-255,0-255也就是0-5V之间的电压。通过AD转换,就是0-1023.这个不断变化的值给到Arduino的PWM引脚,这个引脚通过了mosfet进行了放大。给到了12V的灯泡。于是呈现了我视频里要呈现的0-12V电压变压的效果。==========
- # -*- coding: utf-8 -*-
-
- #实验效果:使用按钮控制LED模块亮度
- #接线:使用windows或linux电脑连接一块arduino主控板,主控板D6接一个LED灯模块
- import time
- from pinpong.board import Board,Pin #导入PWM类实现模拟输出
-
- Board("uno").begin() #初始化,选择板型和端口号,不输入端口号则进行自动识别
- #Board("uno","COM36").begin() #windows下指定端口初始化
- #Board("uno","/dev/ttyACM0").begin() #linux下指定端口初始化
- #Board("uno","/dev/cu.usbmodem14101").begin() #mac下指定端口初始化
-
- pwm0 = Pin(Pin.D6, Pin.PWM)
-
- while True:
- for i in range(100): #从0到255循环
- pwm0.write_analog(i) #设置模拟输出值
- print(i)
- time.sleep(0.05)
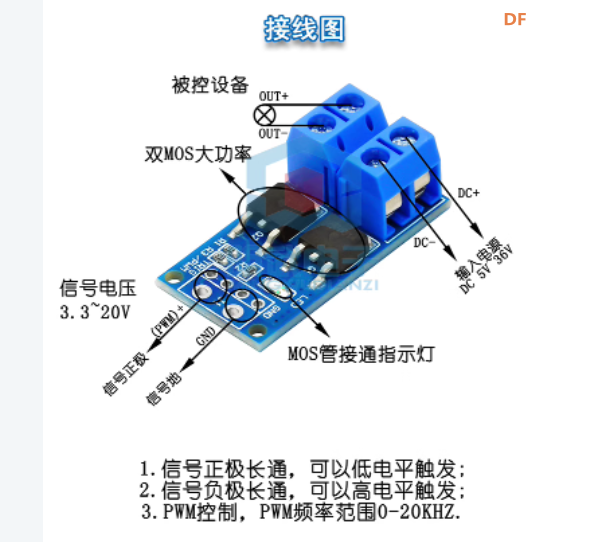
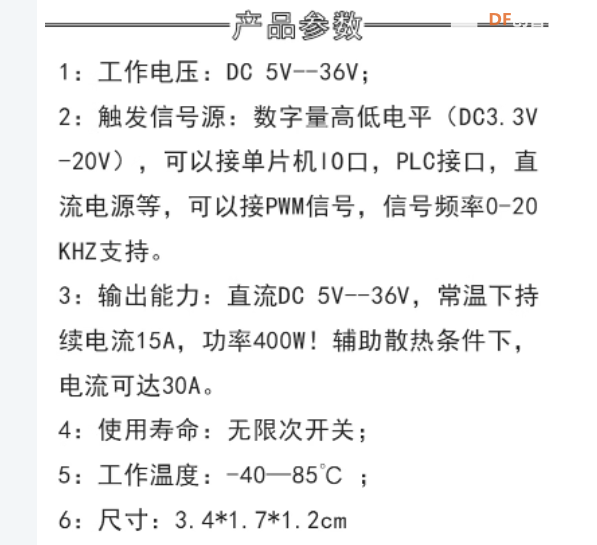
- 下面讲一讲场效应模块mosfet的连线方式。先看照片
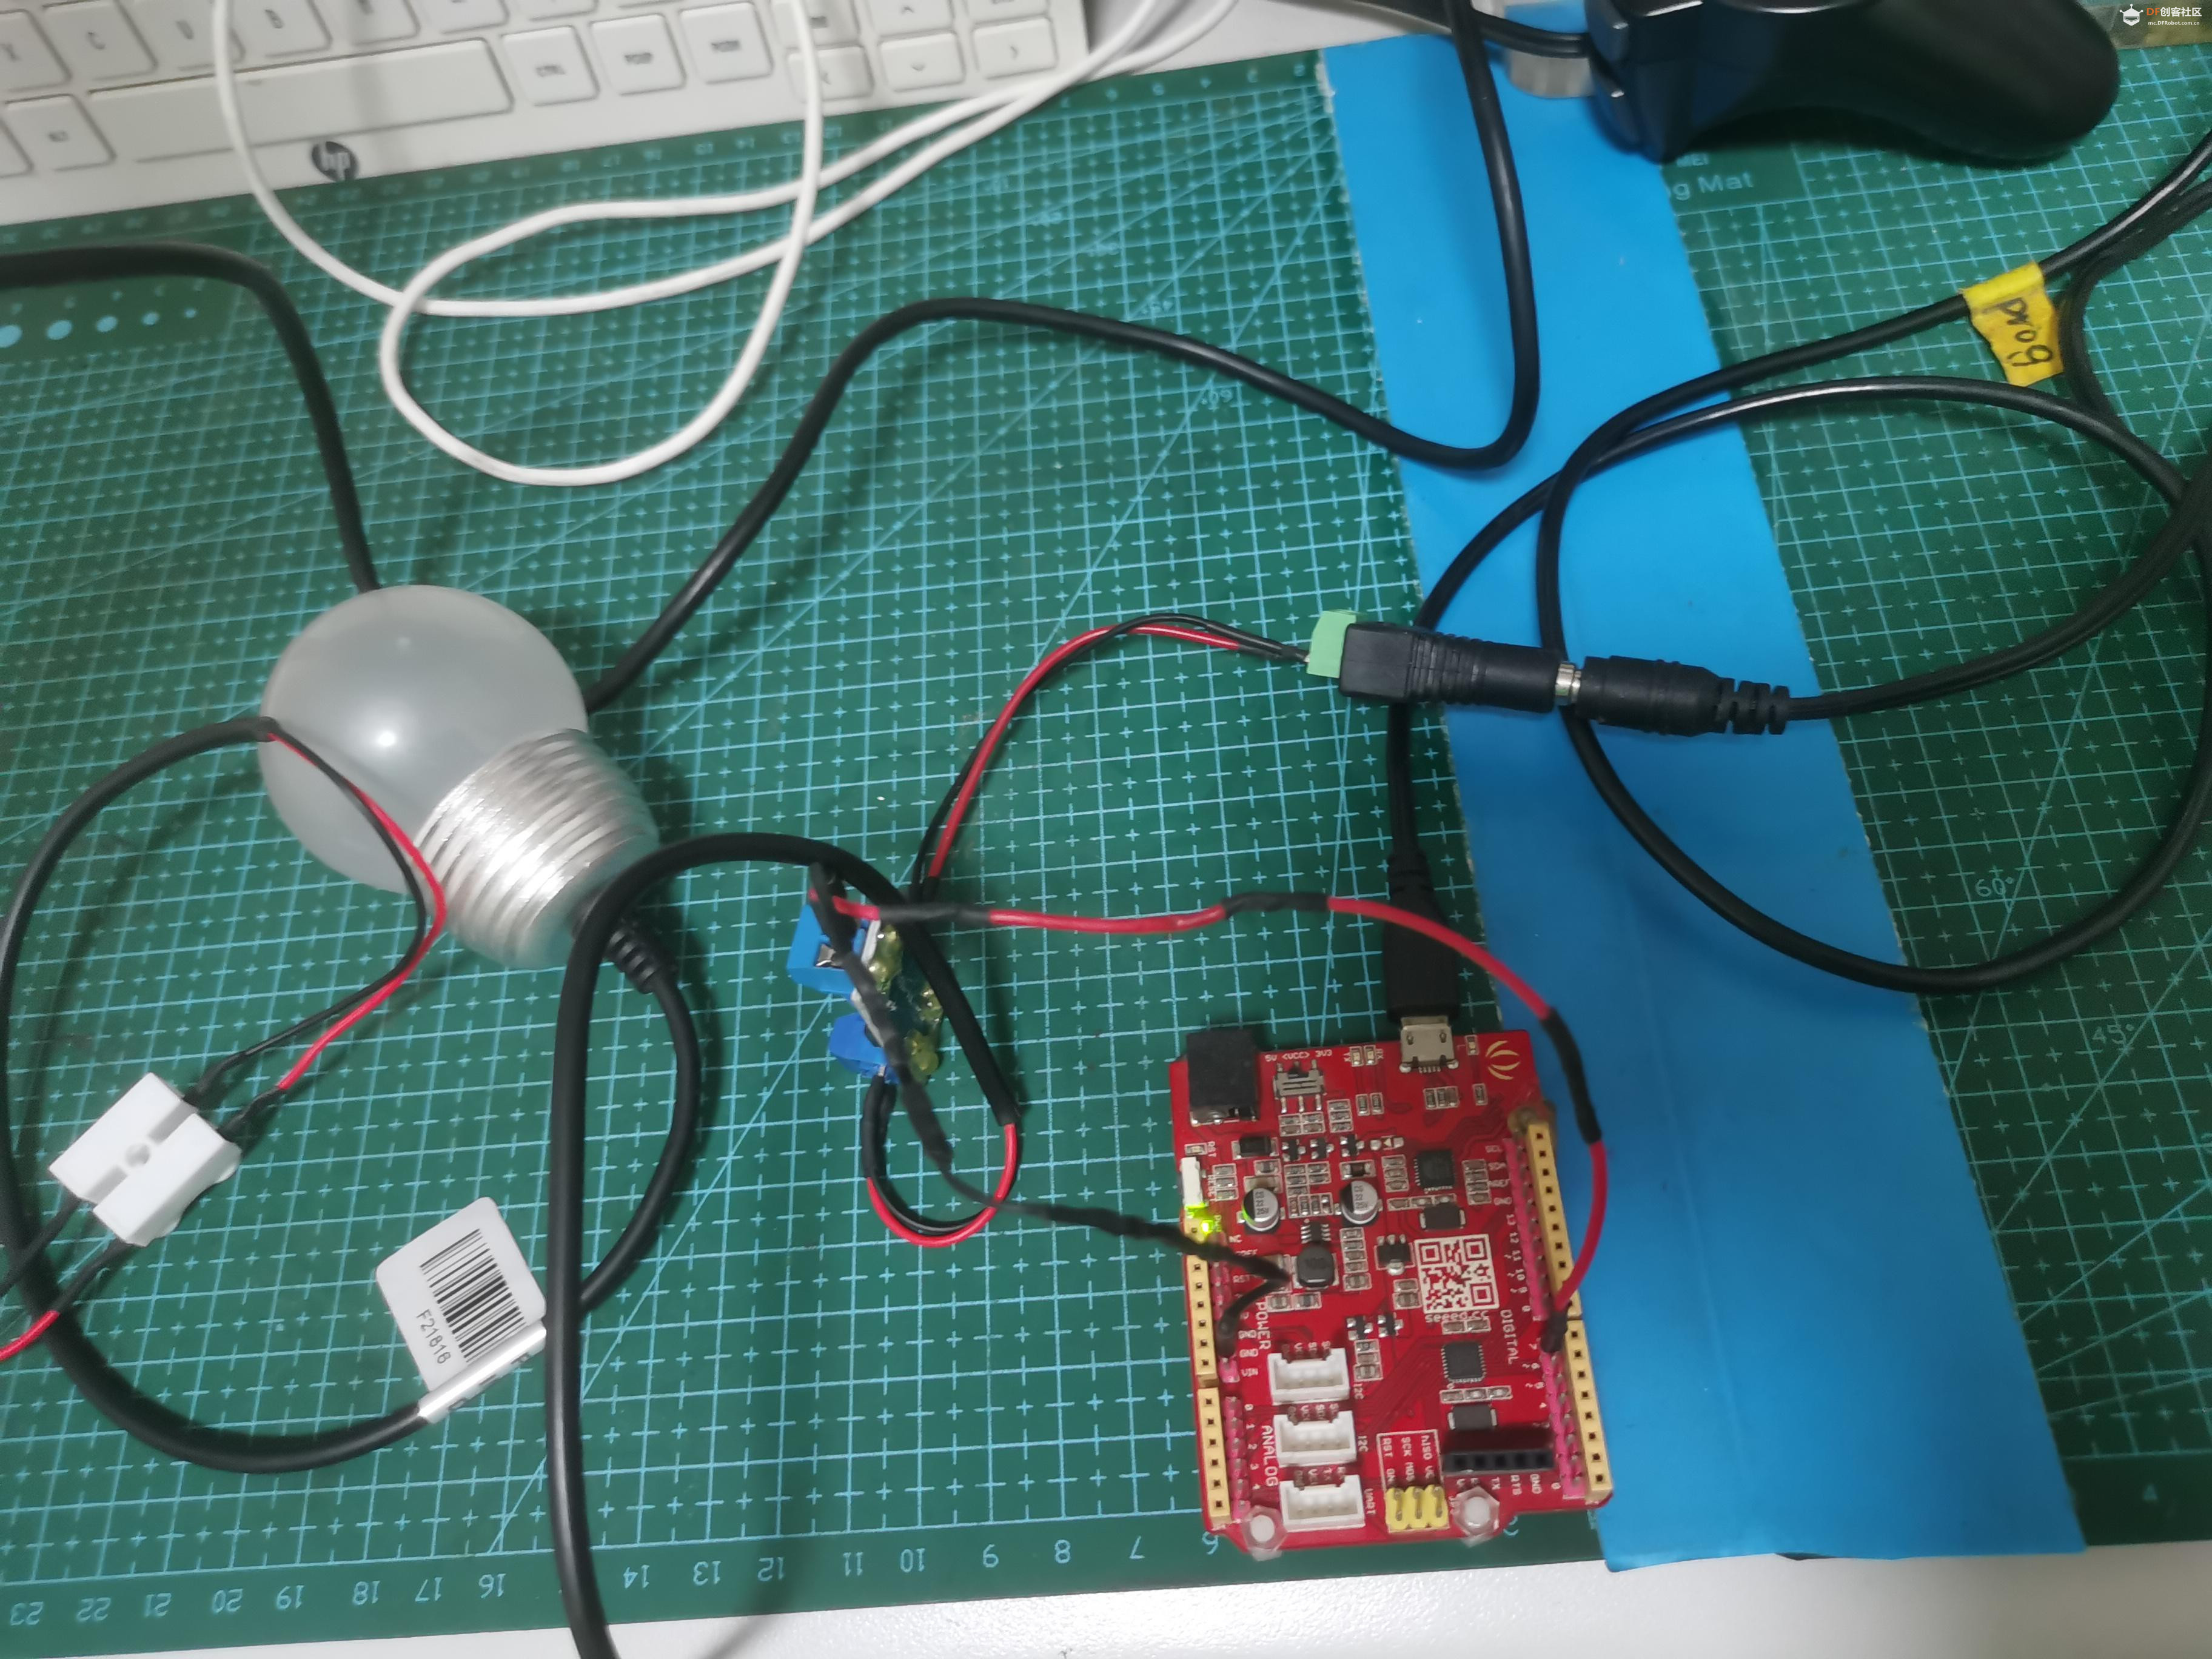
- 下面是连线图。
- 从5V到12V,三极管已经无法应对,需要能应付大功率的场效应管登场了。灯泡选的是12V的灯泡。arduino uno无法直接点亮,它需要通过场效应管放大5V电压到12V才能实现。

| 


 沪公网安备31011502402448

 置顶卡
置顶卡 变色卡
变色卡 千斤顶
千斤顶
 老版主限定
老版主限定
 创作达人
创作达人
 创客造
创客造
 编辑选择奖
编辑选择奖


