- #include <PID_v1.h>
- double input;
- double output;
- double Setpoint;
- double Kp=0, Ki=1, Kd=0;
- PID myPID(&input, &output, &Setpoint, Kp, Ki, Kd, DIRECT);
- void setup() {
- Serial.begin(9600);
- pinMode(5, OUTPUT);
- Setpoint =75; //设置PID的输出值
- myPID.SetMode(AUTOMATIC);//设置PID为自动模式
- //myPID.SetSampleTime(200);//设置PID采样频率为200ms
- //myPID.SetOutputLimits(0,255);
- myPID.SetTunings(Kp, Ki, Kd);
- }
-
- void loop() {
- input = analogRead(A0); // reads the value of the potentiometer (value between 0 and 1023)
- input=map(input, 0, 1024, 0, 255);
- myPID.Compute();//PID转换完成返回值为1
- analogWrite(5,output);
- Serial.print(input, 0);Serial.print(" ");Serial.print(output, 0);Serial.print(" ");Serial.println(Setpoint, 0);
-
- }
Ki=1
Ki=2
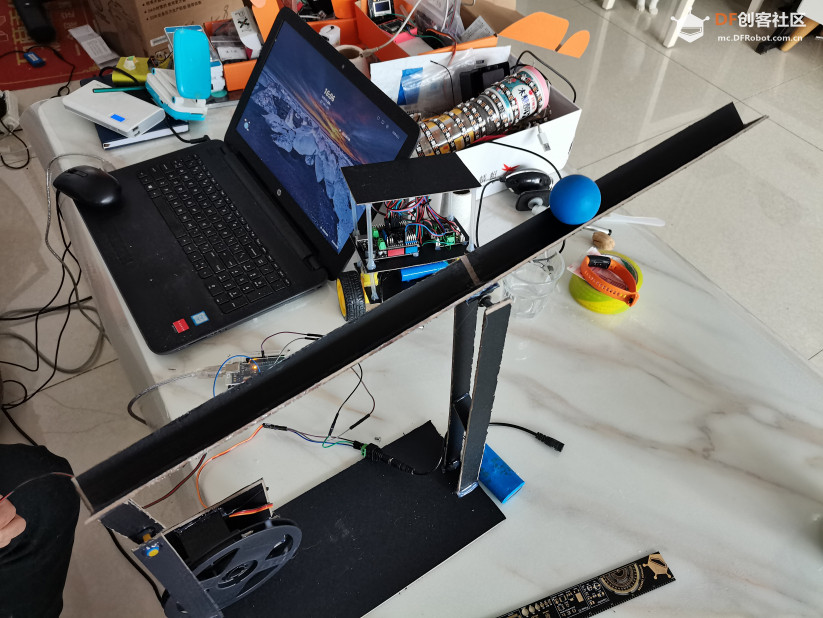
【平衡球实验】
平衡球实验需要控制舵机,180度大舵机。单独供电。
1、测试舵机
DSS-P05 5.1Kg 机器人专用舵机:舵机采用金属齿轮和双轴承结构,耐磨耐用。在一些负载大或者长期运作的项目上面,能够充分保证项目的稳定性。附带的舵机盘和齿轮能够让你省去很多固定的麻烦。https://www.dfrobot.com.cn/goods-230.html
- /*
- Controlling a servo position using a potentiometer (variable resistor)
- by Michal Rinott <[url]http://people.interaction-ivrea.it/m.rinott>[/url]
-
- modified on 8 Nov 2013
- by Scott Fitzgerald
- [url]http://www.arduino.cc/en/Tutorial/Knob[/url]
- */
-
- #include <Servo.h>
-
- Servo myservo; // create servo object to control a servo
-
- int potpin = 0; // analog pin used to connect the potentiometer
- int val; // variable to read the value from the analog pin
-
- void setup() {
- myservo.attach(9); // attaches the servo on pin 9 to the servo object
- }
-
- void loop() {
- val = analogRead(potpin); // reads the value of the potentiometer (value between 0 and 1023)
- val = map(val, 0, 1023, 0, 180); // scale it to use it with the servo (value between 0 and 180)
- myservo.write(val); // sets the servo position according to the scaled value
- delay(15); // waits for the servo to get there
- }
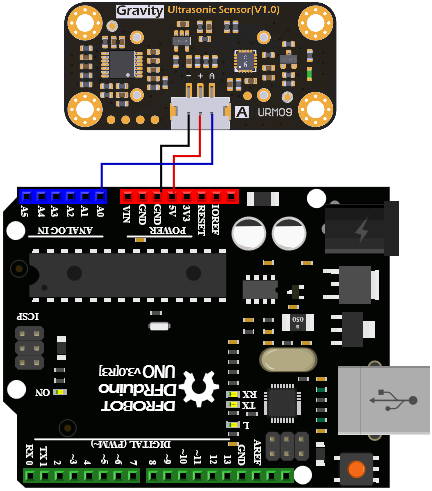
2、传感器使用超声波。平整墙面的有效测距量程为2–500cm。
URM09-模拟量超声波测距传感器:https://www.dfrobot.com.cn/goods-1954.html
测试程序
- // # Editor : roker
- // # Date : 18.02.2019
-
- // # Product name: URM09 Ultrasonic Sensor(Gravity Analog)(V1.0)
- // # Product SKU : SEN0307
- // # Version : 1.0
-
-
- #define MAX_RANG (520)//模块测距极值为520cm(比有效最大量程值略大)
- #define ADC_SOLUTION (1023.0)//Arduino UNO 的ADC精度为10bit
-
- int sensityPin = A0; // select the input pin
- void setup() {
- // Serial init
- Serial.begin(9600);
- }
- float dist_t, sensity_t;
- void loop() {
- // read the value from the sensor:
- sensity_t = analogRead(sensityPin);
- // turn the ledPin on
-
- dist_t = sensity_t * MAX_RANG / ADC_SOLUTION;//
- Serial.print(dist_t, 0);
- Serial.println("cm");
-
- delay(500);
-
- }
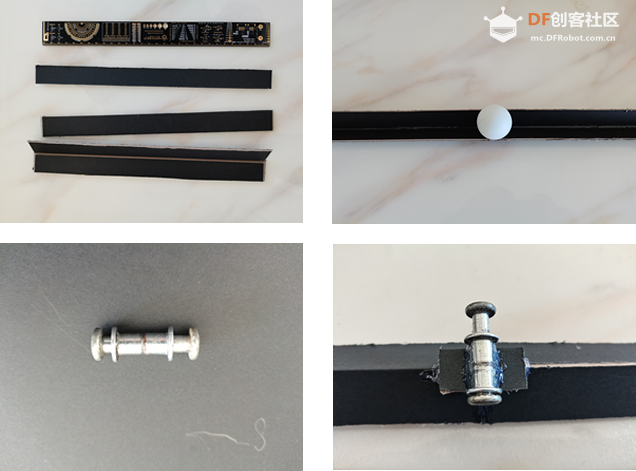
3、制作平衡装置
4、程序编写
-
- #include <PID_v1.h>
- #include <Servo.h>
- #define MAX_RANG (520)//模块测距极值为520cm(比有效最大量程值略大)
- #define ADC_SOLUTION (1023.0)//Arduino UNO 的ADC精度为10bit
-
- int sensityPin = A1; // select the input pin
- Servo myservo; // create servo object to control a servo
- int val; // variable to read the value from the analog pin
- double input;
- double output;//用于提供给舵机角度值。
- double Setpoint;
- double Kp=4, Ki=0.05, Kd=1.5;
- PID myPID(&input, &output, &Setpoint, Kp, Ki, Kd,REVERSE);
- void setup() {
- myservo.attach(9); // attaches the servo on pin 9 to the servo object
- Serial.begin(9600);
- Setpoint =15; //设置PID的输出值
- myPID.SetMode(AUTOMATIC);//设置PID为自动模式
- myPID.SetSampleTime(200);//设置PID采样频率为200ms
- myPID.SetOutputLimits(0,180);
- myPID.SetTunings(Kp, Ki, Kd);
- }
- float dist_t, sensity_t;
- void loop() {
- //val = analogRead(potpin); // reads the value of the potentiometer (value between 0 and 1023)
- //val = map(val, 0, 1023, 0, 180); // scale it to use it with the servo (value between 0 and 180)
-
- sensity_t = analogRead(sensityPin);
- // turn the ledPin on
- input = sensity_t * MAX_RANG / ADC_SOLUTION;//
- myPID.Compute();//PID转换完成返回值为1
- myservo.write(output); // sets the servo position according to the scaled value
- Serial.print(input);Serial.print(" ");Serial.print(output);Serial.print(" ");Serial.println(Setpoint, 0);
-
- }
4、调试PID
PID(&Input, &Output, &Setpoint, Kp, Ki, Kd, Direction)
各参数解释请参考:Arduino PID 库函数指南https://blog.csdn.net/ie_jeton/article/details/76913229
调了一个小时,先确定为:double Kp=4, Ki=0.05, Kd=1.5;
5、结果演示视频


 沪公网安备31011502402448
 置顶卡
置顶卡 变色卡
变色卡 千斤顶
千斤顶

 活跃会员
活跃会员
 宣传大使
宣传大使
 牛X认证
牛X认证
 创客造
创客造
 编辑选择奖
编辑选择奖
 志“童”道合
 编辑选择奖
编辑选择奖
 编辑选择奖
编辑选择奖
 编辑选择奖
编辑选择奖
 编辑选择奖
编辑选择奖


