在本教程中,您将学习如何使用Node-RED(一种物联网 (IoT) 可视化编程工具)通过 Raspberry Pi树莓派作为MQTT代理来控制ESP32板上的LED。MQTT是一种轻量级且简单的消息传递协议,允许设备通过网络相互通信。该项目将需要以下组件:ESP32开发板用于将ESP32 连接到计算机的USB 电缆带有Node-RED的Raspberry Pi树莓派安装有 ArduinoIDE和PubSubClient库的计算机
为您的项目制造PCB
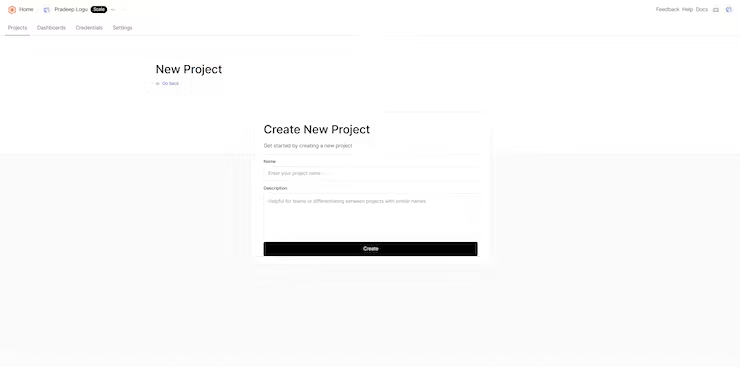
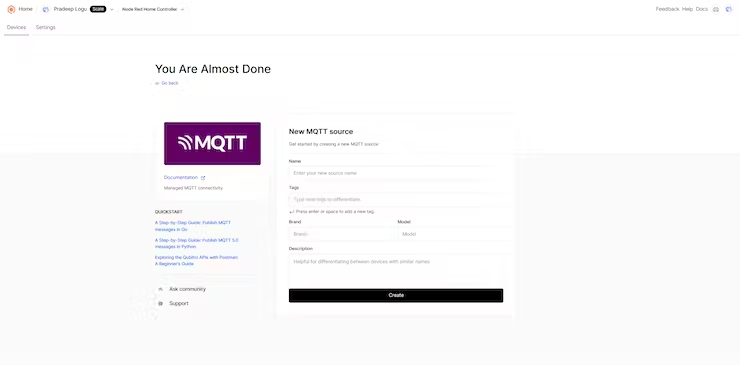
步骤 1:在 Qubitro上创建设备
第一步是在 Qubitro平台上创建设备。设备代表云上的物理设备(树莓派Raspberry Pi)。您需要创建一个设备来获取树莓派Raspberry Pi的MQTT凭据和主题。
要在Qubitro上创建设备,请按照以下步骤操作:
1、登录您的Qubitro 帐户并创建一个新项目
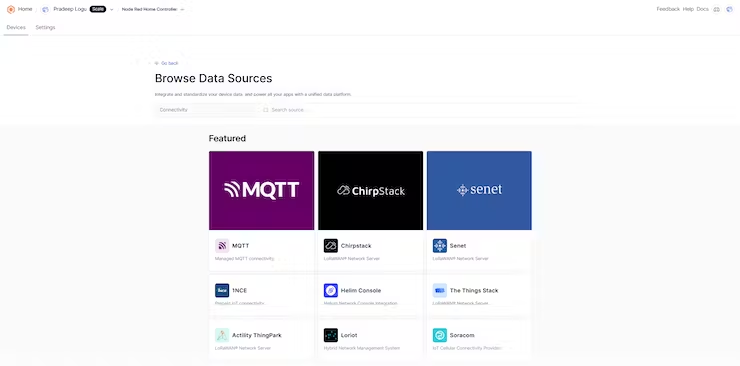
2.然后进入“设备”页面,选择“MQTT”作为通信协议,然后单击“下一步”。
3、输入所有详细信息。
4、复制设备 ID、设备令牌、主机名、端口、发布主题和订阅主题。您稍后将在代码中需要这些值。单击“完成”。
您已在Qubitro上成功创建设备。您可以在“设备”页面上看到您的设备。
第 2 步:使用 Arduino IDE 刷新 ESP32
ESP32 是一款功能强大且多功能的微控制器,可以运行 Arduino 代码。您将使用 Arduino IDE 对 ESP32 进行编程,并使其使用 PubSubClient 库与 MQTT 代理进行通信。
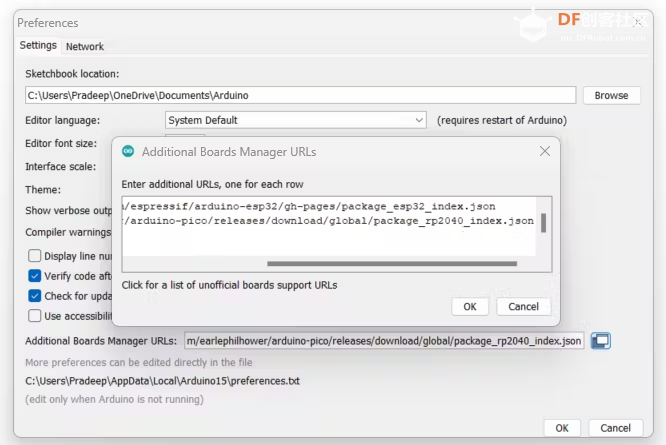
要在Arduino IDE中安装ESP32板,您可以按照本教程中的说明操作或使用以下步骤:
从 Arduino IDE 打开首选项窗口:文件 > 首选项。转到“其他板管理器 URL”字段并输入以下 URL: https: //dl.espressif.com/dl/package_esp32_index.json
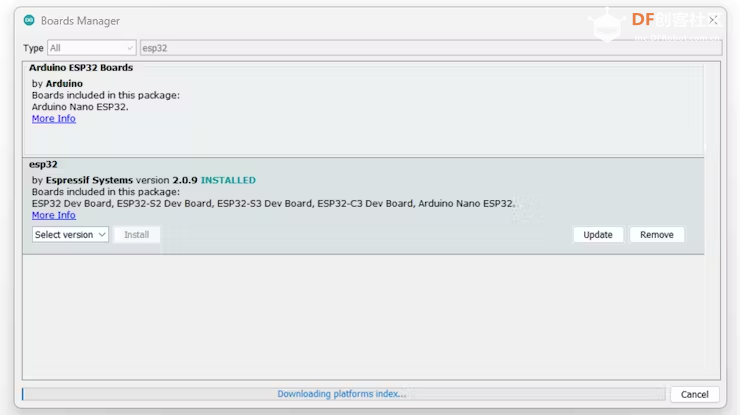
打 Boards Manager(工具 > Board > Boards Manager),搜索ESP32,然后单击“ESP32 by Espressif Systems”的安装按钮。
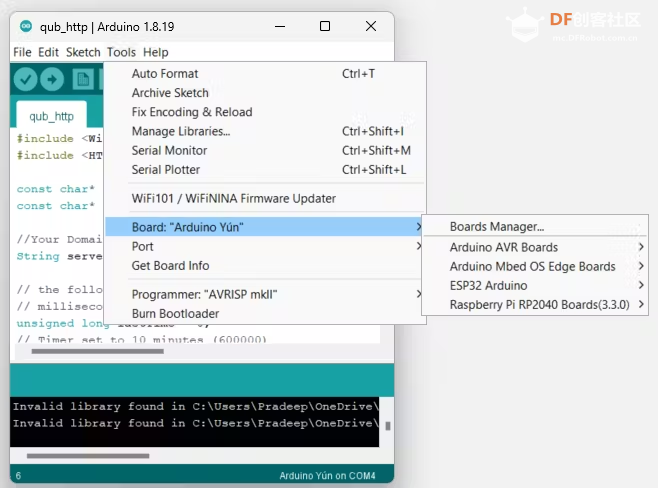
安装后,从“工具”>“开发板”菜单中选择您的 ESP32 开发板。
从 Sketch > Include Library > Manage Libraries 打开库管理器。搜索 PubSubClient 并单击“PubSubClient by Nick O'Leary”的安装按钮。安装后重新启动 Arduino IDE。
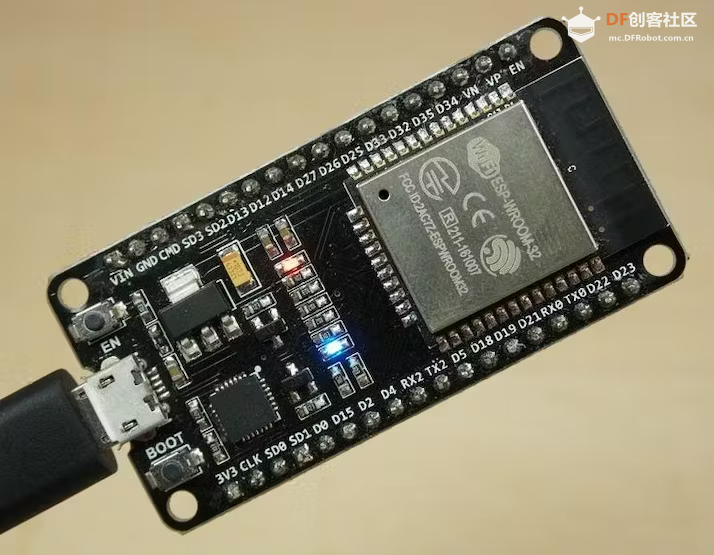
第3步:将LED连接到ESP32
LED是一种简单的器件,当电流流过时就会发光。您将LED连接到ESP32的GPIO引脚之一,并使用MQTT消息控制其状态(打开或关闭)。
就我而言,我将使用ESP32开发板上的板载LED。
第四步:为ESP32编写代码
ESP32的代码将执行以下任务:
连接到您的Wi-Fi 网络连接到树莓派Raspberry Pi上 Qubitro MQTT代理从“输出”接收消息并相应地打开或关闭LED
您可以将以下代码复制并粘贴到您的Arduino IDE中。确保将 <your_ssid>、<your_password>、<your_Qubtro_Credientials> 替换为您自己的值。
代码:
- #include <WiFi.h>
- #define DEBUG_SW 1
- #include <PubSubClient.h>
-
- //Relays for switching appliances
- #define Relay1 2
-
- int switch_ON_Flag1_previous_I = 0;
-
- // Update these with values suitable for your network.
-
- const char* ssid = "ELDRADO";
- const char* password = "amazon123";
- const char* mqtt_server = "broker.qubitro.com"; // Local IP address of Raspberry Pi
-
- const char* username = "";
- const char* pass = "";
-
- // Subscribed Topics
- #define sub1 "output"
-
- WiFiClient espClient;
- PubSubClient client(espClient);
- unsigned long lastMsg = 0;
- #define MSG_BUFFER_SIZE (50)
- char msg[MSG_BUFFER_SIZE];
- int value = 0;
-
-
- // Connecting to WiFi Router
-
- void setup_wifi()
- {
-
- delay(10);
- // We start by connecting to a WiFi network
- Serial.println();
- Serial.print("Connecting to ");
- Serial.println(ssid);
-
- WiFi.mode(WIFI_STA);
- WiFi.begin(ssid, password);
-
- while (WiFi.status() != WL_CONNECTED) {
- delay(500);
- Serial.print(".");
- }
-
- randomSeed(micros());
-
- Serial.println("");
- Serial.println("WiFi connected");
- Serial.println("IP address: ");
- Serial.println(WiFi.localIP());
- }
-
- void callback(char* topic, byte* payload, unsigned int length)
- {
- Serial.print("Message arrived [");
- Serial.print(topic);
- Serial.print("] ");
-
-
- if (strstr(topic, sub1))
- {
- for (int i = 0; i < length; i++)
- {
- Serial.print((char)payload[i]);
- }
- Serial.println();
- // Switch on the LED if an 1 was received as first character
- if ((char)payload[0] == 'f')
- {
- digitalWrite(Relay1, LOW); // Turn the LED on (Note that LOW is the voltage level
- // but actually the LED is on; this is because
- // it is active low on the ESP-01)
- } else {
- digitalWrite(Relay1, HIGH); // Turn the LED off by making the voltage HIGH
- }
- }
- else
- {
- Serial.println("unsubscribed topic");
- }
-
- }
-
-
- // Connecting to MQTT broker
-
- void reconnect()
- {
- // Loop until we're reconnected
- while (!client.connected()) {
- Serial.print("Attempting MQTT connection...");
- // Create a random client ID
- String clientId = "ESP8266Client-";
- clientId += String(random(0xffff), HEX);
- // Attempt to connect
- if (client.connect(clientId.c_str() , username, pass)) {
- Serial.println("connected");
- // Once connected, publish an announcement...
- client.publish("outTopic", "hello world");
- // ... and resubscribe
- client.subscribe(sub1);
- } else {
- Serial.print("failed, rc=");
- Serial.print(client.state());
- Serial.println(" try again in 5 seconds");
- // Wait 5 seconds before retrying
- delay(5000);
- }
- }
- }
-
-
-
- void setup()
- {
-
- pinMode(Relay1, OUTPUT);
- Serial.begin(115200);
- setup_wifi();
- client.setServer(mqtt_server, 1883);
- client.setCallback(callback);
- }
-
- void loop()
- {
-
- if (!client.connected())
- {
- reconnect();
- }
- client. Loop();
- }
编写代码后,从“工具”菜单中选择正确的板和端口,然后单击“上传”按钮,将其上传到 ESP32 板。
步骤 5:创建 Node-RED 流
Node-RED流程将执行以下任务:
连接到树莓派Raspberry Pi上的MQTT代理订阅名为“output”的主题将消息“true”或“false”发布到名为“output”的主题创建带有按钮和文本节点的仪表板
您可以通过从面板中拖放节点并用电线连接它们来创建 Node-RED流。您还可以从此链接导入流程或使用下面的 JSON 代码:
代码:
- {
- "id": "eb8f9c0d054be30c",
- "type": "tab",
- "label": "Flow 2",
- "disabled": false,
- "info": "",
- "env": []
- },
- {
- "id": "4ce6cd876fd5441f",
- "type": "mqtt out",
- "z": "eb8f9c0d054be30c",
- "name": "",
- "topic": "output",
- "qos": "",
- "retain": "",
- "respTopic": "",
- "contentType": "",
- "userProps": "",
- "correl": "",
- "expiry": "",
- "broker": "6d40b7b21c734b53",
- "x": 870,
- "y": 240,
- "wires": []
- },
- {
- "id": "974a7a8bb6db9bf9",
- "type": "mqtt in",
- "z": "eb8f9c0d054be30c",
- "name": "",
- "topic": "output",
- "qos": "2",
- "datatype": "auto-detect",
- "broker": "6d40b7b21c734b53",
- "nl": false,
- "rap": true,
- "rh": 0,
- "inputs": 0,
- "x": 670,
- "y": 320,
- "wires": [
- [
- "d0dc7378c7bfb03b",
- "f1219a2eeabe825f"
- ]
- ]
- },
- {
- "id": "d0dc7378c7bfb03b",
- "type": "debug",
- "z": "eb8f9c0d054be30c",
- "name": "debug 4",
- "active": true,
- "tosidebar": true,
- "console": false,
- "tostatus": false,
- "complete": "payload",
- "targetType": "msg",
- "statusVal": "",
- "statusType": "auto",
- "x": 880,
- "y": 320,
- "wires": []
- },
- {
- "id": "6bd227b280e372b7",
- "type": "ui_switch",
- "z": "eb8f9c0d054be30c",
- "name": "",
- "label": "Light One",
- "tooltip": "",
- "group": "cd687a95.00e108",
- "order": 0,
- "width": 0,
- "height": 0,
- "passthru": true,
- "decouple": "false",
- "topic": "topic",
- "topicType": "msg",
- "style": "",
- "onvalue": "true",
- "onvalueType": "bool",
- "onicon": "",
- "oncolor": "",
- "offvalue": "false",
- "offvalueType": "bool",
- "officon": "",
- "offcolor": "",
- "animate": false,
- "x": 680,
- "y": 240,
- "wires": [
- [
- "4ce6cd876fd5441f"
- ]
- ]
- },
- {
- "id": "f1219a2eeabe825f",
- "type": "ui_text",
- "z": "eb8f9c0d054be30c",
- "group": "cd687a95.00e108",
- "order": 1,
- "width": "6",
- "height": "2",
- "name": "",
- "label": "Status : ",
- "format": "{{msg.payload}}",
- "layout": "row-center",
- "x": 1060,
- "y": 320,
- "wires": []
- },
- {
- "id": "6d40b7b21c734b53",
- "type": "mqtt-broker",
- "name": "Qubitro Downlink",
- "broker": "broker.qubitro.com",
- "port": "1883",
- "clientid": "",
- "autoConnect": true,
- "usetls": false,
- "protocolVersion": "4",
- "keepalive": "60",
- "cleansession": true,
- "autoUnsubscribe": true,
- "birthTopic": "r43MsJYzcVwZtUXVfZo6XD0Ym7CRegewPQXMt$ho",
- "birthQos": "0",
- "birthPayload": "",
- "birthMsg": {},
- "closeTopic": "",
- "closeQos": "0",
- "closePayload": "",
- "closeMsg": {},
- "willTopic": "",
- "willQos": "0",
- "willPayload": "",
- "willMsg": {},
- "userProps": "",
- "sessionExpiry": ""
- },
- {
- "id": "cd687a95.00e108",
- "type": "ui_group",
- "name": "ESP32 Home Controller",
- "tab": "aa146f4d.b53ca",
- "order": 1,
- "disp": true,
- "width": "6",
- "collapse": false
- },
- {
- "id": "aa146f4d.b53ca",
- "type": "ui_tab",
- "name": "Demo Lab",
- "icon": "dashboard",
- "order": 1,
- "disabled": false,
- "hidden": false
- }
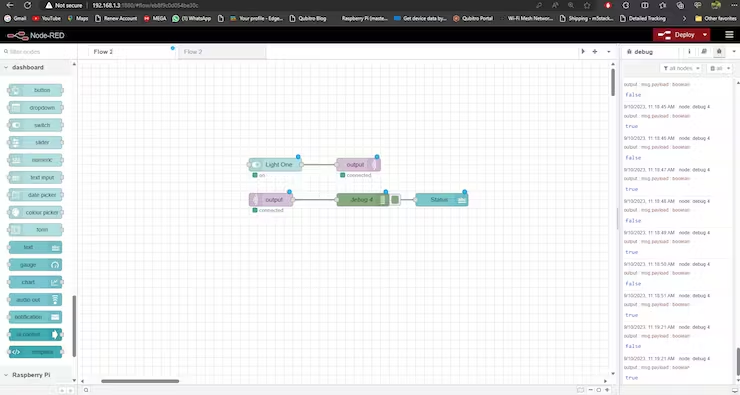
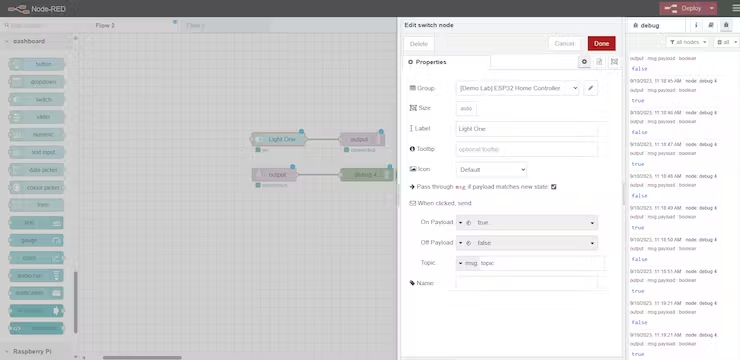
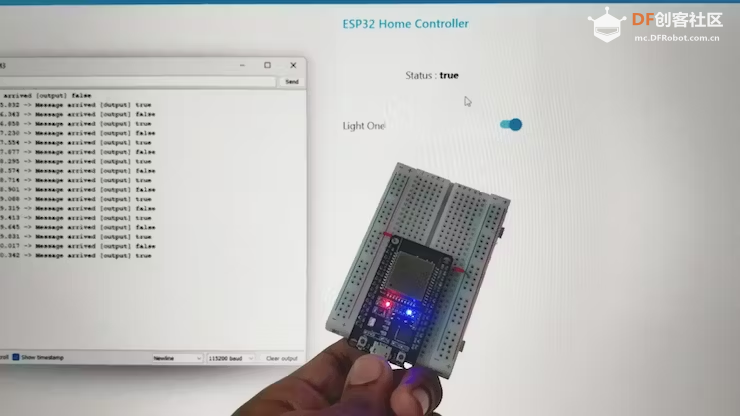
输入开关在打开时将发送“true”,在触发关闭时将发送“false”。
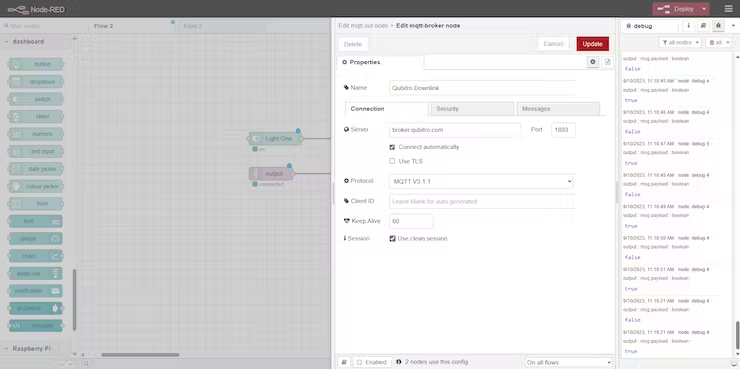
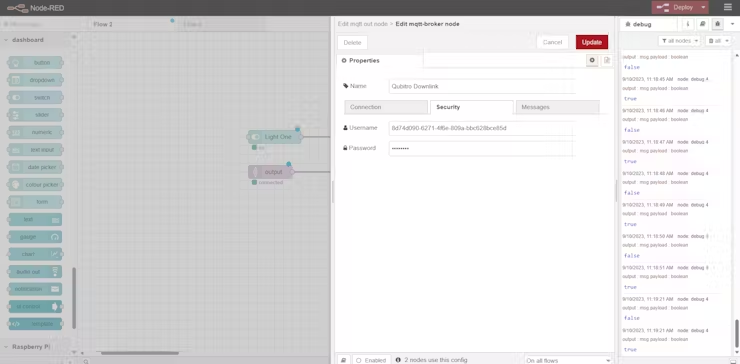
然后单击Qubitro上行链路托盘并编辑属性。
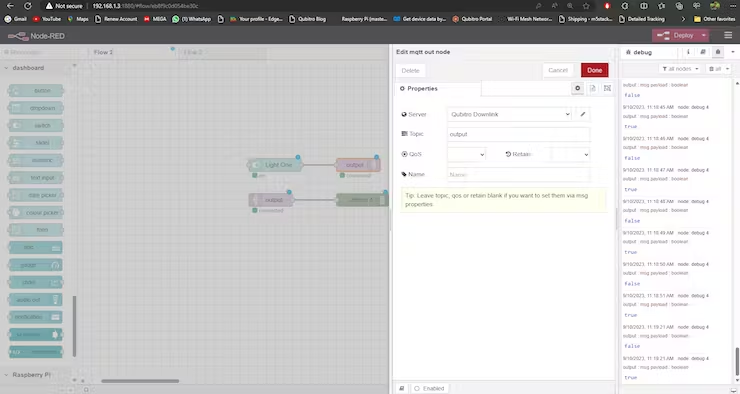
在这里您需要替换您的连接详细信息和凭据。
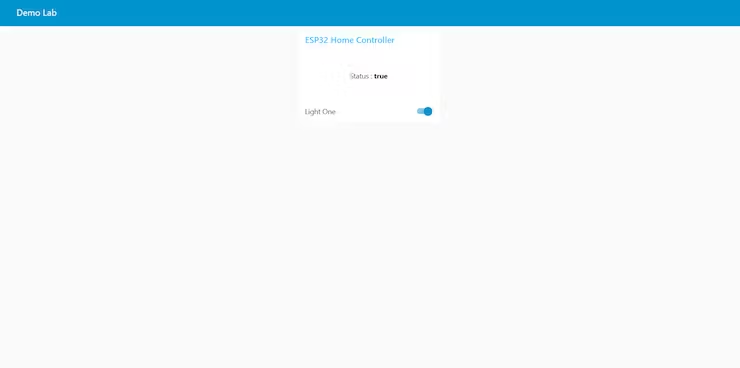
接下来,只需部署流程即可。并导航到node-red服务器的/ui。
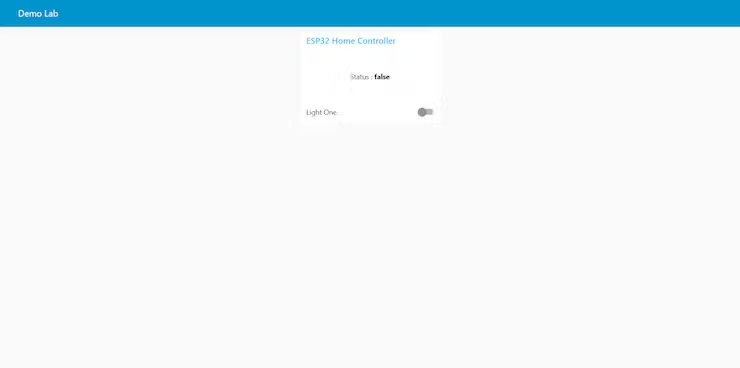
您可以在此处切换开关以打开和关闭导联。
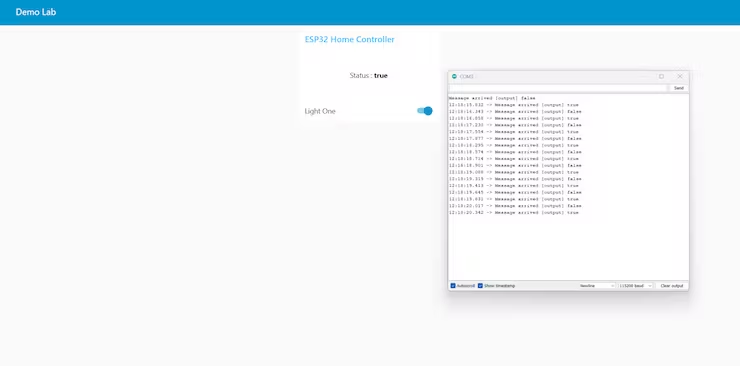
另外,打开串行监视器并检查节点红色响应。
结论:
在本教程中,我们了解了如何使用Node-Red和MQTT服务器控制LED。
本文作者:CETech
原文地址:https://community.dfrobot.com/makelog-313500.html
|


 沪公网安备31011502402448

 置顶卡
置顶卡 变色卡
变色卡 千斤顶
千斤顶


