Python 程序员在对Arduino进行编程时面临的第一个挑战是语言不同。Arduino IDE 使用受 C 和 C++ 启发的语言。事实上,像 Arduino 这样的平台可以很好地与 Python 配合使用,特别是对于需要与传感器和其他物理设备集成的应用程序。如果您已经了解Python的基础知识,那么您将能够通过使用Python来控制Arduino来开始使用它。
本教程的主要目标是向您展示如何通过 PinPong 库使用 Python 与 Arduino 进行通信,以开发您自己的电子项目。
为什么是PinPong 库?
PinPong 库是一个用于控制开源硬件开发板的 Python 库。它基于Firmata协议并兼容MicroPython语法。通过PinPong库,您可以使用Python代码来控制各种常见的开源硬件设备。其基本原理是将特定的固件刷新到硬件板上,使板与计算机之间能够通过串行通信来执行各种命令。
PinPong库的名称由“Pin”和“Pong”组成。“Pin”指的是针,而“Pong”则源自经典游戏Pong,象征着信号的来回传输。
PinPong库的设计旨在让开发者在开发过程中摆脱特定硬件型号的限制,让他们专注于软件实现。即使您最初使用 Arduino 开发程序,也可以通过修改硬件参数轻松切换到其他兼容板,例如 PinPong 板。
PinPong 库的主要特点
- 高灵活性:支持 Arduino 板,包括 Uno、Leonardo、Mega2560、ESP32 板(如 HandPy)、micro:bit、Unihiker 等。它还支持50+传感器,并将逐步支持其他开发板和扩展库。
- 与 MicroPython 的兼容性: MicroPython 是 Python 编程语言的一种变体,广泛使用并以其简单性和可读性而闻名。通过与 MicroPython 兼容,PinPong 简化了开发过程,并允许开发人员利用现有的 Python 知识来编程和控制其硬件。
如何安装 PinPong 库
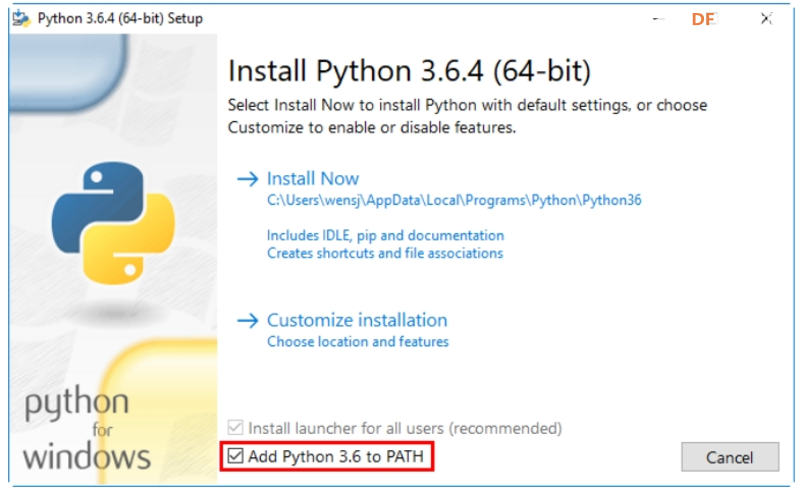
在安装 PinPong 库之前确认您的计算机上已安装 Python 3。 在 Windows 上安装 PinPong 库
下载完成后,按照提示继续安装。注意安装过程的最后一步,勾选“Add to PATH”选项,将Python添加到系统的环境变量中。
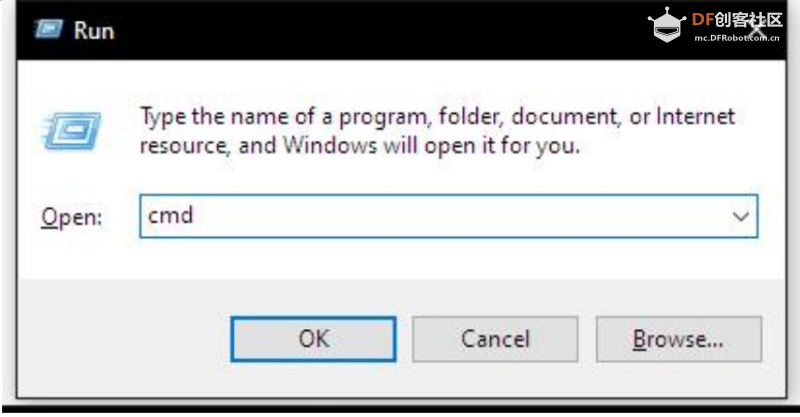
1. 打开命令提示符。使用 Win+R 快捷键,输入“cmd”,然后按 Enter。
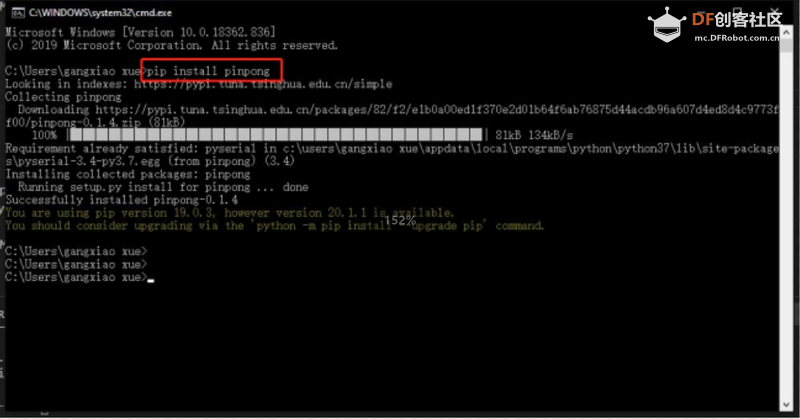
2. 安装 PinPong 库。在命令提示符窗口中输入“pip install pinpong”,等待片刻安装完成。
3、信息查询。要获取当前版本信息、官方文档网站、库列表和端口号,请在“帮助命令”提示符中输入“pingpong”。
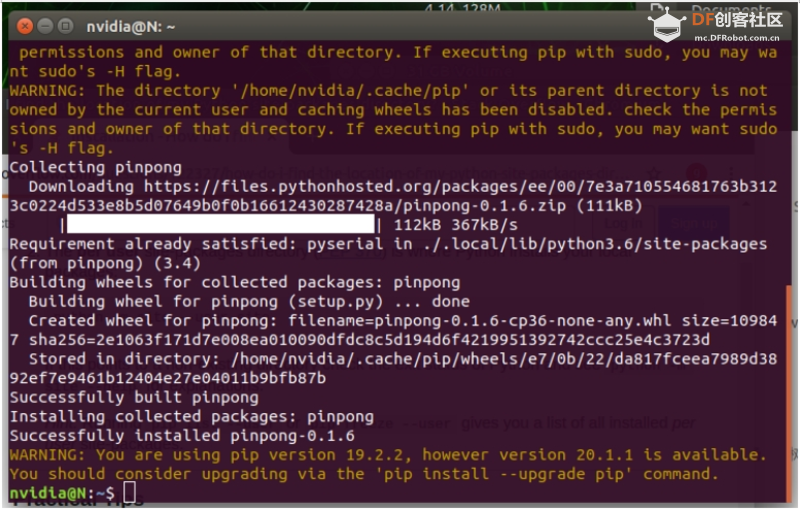
在 Linux 上安装 PinPong 库
安装 Python 3 后,您可以通过在终端中输入“sudo pip install pinpong”来继续 PinPong 安装。
在 Mac 操作系统上安装 PinPong 库
安装 Python 3 后,您可以按照以下步骤继续安装 PinPong 库:
- 打开任意 Finder 窗口,然后按 Shift+Command+U。
- 双击“终端”应用程序。
- 在终端中,输入命令“sudo pip install pinpong”来安装 PinPong 库。
PinPong 库的基本示例
必备的 PinPong 库示例,包括基础库示例、通用库示例和扩展库示例,对于初学者来说是必不可少的。这些示例可以帮助初学者理解和学习如何利用这些库来开发 PinPong 相关的应用程序或项目。
基本 PinPong 库示例:
这些示例程序可以帮助您快速验证模块的使用情况。将代码复制粘贴到Python编辑器中,根据您使用的板子型号修改板子初始化配置。基本库示例中的模块是通过 Board 库导入的。基本 PinPong 库包含以下项目。
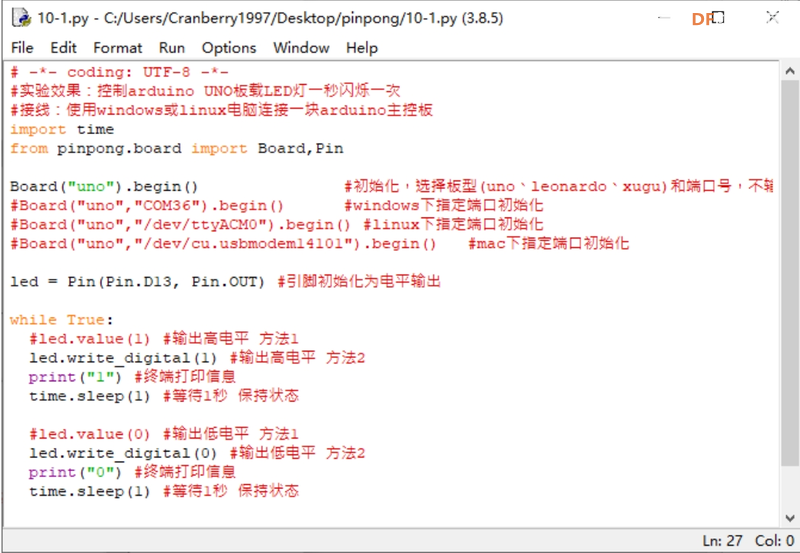
示例:LED 闪烁
将 Arduino 主控板连接到 Windows 或 Linux 计算机。控制Arduino UNO板载LED每秒闪烁一次。
-*- coding: UTF-8 -*-
Experiment effect: Control the onboard LED of the Arduino UNO to blink once per second
Connection: Use a Windows or Linux computer to connect to an Arduino main control board
import time
from pinpong.board import Board, Pin

Board("uno").begin()  # Initialization, select board type (uno, microbit, RPi, handpy) and port number. If no port number is entered, automatic detection will be performed
Board("uno", "COM36").begin()  # Initialization with specified port on Windows
Board("uno", "/dev/ttyACM0").begin()  # Initialization with specified port on Linux
Board("uno", "/dev/cu.usbmodem14101").begin()  # Initialization with specified port on Mac
led = Pin(Pin.D13, Pin.OUT)  # Initialize the pin for digital output

while True:
  # led.value(1)  # Output high level Method 1
  led.write_digital(1)  # Output high level Method 2
  print("1")  # Print information in the terminal
  time.sleep(1)  # Wait for 1 second to maintain the state

  # led.value(0)  # Output low level Method 1
  led.write_digital(0)  # Output low level Method 2
  print("0")  # Print information in the terminal
  time.sleep(1)  # Wait for 1 second to maintain the state
还有其他可用的 PinPong 库示例,演示如何使用按钮控制 Arduino UNO 的板载 LED、改变 LED 的亮度以及测试模拟引脚中断功能。欲了解更多详情,请访问:https://wiki.dfrobot.com/basic_library_examples
实用的 PinPong 库示例:
公共库示例中的模块是通过板库导入的。
示例:控制伺服电机:
        -*- coding: UTF-8 -*-
Connection: Connect an Arduino main control board to a Windows or Linux computer, and connect a servo to D4
import time
from pinpong.board import Board,Pin,Servo # Import Servo library

Board("uno").begin()  # Initialization, select the board type (uno, microbit, RPi, handpy) and port number. If no port number is entered, automatic recognition will be performed
#Board("uno","COM36").begin()  # Initialization by specifying the port under Windows
#Board("uno","/dev/ttyACM0").begin() # Initialization by specifying the port under Linux
#Board("uno","/dev/cu.usbmodem14101").begin()   # Initialization by specifying the port under Mac

s1 = Servo(Pin(Pin.D4)) # Initialize the servo pin by passing Pin into Servo

while True:
    #s1.angle(0) # Control the servo to turn to the 0 degree position Method 1
    s1.write_angle(0)  # Control the servo to turn to the 0 degree position Method 2
    print("0")
    time.sleep(1)

    #s1.angle(90) # Control the servo to turn to the 90 degree position
    s1.write_angle(90)  # Control the servo to turn to the 90 degree position Method 2
    print("90")
    time.sleep(1)

    #s1.angle(180) # Control the servo to turn to the 180 degree position
    s1.write_angle(180)  # Control the servo to turn to the 180 degree position Method 2
    print("180")
    time.sleep(1)

    #s1.angle(90) # Control the servo to turn to the 90 degree position
    s1.write_angle(90)  # Control the servo to turn to the 90 degree position Method 2
    print("90")
    time.sleep(1)
除此之外,PinPong 库中还有其他实用示例。这些示例包括控制蜂鸣器产生声音、从超声波传感器读取数据、从 DHT 传感器获取温度和湿度读数以及管理 WS2812 单线 RGB LED 灯。有关更多详细信息,请参阅提供的链接。
https://wiki.dfrobot.com/common_library_examples
扩展 PinPong 库示例
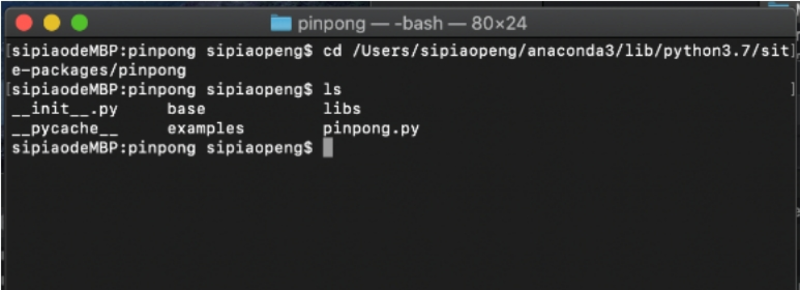
扩展库示例中的模块是通过 libs 库导入的。您可以通过终端输入“pinpong”查询支持的列表和使用方式。所有示例程序代码都可以在安装目录的“examples”文件夹中找到。
示例:颜色识别
将 TCS34725 颜色传感器连接到 Arduino 板的 I2C 引脚(SCL 和 SDA),该板已连接到 Windows 或 Linux 计算机。从 I2C TCS34725 颜色传感器检索颜色值。
-*- coding: UTF-8 -*-
Experiment effect: Read the values of the I2C TCS34725 color sensor
Wiring: Connect an Arduino main control board to a Windows or Linux computer, and connect the TCS34725 color sensor to the I2C port SCL and SDA

import time
from pinpong.board import Board
from pinpong.libs.dfrobot_tcs34725 import TCS34725 # Import the tcs34725 library from libs

Board("uno").begin()               # Initialization, choose the board type (uno, leonardo, xugu) and port number. If the port number is not entered, automatic recognition will be performed
#Board("uno","COM36").begin()      # Initialization with specified port on Windows
#Board("uno","/dev/ttyACM0").begin() # Initialization with specified port on Linux
#Board("uno","/dev/cu.usbmodem14101").begin()   # Initialization with specified port on Mac

tcs = TCS34725() # Sensor initialization

print("Color View Test!");
while True:
  if tcs.begin(): # Look for the sensor, return True if found
    print("Found sensor")
    break # If found, break the loop
  else:
    print("No TCS34725 found ... check your connections")
    time.sleep(1)

while True:
  r,g,b,c = tcs.get_rgbc() # Get the RGBC data
  print(r,g,b,c)
  print("C=%d\tR=%d\tG=%d\tB=%d\t"%(c,r,g,b))

  '''
  # Data conversion
  r /= c
  g /= c
  b /= c
  r *= 256
  g *= 256
  b *= 256;
  print("------C=%d\tR=%d\tG=%d\tB=%d\t"%(c,r,g,b))
  '''
  time.sleep(1)
其他扩展 PinPong 库示例,例如从 I2C TCS34725 颜色传感器、I2C 超声波传感器 (URM09)、I2C MLX90614 红外温度传感器读取值,以及使用 I2C NFC 模块读取卡信息,您可以访问下面的链接了解更多详细信息。
https://wiki.dfrobot.com/extended_library_examples
通过 PinPong 库使用 Python 进行 Arduino 项目
自动植物浇水系统
为了保证植物的健康生长,定期浇水是必要的。然而,我们经常忘记给植物浇水,这可能会导致植物枯萎。为了避免此类问题,我们可以设计一个自动植物浇水系统。
自动植物浇水系统的第一步
驱动继电器
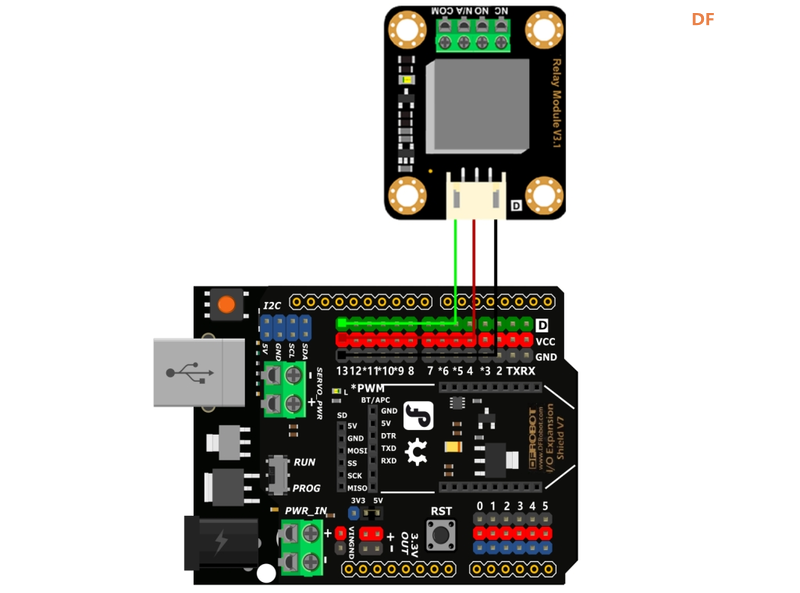
硬件设置:
- 控制器:Arduino UNO、IO传感器扩展板V7.1
- 模块:继电器模块
- 连接:A 型至 B 型 USB 电缆
- 将继电器连接到数字引脚 13
开始编码
通过切换数字引脚的高电平和低电平状态来控制继电器。我们可以参考基础库官方文档中的“Digital Output”示例。运行该程序将使继电器在开关时发出咔哒声并伴随着 LED 的闪烁。
自动植物浇水系统的第二步
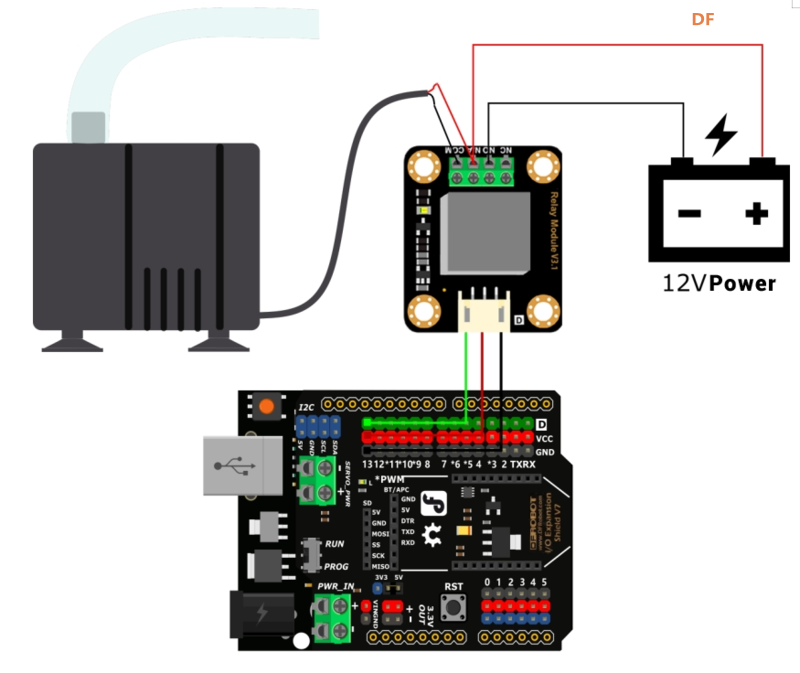
用继电器控制水泵
要实现浇水功能,我们需要用到水泵。然而,大多数水泵工作在12V,而Arduino UNO的输出电压为5V,不足以直接驱动水泵。这种情况下,我们就需要使用继电器来控制水泵。
硬件设置
- 控制器:Arduino UNO、IO传感器扩展板V7.1
- 模块:继电器模块、水泵、12V电源
- 连接:A 型至 B 型 USB 电缆
- 将继电器连接到数字引脚 13。
- 将水泵连接至继电器。
开始编码
您可以使用 time 模块的 time.strftime() 函数来确定时间。在示例中,它将“浇水”设置为每天的 15:30:10。实际使用时,可以相应添加继电器控制功能。
        import time
while True:
    time_now=time.strftime("%H:%M:%S,time.localtime())
    if time_now == "15:30:10":
         print("浇花")
         time.sleep(1)
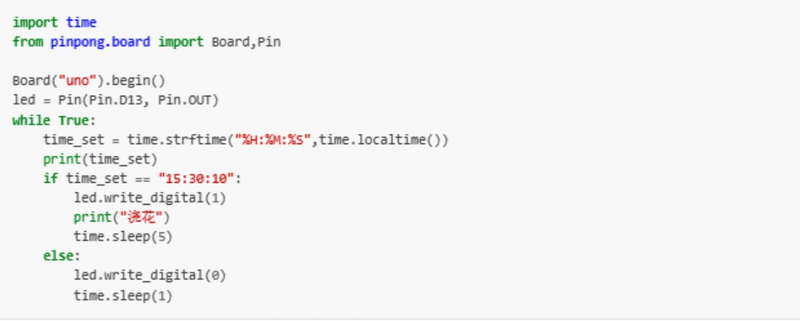
添加继电器,实现每日定时浇水功能。
        import time
from pinpong.board import Board,Pin
Board("uno").begin()
led = Pin(Pin.D13, Pin.OUT)
while True:
    time_set = time.strftime("%H:%M:%S",time.localtime())
    print(time_set)
    if time_set == "15:30:10":
        led.write_digital(1)
        print("浇花")
        time.sleep(5)
        else:
            led.write_digital(0)
            time.sleep(1)
结论:
PinPong 库为 Python 开发人员提供了一种控制 Arduino 板的便捷方法。它简化了与Arduino的通信过程,使得使用Python编程语言控制Arduino变得更加容易和灵活。无论您是初学者还是经验丰富的开发人员,PinPong 库都是构建各种物联网和嵌入式系统项目的宝贵工具。因此,如果您是一名希望探索 Arduino 世界的 Python 程序员,本教程将为您提供一个很好的起点。
| 


 沪公网安备31011502402448

 置顶卡
置顶卡 变色卡
变色卡 千斤顶
千斤顶
 萌萌哒新人
萌萌哒新人
 活跃会员
活跃会员
 宣传大使
宣传大使
 志“童”道合
 编辑选择奖
编辑选择奖


