ESP-NOW 是乐鑫定义的一种无线通信协议,能够在无路由器的情况下直接、快速、低功耗地控制智能设备。它能够与 Wi-Fi 和 Bluetooth LE 共存,支持乐鑫 ESP8266、ESP32、ESP32-S 和 ESP32-C 等多系列 SoC。 广泛应用于智能家电、远程控制和传感器等领域。
据官方接受,ESP-NOW 在空旷环境中可实现200 m+ 的通信距离。
关于ESP-NOW的信息,可以通过视频了解:
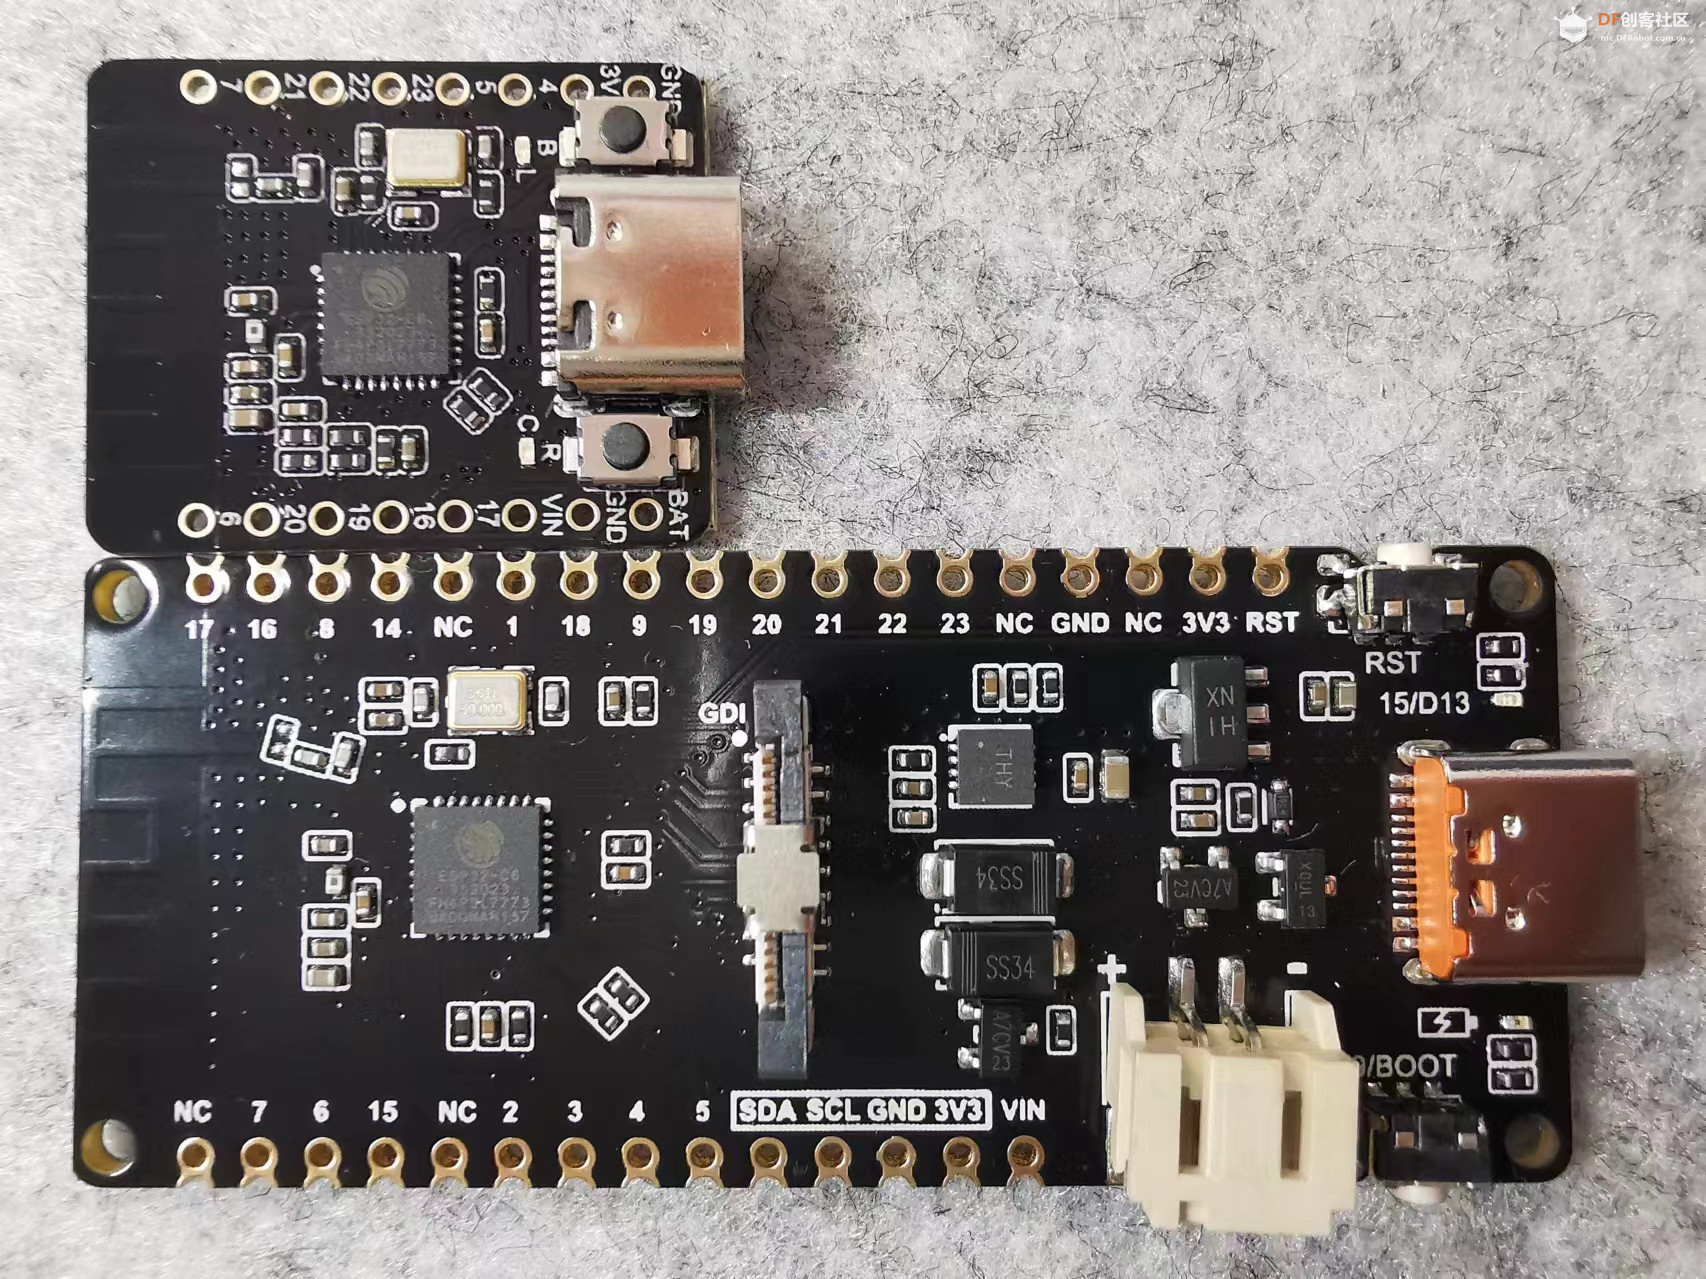
这篇分享,使用两块ESP32-C6开发板,一块为FireBetlee 2 ESP32-6(大板)做为Esp-Now网关,提供MQTT接入服务,Betlee 2 ESP32-6(小板)做为终端,连接到Esp-Now网关,获得MQTT服务。
一、ESPNow2Mqtt支持库
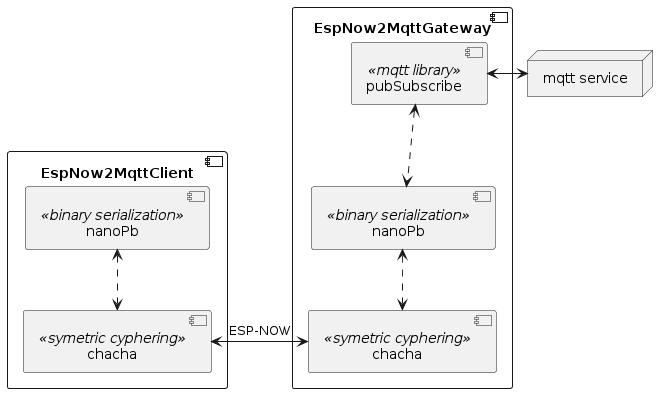
eccnil提供了一个ESPNow2Mqtt的支持库: library for ESP32 to bridge ESPNow and MQTT
其实现的核心功能如下:
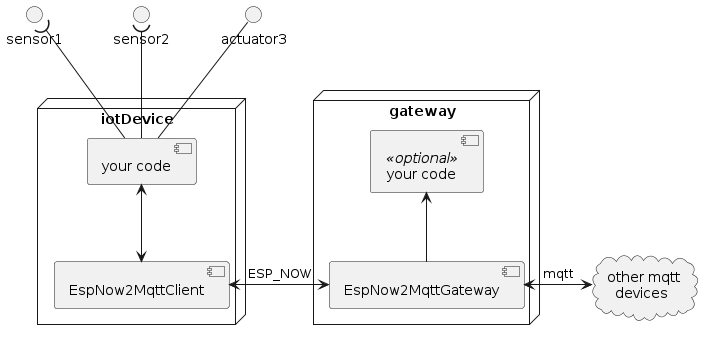
他提供了两个关键的类:EspNow2MqttServer、EspNow2MqttClient
基于这两个库,就可以完成这篇分享需要的功能。
不过这个库,是3年前发布的,要在咱们得ESP32C6上面使用,需要做一些移植改造。
二、Esp-Now网关代码
网关部分的完整代码如下: espnow_mqtt_server.zip espnow_mqtt_server.zip
-
- #include <Arduino.h>
- #ifdef ESP32
- #include <WiFi.h>
- #else
- #include <ESP8266WiFi.h>
- #endif
- // #include "display.hpp"
- #include "display_to_serial.hpp"
- #include "EspNow2MqttGateway.hpp"
- #include <WiFi.h>
- #include <WiFiClient.h>
- #include "secrets.h"
- #include <esp_wifi.h>
-
- // lcd display object creation for tests (not needed for gateway)
- Display display = Display(true);
- #define DISPLAY_LINE_IN_MAC 1
- #define DISPLAY_LINE_IN 2
- #define DISPLAY_LINE_OPERATIONS 3
- #define DISPLAY_LINE_WIFI 6
- #define DISPLAY_LINE_MAC 7
-
- //shared criptokey, must be the same in all devices. create your own
-
- byte sharedKey[16] = {10,200,23,4,50,3,99,82,39,100,211,112,143,4,15,106};
- byte sharedChannel = 6;
- //gateway creation, needs initialization at setup, but after init mqtt
- WiFiClient wifiClient;
- EspNow2MqttGateway gw = EspNow2MqttGateway(sharedKey, wifiClient, MQTT_SERVER_IP, 1883, sharedChannel, MQTT_SERVER_CLIENT_ID, MQTT_SERVER_USER, MQTT_SERVER_PASSWORD);
-
- void setupWiFi(const char* ssid, const char* password){
- // WiFi.mode(WIFI_MODE_STA);
- WiFi.mode(WIFI_STA);
- WiFi.setSleep(false);
- esp_wifi_set_protocol(WIFI_IF_STA, WIFI_PROTOCOL_11B|WIFI_PROTOCOL_11G|WIFI_PROTOCOL_11N|WIFI_PROTOCOL_LR);
- WiFi.begin(ssid, password, sharedChannel);
- display.print(DISPLAY_LINE_WIFI,"wifiConnect ", true);
- while (WiFi.status() != WL_CONNECTED) { // Wait for the Wi-Fi to connect
- delay(100);
- display.print(DISPLAY_LINE_WIFI, "trying to connect to wifi..");
- }
- display.print(DISPLAY_LINE_WIFI,"Connection established!");
- /*
- */
- String ipMsg = String("ip ");
- ipMsg.concat( WiFi.localIP().toString());
- ipMsg.concat( " ch ");
- ipMsg.concat( String((int) WiFi.channel()) );
- display.print(DISPLAY_LINE_WIFI, ipMsg.c_str());
- }
-
- void displayRequestAndResponse(bool ack, request &rq, response &rsp ){
- char line[13];
- for (int opCount = 0; opCount < rq.operations_count; opCount ++)
- {
- int lineNum = DISPLAY_LINE_OPERATIONS + opCount;
- switch (rq.operations[opCount].which_op)
- {
- case request_Operation_ping_tag:
- snprintf(line, sizeof(line), "ping: %d", rq.operations[opCount].op.ping.num );
- break;
- case request_Operation_send_tag:
- snprintf(line, sizeof(line), "send: %s", rq.operations[opCount].op.send.queue );
- break;
- case request_Operation_qRequest_tag:
- snprintf(line, sizeof(line), "ask: %s", rq.operations[opCount].op.qRequest.queue );
- break;
- default:
- snprintf(line, sizeof(line), "unknown op");
- break;
- }
- display.print(lineNum,line,false);
- Serial.println(line);
- }
- snprintf(line, sizeof(line), "%s: %d ops",
- rq.client_id,
- rq.operations_count);
- display.print(DISPLAY_LINE_IN,line,true);
- Serial.println(line);
- String ipMsg = String("ip ");
- ipMsg.concat( WiFi.localIP().toString());
- ipMsg.concat( " ch ");
- ipMsg.concat( String((int) WiFi.channel()) );
- display.print(DISPLAY_LINE_WIFI, ipMsg.c_str());
- }
-
- void displayMyMac(){
- char macStr[22];
- strcpy(macStr, "Mac ");
- strcat(macStr,WiFi.macAddress().c_str());
- display.print(DISPLAY_LINE_MAC, macStr);
- }
-
- void onEspNowRecv(const uint8_t * mac_addr, const uint8_t *incomingData, int len) {
- char macStr[18+1+4]; //18 mac + 1 space + 3 len
- Serial.print("Packet received from: ");
- snprintf(macStr, sizeof(macStr), "%02x:%02x:%02x:%02x:%02x:%02x %db",
- mac_addr[0], mac_addr[1], mac_addr[2], mac_addr[3], mac_addr[4], mac_addr[5], len);
- Serial.println(macStr);
- display.print(DISPLAY_LINE_IN,"---", false);
- display.print(DISPLAY_LINE_IN_MAC,macStr, false);
- }
-
- void setup() {
- Serial.begin(115200);
- delay(1000);
- display.init();
- displayMyMac();
-
- setupWiFi(WIFI_SSID, WIFI_PASSWORD);
-
- //init gateway
- gw.init();
- gw.onProcessedRequest = displayRequestAndResponse;
- gw.onDataReceived = onEspNowRecv;
- EspNow2Mqtt_subscribe(); //FIXME: porque se tiene que llamar a esta función desde aqui??
- }
-
- void loop() {
- // put your main code here, to run repeatedly:
- delay(50);
- gw.loop(); //required to fetch messages from mqtt
- }
上述代码的核心中,首先是完成WiFi联网:- setupWiFi(WIFI_SSID, WIFI_PASSWORD);
联网的信息,在secrets.h文件中提供:
- #ifndef _secrets_hpp_
- #define _secrets_hpp_
-
- const char* WIFI_SSID = "OpenBSD";
- const char* WIFI_PASSWORD = "********";
- const char* OTA_PASSWORD = "********";
-
- const char* MQTT_SERVER_IP = "broker.emqx.io";
- const char* MQTT_SERVER_CLIENT_ID = "espnow_mqtt_gw";
- const char* MQTT_SERVER_USER = "";
- const char* MQTT_SERVER_PASSWORD = "";
-
其中有WiFi连接信息,以及MQTT服务连接信息
WiFi连接后,进行ESP-Now网关初始化:
- gw.init();
- gw.onProcessedRequest = displayRequestAndResponse;
- gw.onDataReceived = onEspNowRecv;
最后,再进行MQTT订阅处理:
复制代码
在loop循环中,再使用 gw.loop() 处理消息。
网关的部分,通常情况下,代码不需要修改,主要起到一个桥梁的作用。
三、终端代码
终端的完整代码如下:espnow_mqtt_client.zip
主要代码为:
-
- /* example with LCD screen that sends single mesages*/
-
- #include <Arduino.h>
- // #include "display.hpp"
- #include "display_to_serial.hpp"
- #ifdef ESP32
- #include <WiFi.h>
- #else
- #include <ESP8266WiFi.h>
- #endif
- #include <esp_wifi.h>
-
- #define DEBUG_MODE 0
-
- #include "EspNow2MqttClient.hpp"
-
- #include <ArduinoJson.h>
- JsonDocument doc;
-
- #define LED_PIN 15
-
- Display display = Display();
- #define DISPLAY_LINE_OPERATION 1
- #define DISPLAY_LINE_DATA_SENT 2
- #define DISPLAY_LINE_DELIVERY_STATUS 3
- #define DISPLAY_LINE_RESPONSE 4
- #define DISPLAY_LINE__ 5
- #define DISPLAY_LINE_ESPNOW_STATUS 6
- #define DISPLAY_LINE_MAC 7
-
- #define MESSAGE_TYPE_A 1
- #define MESSAGE_TYPE_B 2
- const char* queueA = "light";
- const char* queueB = "motor";
-
- byte sharedKey[16] = {10,200,23,4,50,3,99,82,39,100,211,112,143,4,15,106};
- byte sharedChannel = 6 ;
- // uint8_t gatewayMac[6] = {0xA4, 0xCF, 0x12, 0x25, 0x9A, 0x30};
- uint8_t gatewayMac[6] = {0x54, 0x32, 0x04, 0x0B, 0x2F, 0x64};
- EspNow2MqttClient client = EspNow2MqttClient("tstRq", sharedKey, gatewayMac, sharedChannel);
-
- void displayDataOnCompletion( response & rsp)
- {
- char line[30];
- int resultCode;
-
- if (1 == rsp.opResponses_count)
- {
- resultCode = rsp.opResponses[0].result_code;
- const char * queue = rsp.message_type == MESSAGE_TYPE_A? queueA : queueB ;
- DeserializationError err;
- switch (resultCode)
- {
- case response_Result_OK:
- snprintf(line, sizeof(line), "%s ok: %s", queue, rsp.opResponses[0].payload);
- err = deserializeJson(doc, (const byte*)rsp.opResponses[0].payload);
- if (!err) { //检查反序列化是否成功
- if(doc.containsKey("status")) {
- int val = doc["status"];
- if(val) {
- Serial.println("Set LED On");
- digitalWrite(LED_PIN, HIGH);
- } else {
- Serial.println("Set LED Off");
- digitalWrite(LED_PIN, LOW);
- }
- }
- } else {
- Serial.print(F("deserializeJson() failed: "));
- Serial.println(err.c_str());
- }
- break;
- case response_Result_NO_MSG:
- #if DEBUG_MODE
- snprintf(line, sizeof(line), "%s ok but no msg %d", queue, rsp.message_type);
- #endif
- break;
- default:
- #if DEBUG_MODE
- snprintf(line, sizeof(line), "%s status: %d %s", queue, resultCode, rsp.opResponses[0].payload);
- #endif
- break;
- }
- } else {
- snprintf(line, sizeof(line), "error: %d", rsp.opResponses_count);
- }
- #if DEBUG_MODE
- display.print(DISPLAY_LINE_RESPONSE,line,true);
- #else
- if (resultCode == response_Result_OK){
- display.print(DISPLAY_LINE_RESPONSE,line,true);
- }
- #endif
- // Serial.println(line);
- }
-
- void onDataSentUpdateDisplay(bool success) {
- #if DEBUG_MODE
- display.print(DISPLAY_LINE_DELIVERY_STATUS, success ? "Delivery Success" : "Delivery Fail", false);
- #endif
- }
-
- void displayGwMac()
- {
- char macStr[24];
- snprintf(macStr, sizeof(macStr), "GwMac %02x:%02x:%02x:%02x:%02x:%02x",
- gatewayMac[0], gatewayMac[1], gatewayMac[2], gatewayMac[3], gatewayMac[4], gatewayMac[5]);
- display.print(DISPLAY_LINE_MAC, macStr);
- }
-
- void displayMyMac()
- {
- char macStr[22];
- strcpy(macStr, "Mac ");
- strcat(macStr,WiFi.macAddress().c_str());
- display.print(DISPLAY_LINE_MAC, macStr);
- }
-
- int32_t getWiFiChannel(const char *ssid) {
- if (int32_t n = WiFi.scanNetworks()) {
- for (uint8_t i=0; i<n; i++) {
- if (!strcmp(ssid, WiFi.SSID(i).c_str())) {
- return WiFi.channel(i);
- }
- }
- }
- return 0;
- }
-
- void testRequest(int msgType)
- {
- bool ret;
- const char* queue = MESSAGE_TYPE_A == msgType ? queueA: queueB;
- #if DEBUG_MODE
- display.print(DISPLAY_LINE_OPERATION, "request", false);
- display.print(DISPLAY_LINE_DATA_SENT, queue, false);
- #endif
- ret = client.doSubscribe(queue, msgType);
- #if DEBUG_MODE
- if(ret) {
- display.print(DISPLAY_LINE_MAC, "doSubscribe OK.");
- } else {
- display.print(DISPLAY_LINE_MAC, "doSubscribe Fail.");
- }
- display.print(DISPLAY_LINE_MAC, "\n");
- #endif
- }
-
- void setup() {
- Serial.begin(115200);
- delay(1000);
- pinMode(LED_PIN, OUTPUT);
-
- display.init();
- displayGwMac();
- displayMyMac();
-
- int initcode;
- do {
- display.print(DISPLAY_LINE_ESPNOW_STATUS, " TRYING");
- initcode = client.init();
- switch (initcode)
- {
- case 1:
- display.print(DISPLAY_LINE_ESPNOW_STATUS ,"CANNOT INIT");
- break;
- case 2:
- display.print(DISPLAY_LINE_ESPNOW_STATUS ,"CANNOT PAIR");
- break;
- default:
- display.print(DISPLAY_LINE_ESPNOW_STATUS ,"PAIRED");
- break;
- }
- delay(1001);
- } while (initcode != 0);
-
- client.onSentACK = onDataSentUpdateDisplay;
- client.onReceiveSomething = displayDataOnCompletion;
- }
-
- void loop() {
- testRequest (MESSAGE_TYPE_A);
- // delay(3000);
- // testRequest (MESSAGE_TYPE_B);
- delay(1000);
- }
其中,进行的主要处理如下。首先,是客户端初始化:
- client.init();
-
-
- client.onSentACK = onDataSentUpdateDisplay;
- client.onReceiveSomething = displayDataOnCompletion;
初始化完成后,发送时会调用client.onSentACK对应的函数,接收时,会调用client.onReceiveSomething对应的函数。
在接受调用displayDataOnCompletion中,有进行消息解码的处理,具体代码如下:
-
- snprintf(line, sizeof(line), "%s ok: %s", queue, rsp.opResponses[0].payload);
- err = deserializeJson(doc, (const byte*)rsp.opResponses[0].payload);
- if (!err) { //检查反序列化是否成功
- if(doc.containsKey("status")) {
- int val = doc["status"];
- if(val) {
- Serial.println("Set LED On");
- digitalWrite(LED_PIN, HIGH);
- } else {
- Serial.println("Set LED Off");
- digitalWrite(LED_PIN, LOW);
- }
- }
- } else {
- Serial.print(F("deserializeJson() failed: "));
- Serial.println(err.c_str());
- }
在这段代码中,会检测收到的消息是否为json格式,如果是的,则根据status字段,来控制LED的亮灭。
四、实际测试
我家在13楼,所以我把大板调试好,放在了窗户边的桌子上。
然后参考我之前的文章, ESP32-C6安全(SSL)MQTT服务点灯全套流程 DF创客社区 (dfrobot.com.cn) 在手机上做好mqtt工具的设置:
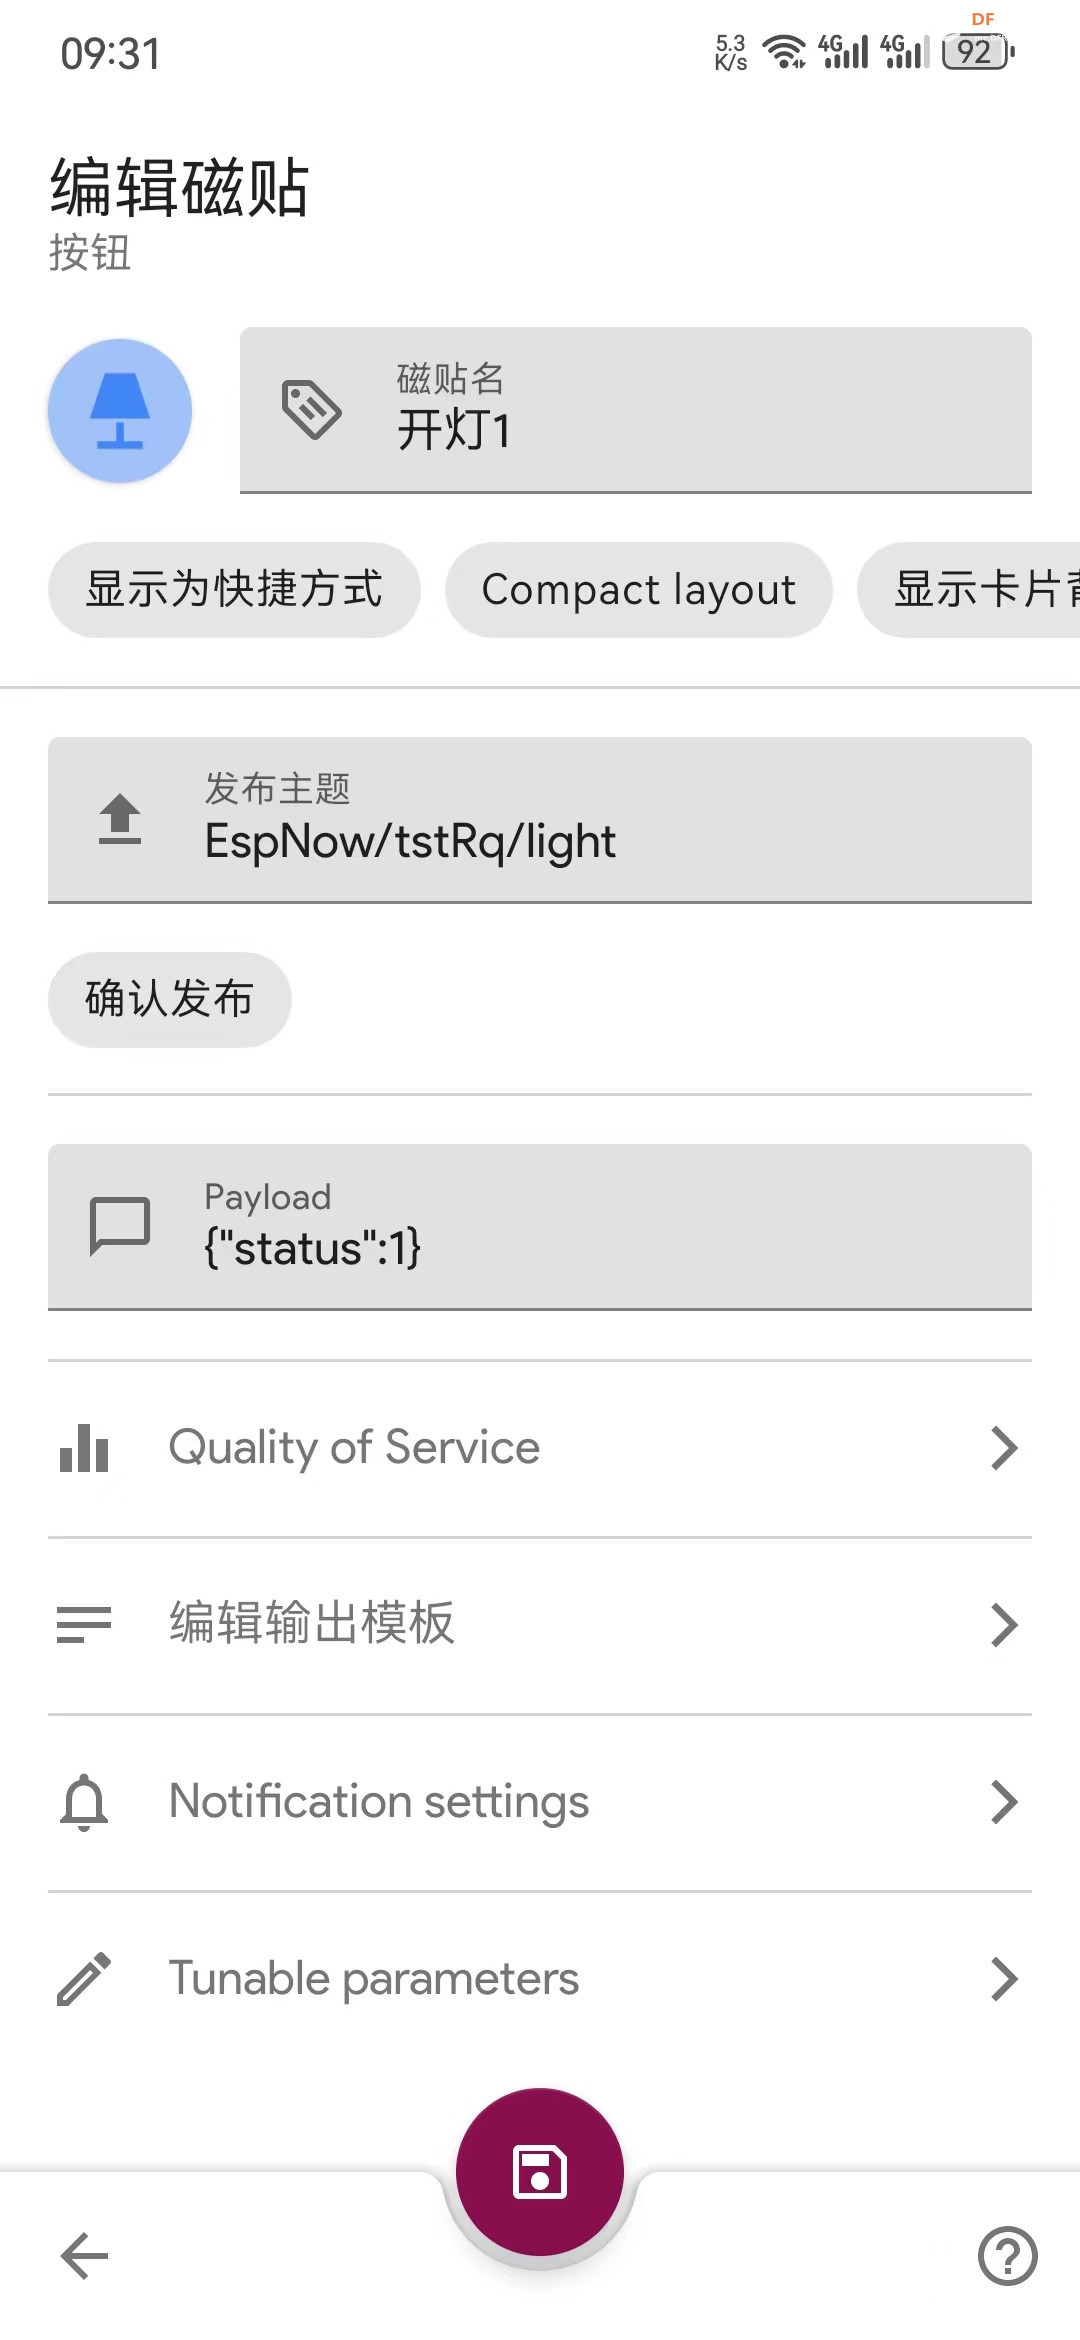 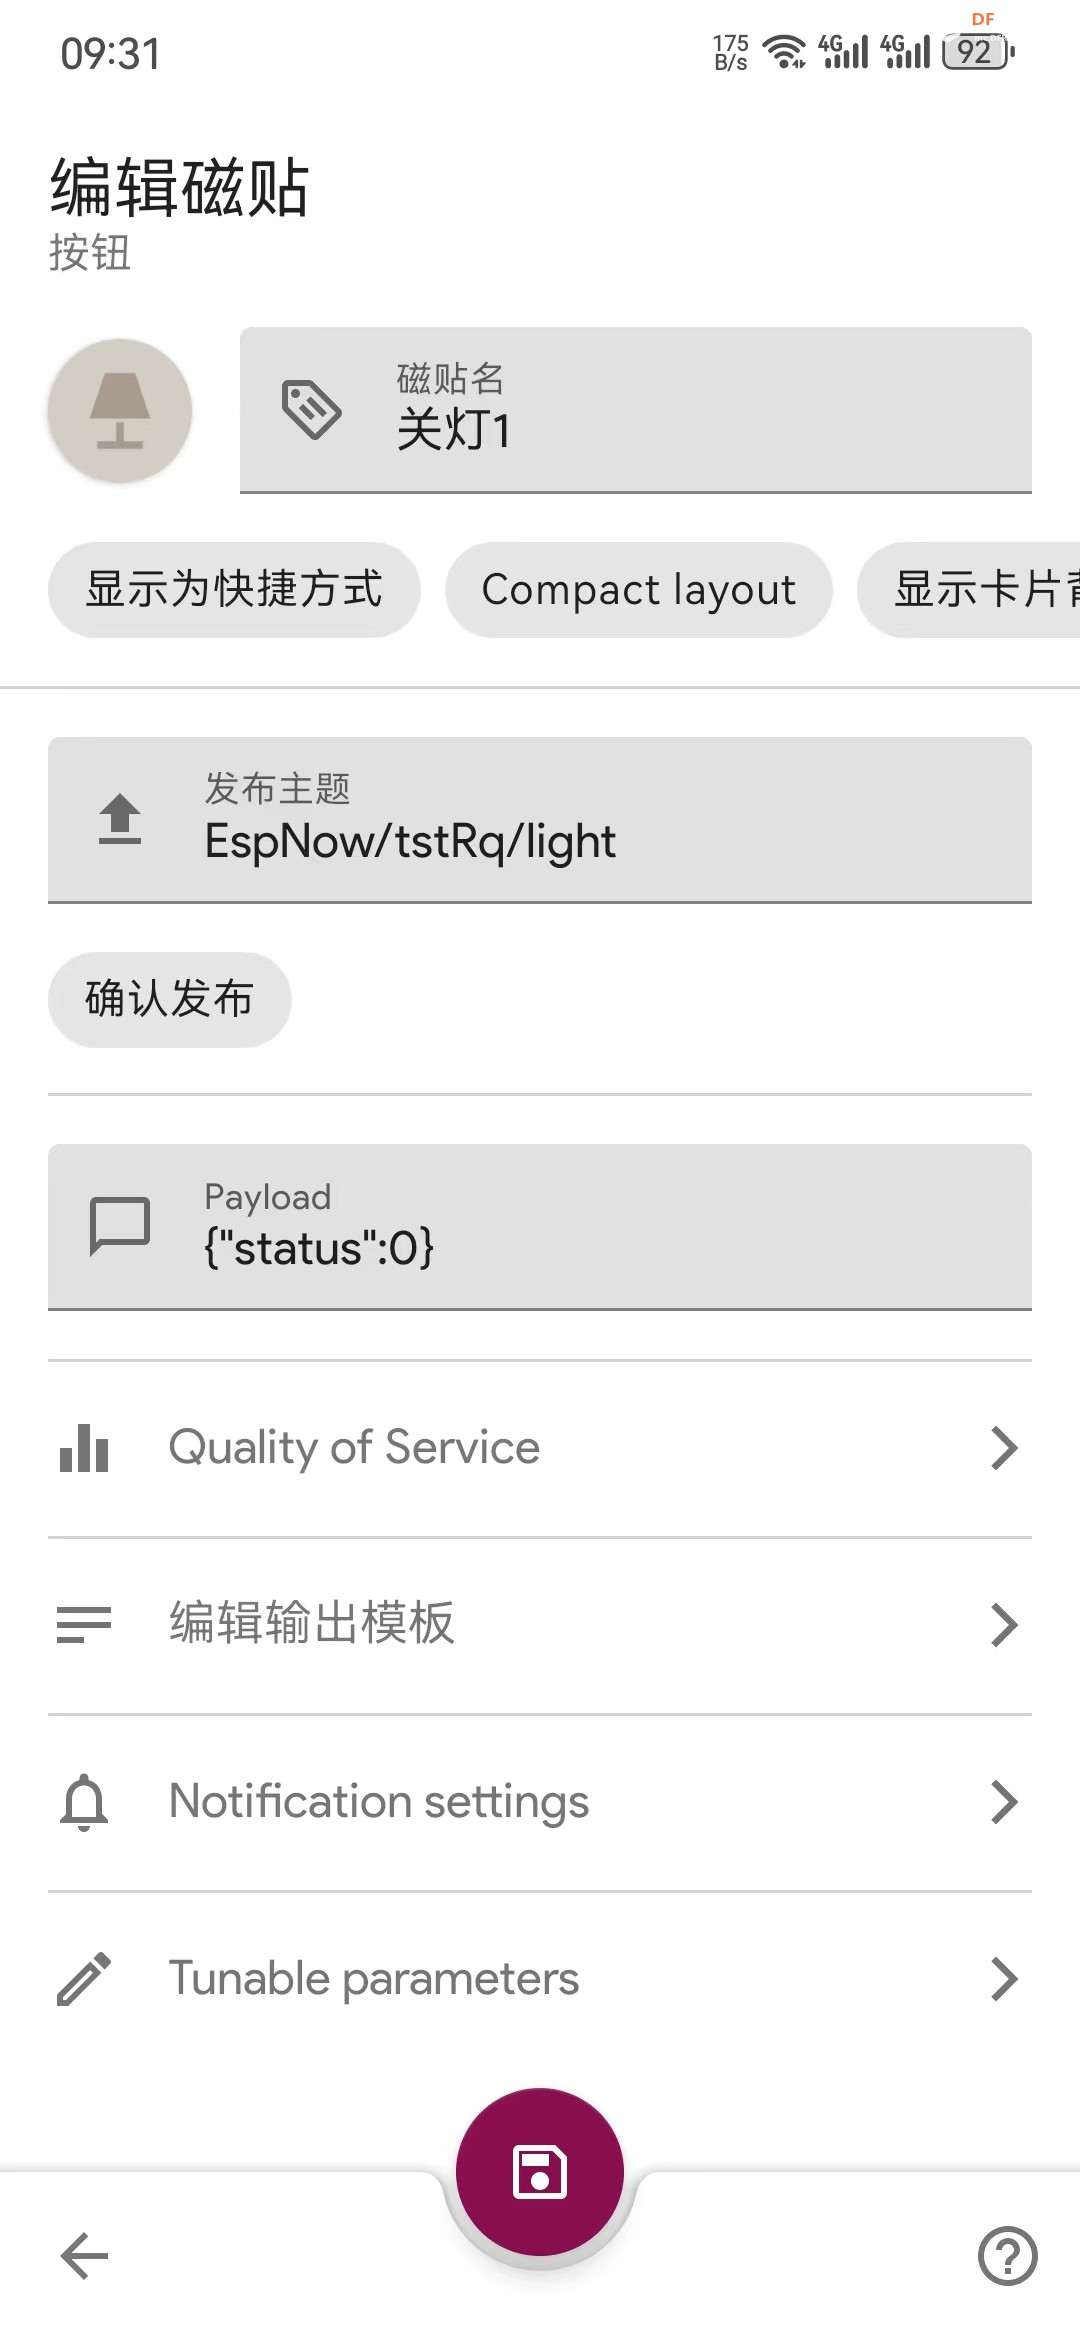
然后我手拿小板就出发了。
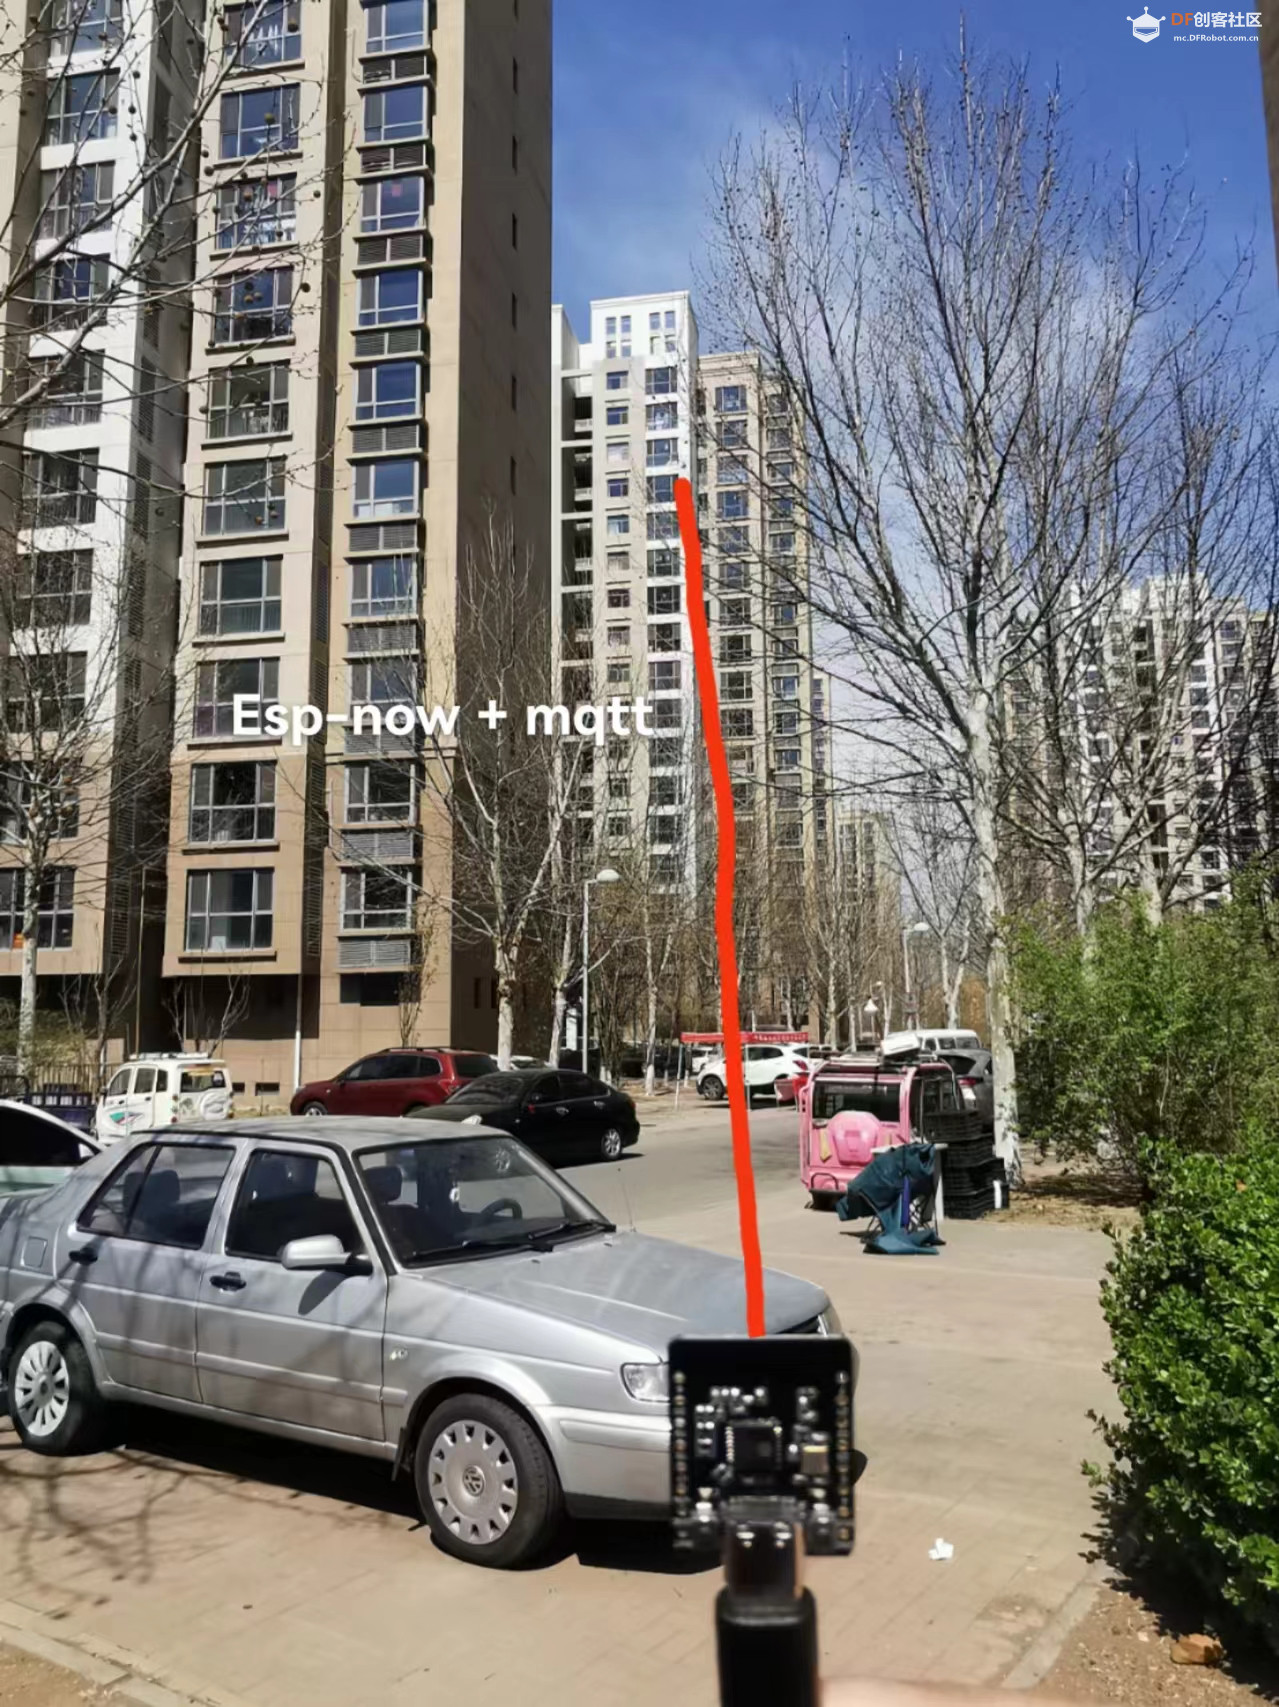
实际测试时,75米左右,都可以很好的进行控制,再远了一些,有时候信号就不太好了。如果是有外置天线的情况下,距离应该会更好吧。
|
 编辑选择奖
编辑选择奖


 沪公网安备31011502402448

 置顶卡
置顶卡 变色卡
变色卡 千斤顶
千斤顶


