收到进阶版帮助帖的启发,写完网页控灯帖子(https://mc.dfrobot.com.cn/thread-318980-1-1.html )后,我又想到了用蓝牙的方式来控灯。复制代码 D:\desktop\C6 测评报告 \LANYA-BLUETOOTH1\LANYA-BLUETOOTH1.ino: In member function 'virtual void MyCallbacks::onWrite(BLECharacteristic*)':
D:\desktop\C6 测评报告 \LANYA-BLUETOOTH1\LANYA-BLUETOOTH1.ino:66:54: error: conversion from 'String' to non-scalar type 'std::string' {aka 'std::__cxx11::basic_string<char>'} requested
exit status 1
Compilation error: conversion from 'String' to non-scalar type 'std::string' {aka 'std::__cxx11::basic_string<char>'} requested
2、于是修改样例代码,将std::string rxValue = pCharacteristic -> getValue () ; //接收数据,并赋给rxValue
改成 S tring rxValue = pCharacteristic -> getValue () ;
调试成功。
3、修改样例代码,增加米奇小灯的控灯程序,如下:
/*
Video: https://www.youtube.com/watch?v=oCMOYS71NIU
Based on Neil Kolban example for IDF: https://github.com/nkolban/esp32-snippets/blob/master/cpp_utils/tests/BLE%20Tests/SampleNotify.cpp
Ported to Arduino ESP32 by Evandro Copercini
Create a BLE server that, once we receive a connection, will send periodic notifications.
The service advertises itself as: 6E400001-B5A3-F393-E0A9-E50E24DCCA9E
Has a characteristic of: 6E400002-B5A3-F393-E0A9-E50E24DCCA9E - used for receiving data with "WRITE"
Has a characteristic of: 6E400003-B5A3-F393-E0A9-E50E24DCCA9E - used to send data with "NOTIFY"
The design of creating the BLE server is:
1. Create a BLE Server
2. Create a BLE Service
3. Create a BLE Characteristic on the Service
4. Create a BLE Descriptor on the characteristic
5. Start the service.
6. Start advertising.
*/
/* 该示例演示了蓝牙数据透传,烧录代码,打开串口监视器,打开手机的BLE调试助手
* 1.即可看见ESP32发送的数据--见APP使用图
* 2.通过BLE调试助手的输入框可向ESP32发送数据--见APP使用图
* 该示例由BLE_uart示例更改而来
*/
#include <BLEDevice.h>
#include <BLEServer.h>
#include <BLEUtils.h>
#include <BLE2902.h>
#include <Adafruit_NeoPixel.h>
#ifdef __AVR__
#include <avr/power.h> // Required for 16 MHz Adafruit Trinket
#endif
// Which pin on the Arduino is connected to the NeoPixels?
#define PIN 6 // On Trinket or Gemma, suggest changing this to 1
// How many NeoPixels are attached to the Arduino?
#define NUMPIXELS 15 // Popular NeoPixel ring size
// When setting up the NeoPixel library, we tell it how many pixels,
// and which pin to use to send signals. Note that for older NeoPixel
// strips you might need to change the third parameter -- see the
// strandtest example for more information on possible values.
Adafruit_NeoPixel pixels(NUMPIXELS, PIN, NEO_GRB + NEO_KHZ800);
BLEServer *pServer = NULL;
BLECharacteristic * pTxCharacteristic;
bool deviceConnected = false;
uint8_t txValue = 0;
int led = 15;
// See the following for generating UUIDs:
// https://www.uuidgenerator.net/
#define SERVICE_UUID "6E400001-B5A3-F393-E0A9-E50E24DCCA9E" // UART service UUID
#define CHARACTERISTIC_UUID_RX "6E400002-B5A3-F393-E0A9-E50E24DCCA9E"
#define CHARACTERISTIC_UUID_TX "6E400003-B5A3-F393-E0A9-E50E24DCCA9E"
//蓝牙连接/断开处理。当有连接/断开事件发生时自动触发
class MyServerCallbacks: public BLEServerCallbacks {
void onConnect(BLEServer* pServer) { //当蓝牙连接时会执行该函数
Serial.println("蓝牙已连接");
deviceConnected = true;
};
void onDisconnect(BLEServer* pServer) { //当蓝牙断开连接时会执行该函数
Serial.println("蓝牙已断开");
deviceConnected = false;
delay(500); // give the bluetooth stack the chance to get things ready
pServer->startAdvertising(); // restart advertising
}
};
/****************数据接收部分*************/
/****************************************/
//蓝牙接收数据处理。当收到数据时自动触发
class MyCallbacks: public BLECharacteristicCallbacks {
void onWrite(BLECharacteristic *pCharacteristic) {
String rxValue = pCharacteristic->getValue();//接收数据,并赋给rxValue
if(rxValue == "ON"){
Serial.println("OPEN");
digitalWrite(led,HIGH);
delay(0);
for(int i=0; i<NUMPIXELS; i++) { // For each pixel...
// pixels.Color() takes RGB values, from 0,0,0 up to 255,255,255
// Here we're using a moderately bright green color:
pixels.setPixelColor(i, pixels.Color(0, 150, 0));
pixels.show(); // Send the updated pixel colors to the hardware.
delay(0); // Pause before next pass through loop
}
} //判断接收的字符是否为"ON"
if(rxValue == "OFF"){
Serial.println("CLOSE");
digitalWrite(led,LOW);
pixels.clear(); //得到/OFF时关闭灯
for(int i=0; i<NUMPIXELS; i++) { // For each pixel...
// pixels.Color() takes RGB values, from 0,0,0 up to 255,255,255
// Here we're using a moderately bright green color:
pixels.setPixelColor(i, pixels.Color(0, 0, 0));
pixels.show(); // Send the updated pixel colors to the hardware.
delay(0); // Pause before next pass through loop
}
} //判断接收的字符是否为"OFF"
}
};
/***************************************/
/****************************************/
void setup() {
Serial.begin(115200);
BLEBegin(); //初始化蓝牙
pinMode(led,OUTPUT);
#if defined(__AVR_ATtiny85__) && (F_CPU == 16000000)
clock_prescale_set(clock_div_1);
#endif
pixels.begin();
}
void loop() {
/****************数据发送部分*************/
/****************************************/
if (deviceConnected) { //如果有蓝牙连接,就发送数据
pTxCharacteristic->setValue("Hello "); //发送字符串
pTxCharacteristic->notify();
delay(1000); // bluetooth stack will go into congestion, if too many packets are sent
pTxCharacteristic->setValue("Nanjing "); //发送字符串
pTxCharacteristic->notify();
delay(1000); // bluetooth stack will go into congestion, if too many packets are sent
}
/****************************************/
/****************************************/
}
void BLEBegin(){
// Create the BLE Device
BLEDevice::init(/*BLE名称*/"UART Service");
// Create the BLE Server
pServer = BLEDevice::createServer();
pServer->setCallbacks(new MyServerCallbacks());
// Create the BLE Service
BLEService *pService = pServer->createService(SERVICE_UUID);
// Create a BLE Characteristic
pTxCharacteristic = pService->createCharacteristic(
CHARACTERISTIC_UUID_TX,
BLECharacteristic::PROPERTY_NOTIFY
);
pTxCharacteristic->addDescriptor(new BLE2902());
BLECharacteristic * pRxCharacteristic = pService->createCharacteristic(
CHARACTERISTIC_UUID_RX,
BLECharacteristic::PROPERTY_WRITE
);
pRxCharacteristic->setCallbacks(new MyCallbacks());
// Start the service
pService->start();
// Start advertising
pServer->getAdvertising()->start();
Serial.println("Waiting a client connection to notify...");
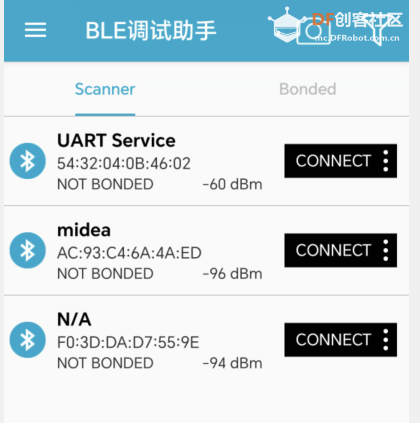
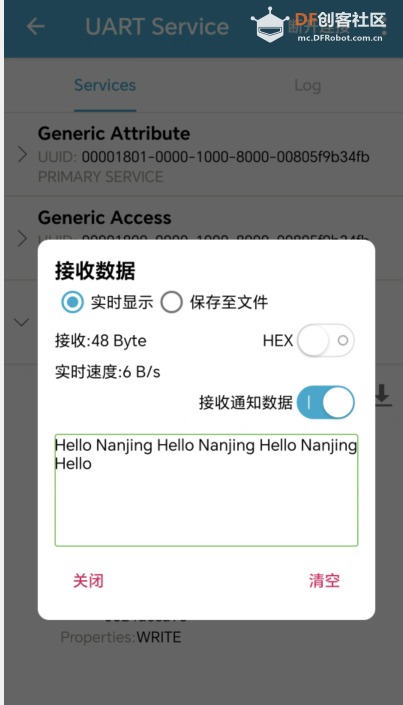
} 复制代码 4、在手机上下载“BLE调试助手”的app,连接蓝牙,查看收发消息情况。


 沪公网安备31011502402448