本帖最后由 zoey不种土豆 于 2024-10-16 13:54 编辑
项目概述
本次分享的社区优秀案例是一个基于行空板和FireBeetle ESP32 实现的无障碍家庭项目———用语音控制的自动开关橱柜。通过语音控制柜门自动开关,来方便居家日常生活,也可用来改善因家庭空间或动线不合理带来的橱柜取用困难问题,或是为行动不便的残障人士减少居家生活中的困难。(注:原作者还分享了一个通过接近式传感器控制自动开关的方案,如果有兴趣,可以看到文末阅读原文)
本项目不只局限于设计智能自动开关橱柜,还整合了智能厨房解决方案,大家还可以基于此项目来添加更多设备,并使这些定制设备更易于使用。
在设计方案时,考虑到有多个橱柜的情况,计划对不同橱柜设置不同的名字来语音激活。
本次项目的构思主要有以下有 3 个部分:
1.发出“打开”或“关闭”指令的设备。
2.负责开启和关闭智能橱柜的设备。
3.作为中介,能监听传入的指令,并将它们分发给正在等待激活指令的智能设备。
项目构思视图
用品清单
硬件
行空板 ×1
DFRobot FireBeetle ESP32 ×1
M5Stack CM4Stack 开发套件 ×1
SG90 微型伺服电机 ×若干
软件
Arduino IDE
Mind+
Thonny
项目过程
想要控制橱柜的智能开关,可通过使用IFTTT(If This Then That,基于任务的触发)来轻松集成语音命令的方法。这个IFTTT设置是一个易于理解的方法,用于为已有设备添加语音命令。
IFTTT的工作原理:
1.触发器(This):这是配方的起始点,可以是特定服务上的事件,如收到新邮件、日历上的新事件、社交媒体上的新帖子等。
2.动作(That):这是触发器发生后要执行的操作,可以是发送通知、发送邮件、控制智能家居设备等。
3.频道(channel):将触发器和动作结合起来的规则,用户可以创建多个频道来自动化不同的任务。
IFTTT的界面简单直观,使得即使是没有编程背景的用户也能轻松创建和使用配方。
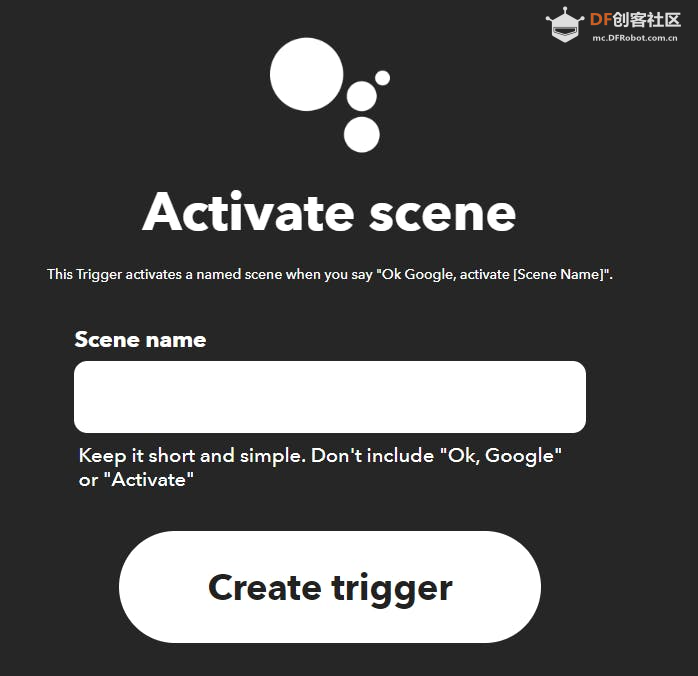
作者使用的是安卓和谷歌设备,通过Google助手添加语音命令开始。
可以设置场景命名,本项目命名为 "sink cabinet"
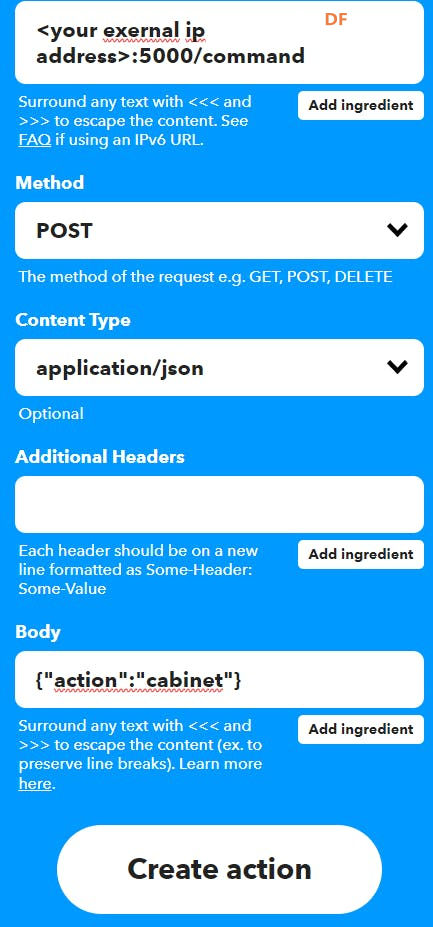
对于 “if this then that” 的 “that” 部分,选择 webhook。按如下所示进行设置,可以正常运行。
由于IFTTT通过外部服务工作,所以外部IP地址会用于智能家居设备。如果您不想使用IFTTT或包含外部IP,我们的解决方案将也包括一个完全内部的设置——智能厨房的自定义中心。
智能化厨房
使用CM4Stack 开发套件与 Raspberry Pi Compute Module 4 设置智能家庭设备。
目标是将其设置通用到可以添加更多新设备。编写一个设置了Flask服务器的Python脚本,等待接收命令,然后将命令发布到同一服务上的MQTT主题。这样,像ESP32这样的设备就可以轻松接收到“cabinet”命令。
设置
开始编码之前,在 CM4Stack 上完成设置,只需复制粘贴下面的许多命令即可。只需将特定字段更新为您想要的内容,例如您的用户名和密码。
安装和配置 Mosquitto (MQTT Broker):
通过安装 Mosquitto MQTT 代理来设置 Mosquitto MQTT 代理:
接下来,将 Mosquitto 配置为侦听所有网络接口并设置身份验证。编辑 Mosquitto 配置文件:
在文件末尾添加以下内容:
创建密码文件并添加用户(在此文件中更改用户名):
系统会提示设置密码。然后,重新启动 Mosquitto 以应用更改:
配置网络:
通过编辑 DHCP 客户端配置文件,确保设备具有静态 IP 地址。这样,当重启时,不需要更新所有连接的设备:
添加以下行:
再次重启:
配置防火墙:
需要确保某些端口是打开的:
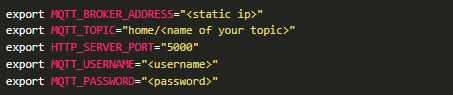
设置环境变量:
最后需要设置 Python 脚本将使用的环境变量,根据需要更新下面的值:
到此为止,您应该已经准备好运行我们在本节开头讨论的程序了。代码包含在项目中。只需确保在代码中更新值以匹配您刚才设置的值,并且一切都应该立即正常工作。
按需要添加更多橱柜
如果想添加更多橱柜,也很容易实现更改。这里添加了第二个伺服器并扩展了程序。我们不再只监听“cabinet”,而是监听特定的橱柜。因此,程序将改为监听“dishwasher cabinet”和“stove cabinet”。这感觉更像是实际使用时的更真实表现。
如介绍 Flask 服务器设置的部分所述,不需要在那里进行任何修改。
自定义语音命令
行空板配有一个内置麦克风,可以进行语音命令设置。通过设置一个简单的 python 脚本,可以让行空板作为通过刚设置的 CM4Stack 的 Flask 服务器运行语音命令的一种方法,然后转到我们刚刚构建的 Smart Cabinet 等设备。
通过 Mind+ 运行,监听语音命令,我们监听语音命令,当我们听到单词“butler”时,将随后的单词发送到Flask服务器。然后这些命令会传输到家中的设备,包括我们的智能开关橱柜。“Butler”作为触发词,就像你说“小爱同学”或“Hey Siri”一样,同时也很容易更改。
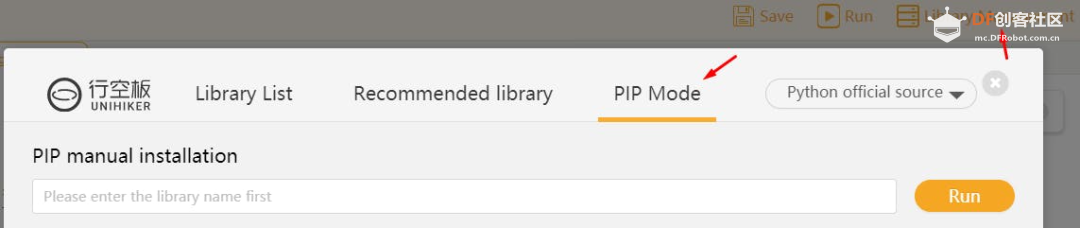
实现这个功能,需要以下两个库:
可以通过 Mind+ 中的 Library Management 选项卡进行安装。
需要通过 ssh 连接到 行空板 并运行以下命令,否则您将遇到 Google api 错误:
- sudo apt-get install flac
项目总结
这套可以自动运行的智能橱柜完成了!可选择自动运行,或作为智能家居中心,为未来的自定义智能家居项目做准备,可以通过语音命令控制这些自定义的智能家居项目。希望这个项目可以帮助到有需要的人,为他们带来无障碍体验的居家生活。
希望大家喜欢这个项目。
附件
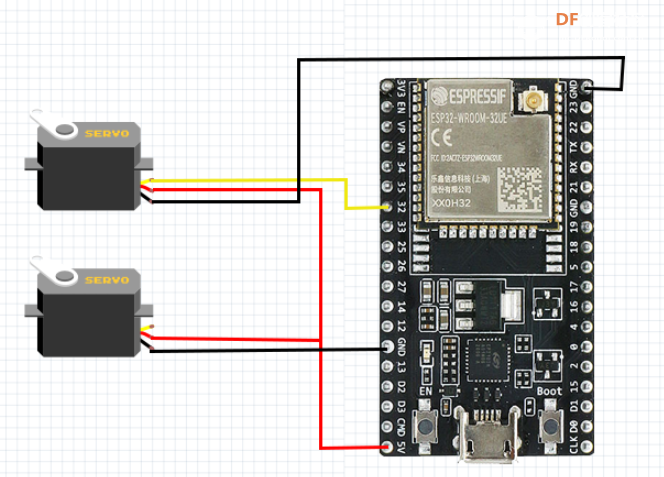
1.Smart Cabinets 原理图
控制 2 个舵机,来演示使用 ESP32 控制多个橱柜
voice_controller.py
在行空板上运行,以侦听语音命令,然后这些命令可以与 Flask 服务器通信并控制我们的橱柜
- <div data-page-id="YqyEdhFqao7fmGxKfa2cALV3nOc" data-lark-html-role="root" data-docx-has-block-data="false"><pre class="ace-line ace-line old-record-id-AREPdjLz1omexTxZYxBc2qg5nWg"><code class="language-Python" data-lark-language="Python" data-wrap="false"># -*- coding: UTF-8 -*-
-
- import sys
- import speech_recognition as sr
- import time
- import paho.mqtt.publish as publish
-
- # MQTT Broker Settings
- BROKER = "192.168.86.84" # Change to your MQTT broker's IP address - this is the default one
- PORT = 1883
- TOPIC = "home/<topic>"
- USERNAME = "<username>" # Change to your MQTT username
- PASSWORD = "<password>" # Change to your MQTT password
-
- said_butler = False # To check if the last word we heard was "butler" so we know to send the next word(s) as a command
-
- def listen_for_commands(recognizer, audio):
- global said_butler
- """Callback function that processes the audio as soon as it is available."""
- try:
- # Recognize speech using Google's speech recognition
- command = recognizer.recognize_google(audio).lower()
- print("You said:", command)
-
- # Check if the command contains the wake word 'butler'
- if 'butler' in command:
- said_butler = True # Set flag to true to send next commands
- command = command.split('butler', 1)[1].strip() # Get everything after 'butler'
-
- if said_butler and command: # If the flag is set and there is a command
- print("Command received:", command)
- words = command.split()
- if len(words) > 0:
- first_word = words[0]
- print("First word received:", first_word)
- # Send the first word as a separate command to the MQTT broker
- publish.single(TOPIC, first_word, hostname=BROKER, port=PORT, auth={'username': USERNAME, 'password': PASSWORD})
-
- # Send the full command to the MQTT broker
- publish.single(TOPIC, command, hostname=BROKER, port=PORT, auth={'username': USERNAME, 'password': PASSWORD})
- print("Commands sent to the Flask server via MQTT.")
- said_butler = False # Reset flag after command is sent
-
- except sr.UnknownValueError:
- print("Google Speech Recognition could not understand the audio")
- except sr.RequestError as e:
- print(f"Could not request results from Google Speech Recognition service; {e}")
-
- def main():
- # Initialize recognizer class (for recognizing the speech)
- recognizer = sr.Recognizer()
- microphone = sr.Microphone()
-
- # Adjust the recognizer sensitivity to ambient noise and record audio
- with microphone as source:
- recognizer.adjust_for_ambient_noise(source)
- print("Set minimum energy threshold to:", recognizer.energy_threshold)
- recognizer.pause_threshold = 0.8 # Adjust based on testing; default is 0.8 seconds
- recognizer.non_speaking_duration = 0.4 # Adjust based on testing; default is 0.5 seconds
-
- # Start listening in the background (non-blocking)
- stop_listening = recognizer.listen_in_background(microphone, listen_for_commands, phrase_time_limit=5)
-
- # Keep the main thread alive, or the background listener will stop
- try:
- while True:
- time.sleep(0.1) # Sleep briefly to limit CPU usage
- except KeyboardInterrupt:
- stop_listening(wait_for_stop=False) # Stop listening when Ctrl+C is pressed
- print("Stopped listening...")
-
- if __name__ == "__main__":
- main()
SmartCabinetsPlural_Generified.ino
这是一个如何让一个微控制器运行多个 smart cabinet 的示例,以及演示处理多个 cabinets 的一般逻辑调整。复制代码
smartCabinet_Generified.ino
在 ESP32 上运行的单个智能橱柜的代码。
复制代码
smart_house.py
用来在 CM4Stack 上运行 Flask 服务器的方法,充当发出语音命令和 Smart Cabinet 之间的中间人。- <div data-page-id="YqyEdhFqao7fmGxKfa2cALV3nOc" data-lark-html-role="root" data-docx-has-block-data="false"><pre class="ace-line ace-line old-record-id-Z3LXduqgeog1WdxFiVCcV9K6nib"><code class="language-Python" data-lark-language="Python" data-wrap="false">from flask import Flask, request, jsonify
- import paho.mqtt.client as mqtt
- import logging
- import os
-
- # Configuration parameters
- broker_address = os.getenv('MQTT_BROKER_ADDRESS', '192.168.86.84') # Default to internal IP address
- mqtt_topic = os.getenv('MQTT_TOPIC', 'home/<topic>')
- http_server_port = int(os.getenv('HTTP_SERVER_PORT', 5000))
- mqtt_username = os.getenv('MQTT_USERNAME', '<username>')
- mqtt_password = os.getenv('MQTT_PASSWORD', '<password>')
-
- # Create Flask app
- app = Flask(__name__)
-
- # Setup logging
- logging.basicConfig(level=logging.INFO)
-
- # MQTT setup
- mqtt_client = mqtt.Client(client_id="<client id>", protocol=mqtt.MQTTv311)
- mqtt_client.username_pw_set(username=mqtt_username, password=mqtt_password)
-
- # Define on_connect callback
- def on_connect(client, userdata, flags, rc):
- if rc == 0:
- logging.info("Connected to MQTT Broker")
- client.subscribe(mqtt_topic)
- elif rc == 5:
- logging.error("Authentication failed - check username and password")
- else:
- logging.error(f"Failed to connect, return code {rc}")
-
- # Define on_message callback
- def on_message(client, userdata, message):
- logging.info(f"Received message: {message.payload.decode()} on topic {message.topic}")
-
- mqtt_client.on_connect = on_connect
- mqtt_client.on_message = on_message
-
- try:
- mqtt_client.connect(broker_address)
- mqtt_client.loop_start()
- except Exception as e:
- logging.error(f"Failed to connect to MQTT Broker: {e}")
-
- @app.route('/command', methods=['POST'])
- def handle_command():
- try:
- data = request.json
- action = data.get('action', '')
- if action:
- mqtt_client.publish(mqtt_topic, action)
- logging.info(f"Command '{action}' sent to MQTT topic.")
- return jsonify({"status": "success", "message": f"Command '{action}' sent to MQTT topic."}), 200
- logging.warning("No action specified in the command.")
- return jsonify({"status": "error", "message": "No action specified in the command."}), 400
- except Exception as e:
- logging.error(f"Error handling command: {e}")
- return jsonify({"status": "error", "message": "Failed to process command."}), 500
-
- if __name__ == '__main__':
- try:
- app.run(host='0.0.0.0', port=http_server_port)
- except Exception as e:
- logging.error(f"Exception occurred: {e}")
- finally:
- mqtt_client.loop_stop()
- mqtt_client.disconnect()
作者:donutsorelse
发布时间:2024.09.05
原文链接:Smart Cabinets with a Custom Smart Home
| 


 萌萌哒新人
萌萌哒新人
 活跃会员
活跃会员
 编辑选择奖
编辑选择奖


 沪公网安备31011502402448

 置顶卡
置顶卡 变色卡
变色卡 千斤顶
千斤顶


