本帖最后由 szjuliet 于 2025-2-28 17:34 编辑

《给我发消息》之Part 0
《给我发消息》之Part 1
《给我发消息》之Part 2
《给我发消息》之Part 3
《给我发消息》之Part 4
《给我发消息》之Part 5
项目一:给我发消息之Part 3
Message Me BACK! 给我回消息App
到目前为止,你已经从app向Microbit发送了消息。在这个项目中,使用Microbit按钮发送消息返回。(稍后,你还可以使用Microbit的传感器发送数据。)
构建一个app,通过蓝牙连接接收来自Microbit的数据。使用Microbit按钮发送消息“Yes”,“No”和“Maybe”!
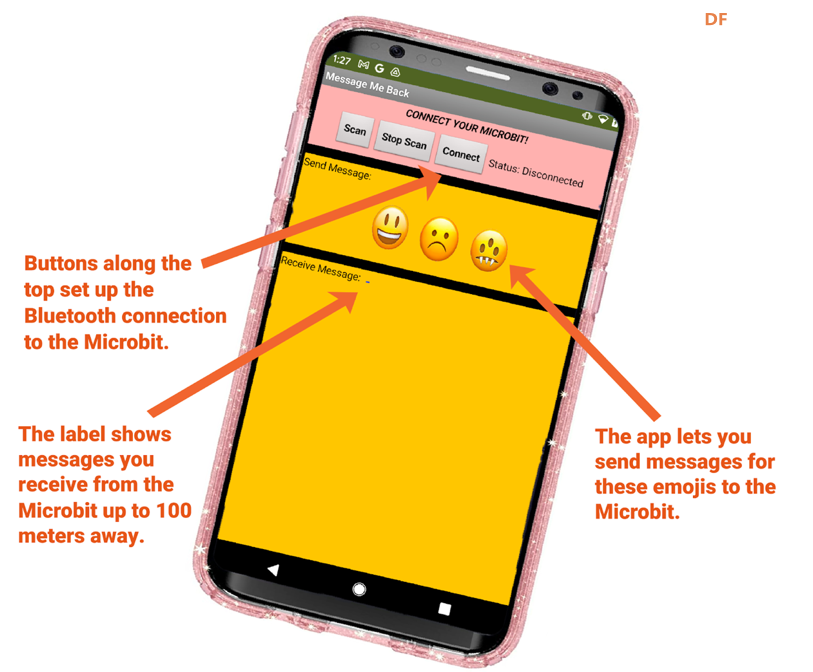
完成后的app是这样的:
从这里开始
一、发送和接收消息
1. 获取App Inventor启动代码。
- 该代码允许你快速连接到Microbit。
- 找到老师提供的文件(Message_Me_BACK_STARTER.aia)或在包含本课程的文件夹中找到的文件。(请在文末附件中下载)
- 把文件下载到你电脑的硬盘上。注意保存文件的位置。
- 进入App Inventor AI2 Designer和Blocks Editor (http://ai2.appinventor.mit.edu)。
- 从电脑中导入文件。
2. 查看Message Me BACK界面设计。
这个app与上一课中的Message Me几乎相同,除了现在这个app有从Microbit接收消息的方法。你知道哪个是显示接收到的消息的组件吗?
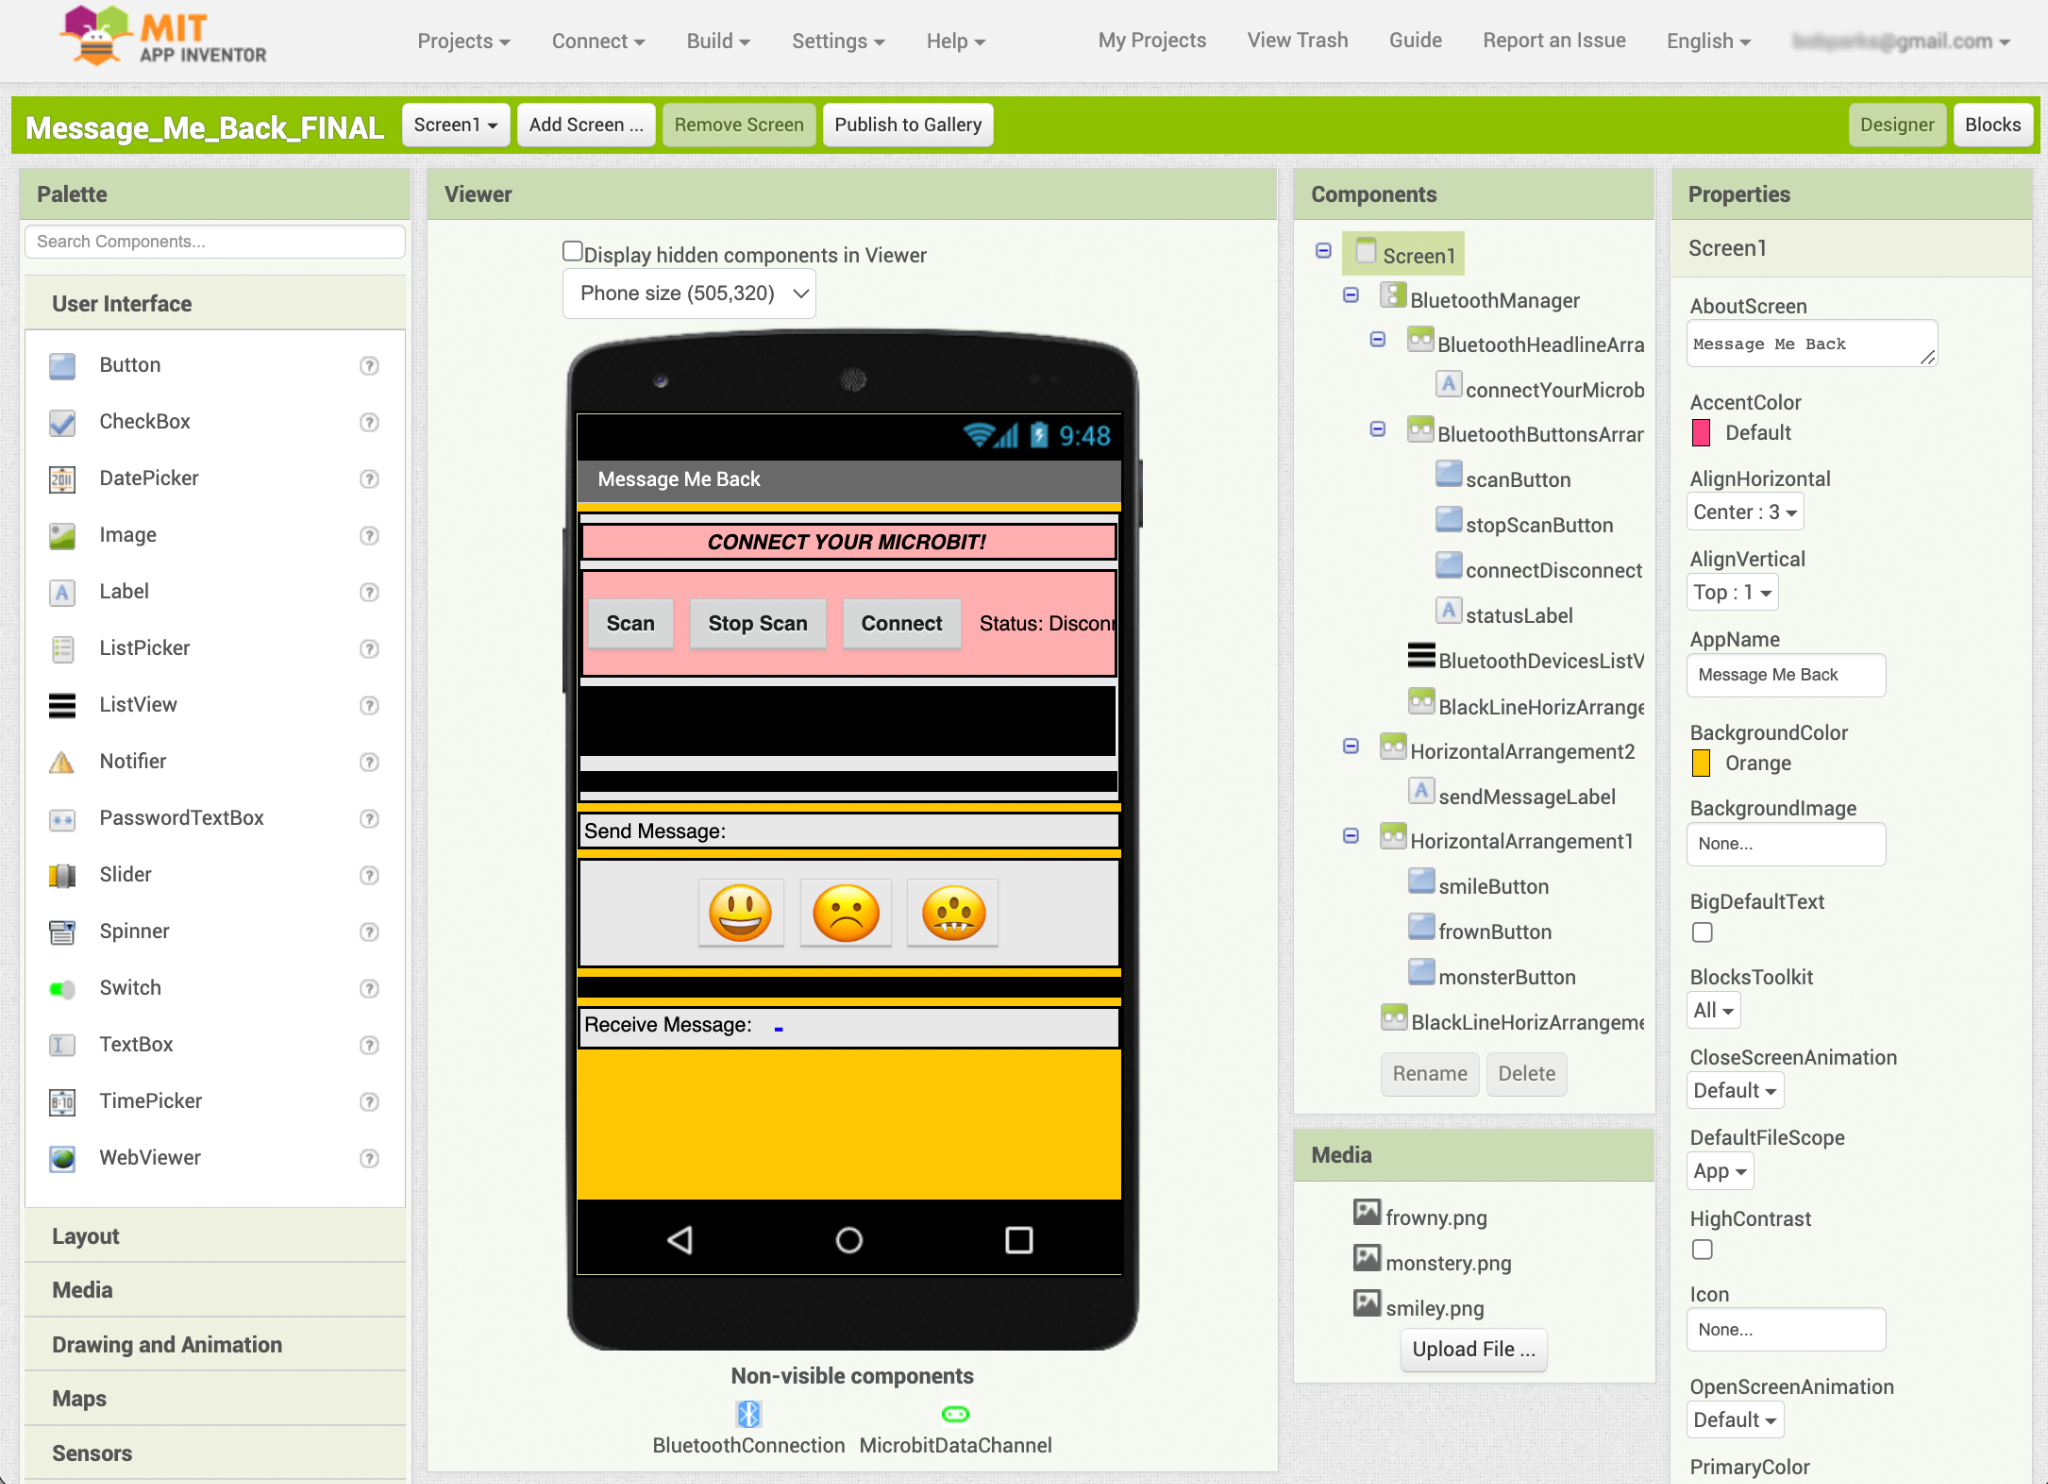
这个app中添加了哪些新组件?
3. 查看启动代码。
点击App Inventor中的Blocks按钮查看开始使用的代码。

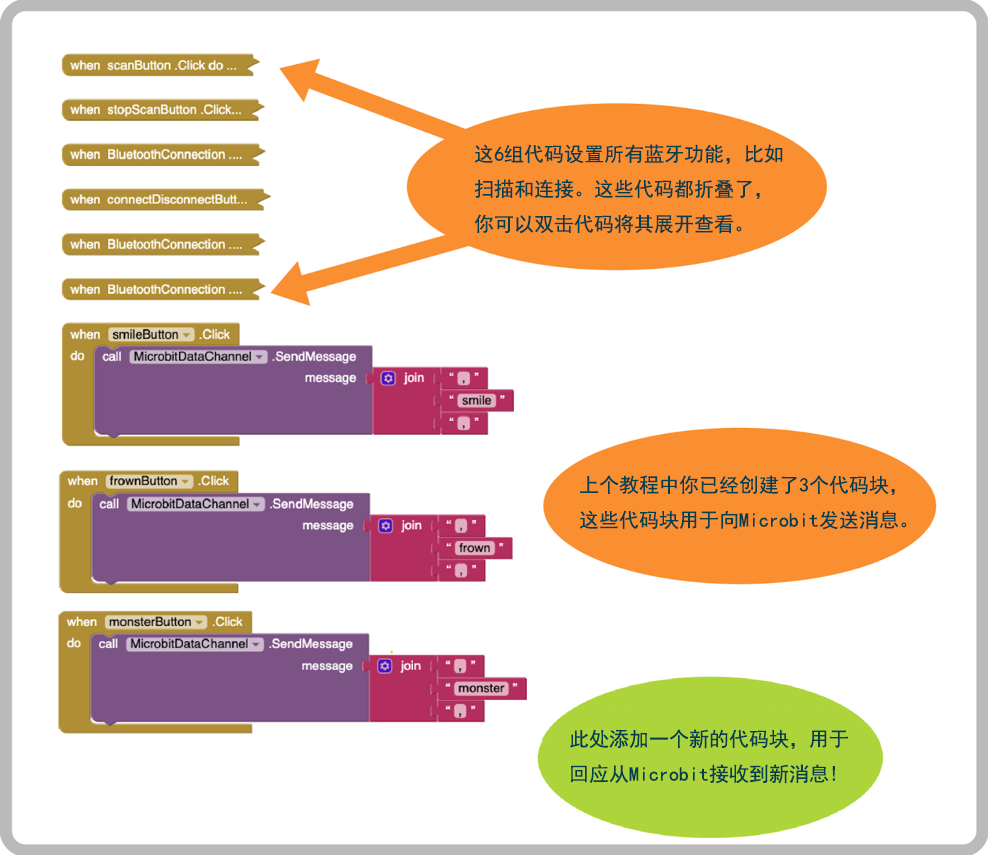
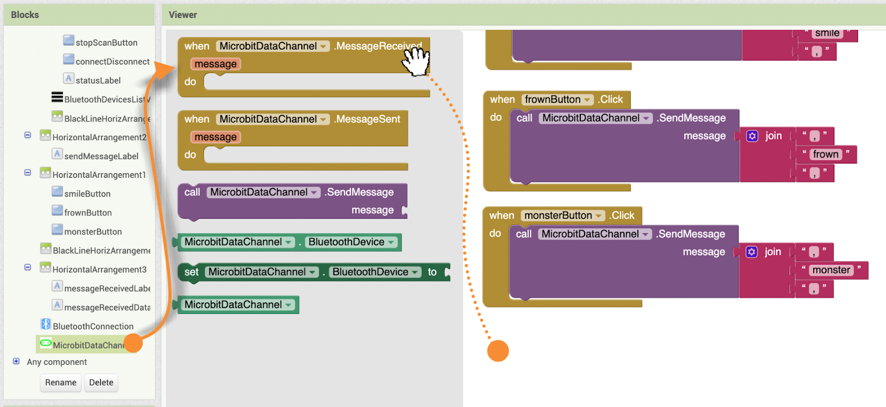
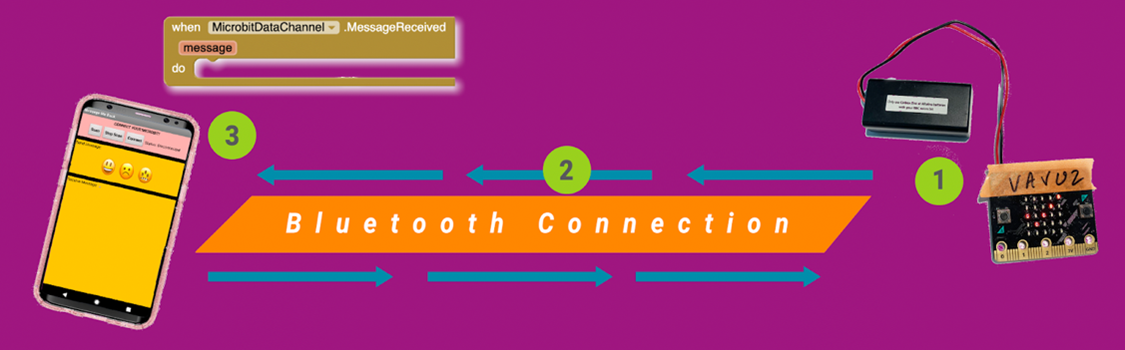
4. 什么代码块可以接收来自Microbit的消息?
找到一个可以接收消息的代码块。首先搜索块代码列表底部附近的MicrobitDataChannel抽屉。现在看看这个抽屉,然后在下一页检查你的答案。
答案:
- Microbit发送一条消息。
- 信息通过蓝牙无线电波传播。
- 当消息到达移动设备时,<font class="text-color-14" color="#ffc107">MessageReceived</font>代码块响应。
-
如何使用此代码块在app中显示新消息?请注意此代码块中的变量<font class="text-color-2" color="#e91e63">message</font>。将鼠标悬停在变量上以查找<font class="text-color-2" color="#e91e63">get message</font>代码块。
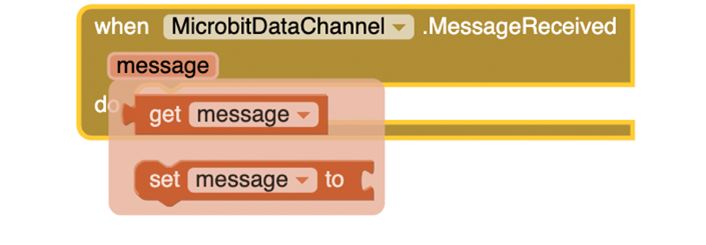
-
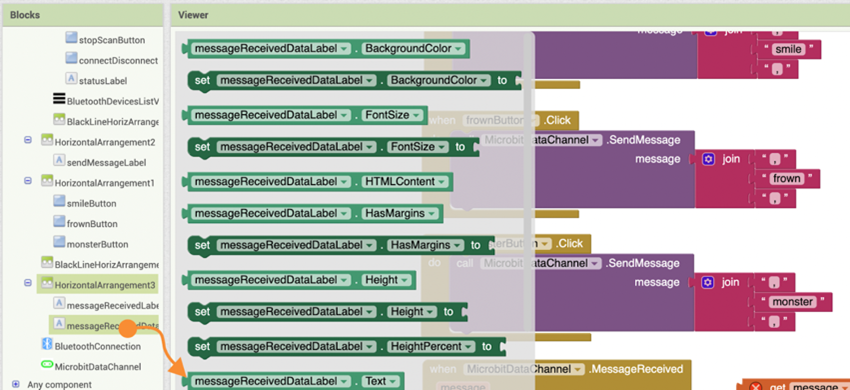
使用该变量设置<font class="text-color-10" color="#4caf50">messageReceivedDataLabel</font>的文本。
-
在App Inventor中完成新代码块的编码,并开始处理Microbit代码。

-
提示:保持两个App Inventor都在浏览器上打开。你很快就会对你的应用进行实时测试。
二、对Microbit进行编码以发送消息
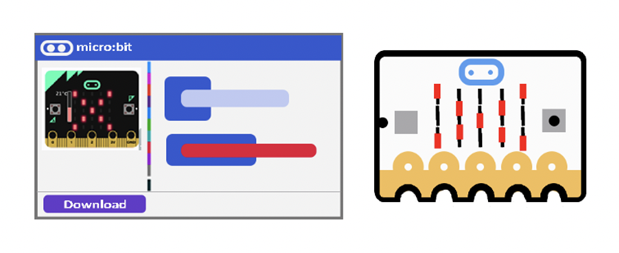
1. 获取Microbit MakeCode。
- 找到老师提供的文件(microbit-Message_Me_BACK_STARTER.hex)或在包含本课程的文件夹中找到的文件。(译注:请在附件中下载)
- 按照与第2课相同的步骤,在 makecode.microbit.org 上导入代码。(重要:如0_Preparation文档中所述,如果使用比版本V2更老的Microbit,请转到 https://makecode.microbit.org/v4)。
2. 检查新代码。
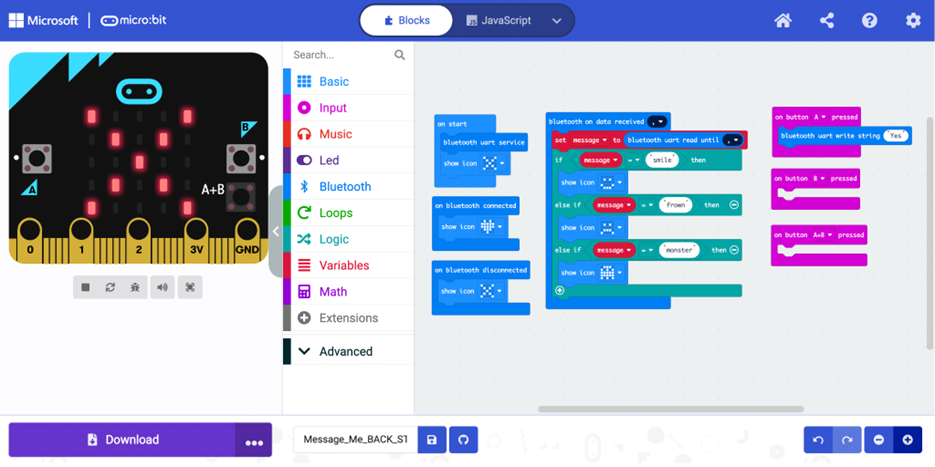
-
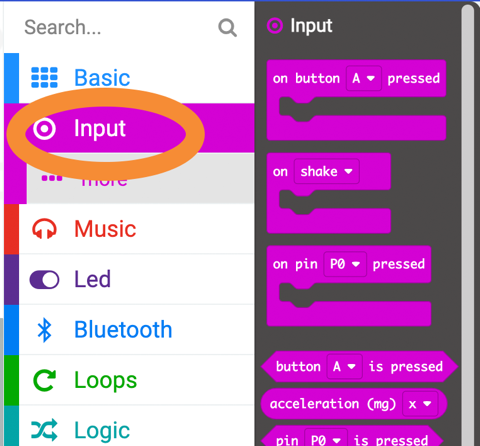
注意,代码块 <font class="text-color-2" color="#e400e4">on button A pressed</font> 来自 <font class="text-color-2" color="#e400e4">input</font> 抽屉:

-
代码块<font class="text-color-6" color="#2196f3"> bluetooth uart write string</font> 的目的是什么?如果这些词听起来很奇怪,不要担心。我们将在下面解释所有的术语。而且,编码中的大多数想法使用起来比谈论起来容易得多!
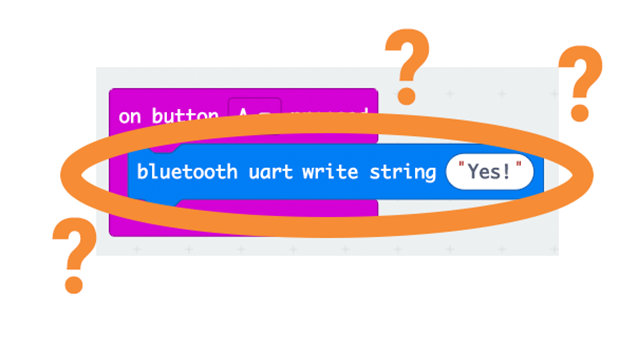
什么是<font class="text-color-6" color="#2196f3"> bluetooth uart write string</font> ?
什么是UART?
- UART是计算机发送和接收消息的一种常用方式。
- 如果你和一个说西班牙语、汉语或英语的朋友在一起,你会选择一种语言来交流——“今天我们说汉语吧!”
- 当两台计算机通信时,它们会对彼此说:“让我们说UART!”
- UART是一个长名称的缩写,当下对你来说并不重要。(如果你真的必须知道,它是“Universal Asynchronous Receiver/Transmitter,通用异步接收器/发射器”)
- UART信息通过蓝牙无线电波从你的Microbit传输到你的app。
为什么代码块中用write这个词(bluethhth uart write string)?
- “write”这个词意味着代码块将发送一条消息。
- 如果代码块用的是“read”,意味着会收到一条通过蓝牙发送过来的消息。
什么是字符串?
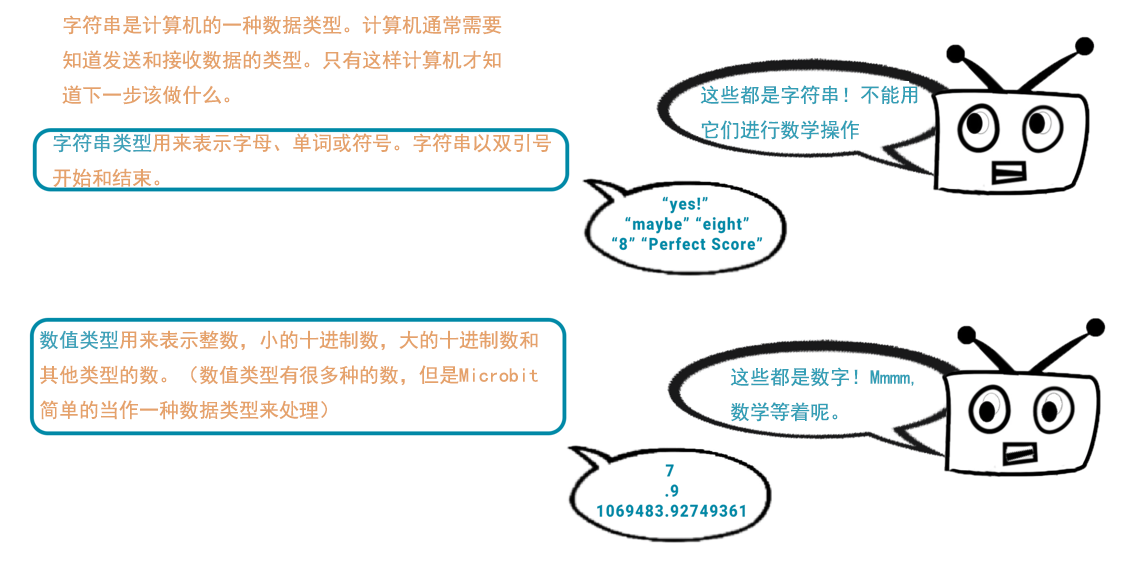
总之 ,

意味着使用蓝牙发送消息“Yes!”。
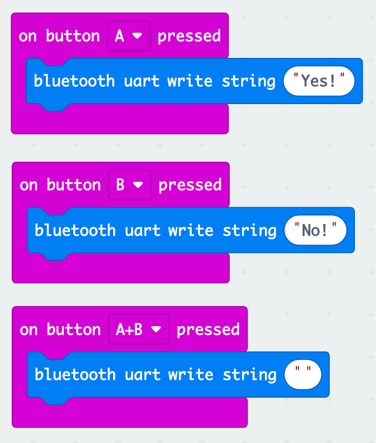
3. 完成Microbit代码块的编码。
-
找到<font class="text-color-6" color="#2196f3"> bluetooth uart write string</font>代码块,并将其拖动到<font class="text-color-2" color="#e400e4">on button B pressed</font>代码块上。
-
首先,点击<font class="text-color-6" color="#2196f3"> Bluetooth</font>抽屉下的<font class="text-color-6" color="#2196f3"> • • • more</font>
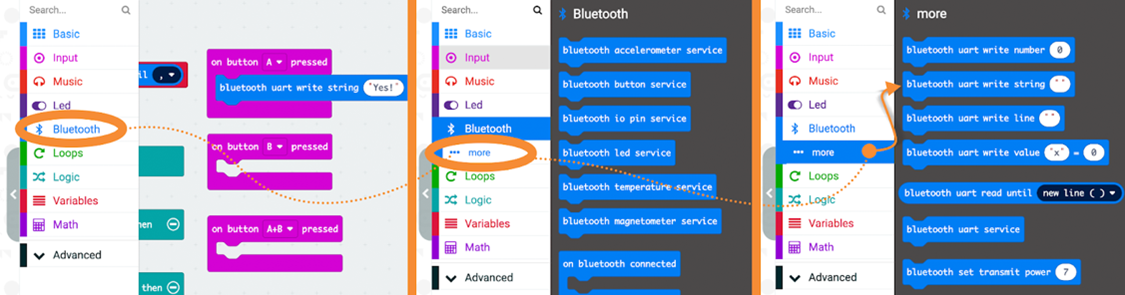
-
然后选择<font class="text-color-6" color="#2196f3"> bluetooth uart write string</font>
-
请注意:请确保选择标有“字符串”的代码块 -- 而不是上面那个。(第一个代码块会发送什么类型的消息?)
4. 为按钮B添加一条消息。
- 当按下B键时,你会发送什么字符串?发送“No!”怎么样?

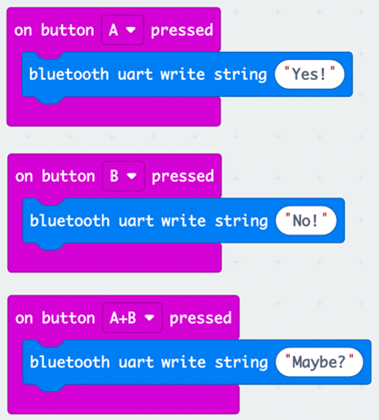
5. 当按下按钮A和B时发送消息。
-
重复上述步骤,将另一个<font class="text-color-6" color="#2196f3"> bluetooth uart write string</font> 代码块添加到<font class="text-color-2" color="#e400e4">on button A+B pressed</font>代码块上。(或者,简单地从它上面的条目中剪切并粘贴代码块,并修改“”中的消息。)
-
当同时按下A键和B键时,你会发送什么字符串?发送“Maybe?”怎么样?
三、测试
1. 把你的Message Me BACK代码烧录到Microbit上
2. 将app加载到App Inventor Companion(AI伴侣)中
- 在你的设备上加载Message Me BACK应用程序到App Inventor Companion。
3. 将Microbit连接到App
| 


 沪公网安备31011502402448

 置顶卡
置顶卡 变色卡
变色卡 千斤顶
千斤顶
 版主限定
版主限定
 创作达人
创作达人
 编辑选择奖
编辑选择奖
 ARD DAY
 编辑选择奖
编辑选择奖
 星球译员
星球译员
 编辑选择奖
编辑选择奖
 编辑选择奖
编辑选择奖
 编辑选择奖
编辑选择奖
 编辑选择奖
编辑选择奖
 编辑选择奖
编辑选择奖


