本帖最后由 极凹甫 于 2022-4-8 10:20 编辑
1、 接口功能
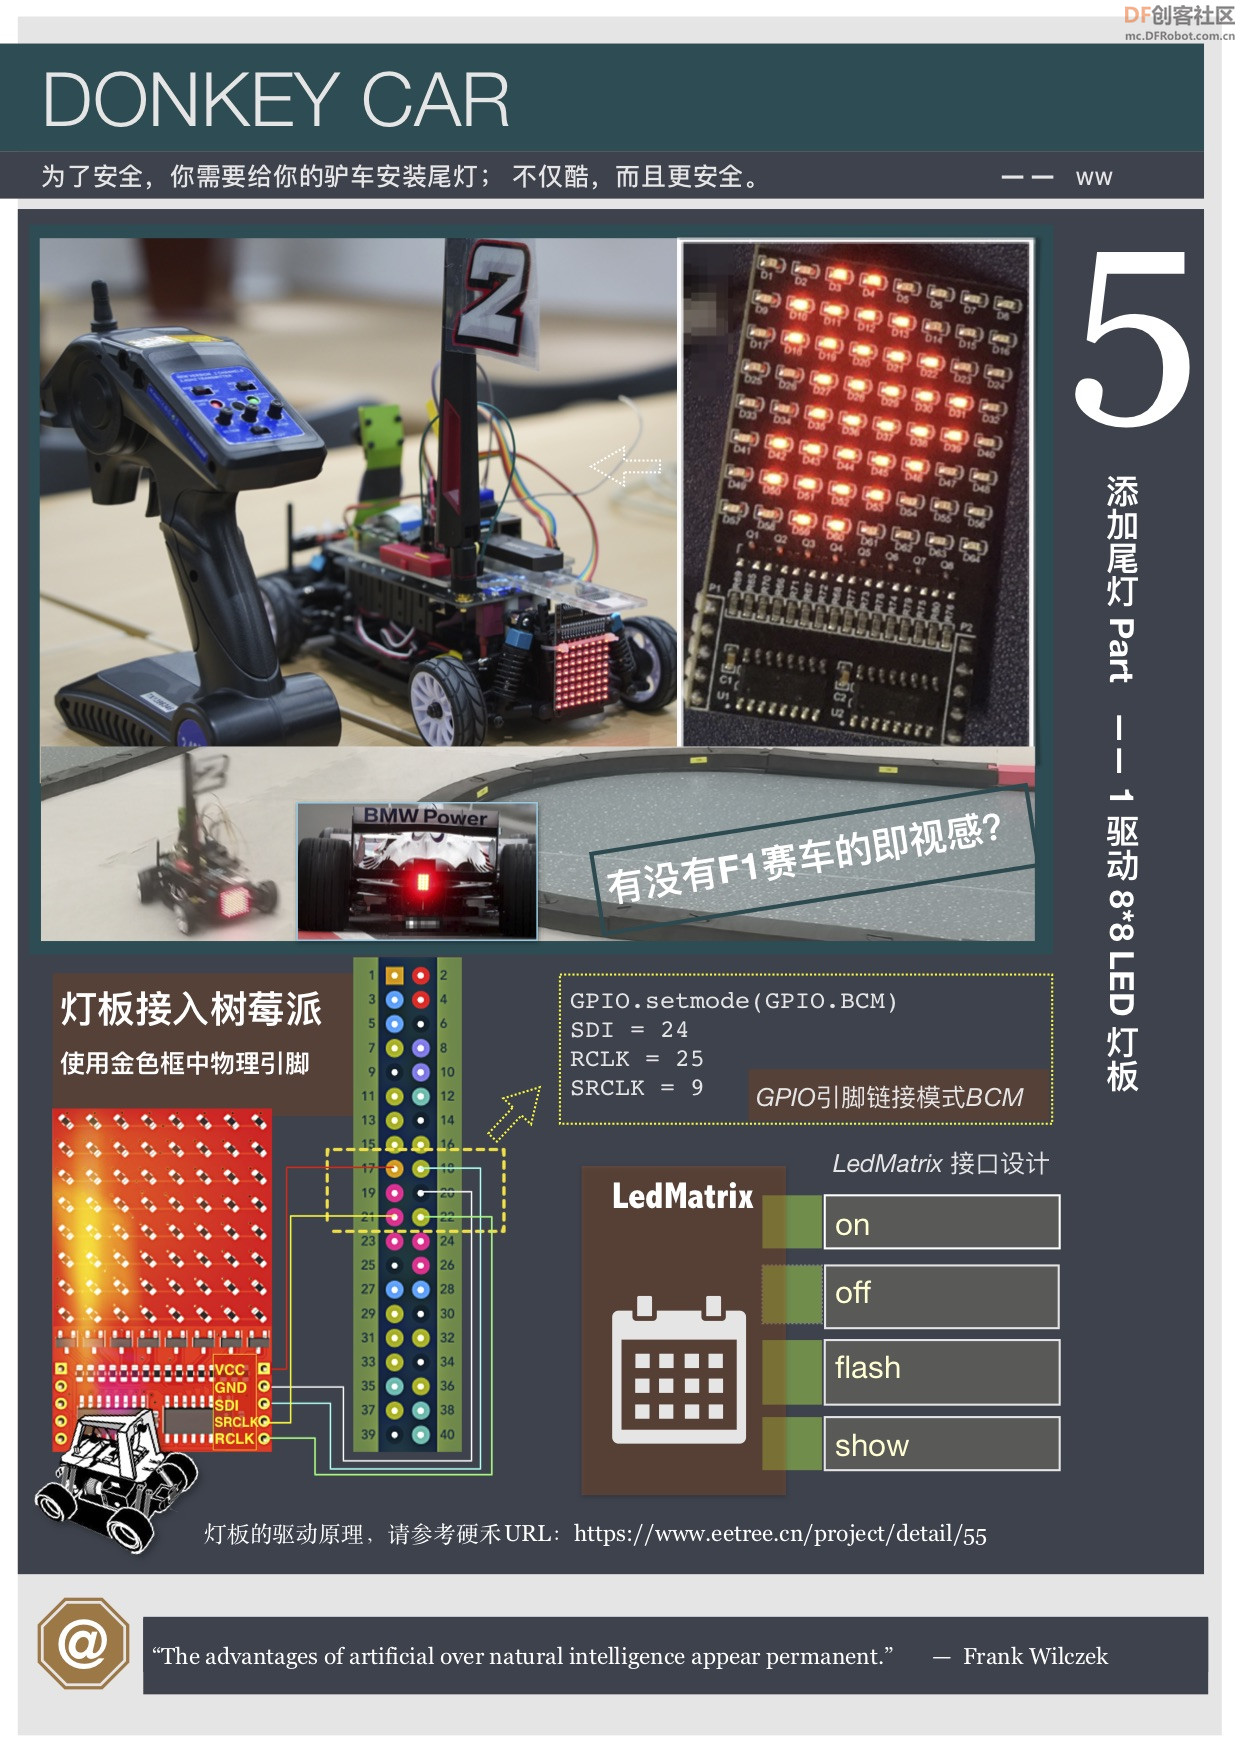
接口就是你想要这个模块提供哪些功能,有了这个接口,后面的工作就慢慢来实现吧。
主要有on,off, flash, show 4个接口提供给用户使用。
- class LedMatrix():
-
- '''
- # 初始化ledMartix的引脚
- '''
- def __init__(self):
- pass
-
- '''
- #led 全亮
- '''
- def on(self):
- pass
-
- '''
- #led 全灭
- '''
- def off(self):
- pass
-
- '''
- # led 闪烁
- '''
- def flash(self):
- pass
-
- """
- 用来显示一个字符的编码,你可以自己定义一个编码来显示
- 自定义工具地址:https://www.smilefrog.net/tools/DotMatrix/
- 自己画个图,可以得到一串如下code
- [0x38, 0x78, 0x18, 0x18, 0x18, 0x18, 0x7E, 0x7E]
- 将此列表传入show,即可显示。
- """
- def show(self, code):
- pass
-
- '''
- 尾灯显示一个数字
- '''
- def show_num(self, num=0):
- pass
-
- '''
- 释放引脚和相关资源
- '''
- def destory(self):
- pass
2、实现LedMatrix代码
- class LedMatrix(object):
-
- '''
- # 初始化
- '''
- def __init__(self, SDI=24, RCLK=25, SRCLK=9):
- self.SDI = SDI
- self.RCLK = RCLK
- self.SRCLK = SRCLK
- self.mxled_enable = False
- self.mxled_thread = None
- self.reset_count = 0
- self.setup()
-
- '''
- ledMartix的引脚初始化
- '''
- def setup(self):
- GPIO.setmode(GPIO.BCM) # Number GPIOs by its BCM location
- GPIO.setup(self.SDI, GPIO.OUT)
- GPIO.setup(self.RCLK, GPIO.OUT)
- GPIO.setup(self.SRCLK, GPIO.OUT)
- GPIO.output(self.SDI, GPIO.LOW)
- GPIO.output(self.RCLK, GPIO.LOW)
- GPIO.output(self.SRCLK, GPIO.LOW)
-
- '''
- 595的驱动原理是移位,8*8的led点阵需要横向8位,竖向8位来点亮响应的led
- 本函数就是为了移动一个8位2进制到响应的控制引脚。
- '''
-
- def hc595_shift(self, data):
- for bit in range(0, 8):
- GPIO.output(self.SDI, 0x80 & (data << bit))
- GPIO.output(self.SRCLK, GPIO.HIGH)
- #time.sleep(0.0001)
- GPIO.output(self.SRCLK, GPIO.LOW)
- GPIO.output(self.RCLK, GPIO.HIGH)
- #time.sleep(0.0001)
- GPIO.output(self.RCLK, GPIO.LOW)
-
- '''
- 595如果闪烁或者显示一个图形,需要一个线程在一直刷新
- reset的目的在于切换不同的显示模式的时候,停止正在运行的线程。
- 全亮和全灭不需要使用线程刷新可以一直保持。
- '''
- def reset(self):
- if self.mxled_enable:
- self.mxled_enable = False
- self.reset_count += 1
- time.sleep(0.01)
-
- '''
- #led 全亮
- '''
- def on(self):
- self.reset()
- self.hc595_shift(0xFF) # 11111111
- self.hc595_shift(0xFF)
- self.mxled_enable = True
-
- '''
- #led 全灭
- '''
- def off(self):
- self.reset()
- self.hc595_shift(0x00) # 00000000
- self.hc595_shift(0x00)
-
- """
- 用来显示一个字符的编码,你可以自己定义一个编码来显示
- 自定义工具地址:https://www.smilefrog.net/tools/DotMatrix/
- 自己画个图,可以得到一串如下code
- [0x38, 0x78, 0x18, 0x18, 0x18, 0x18, 0x7E, 0x7E]
- 将此列表传入show,即可显示。
- 并启动一个线程,来保持这个刷新的频率
- """
- def show(self, code, is_flash=False):
- self.reset()
- self.mxled_enable = True
- self.mxled_thread = threading.Thread(target=self._show, args=[code, is_flash])
- self.mxled_thread.start()
-
- '''
- code_row_refresh 逐行扫描的row值,一共8行,从下到上逐渐是1
- 0x01 0000 0001
- 0x02 0000 0010
- 0x04 0000 0100
- 0x08 0000 1000
- 0x10 0001 0000
- 0x20 0010 0000
- 0x40 0100 0000
- 0x80 1000 0000
- '''
- code_row_refresh = [0x01, 0x02, 0x04, 0x08, 0x10, 0x20, 0x40, 0x80]
-
- '''
- code: 要显示图形的编码
- 逐行扫描,显示一个code,该code的长度必须是8
- 类似[0x38, 0x78, 0x18, 0x18, 0x18, 0x18, 0x7E, 0x7E]
- 共8行,每一行显示点亮 为1的led小灯。
-
- is_flash: 显示的图形 你是否需要闪烁效果。默认是False
- '''
-
- def _show(self, code, is_flash=False):
- reset_flag = self.reset_count
- while self.mxled_enable:
- for i in range(len(code) - 1, -1, -1):
- self.hc595_shift(LedMatrix.code_row_refresh[7 - i])
- self.hc595_shift(code[i])
- if is_flash:
- time.sleep(0.01)
- else:
- time.sleep(0.002)
-
- if self.reset_count < reset_flag: break
-
- '''
- # led 闪烁
- '''
-
- def flash(self, rate_hz=2):
- self.reset()
- self.mxled_enable = True
- self.mxled_thread = threading.Thread(target=self._flash, args=[rate_hz])
- self.mxled_thread.start()
-
- def _flash(self, rate_hz=2):
- reset_flag = self.reset_count
- while self.mxled_enable:
- self.hc595_shift(0xFF) # 11111111
- self.hc595_shift(0xFF)
- time.sleep(1/rate_hz)
- self.hc595_shift(0x00) # 00000000
- self.hc595_shift(0x00)
- time.sleep(1/rate_hz)
- if self.reset_count < reset_flag: break
-
-
- ''' 数字0~9的code'''
- code_0 = [0x7E, 0x7E, 0x42, 0x42, 0x42, 0x42, 0x7E, 0x7E]
- code_1 = [0x38, 0x78, 0x18, 0x18, 0x18, 0x18, 0x7E, 0x7E]
- code_2 = [0x7E, 0x06, 0x06, 0x7E, 0x7E, 0x60, 0x60, 0x7E]
- code_3 = [0x3E, 0x3E, 0x02, 0x3E, 0x3E, 0x02, 0x3E, 0x3E]
- code_4 = [0x0C, 0x1C, 0x34, 0x64, 0x44, 0x7E, 0x7E, 0x04]
- code_5 = [0x7E, 0x60, 0x60, 0x7E, 0x7E, 0x06, 0x06, 0x7E]
- code_6 = [0x7E, 0x60, 0x60, 0x7E, 0x7E, 0x66, 0x66, 0x7E]
- code_7 = [0x7E, 0x7E, 0x06, 0x0C, 0x0C, 0x18, 0x30, 0x30]
- code_8 = [0x7E, 0x7E, 0x42, 0x7E, 0x7E, 0x42, 0x7E, 0x7E]
- code_9 = [0x7E, 0x7E, 0x42, 0x7E, 0x7E, 0x02, 0x02, 0x7E]
-
- code_num = [code_0, code_1, code_2, code_3, code_4,
- code_5, code_6, code_7, code_8, code_9]
-
- '''
- 尾灯显示一个数字
- '''
-
- def show_num(self, num=0, is_flash=False):
- self.show(LedMatrix.code_num[num % 10], is_flash)
-
- '''
- 释放引脚和相关资源
- '''
-
- def destory(self):
- self.off()
- GPIO.cleanup()
3、测试
将ledmatrix.py 上传到树莓派任意目录,然后启动python 交互环境来运行试试吧。
- >>> import ledmatrix as mx
- >>> led = mx.LedMatrix()
- >>> led.off()
- >>> led.flash()
- >>> led.flash(5)
- >>> led.flash()
- >>> led.show_num(9)
- >>> led.show_num(9, 2)
- >>> led.off()
- >>> led.destory()
- >>>
- >>> exit()
你的尾灯是不是启动了。
后面会将这个ledmatrix加入到驴车的part框架中来。
让我们一起让驴车又快,又酷,又好玩!
⚠️: 文中的代码,别直接用;很简单看懂了,你会调试通过的。
|


 沪公网安备31011502402448

 置顶卡
置顶卡 变色卡
变色卡 千斤顶
千斤顶


